

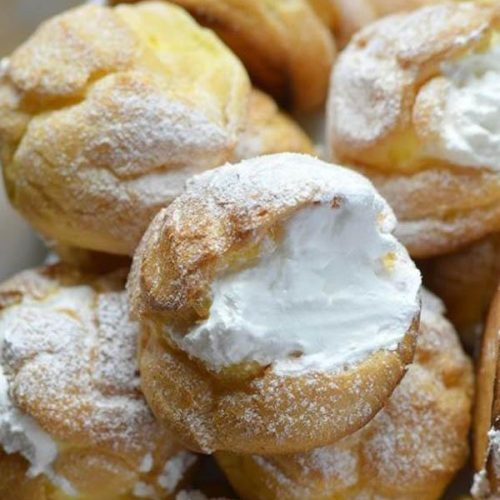
Oh, cream puffs. Just saying the name makes me feel all warm and fuzzy inside. I remember the first time I ever tried making them for my family. I was probably about ten years old, watching my grandma whip them up for a special occasion, and I was utterly mesmerized. The way the dough puffed up in the oven, like magic, and then that impossibly light, Whipped Cream filling… it was pure culinary sorcery to my young eyes. Now, decades later, I’ve made them countless times, tweaking and perfecting, and I can honestly say this recipe is the one. It’s the one that never fails, the one that gets rave reviews, and the one that makes even a regular Tuesday feel like a celebration. Forget those sad, dense store-bought versions; these homemade cream puffs are on a whole other level. They’re lighter than air, creamy beyond compare, and surprisingly, not as daunting as you might think!
What are cream puffs?
So, what exactly are these delightful little clouds of joy? At their heart, cream puffs (or éclairs, if they’re shaped differently) are made from a simple pastry dough called pâte à choux. It’s a bit of a funny name, “choux” meaning cabbage in French, supposedly because the rounded puffs look a bit like small cabbages. What’s really cool about this dough is that it doesn’t use any leavening agents like baking soda or yeast. Instead, the steam trapped inside the dough during baking is what makes them puff up so dramatically. They’re essentially hollow shells just begging to be filled with something utterly delicious. Think of them as the perfect blank canvas for all sorts of creamy, dreamy fillings and toppings. They’re elegant enough for a fancy party but humble enough to enjoy with a cup of tea on a quiet afternoon.
How to Make Cream Puffs
Quick Overview
Making these cream puffs is really a three-part process: creating the light-as-air choux pastry shells, whipping up a decadent cream filling, and then bringing it all together with a drizzle of glaze. The pastry involves a quick stovetop cooking method followed by baking until golden and puffed. The filling is usually a simple custard or whipped cream, and the glaze adds that perfect finishing touch. It sounds like a lot, but each step is straightforward and moves along pretty quickly. Trust me, the magic that happens in your oven is totally worth the small amount of effort!
Ingredients
For the Main Batter:
You’ll need 1 cup of water. I find regular tap water works perfectly fine, but some people swear by filtered water for absolute purity. Make sure it’s at room temperature. Then, we’ve got 1/2 cup (1 stick) of unsalted butter. I always use unsalted because it gives me more control over the saltiness. Cut it into cubes so it melts more evenly. A good pinch of salt is crucial here – about 1/4 teaspoon is perfect. It really balances the sweetness and brings out the buttery flavor. And for the flour, it’s 1 cup of all-purpose flour. I’ve tested this with various brands, and they all work well, but make sure it’s not self-rising. You want that predictable texture.
For the Filling:
This is where the real indulgence begins! We’ll use 1 1/2 cups of heavy whipping cream. Make sure it’s nice and cold when you whip it – that’s key for volume. Then, 1/2 cup of powdered sugar, also known as confectioners’ sugar. It dissolves beautifully and makes the filling super smooth. For that classic vanilla flavor, you’ll need 1 teaspoon of pure Vanilla Extract. Don’t skimp on the vanilla; it makes a huge difference. And if you’re feeling extra fancy, a tiny pinch of salt can really make the vanilla pop!
For the Glaze:
A simple chocolate glaze is my go-to, but feel free to get creative! For the chocolate version, you’ll need 1/2 cup of semi-sweet chocolate chips. You can use chopped chocolate too. Then, about 2 tablespoons of unsalted butter to give it that glossy sheen. And finally, 1 to 2 tablespoons of milk or cream to get the consistency just right. You want it pourable but not too thin.
Step-by-Step Instructions
Step 1: Preheat & Prep Pan
First things first, let’s get the oven ready. Preheat it to 400°F (200°C). This high initial heat is important for that initial puff. While the oven is heating, grab a large baking sheet. You can line it with parchment paper or a silicone baking mat for easier cleanup, but it’s not strictly necessary. If you’re not using parchment, just lightly grease the baking sheet. Then, grab a piping bag fitted with a round tip (about 1/2 inch) or two spoons. We’ll use these to shape the cream puffs.
Step 2: Mix Dry Ingredients
In a medium bowl, whisk together your 1 cup of all-purpose flour and 1/4 teaspoon of salt. Just a quick whisk to make sure they’re evenly distributed. This might seem simple, but ensuring the salt is evenly mixed prevents any salty surprises in one bite.
Step 3: Mix Wet Ingredients
In a medium saucepan, combine the 1 cup of water and 1/2 cup (1 stick) of unsalted butter. Place the saucepan over medium heat. Stir occasionally until the butter is completely melted and the mixture just comes to a rolling boil. You want to see those big bubbles!
Step 4: Combine
As soon as the water and butter mixture boils, immediately remove the saucepan from the heat. Dump in all of the flour mixture at once. Now, this is where you need a sturdy spoon or a wooden spatula. Stir vigorously until the mixture forms a ball and pulls away cleanly from the sides of the pan. It will look a bit shaggy at first, but keep stirring! This process cooks the flour slightly and helps create that steam-generating structure. Keep stirring for about 1 to 2 minutes. It’s important to get rid of some of the excess moisture.
Step 5: Prepare Filling
While the dough is cooling slightly, let’s make that glorious filling. In a large, chilled bowl, combine the 1 1/2 cups of heavy whipping cream, 1/2 cup of powdered sugar, 1 teaspoon of vanilla extract, and a tiny pinch of salt. Use an electric mixer (or a whisk and some serious arm power!) to whip the cream until stiff peaks form. This means when you lift the beaters, the cream holds its shape and doesn’t droop. Be careful not to overbeat, or you’ll end up with butter!
Step 6: Layer & Swirl
This step refers to shaping the dough. Once the flour mixture has cooled for about 5 minutes (you don’t want it piping hot when you add the eggs, or they’ll cook!), you’re going to add the eggs, one at a time. Beat well after each addition until fully incorporated. You’ll need 4 large eggs. The dough will look a bit like it’s separating at first, but keep beating and it will smooth out. You’re looking for a thick, glossy dough that holds its shape but is soft enough to pipe. It should fall slowly from the spoon in a V-shape.
Now, transfer the dough to your prepared piping bag. If you don’t have a piping bag, you can use two spoons. Pipe mounds about 2 inches in diameter onto your prepared baking sheet, leaving about 2 inches between them because they’ll puff up! If using spoons, scoop about 2 tablespoons of dough for each puff and drop it onto the baking sheet. Gently smooth any peaks with a wet fingertip – this helps them bake evenly and prevents burnt tips.
Step 7: Bake
Now for the main event! Bake the cream puffs in the preheated 400°F (200°C) oven for 20 minutes. DO NOT open the oven door during this time! They need that consistent heat to puff up properly. After 20 minutes, reduce the oven temperature to 350°F (175°C) and continue baking for another 20-25 minutes, or until the cream puffs are a deep golden brown and feel light and hollow when you gently tap them. They should sound dry. If they seem to be browning too quickly, you can tent them loosely with foil. Once baked, turn off the oven, prop the door open slightly with a wooden spoon, and let them sit in the oven for about 10 minutes. This helps them dry out and prevents them from collapsing.
Step 8: Cool & Glaze
Remove the cream puffs from the oven and transfer them to a wire rack to cool completely. This is important because if you fill them while they’re warm, the cream will melt. Once they’re totally cool, it’s time for the glaze. In a heatproof bowl, combine the semi-sweet chocolate chips and butter. Melt them gently either in the microwave (in 30-second intervals, stirring in between) or over a double boiler. Stir until smooth. Add 1 to 2 tablespoons of milk or cream, a little at a time, stirring until you reach a nice, drizzly consistency. You don’t want it too thick or too thin.
Step 9: Slice & Serve
Once the pastry shells are completely cool, you have a couple of options for filling. You can carefully slice them in half horizontally with a serrated knife, then spoon or pipe the whipped cream filling onto the bottom half and place the top back on. Or, for a cleaner look, you can poke a small hole in the bottom or side of each puff and pipe the filling in. Drizzle generously with your prepared chocolate glaze. They are best served the same day they are made for optimal crispness!
What to Serve It With
These cream puffs are so wonderfully versatile, making them a hit for any occasion! For a delightful breakfast treat, imagine serving them alongside a steaming mug of strong coffee. The slightly sweet pastry and creamy filling are just the pick-me-up you need. For a more elegant brunch spread, I love arranging them on a tiered stand with fresh berries and maybe a glass of mimosa. They add a touch of sophistication without being fussy. As a decadent dessert, they’re absolute showstoppers. Serve them after a nice meal with a scoop of vanilla Ice Cream or a rich chocolate sauce for an extra layer of indulgence. My kids adore them as a special after-school snack, and honestly, they’re my go-to for a cozy snack when I need something sweet and comforting. Paired with a warm cup of tea or hot chocolate, they’re pure bliss. My family has a tradition of making these for my birthday every year, and they disappear in minutes!
Top Tips for Perfecting Your Cream Puffs
I’ve made enough batches of these cream puffs to have learned a few tricks along the way! When it comes to the pastry, the key is really getting that dough cooked properly on the stovetop. Don’t rush that step; stirring for a good minute or two helps evaporate excess moisture, which is essential for good puff. Also, when you add the eggs, make sure the dough has cooled down slightly so you don’t scramble them! You’re looking for a dough that is glossy and thick enough to hold its shape but still pliable. Too stiff and they won’t puff well; too soft and they’ll spread too much. When it comes to filling, don’t overbeat your cream! You want lovely soft peaks, not butter. A touch of vanilla extract makes all the difference, and I’ve even experimented with adding a tiny bit of almond extract for a different flavor profile.
For baking, the initial high heat is critical for that dramatic rise. Resist the urge to peek! Once you reduce the heat, you’re just aiming to cook them through and dry them out. If they look done but still feel a bit soft, letting them cool in the turned-off oven with the door ajar is a lifesaver. It helps ensure they stay crisp. For the glaze, consistency is everything. If it’s too thick, add a touch more milk or cream. If it’s too thin, add a few more chocolate chips. I’ve learned that sometimes, depending on the humidity, you might need to adjust the liquid slightly. And for variations, don’t be afraid to play! A dusting of powdered sugar is lovely if you don’t want a glaze, or you can experiment with different extracts in your cream filling. I once tried a lemon-zest infused cream and it was divine!
Storing and Reheating Tips
These cream puffs are definitely at their absolute best when enjoyed the same day they are made. The pastry shell is at its crispiest, and the filling is at its freshest. However, if you do have leftovers, don’t despair! You can store unfiiiled, cooled shells at room temperature in an airtight container for up to 24 hours. They might lose a *little* crispness, but they’ll still be delicious. If you’ve already filled them, your best bet is the refrigerator. Store filled cream puffs in an airtight container in the fridge for up to 2 days. The pastry will soften over time due to the moisture from the filling, but they’re still quite tasty. For longer storage, I’d recommend storing the unfiiiled shells. You can freeze them once completely cooled by wrapping them tightly in plastic wrap and then placing them in a freezer-safe bag. They’ll keep in the freezer for up to a month. To reheat, just let them thaw at room temperature and then, if you want to crisp them up a bit, you can pop them in a low oven (around 300°F or 150°C) for about 5-10 minutes. Fill them just before serving for the best texture. I never glaze them until right before I’m ready to serve, especially if they’ve been stored, to keep that glossy finish!
Frequently Asked Questions
Final Thoughts
So there you have it – my go-to recipe for the most divine cream puffs! I truly hope you give this a try. It’s one of those recipes that feels special, but is surprisingly achievable for any home baker. The joy of seeing those little dough balls puff up into golden perfection is almost as rewarding as the first bite. They’re perfect for impressing guests, celebrating milestones, or just treating yourself because, well, you deserve it! If you love these, you might also enjoy my Classic Vanilla Bean Panna Cotta or my Easy Chocolate Eclairs. I can’t wait to hear what you think, and I’d love to see how yours turn out! Please leave a comment below with your thoughts, any variations you tried, or your own cream puff memories. Happy baking!
Cream puffs
Ingredients
Choux Pastry
- 1 cup water
- 0.5 cup butter unsalted, cut into pieces
- 0.25 teaspoon salt
- all-purpose flour
- 4 large eggs
Whipped Cream Filling
- 2 cups heavy cream cold
- 0.5 cup powdered sugar
- 1 teaspoon vanilla extract
Garnish
- powdered sugar for dusting
Instructions
Make the Choux Pastry
- Preheat oven to 400°F (200°C). Line a baking sheet with parchment paper.
- In a medium saucepan, combine water, butter, and salt. Bring to a rolling boil over medium heat.
- Remove from heat and immediately add all the flour. Stir vigorously with a wooden spoon until the dough forms a ball and pulls away from the sides of the pan.
- Return the saucepan to low heat and cook, stirring constantly, for 1-2 minutes to dry out the dough slightly.
- Transfer the dough to a large bowl of a stand mixer fitted with the paddle attachment. Let it cool for 5 minutes.
- Add the eggs one at a time, beating well after each addition, until the dough is smooth and glossy. The dough should be thick but still pipeable.
- Spoon or pipe mounds of dough (about 2 tablespoons each) onto the prepared baking sheet, leaving about 2 inches between them.
- Bake for 20 minutes at 400°F (200°C), then reduce oven temperature to 350°F (175°C) and bake for another 10-15 minutes, or until golden brown and puffed.
- Once baked, pierce each cream puff with a sharp knife or skewer to allow steam to escape and prevent them from becoming soggy. Let them cool completely on a wire rack.
Make the Whipped Cream Filling
- In a chilled bowl, beat the cold heavy cream with an electric mixer until soft peaks form.
- Gradually add the powdered sugar and vanilla extract, and continue beating until stiff peaks form.
Assemble the Cream Puffs
- Once the cream puffs are completely cool, slice them in half horizontally or make a slit in the side.
- Fill the bottom half of each cream puff generously with the whipped cream filling.
- Place the top half of the cream puff back on top.
- Dust the tops of the cream puffs with powdered sugar just before serving.
Notes
Featured Comments
“I totally get the feeling—cream puffs are such a comforting treat! First time making them was a bit tricky, but so worth it.”
“Impressed! Clear steps and absolutely loved results. Perfect for busy nights.”
“New favorite here — spot on. crowd-pleaser was spot on.”
“Super easy and turned out amazing! My family asked for seconds. Saving this one.”
“This sweet treat was absolutely loved — the balanced really stands out. Thanks!”
“Made it tonight and wow — super easy! Will definitely make Cream puffs again.”


I totally get the feeling—cream puffs are such a comforting treat! First time making them was a bit tricky, but so worth it.