

You know those days when a serious sweet craving hits, but the thought of baking a whole cake or whipping up a complicated dessert just feels… impossible? Yeah, I’ve been there, probably more times than I’d like to admit! It usually happens around 10 pm, right when I’m settled on the couch, and suddenly, I *need* something delightful. For the longest time, my go-to was a store-bought pint, but let’s be honest, that can get pricey and sometimes, you just want something a little more wholesome, a little less… processed. Then, a little while back, I stumbled upon a game-changer: cottage cheese ice cream. Now, before you make that “ew” face, hear me out! This isn’t just some weird health fad. This cottage cheese ice cream is unbelievably creamy, ridiculously easy, and tastes like pure magic. It’s the kind of treat that feels indulgent but is actually packed with protein, making it a win-win in my book.
What is cottage cheese ice cream?
So, what exactly is this magical concoction I’m raving about? Think of it as the easiest, quickest, most satisfying frozen treat you can whip up without an ice cream maker. It’s essentially a blended mixture of cottage cheese, a sweetener, and your favorite flavorings, frozen until scoopable. The cottage cheese is the secret weapon here. When blended until super smooth, it creates an incredibly creamy base that’s surprisingly neutral in flavor. It mimics the texture of traditional ice cream but with a fraction of the fat and calories, and a significant protein boost. It’s less about tasting the cottage cheese itself and more about harnessing its creamy power. It’s like a delicious, healthier hack for that ice cream fix we all love.
How to Make Cottage Cheese Ice Cream
Quick Overview
The process for this cottage cheese ice cream is wonderfully simple. You’ll blend your ingredients until completely smooth, then freeze it until it reaches that perfect scoopable consistency. The key is ensuring the cottage cheese is blended until utterly creamy to avoid any grainy texture. It’s a no-churn, no-fuss method that delivers incredible results in just a few hours. Seriously, it’s that easy!
Ingredients
For the Main Base:
2 cups (about 16 oz) full-fat cottage cheese: I always opt for full-fat here. It makes a world of difference in creaminess and richness. If you use low-fat, it can sometimes come out a bit icier. Make sure it’s good quality; some brands are smoother than others.
1/2 cup milk (any kind works, dairy or non-dairy): This helps with blending and achieving a smoother consistency. I’ve found that a splash of almond milk actually makes it even creamier!
1/2 cup sweetener (maple syrup, honey, or granulated sugar): Adjust this to your taste preference. Maple syrup adds a lovely subtle flavor, while honey offers a floral note. Granulated sugar works just fine too!
1 teaspoon vanilla extract: Don’t skimp on this! It enhances all the other flavors.
1/4 teaspoon almond extract (optional, but highly recommended): This adds that extra “bakery” flavor that takes it to the next level.
Pinch of salt: This little bit of salt really balances the sweetness and makes the flavors pop.
For Flavor Add-ins (Optional):
2 tablespoons unsweetened cocoa powder: For a rich chocolate version.
1/2 cup fresh or frozen berries: Blend them in for a fruity kick.
1/4 cup melted chocolate chips: Stir in for chocolate chip cookie dough vibes.
1/4 cup peanut butter or other nut butter: Swirl it in for a nutty delight.
Step-by-Step Instructions
Step 1: Prepare the Cottage Cheese
Start by draining off any excess liquid (whey) from your cottage cheese. This is an important step to avoid an overly watery ice cream. You can do this by simply letting it sit in a fine-mesh sieve for about 10-15 minutes. You don’t want it bone dry, just not swimming in liquid.
Step 2: Blend Until Silky Smooth
Add the drained cottage cheese to a high-powered blender or a food processor. Blend on high speed for at least 1-2 minutes, scraping down the sides as needed. You want it to be completely smooth and creamy, without any curds. Patience here is key – the smoother the blend, the creamier your ice cream will be. If you don’t have a high-powered blender, you might need to blend for a bit longer or pulse it in stages.
Step 3: Add Remaining Base Ingredients
Once the cottage cheese is perfectly smooth, add the milk, sweetener (maple syrup, honey, or sugar), vanilla extract, almond extract (if using), and a pinch of salt to the blender. Blend again until everything is thoroughly combined and the mixture is homogenous. Give it a little taste and adjust sweetness if needed. Remember, it will taste less sweet once frozen.
Step 4: Incorporate Flavor Add-ins (If Using)
Now’s the fun part! If you’re adding cocoa powder for chocolate, add it now and blend until smooth. If you’re using berries, add them and blend until combined. For things like melted chocolate chips or peanut butter swirls, you’ll want to blend the base until smooth, then pour it into a freezer-safe container and swirl those in at the end, rather than blending them into the whole batch. This gives you those lovely ribbons of flavor.
Step 5: Freeze the Mixture
Pour the blended mixture into a freezer-safe container. A loaf pan or a shallow glass container works well. If you’re doing swirls, gently dollop your add-ins on top and use a knife or skewer to create swirls. Cover the container tightly with plastic wrap, pressing it directly onto the surface of the ice cream to prevent ice crystals from forming. Then, cover with the lid or foil. Freeze for at least 4-6 hours, or until firm and scoopable. The exact time will depend on your freezer.
Step 6: Soften Before Serving
This cottage cheese ice cream can get quite firm, especially if you used full-fat cottage cheese. Before scooping, let it sit at room temperature for about 10-15 minutes to soften slightly. This makes scooping much easier and improves the texture. If you forget and it’s too hard, just pop it back in the blender for a quick pulse with a tiny splash of milk.
Step 7: Scoop and Enjoy!
Once slightly softened, scoop your homemade cottage cheese ice cream into bowls. Enjoy it plain or with your favorite toppings! I love it with a sprinkle of sea salt, some fresh berries, or even a drizzle of more maple syrup.
What to Serve It With
This cottage cheese ice cream is wonderfully versatile and fits into so many meal occasions. For a quick and healthy breakfast, I love a small scoop alongside some fresh fruit and a sprinkle of granola. It adds a lovely creamy, slightly sweet element to start the day. It feels like a real treat, but it’s still a protein-packed option. When we have family over for brunch, I’ll often make a batch and serve it in small, elegant glasses with a few raspberries and a mint sprig. It feels special enough for guests but is so easy to prepare ahead of time.
As a dessert, it’s a dream! It’s perfect after a rich meal when you want something sweet but not too heavy. My favorite way is to have it with a few dark chocolate shavings or a drizzle of caramel sauce. It’s the perfect light yet satisfying end to a dinner party. And for those cozy snack times, when I just need something comforting? A scoop of this cottage cheese ice cream is perfect. I often pair it with a cup of hot tea or a small glass of milk. My kids ask for this all the time as an after-school treat, especially when I’ve added chocolate or fruit. It’s a lifesaver for satisfying those sweet cravings guilt-free!
Top Tips for Perfecting Your Cottage Cheese Ice Cream
Over the years of making this, I’ve picked up a few tricks that really make a difference. When it comes to the cottage cheese prep, I can’t stress enough how important it is to drain off that excess liquid. A fine-mesh sieve is your best friend here. If you skip this step, you risk an icy, watery outcome, and nobody wants that. I’ve learned this the hard way after a few less-than-perfect batches!
For mixing advice, always, always use a high-powered blender or a food processor if you have one. You’re aiming for a texture so smooth that you can’t distinguish it from yogurt or even cream cheese. Blend, scrape down, blend again. It might take longer than you think, but the payoff in creaminess is HUGE. If you don’t have a powerful blender, you can try making it in smaller batches, but make sure it’s truly blended. For swirl customization, I love adding things like peanut butter or melted chocolate chips *after* the base is blended. Pour the base into your container, dollop the swirl ingredient on top, and then use a knife or skewer to gently swirl it through. Don’t over-mix, or you’ll lose those beautiful ribbons.
When it comes to ingredient swaps, feel free to experiment! If you prefer honey, use it instead of maple syrup, just remember it has a stronger flavor. For a dairy-free option, coconut milk or oat milk work wonderfully in place of regular milk, and they often contribute to an even creamier texture. If you’re watching sugar intake, you can experiment with sugar substitutes, but be mindful that some can leave an aftertaste. For baking tips (though this isn’t baked!), the equivalent is freezing tips: make sure your container is freezer-safe and cover it tightly to prevent freezer burn. Pressing plastic wrap directly onto the surface is a trick I learned from my grandma for keeping things icy-free. And for glaze variations (if you decide to top it), a simple drizzle of maple syrup or a dusting of cocoa powder works beautifully. Don’t feel pressured to do anything elaborate; the ice cream itself is the star!
Storing and Reheating Tips
Storing this cottage cheese ice cream is pretty straightforward, but a few things help maintain its quality. If you plan to eat it within a day or two, you can keep it covered at room temperature for about 5-10 minutes before scooping. However, for longer storage, definitely move it to the refrigerator. Store it in an airtight container, and it should stay good for up to a week, though the texture might change slightly after a few days. I always make sure my container is well-sealed to keep out any weird freezer smells.
For longer storage, the freezer is your best bet. Wrap the container tightly in plastic wrap and then in aluminum foil to prevent ice crystals. It can last for about 1-2 months in the freezer. When you’re ready to enjoy it, let it thaw on the counter for about 15-20 minutes before scooping. If it’s still too hard, you can pulse it a few times in a food processor with a tiny splash of milk to loosen it up. I usually wait until it’s just scoopable. If you’ve added any swirls or mix-ins, make sure they’re distributed well before freezing. The glaze timing advice is simple: for the best texture, add any drizzles or toppings just before serving. Glazing too far in advance can sometimes make toppings soggy.
Frequently Asked Questions
Final Thoughts
I truly hope you give this cottage cheese ice cream a try. It’s one of those recipes that surprised me with how good it turned out, and it’s become a staple in my freezer for those moments when only dessert will do. It’s proof that you can have incredibly delicious, creamy, and satisfying frozen treats without all the usual guilt. What I love most is how it’s so adaptable – you can make it your own with your favorite flavors and mix-ins. It’s the perfect example of simple ingredients coming together to create something truly special.
If you’re a fan of easy desserts or are looking for a healthier alternative to traditional ice cream, this is definitely for you. And if you have any other favorite flavor combinations or twists on this recipe, please share them in the comments below! I’m always looking for new ideas. I can’t wait to hear how yours turns out. Happy scooping!
Cottage Cheese Ice Cream
Ingredients
Main Ingredients
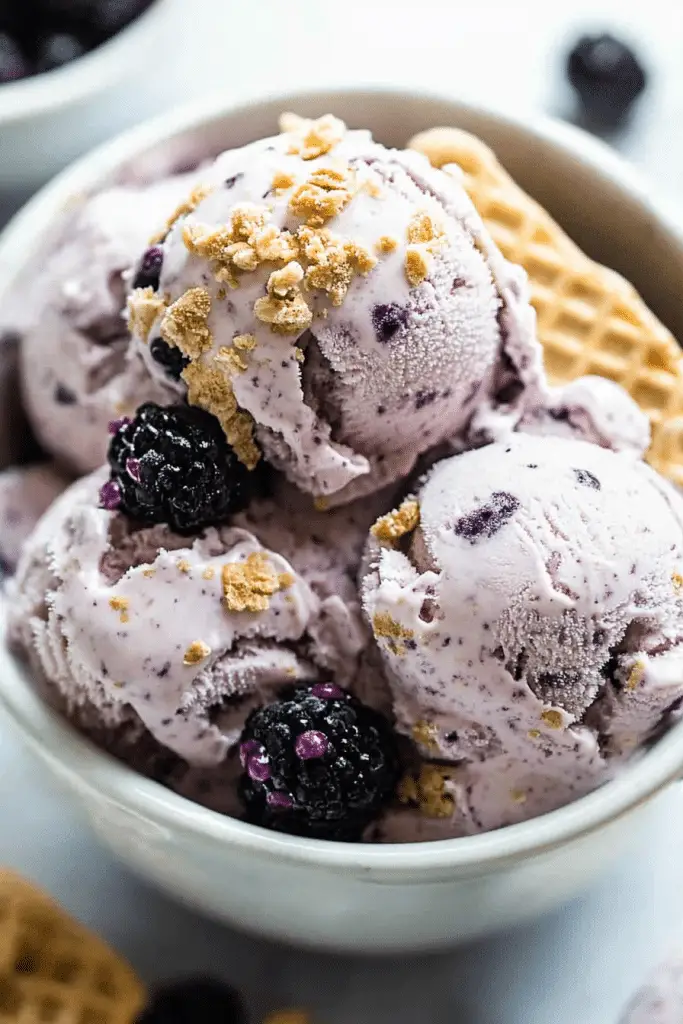
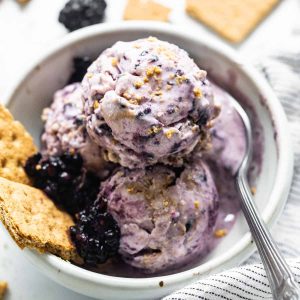
- 22 oz full-fat cottage cheese We used 4%
- 0.333 cup honey *Adjust to taste
- 1 teaspoon vanilla extract
- 1 cup fresh blackberries separated
- 0.333 cup fresh blackberries separated
- 3 sheets graham cracker separated
- 0.5 teaspoon flaky salt Optional
Instructions
Preparation Steps
- Add the cottage cheese, honey, and vanilla extract to a high-speed food processor. Process on high until thick and creamy, between 3-5 minutes.
- Next, add 1 cup of blackberries to the food processor and pulse until the blackberries are just broken up and combined. The cottage cheese will turn a slight purple color.
- Pour the mixture into a bowl or a loaf pan. Crumble two of the graham crackers on top and fold them into the mixture until combined.
- Top with the remaining blackberries and crumble one last graham cracker over the top. Option to top with salt.
- Cover and place in the freezer for at least 4-6 hours or overnight.*
- Serve in a dish or on an ice cream cone.
Notes
Featured Comments
“I totally get that craving! This sounds like the perfect no-bake solution—simple, creamy, and satisfying.”
“I totally get that! This sounds like the perfect no-bake solution for a sweet craving—simple, creamy, and ready in no time.”
“Impressed! Clear steps and crowd-pleaser results. Perfect for busy nights.”
“New favorite here — quick weeknight win. crowd-pleaser was spot on.”
“Super easy and turned out amazing! My family asked for seconds. Saving this one.”
“This sweet treat was absolutely loved — the balanced really stands out. Thanks!”


I totally get that! This sounds like the perfect no-bake solution for a sweet craving—simple, creamy, and ready in no time.
I totally get that craving! This sounds like the perfect no-bake solution—simple, creamy, and satisfying.