

There are some recipes that just… save your life. You know the ones. They’re your go-to when unexpected guests arrive, when you’ve had a ridiculously long day and the last thing you want to do is spend hours in the kitchen, or when that late-night craving for something sweet hits hard and you need instant gratification. This dump cake is precisely that kind of recipe for me. It’s the dessert equivalent of a cozy hug, and honestly, it’s so ridiculously simple that I sometimes feel like I’m cheating. Forget those complicated layer cakes that require precision and a whole afternoon; this dump cake is your new best friend. It’s the kind of thing my grandma used to whip up, and every time I make it, I’m transported back to her warm kitchen, the air thick with the scent of warm fruit and sweet cake. It’s truly my favorite Dump Cake Recipe, a testament to how simple ingredients can create something truly magical.

What is dump cake?
So, what exactly is this magical thing called a Dump Cake? It’s exactly what it sounds like: you literally “dump” ingredients into a baking dish and bake it. There’s no creaming butter and sugar, no delicate folding of dry into wet ingredients. It’s all about layering and letting the oven do the heavy lifting. Think of it as a super-lazy, incredibly forgiving, and downright delicious cousin to a cobbler or a crisp, but with the glorious texture of a cake. The beauty of this dump cake is that it transforms humble pantry staples into something truly spectacular. It’s incredibly versatile, meaning you can tailor it to whatever fruit you have on hand or whatever you’re craving. It’s the ultimate “set it and forget it” dessert that always impresses.
How do I make dump cake?
Quick Overview
This dump Cake Recipe is a culinary miracle of speed and simplicity. You’ll essentially layer your fruit filling directly into a baking dish, top it with a dry cake mix, and then drizzle melted butter over everything. Pop it in the oven, and about 40-50 minutes later, you’ll have a warm, bubbly, cakey delight. It’s the kind of recipe that makes you feel like a baking rockstar with almost no effort involved. Seriously, it’s that straightforward.
Ingredients
For the Main Batter:
1 box (about 15.25 oz) yellow cake mix: This is the base for our cakey topping. I always use a standard yellow cake mix because it has a lovely, neutral flavor that lets the fruit shine, but you can totally experiment with spice cake or even a white cake mix if you’re feeling adventurous! Make sure it’s just the dry mix; no need for eggs or oil here!
1 cup (2 sticks) unsalted butter, melted: This is crucial for creating that glorious, golden crust. Using unsalted butter gives you more control over the saltiness. Don’t skimp here; it’s what makes the magic happen!
For the Filling:
2 cans (21 oz each) fruit pie filling (your choice of flavor): This is where the flavor party really starts! Peach, cherry, apple, blueberry – whatever you love. I’m partial to a good cherry or peach filling, especially when it’s a bit chilly outside. Make sure you get the pre-made pie filling, not just plain canned fruit. Some people like to add a little extra zest or a pinch of spice to their filling, which is a great idea too!
1/2 teaspoon ground cinnamon (optional, but recommended): This little addition really elevates the flavor, especially with apple or peach fillings. It just adds that extra warmth and spice that makes it feel so homemade.
Step-by-Step Instructions
Step 1: Preheat & Prep Pan
First things first, preheat your oven to 375 degrees Fahrenheit (190 degrees Celsius). Grab a 9×13 inch baking dish – this size is perfect for getting those lovely crispy edges. You don’t need to grease it; the butter from the topping will take care of that. Just make sure it’s clean and ready to go!
Step 2: Mix Dry Ingredients
There’s actually no mixing of dry ingredients for this dump cake! You’ll just use the dry cake mix as is. This is part of what makes it so incredibly simple!
Step 3: Mix Wet Ingredients
Melt your butter. I usually do this in a small saucepan on the stovetop or in a microwave-safe bowl in the microwave for about 30-60 seconds. You just want it fully melted and pourable.
Step 4: Combine
This is where the “dump” part comes in! Open your cans of fruit pie filling and pour them evenly into the bottom of your prepared baking dish. If you’re using cinnamon, sprinkle it over the fruit now. Then, evenly sprinkle the dry cake mix over the top of the fruit. Don’t mix it in! Just let it sit on top. Finally, slowly and evenly drizzle the melted butter all over the dry cake mix, making sure to get as much coverage as possible. It might look a little uneven at first, and that’s totally okay!
Step 5: Prepare Filling
The fruit pie filling is already prepared for you! You just open the can and pour it in. If you want to jazz it up, you could stir in a little extra spice like nutmeg or a splash of Vanilla Extract into the fruit before you pour it, but it’s delicious just as it is.
Step 6: Layer & Swirl
This step is all about the layering. Pour the fruit filling first, then sprinkle the dry cake mix evenly over the top, followed by the melted butter. There’s no real swirling needed here, the baking process creates its own beautiful, rustic texture.
Step 7: Bake
Pop that dish into your preheated oven and bake for 40-50 minutes, or until the topping is golden brown and bubbly around the edges. You’ll know it’s done when you see that gorgeous caramelization happening. If the top is browning too quickly, you can loosely tent it with foil for the last 10-15 minutes of baking.
Step 8: Cool & Glaze
This is the hardest part: waiting for it to cool slightly! Let the dump cake rest for about 10-15 minutes after it comes out of the oven. This helps it set up a bit so it doesn’t fall apart when you serve it. There’s no separate glaze to make for this recipe; the melted butter and cake mix create a beautiful, naturally sweet topping.
Step 9: Slice & Serve
Scoop generous portions into bowls. It’s fantastic served warm, especially with a dollop of whipped cream, a scoop of vanilla ice cream, or even a drizzle of caramel sauce if you’re feeling extra indulgent. The contrast of the warm, fruity cake with cold ice cream is just divine!
What to Serve It With
This dump cake is pretty much a meal in itself, but if you’re looking to round out your spread or serve it for a specific occasion, I’ve got some ideas! For a cozy breakfast, especially on a weekend, I love serving a small portion warm with a strong cup of coffee. It feels like a decadent treat to start the day. If you’re hosting a brunch, you can make it ahead and reheat it gently. Present it beautifully in the baking dish and let guests scoop their own. A few berries on the side or some yogurt can make it feel a bit more elegant. As a dessert, it’s an absolute winner. It pairs wonderfully with a scoop of good quality vanilla bean ice cream – the warm cake and cold ice cream are a match made in heaven. A drizzle of chocolate or caramel sauce takes it over the top! For those really casual, cozy snack times, a simple bowl with a fork is all you need. My kids sometimes ask for it as a special after-school treat, and it’s always a hit. I’ve also found it pairs surprisingly well with a dollop of mascarpone cheese for a richer finish, or even a spoonful of Greek yogurt if you want something a little lighter and tangier.
Top Tips for Perfecting Your Dump Cake
I’ve made this dump cake more times than I can count, and over the years, I’ve picked up a few tricks that I think make it even better. When it comes to the fruit filling, don’t be afraid to mix and match! If you can’t find a specific pie filling, you can often use two cans of fruit (like cherry pie filling and sliced peaches) and maybe add a tablespoon or two of cornstarch to thicken them up if they seem too watery. For the cake mix, if you happen to have a box that’s been open for a while, give it a good shake to ensure there aren’t any clumps. And while yellow cake mix is my go-to, don’t be afraid to try a spice cake mix, especially with apple or pumpkin filling – it adds a wonderful layer of flavor. A little tip I learned early on: make sure you’re distributing the dry cake mix as evenly as possible. If you have big mounds of it in one spot, you might get a patch of dry cake. It doesn’t have to be perfect, but aim for an even sprinkle. When you’re drizzling the melted butter, try to get it all over the surface. This is what helps the cake mix bake into that lovely, golden, slightly crispy topping. Some people like to use a pastry blender to cut the butter into the cake mix before baking, but honestly, the drizzle method is so much easier and works just as well for this dump cake. If your oven tends to run hot, keep an eye on it during the last 15 minutes of baking. If the top is getting too dark before the center is bubbly, just loosely tent it with aluminum foil. This is a lifesaver! And finally, the best way to test for doneness is to look for those lovely, bubbly edges and a golden-brown top. You can also gently insert a knife into the center; if it comes out mostly clean, you’re good to go. Don’t be tempted to overbake it, or the cake part can get a bit dry.
Storing and Reheating Tips
One of the best things about this dump cake is how well it stores and reheats, making it perfect for leftovers (if you even have any!). For best results, let the cake cool completely before storing. If you plan on eating it within a day or two, you can simply cover the baking dish tightly with plastic wrap or aluminum foil and leave it at room temperature. It stays remarkably moist this way. If you think it will be longer than two days, or if your kitchen is particularly warm, it’s best to store it in the refrigerator. Again, cover it well to prevent it from drying out. It should keep well in the fridge for up to 4 days. When it comes to reheating, I have a few favorite methods. For a single serving, the microwave is super quick – just pop a portion onto a plate and heat for 30-60 seconds, or until warmed through. For a larger portion or if you want to revive that slightly crisp topping, the oven is your friend. Reheat in a preheated oven at 325 degrees Fahrenheit (160 degrees Celsius) for about 10-15 minutes, or until heated through and the topping is nice and warm. I don’t recommend freezing this dump cake once it’s baked, as the texture of the cake topping can change quite a bit after thawing. However, if you *really* wanted to freeze it, I’d suggest baking it, letting it cool completely, then cutting it into individual portions and wrapping each portion tightly in plastic wrap and then aluminum foil. Thaw overnight in the refrigerator and reheat as usual. I always prefer to add any fresh toppings like whipped cream or ice cream *after* reheating, rather than trying to store them together.
Frequently Asked Questions
Final Thoughts
So there you have it – the easiest, most satisfying dump cake you’ll ever make. It’s a recipe that proves you don’t need complicated steps or fancy ingredients to create something truly delightful. It’s a taste of comfort, a shortcut to happiness, and a reliable friend in the kitchen for those moments when you need it most. I sincerely hope you give this dump cake a try. It’s one of those recipes that just keeps on giving, and I have a feeling it might become a favorite in your household too. If you’re looking for more simple yet delicious baking ideas, you might also enjoy my easy apple crumble or my foolproof chocolate chip cookie bars – they share that same spirit of deliciousness with minimal fuss! I can’t wait to hear what you think, and I’d love to see your creations. Don’t hesitate to leave a comment below with your favorite fruit filling combination or any fun twists you tried!
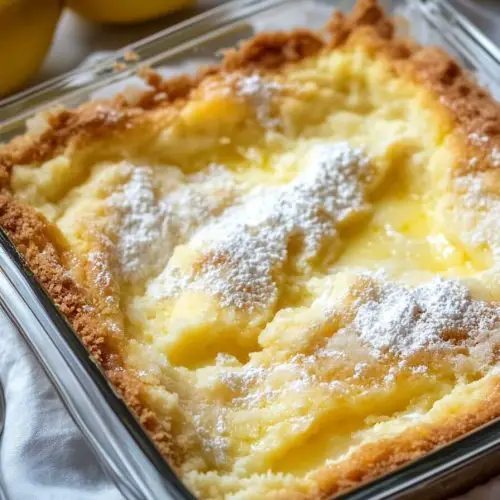
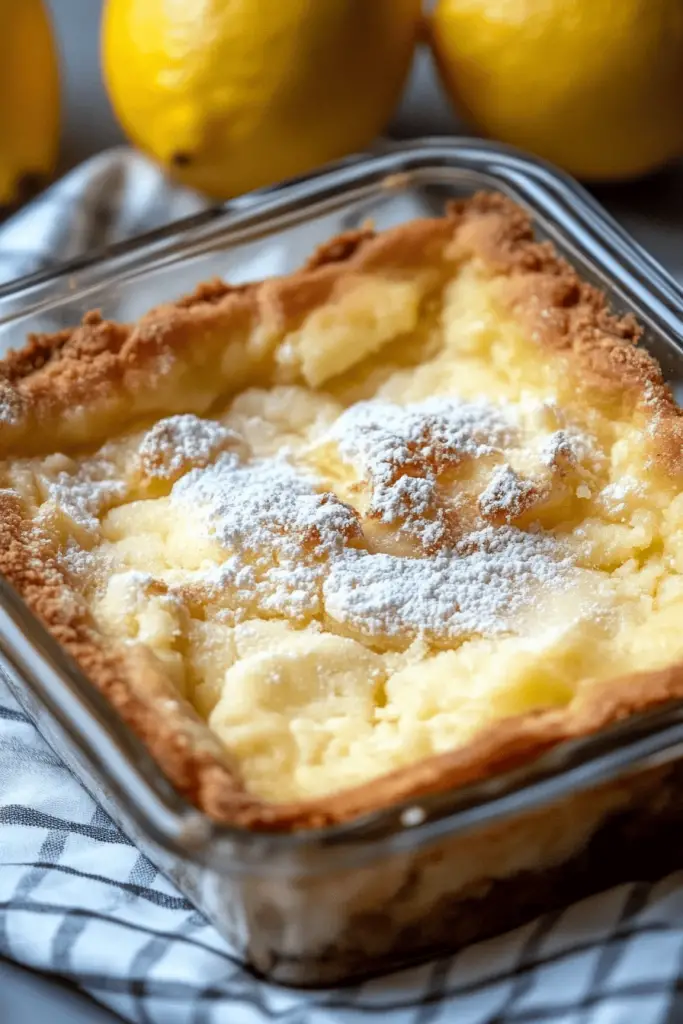
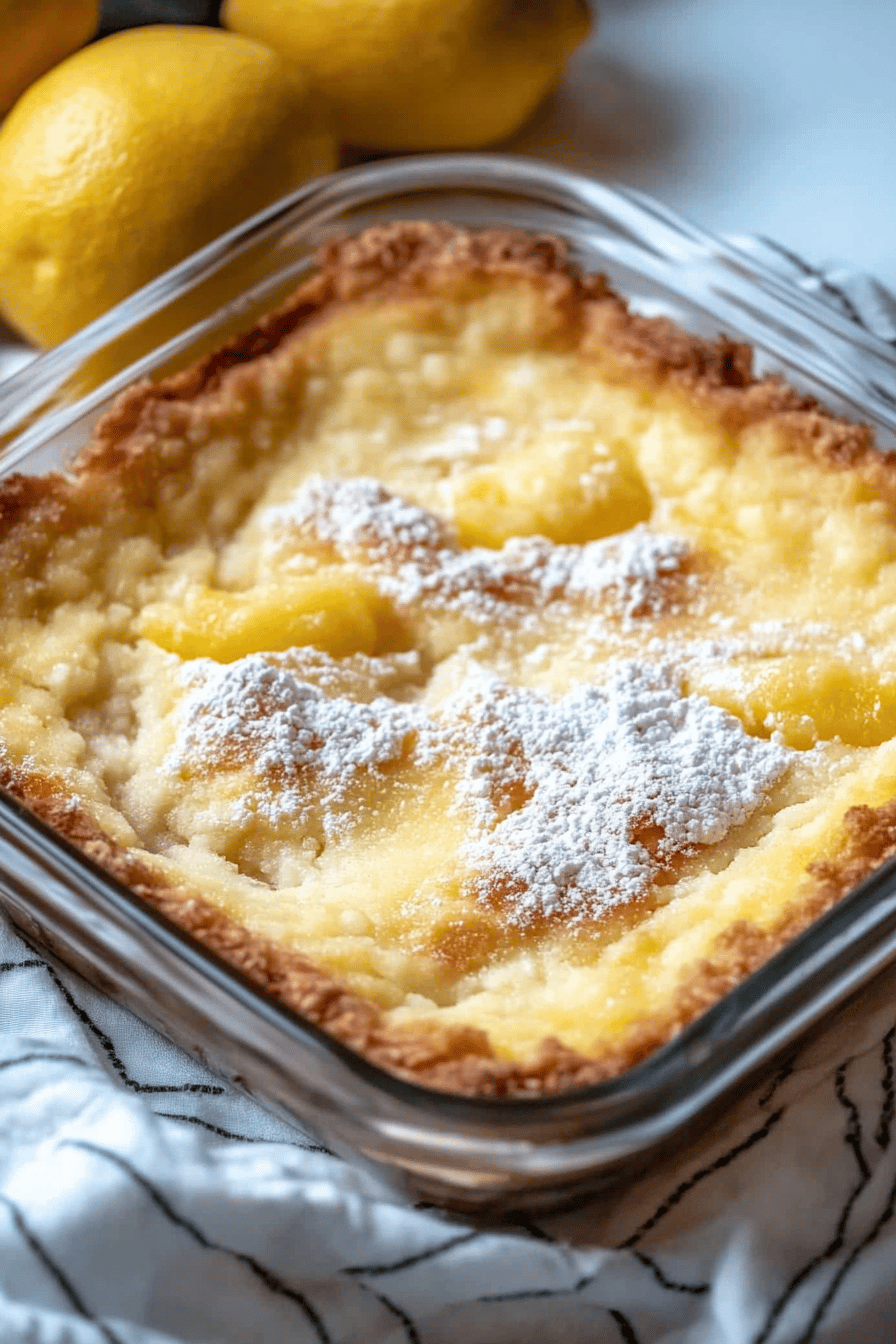
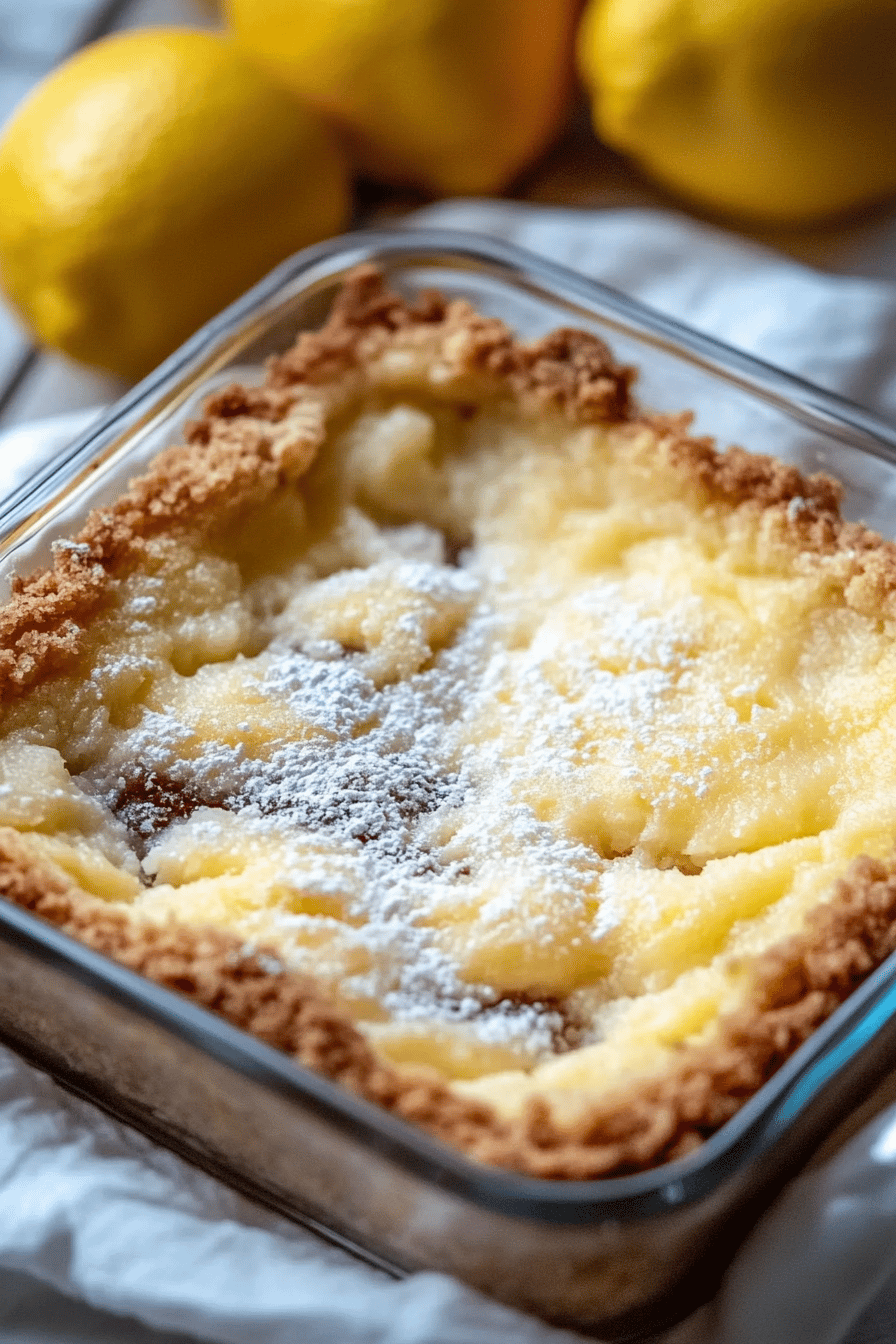
Lemon Cream Cheese Dump Cake
Ingredients
Main Ingredients
- 0.45 ounces lemon cake mix
- 0.4 ounces cream cheese softened
- 0.23 ounces butter melted
- 0.5 cups milk
- 0.5 cups sugar
- 0.25 teaspoons vanilla extract
Instructions
Preparation Steps
- Preheat your oven to 350°F (175°C). Grease a 9x13 inch baking dish.
- In a large bowl, combine the softened cream cheese, melted butter, milk, sugar, and vanilla extract. Beat until smooth and well combined.
- Pour the cream cheese mixture into the prepared baking dish and spread evenly.
- Sprinkle the dry lemon cake mix evenly over the cream cheese mixture.
- Bake for 50-60 minutes, or until the cake is golden brown and a toothpick inserted into the center comes out clean.
- Let the dump cake cool for at least 15 minutes before serving. It can be served warm or at room temperature.
Notes
Featured Comments
“Impressed! Clear steps and crowd-pleaser results. Perfect for busy nights.”
“New favorite here — comforting. crowd-pleaser was spot on.”
“Super easy and turned out amazing! My family asked for seconds. Saving this one.”
“This sweet treat was absolutely loved — the bright really stands out. Thanks!”
“Made it tonight and wow — turned out amazing! Will definitely make dump cake again.”
“Packed with flavor and so simple. Exactly what I wanted from dump cake.”


