

There’s something about the smell of baked mashed potatoes wafting through the house that instantly feels like a warm hug. I remember my grandma’s kitchen, where she’d pull a golden, slightly crispy dish out of the oven, the aroma making everyone gather around. This recipe is my modern twist on that timeless comfort food—a creamy, cheesy, slightly crispy baked mashed potatoes that’s become a staple in my family. It’s honestly one of those dishes I do when I want to impress without much fuss because, trust me, it’s easier than you think. My kids ask for this all the time, and I’ve tested it with everything from herb-infused butter to a sprinkle of bacon bits—it never fails to disappear in minutes. It’s perfect when you’re craving something rich but want that little bit of crunch on top. Plus, it’s a great way to use up leftover mashed potatoes or to make a cozy side that everyone will love. Let me walk you through why this has become my go-to comfort food—because, honestly, I think you’re going to love it just as much as we do.
What is baked potato?
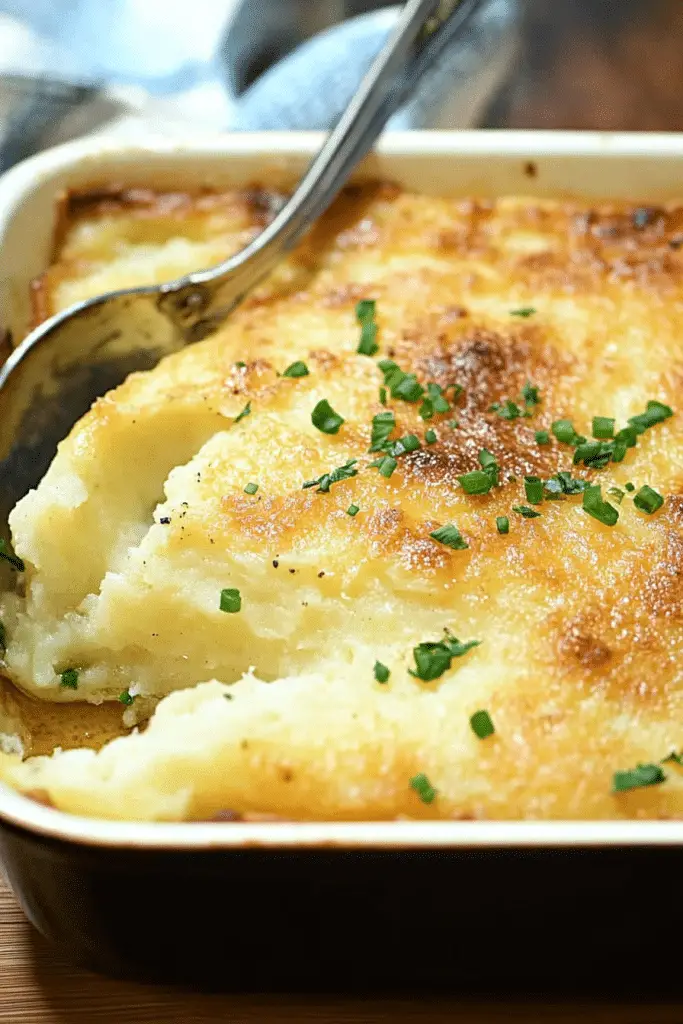
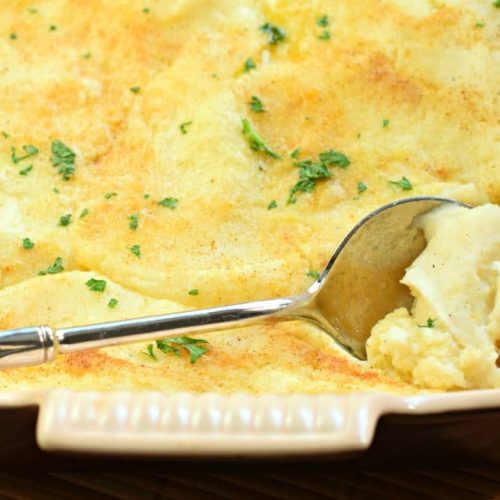
Think of baked mashed potatoes as the lovechild of your favorite creamy mash and a crispy, cheesy casserole. It’s essentially plain mashed potatoes that get a little dress-up before hitting the oven—usually topped with cheese, butter, or herbs, then baked until bubbly and golden brown on top. The name isn’t fancy; it’s just what you get when you transform a humble side into a spectacular dish that feels like a meal in itself. The magic here is in the texture—velvety potatoes with a gorgeous crunchy crust—and the flavor, which gets a boost from butter and cheese. It’s basically comfort food hugged by a crispy, cheesy topping, making each bite a little celebration. I love that you can easily customize this—add garlic, chives, or a sprinkle of paprika—whatever makes your taste buds dance. Whether you’re making it for a big family dinner or a cozy weekend lunch, baked mashed potatoes are a crowd-pleaser and a real hero in my kitchen.
How do I make baked potatoes?
Quick Overview
This baked mashed potatoes recipe is all about transforming your beloved creamy mash into a crispy, cheesy dish. It starts with good, fluffy mashed potatoes—preferably made from Yukon Gold or russet potatoes for the best texture. Mix in butter, milk, and a handful of cheese—whatever you like—and then pour it into a buttered baking dish. Top with more cheese and perhaps a sprinkle of herbs or bacon if you’re feeling fancy. Into the oven it goes until bubbling and golden on top. The beauty? It’s all straightforward and makes a fantastic side or even a main course if you add a salad or some roasted veggies. What makes this method special is how easily you can prepare parts of it ahead of time, saving you stress when you’re ready to bake. Plus, I promise, the crispy edges have a little magic all their own. Ready to see how simple but spectacular this dish can be? Let’s dive in!
Ingredients
For the Main Batter:
– 4 cups mashed potatoes (cooled slightly; creamy or chunky, your call)
– 4 Tbsp unsalted butter, softened
– 1/2 cup whole milk or heavy cream (or almond milk for dairy-free, tested and just as creamy!)
– 1 cup shredded cheese (cheddar, mozzarella, or a mix—whatever melts best and you love)
– Salt and black pepper to taste
– Optional: minced garlic, chopped chives, or shredded cooked bacon
For the Filling:
– Extra cheese for topping
– Sliced scallions or herbs for garnish
– A dash of smoked paprika or cayenne for a little heat
For the Glaze:
– A handful of cheese or a drizzle of melted butter mixed with herbs
– Optional: a little grated Parmesan or grated Gruyère for an extra touch of flavor
Step-by-Step Instructions
Step 1: Preheat & Prep Pan
Set your oven to 375°F (190°C). Lightly butter a baking dish—either a 9×9 or an oval casserole works perfectly. I like to do this first because it gives the butter a chance to soak into the edges, preventing sticking and adding extra flavor when baked. If you want a slightly crispy crust, sprinkle a little Parmesan or breadcrumbs at this stage, too. Ready your ingredients; I usually have everything measured and prepped so I can move smoothly through the steps without scrambling at the last minute.
Step 2: Mix Dry Ingredients
In a big bowl, I start with my cooled mashed potatoes. I like using Yukon Gold for their buttery flavor and silky texture, but russets work just as well. Fluff ‘em up with a fork or a whisk if they’re chunkier. This is the base of our creamy delight—so make sure they’re smooth enough for mixing but not so hot that they start to stiffen the butter and cheese when added.
Step 3: Mix Wet Ingredients
In a separate bowl, whisk together softened butter and milk or cream until nicely combined. I’ve tested this with almond milk, and honestly, it made the dish even creamier—so don’t be afraid to swap! Pour this mixture into your mashed potatoes gradually, folding gently so they stay fluffy. You want a smooth but not runny consistency, kinda like thick cake batter. Add salt and pepper here—taste test! This is your moment to adjust seasonings, trusting your palate.
Step 4: Combine
Now, gently fold the wet ingredients into the potatoes until just combined. Overmixing can make the potatoes gluey, so keep it light. You’re aiming for a uniform, creamy mixture, but don’t worry if some lumps remain—they actually add a nice rustic texture.
Step 5: Prepare Filling
Stir in your shredded cheese into the mixture if you want a cheesy inside, or reserve most for the topping. If you like garlic or herbs, add them now too. For variations, you might fold in cooked bacon or spinach for extra flavor. Just make sure everything is cooled enough so the cheese doesn’t melt instantly when mixed in. This is where you can really make it your own!
Step 6: Layer & Swirl
Pour half of your potato mixture into the prepared dish. Spread it out evenly. Add your filling layer—maybe more cheese, herbs, or even a swirl of pesto. Then add the rest of the mashed potatoes on top. Using a spoon or spatula, gently swirl the top layer to create beautiful ripples and marbling—trust me, the visual impact makes the dish even more tempting when it comes out of the oven.
Step 7: Bake
Pop your assembled dish into the oven and bake for 25-30 minutes. You’ll know it’s ready when the top is bubbling and golden brown—don’t forget to keep an eye on it toward the end so it doesn’t over-brown. If you want an extra crispy top, broil it for the last 2-3 minutes, but watch carefully. Every oven is different, so start checking around the 25-minute mark.
Step 8: Cool & Glaze
Once out of the oven, let it rest for about 5 minutes. This helps the layers set so you get clean slices. If you love a little extra cheesy crunch, sprinkle some more cheese on top right after baking and pop it back in briefly or broil for a minute. For a finishing touch, drizzle melted herb butter or sprinkle fresh herbs and scallions. I love this little step—it elevates the whole dish and makes it look fancy enough for even a special dinner.
Step 9: Slice & Serve
Use a sharp knife to cut into even squares or wedges. Because it’s baked, it holds together beautifully—perfect for serving in rustic slices, serving spooned out for a creamy effect, or even plated with a side salad for an effortless meal. The smell alone will make everyone come running, so serve hot and enjoy every cheesy, crispy bite. Trust me—these baked mashed potatoes are comfort-food magic that I promise you’ll make again and again.
What to Serve It With
This dish is so versatile. For breakfast, pair it with crispy bacon and a fried egg on top—believe me, it works! For weekend brunch, serve with a fresh side salad, some crusty bread, and your favorite morning beverage. It also makes a show-stopping side for roasted chicken or grilled steak—just heat it up and put it on the table. My family loves it with a big green salad, drizzle of balsamic, and maybe some roasted asparagus—adding a bit of freshness cuts through the richness nicely. For a more casual vibe, serve it with hot sauce or a dollop of sour cream, and it’s perfect for cozy nights in. Honestly, I’ve even had leftovers for breakfast with a fried egg—delicious! The beauty is how flexible it is, making any meal feel a little more special. And, of course, it’s always a hit at potlucks or family dinners, thanks to that irresistible golden crust and creamy inside.
Top Tips for Perfecting Your Baked Mashed Potatoes
Here’s where the fun really begins! The first thing I learned after making this countless times is to choose the right potatoes—they should be fluffy yet sturdy enough to hold up to the baking process. Yukon Golds give a buttery flavor and smooth texture, but russets make for fluffier, more rustic bites. When preparing mashed potatoes, avoid overmixing because that can release excess starch—trust me, a light fold-in keeps it silky.
For the topping, I prefer a mix of cheeses—cheddar for sharpness, mozzarella for gooeyness, or even Gruyère for a nutty flavor. To get that perfect crispy crust, sprinkle a little Parmesan or breadcrumbs on top before baking, and don’t be shy about broiling for a couple of minutes to turn up the golden perfection.
When it comes to the filling, I love adding herbs like thyme or chives—they add freshness and brightness. If using bacon, make sure it’s crispy beforehand so it crisps up even more during baking. I’ve also experimented with mixing in sautéed vegetables—spinach or caramelized onions—that add depth and nutrition.
On baking, oven placement matters—middle rack ensures even browning. If your oven runs hot, check early and maybe cover the dish with foil if needed. For storage, leftovers reheat beautifully in the oven or microwave, but I recommend removing the crusty top if you’re reheating and adding cheese again to refresh that beautiful topping. Honestly, after years of experimenting, my biggest tip is just to taste as you go—seasoning is everything! And hey, swapping out ingredients—like trying different cheeses or adding a pinch of smoked paprika—keeps it exciting every time.
Storing and Reheating Tips
Leftover baked mashed potatoes are a gift—so forgiving and easy to store! If you’re saving some, let them cool completely, then cover with plastic wrap or transfer to an airtight container. At room temperature, they’re good for about 2 hours, but if you’re not eating right away, pop them in the refrigerator. They’ll stay fresh for up to 3 days. When reheating, I prefer to do it slowly in the oven at 350°F (about 10-15 minutes), covered with foil, to keep them creamy. If I want the top crispy again, I remove the foil and broil for a minute or two at the end—just watch carefully so it doesn’t burn. If you’re freezing leftovers, wrap tightly in foil and plastic wrap, then store in a freezer-safe container for up to 2 months. Thaw in the fridge overnight and reheat as mentioned. A little note on glazing: if you like a fresh, zingy glaze or herbs, wait until reheating to add it, so it stays fresh and vibrant. This dish reheats wonderfully—sometimes better than fresh, because the flavors meld even more.
Frequently Asked Questions
Final Thoughts
If there’s one dish that instantly makes me feel cozy and nostalgic, it’s baked mashed potatoes. It’s like hugging a warm blanket—creamy, cheesy, crispy, and completely satisfying. I love how the simple ingredients come together to create something much more than the sum of its parts. It’s forgiving, adaptable, and always a hit—whether for a weeknight family dinner or a special weekend gathering. Over the years, I’ve played around with different cheeses, herbs, and toppings, and each tweak feels like discovering a new secret. My advice? Use high-quality butter and cheese for the best flavor, don’t skip the crispy crust, and trust your taste buds. Once you master this, it’s guaranteed to become one of your go-to comfort foods too. Happy baking! And I can’t wait to hear how yours turns out—share your favorite twist in the comments or tag me in your photos. Nothing beats good food and good company, right?
baked mashed potatoes
Ingredients
Main Ingredients
- 4.5 cups mashed potatoes
- 1 cup sour cream
- 4 oz cream cheese
- 0.25 cup unsalted butter
- 1 tsp kosher salt
- 0.5 tsp black pepper
- 0.25 tsp paprika
- 2 tbsp chopped parsley
Instructions
Preparation Steps
- Preheat oven to 375 degrees F (190 degrees C). Grease a baking dish.
- In a large mixing bowl, combine mashed potatoes, sour cream, cream cheese, salt, pepper, and paprika. Mix until smooth.
- Transfer the mixture to the prepared baking dish. Dot the top with slices of butter.
- Bake uncovered for 35-40 minutes until golden brown on top. Garnish with chopped parsley before serving.
Notes
Featured Comments
“Impressed! Clear steps and crowd-pleaser results. Perfect for busy nights.”
“New favorite here — family favorite. crowd-pleaser was spot on.”
“Super easy and turned out amazing! My family asked for seconds. Saving this one.”
“This sweet treat was absolutely loved — the silky really stands out. Thanks!”
“Made it tonight and wow — comforting! Will definitely make Easy Baked Mashed Potatoes Recipe again.”
“Packed with flavor and so simple. Exactly what I wanted from Easy Baked Mashed Potatoes Recipe.”


