


You know those nights? The ones where you’re desperately craving pizza, that warm, cheesy goodness, but the thought of dealing with a heavy, carb-laden crust just makes you sigh? Yeah, I’ve been there. For years, I tried to find a healthier alternative that didn’t taste like… well, health food pretending to be pizza. Then, I stumbled upon the magic of cauliflower crust pizza, and let me tell you, it was a game-changer. This isn’t just any cauliflower crust; this is the one that makes my kids ask for seconds (and sometimes thirds!), the one that impresses even the most skeptical of my friends, and the one I turn to when I want that pizza fix without the guilt. It’s shockingly good, and honestly, you won’t believe it’s made from cauliflower until you see it emerge from the oven. It’s become my go-to, my secret weapon, my absolute favorite way to enjoy pizza night.
What is Cauliflower Crust Pizza?
So, what exactly is this wonder of a cauliflower crust pizza? At its heart, it’s pizza, but with a brilliant twist. Instead of a traditional flour-based dough, we’re using finely riced cauliflower as the base. Think of it as taking the humble cauliflower, transforming it into something magical, and then using it as the perfect canvas for all your favorite pizza toppings. It’s essentially a healthier, lower-carb, and often gluten-free alternative to your classic pizza crust. The process involves cooking the cauliflower until tender, then squeezing out as much moisture as possible (this is super important, trust me!) before mixing it with binders like cheese and egg to form a pliable dough. This “dough” is then shaped, pre-baked, and finally topped and baked again. It’s a culinary sleight of hand that results in a surprisingly sturdy, deliciously crispy crust that’s ready to hold all that glorious cheese and sauce.
How do you make cauliflower crust pizza?
Quick Overview
Making this cauliflower crust pizza is a straightforward process that’s all about a few key steps. First, we’ll get our cauliflower ready – breaking it down and getting it nice and dry. Then, we’ll mix that with some cheese and an egg to create our crust base. After a quick pre-bake to make it firm, we’ll add our favorite toppings and bake it again until it’s bubbly and golden. The magic really happens in squeezing out that moisture from the cauliflower and getting a good pre-bake, which ensures a crispy, not soggy, crust. It’s a simple, rewarding process that yields a fantastic result every single time.
Ingredients
For the Cauliflower Crust:
1 medium head of cauliflower (about 2-3 cups of florets)
1 large egg, lightly beaten
1/2 cup shredded mozzarella cheese (plus extra for topping)
1/4 cup grated Parmesan cheese
1 teaspoon dried Italian seasoning
1/2 teaspoon garlic powder
1/4 teaspoon salt
Pinch of Black Pepper
For the Toppings:
1/2 cup pizza sauce or marinara sauce
1 cup shredded mozzarella cheese
Your favorite pizza toppings (pepperoni, mushrooms, onions, peppers, olives, etc.)
Step-by-Step Instructions
Step 1: Preheat & Prep Pan
Preheat your oven to 400°F (200°C). Line a baking sheet with parchment paper. This is crucial for preventing sticking and making cleanup a breeze. If you have a pizza stone, you can preheat that in the oven now and then carefully slide the parchment-lined pizza onto it later for an extra crispy bottom.
Step 2: Process Cauliflower
Wash and thoroughly dry your cauliflower. Cut it into florets, removing the thickest parts of the stalk. Place the florets into a food processor and pulse until the cauliflower is broken down into fine, rice-like pieces. You don’t want large chunks; aim for a consistency similar to couscous or rice. You should have about 2-3 cups of riced cauliflower.
Step 3: Cook and Drain Cauliflower
Transfer the riced cauliflower to a microwave-safe bowl. Cover and microwave on high for 4-5 minutes, or until tender. Alternatively, you can steam it on the stovetop for about 5-7 minutes. The key here is to cook it until it’s soft enough to mash easily. Once cooked, let it cool slightly for a few minutes. Then, transfer the cooked cauliflower to a clean kitchen towel or cheesecloth. This is the MOST important step for a crispy crust: Squeeze out as much liquid as humanly possible. Seriously, wring it out like you mean it! The drier your cauliflower, the crispier your crust will be.
Step 4: Mix Crust Ingredients
In a medium bowl, combine the thoroughly squeezed cauliflower, the beaten egg, 1/2 cup mozzarella cheese, Parmesan cheese, Italian seasoning, garlic powder, salt, and pepper. Mix everything together with your hands or a spoon until well combined and it starts to form a dough-like consistency. It will be a bit sticky, but it should hold together when you press it.
Step 5: Shape and Pre-Bake Crust
Transfer the cauliflower mixture to the parchment-lined baking sheet. Use your hands or the back of a spoon to spread it out into a round pizza shape, about 1/4 to 1/2 inch thick. Make sure the edges aren’t too thin, or they might burn before the center is done. Try to make the thickness as even as possible. Bake in the preheated oven for 15-20 minutes, or until the crust is golden brown and firm to the touch.
Step 6: Add Toppings
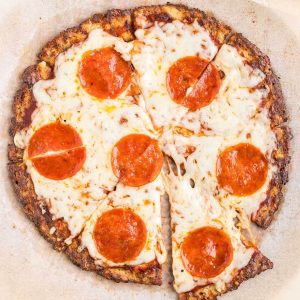
Once the crust is pre-baked and firm, carefully remove it from the oven. Spread your pizza sauce evenly over the crust, leaving a small border for the edge. Sprinkle with the remaining 1 cup of mozzarella cheese, and then add all your favorite toppings. Don’t overload it, or the crust might struggle to hold everything.
Step 7: Bake Again
Return the pizza to the oven and bake for another 10-15 minutes, or until the cheese is melted, bubbly, and lightly browned, and the toppings are cooked through. Keep an eye on it to make sure the edges don’t get too dark.
Step 8: Cool and Slice
Let the pizza cool on the baking sheet for about 5-10 minutes before slicing. This allows the crust to set up a bit more, making it easier to cut and serve. Use a sharp knife or a pizza cutter to slice it into wedges. Enjoy your delicious, homemade cauliflower crust pizza!
What to Serve It With
This cauliflower crust pizza is honestly a star on its own, but it also pairs beautifully with a few things to round out a meal or create a specific vibe. For breakfast, I love having a slice leftover cold (don’t judge!) with a strong cup of black coffee. It’s surprisingly satisfying and a great way to start the day without feeling heavy. If you’re going for brunch, this pizza can be a real crowd-pleaser. Imagine a beautifully presented pizza, perhaps with a more “brunchy” topping like scrambled eggs and spinach, served alongside a fresh green salad with a light vinaigrette and maybe some fresh fruit. For a sophisticated touch, a glass of sparkling cider or a mimosa wouldn’t go amiss. As a light yet satisfying dessert, you could even do a sweet version – think a drizzle of honey, some ricotta cheese, and a sprinkle of berries on a lightly sweetened crust. It’s elegant and unexpected. And for those cozy snacks or casual weeknight dinners, this pizza is perfect. Serve it up with a big bowl of steamed broccoli or a simple side salad. My family loves it with some oven-roasted sweet potato fries. It’s that comforting, familiar pizza experience, but with a healthy twist that makes everyone feel good.
Top Tips for Perfecting Your Cauliflower Crust Pizza
Over the years, I’ve learned a few tricks that make this cauliflower crust pizza recipe truly shine, and I’m excited to share them with you! First, when it comes to cauliflower prep, the most critical part is moisture removal. I can’t stress this enough: squeeze, squeeze, and squeeze some more. Use a fine-mesh sieve if you don’t have a cheesecloth or good kitchen towel – anything to get that water out. Grating the cauliflower into very fine pieces before cooking also helps it break down better and release more moisture. For mixing advice, resist the urge to overmix once you add the egg and cheese. You want everything just incorporated. Overworking it can make the crust gummy. The mixture should feel like a moist dough that you can press into shape. If it feels too wet, add a tablespoon more Parmesan; if it feels too dry and crumbly, you might need to add a tiny splash of water or a bit more cheese. When it comes to swirl customization, that’s more for other recipes, but for this pizza, focus on an even layer for the crust! Ensure it’s the same thickness throughout so it bakes evenly. For ingredient swaps, I’ve experimented quite a bit. You can try using Almond Flour or coconut flour in place of some of the Parmesan if you’re looking for dairy-free options, but you might need to adjust the egg ratio or add a bit more binder. Sometimes, adding a tablespoon of psyllium husk can help with structure if you’re going dairy-free and gluten-free. For the egg, a flax egg (1 tbsp flaxseed meal + 3 tbsp water, let sit for 5 mins) can work as a vegan substitute, but the crust might be a little softer. On the baking tips front, oven temperature can vary wildly. If your oven runs hot, you might need to reduce the temperature slightly or watch the crust more carefully. Placing the pizza on the middle rack usually ensures even cooking. If the edges are browning too quickly, you can loosely tent the edges with foil. For the glaze variations, well, this recipe doesn’t really have a glaze, but if you were making a dessert version, a simple icing made with powdered sugar and a bit of milk or lemon juice would be lovely. For savory, a drizzle of balsamic glaze after baking is always a winner!
Storing and Reheating Tips
One of the best things about this cauliflower crust pizza is that it leftovers are actually delicious, which isn’t always the case with healthier alternatives! For room temperature storage, I generally recommend eating it within 2 hours if you have toppings like meat or dairy on it. If it’s just plain with sauce and cheese, it can probably hang out for a bit longer, but it’s best enjoyed fresh. For refrigerator storage, once cooled completely, wrap individual slices tightly in plastic wrap or foil, or store them in an airtight container. It should keep well in the fridge for 2-3 days. The crust might soften a bit as it sits, but it’s still really tasty. If you want to get really fancy, you can even place a paper towel in the bottom of your container to absorb any excess moisture. When it comes to freezer instructions, this pizza freezes surprisingly well! Once baked and cooled, you can wrap individual slices tightly in plastic wrap, then in aluminum foil or place them in a freezer-safe bag. It’s best to freeze it without too many delicate toppings. It can be stored in the freezer for up to 1-2 months. To reheat from frozen, it’s best to place it directly on a baking sheet in a 350°F (175°C) oven for about 15-20 minutes, or until heated through and the crust is crispy again. For reheating from the fridge, I find the best method is to pop it back into a hot oven (around 375°F/190°C) for about 8-10 minutes, or until the cheese is melty and the crust is firm. You can also use a toaster oven or even a skillet on the stovetop for a crispy bottom. The key is to reheat it so it regains some of that original crispness.
Frequently Asked Questions
Final Thoughts
Honestly, I was skeptical at first, but this cauliflower crust pizza has completely won me over, and I have a feeling it will do the same for you. It’s that perfect blend of healthy and satisfying, proving you don’t have to sacrifice flavor for a lighter option. The crispy crust, the melty cheese, all your favorite toppings – it’s everything you love about pizza, but somehow even better because you can feel great about eating it. It’s become a staple in my home, especially when I want a comforting meal that’s also packed with veggies. If you’re looking for other delicious, healthier twists on your favorites, you might also want to check out my recipe for [Link to another healthy recipe, e.g., Zucchini Noodles with Pesto] or my [Link to another related recipe, e.g., Sheet Pan Lemon Herb Chicken and Veggies]. I truly hope you give this cauliflower crust pizza a try. I can’t wait to hear what you think and see how you customize it! Happy baking, and enjoy every delicious bite!
Cauliflower Crust Pizza
Ingredients
Crust Ingredients
- 1 head cauliflower small to medium sized, should make 2 cups once processed
- 0.5 teaspoon dried basil
- 0.25 teaspoon dried oregano
- 1 teaspoon garlic salt or 0.25 teaspoon salt and 0.25 teaspoon garlic powder
- 0.33 cup parmesan cheese shredded
- 0.33 cup mozzarella cheese shredded
- 1 large egg
Toppings
- pizza sauce
- toppings of your choice
Instructions
Preparation Steps
- Preheat oven to 450 degrees F.
- Line a baking sheet with parchment paper and spray with non-stick cooking spray, or use a silicone baking mat.
- Cut the cauliflower florets from the stem. Place florets in a food processor and pulse until they resemble rice. Be careful not to overprocess into a puree.1 head cauliflower
- Transfer the riced cauliflower to a microwave-safe bowl and microwave for about 4 minutes.
- Pour the microwaved cauliflower onto a kitchen towel or paper towels and wring out as much moisture as possible. The drier, the better.
- In a bowl, combine the dried cauliflower with basil, oregano, garlic salt, parmesan cheese, mozzarella cheese, and egg. Mix well.1 head cauliflower
- Using your hands, form the mixture into a ball, then place it on the prepared baking sheet and flatten it into a pizza shape. Aim for an even thickness.
- Bake for about 15 minutes, or until the edges are golden brown and the center is set. Flip the crust and bake for a few more minutes.
- Remove from oven and let cool for a few minutes.
- Spread with your favorite pizza sauce and add your desired toppings. Bake at 350 degrees F for 3-5 minutes, or until the cheese is melted and lightly browned.1 head cauliflower
- For an extra crispy crust, consider using a pizza stone.
Notes
Featured Comments
“Impressed! Clear steps and super easy results. Perfect for busy nights.”
“New favorite here — family favorite. crowd-pleaser was spot on.”
“Super easy and turned out amazing! My family asked for seconds. Saving this one.”
“This sweet treat was absolutely loved — the bright really stands out. Thanks!”
“Made it tonight and wow — so flavorful! Will definitely make Easy Cauliflower Crust Pizza Magic again.”
“Packed with flavor and so simple. Exactly what I wanted from Easy Cauliflower Crust Pizza Magic.”


