

There’s nothing quite like the first scoop of something frozen and sweet on a warm day. But what if I told you I’ve got a cool, no-fuss recipe that combines the creaminess of ice cream with the ease of a no-bake pie? Yep, it’s my favorite ice cream pie—my go-to when I want something impressive but don’t want to turn on the oven. I remember making this for the first time because I needed a quick dessert for a family gathering, and it disappeared in minutes! The best part? It’s so versatile—use any ice cream flavor you love, add fun toppings, and you’ve got a showstopper that everyone will ask for again and again. Trust me on this one, it’s the dessert my kids ask for whenever they’re craving something sweet, and it’s become a family tradition to whip up a batch whenever summer hits. It’s honestly a bit addictive, and I can’t wait to share the details so you can try it too!
What is Ice Cream Pie?
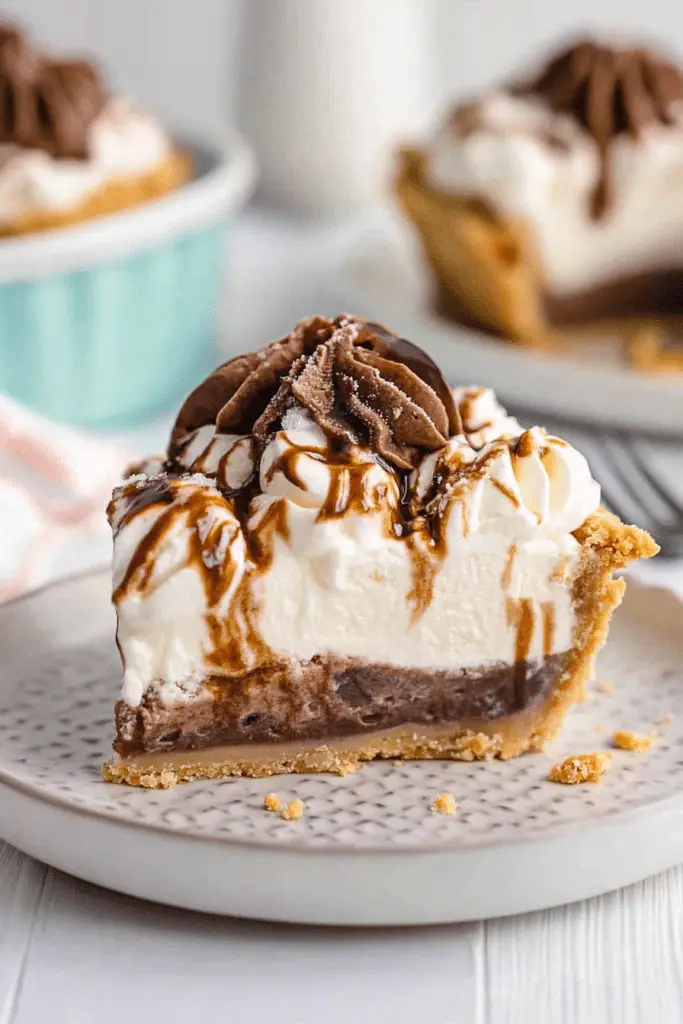
Think of an ice cream pie as a creamy, frozen dream wrapped in a crispy crust—kind of like the love child of a pie and your favorite ice cream sundae. Essentially, it’s a no-bake dessert that combines a crunchy crust, usually made from graham crackers or cookies, with a rich, scoopable ice cream filling. The name says it all: a pie made with ice cream! Its charm is in how simple it is to pull together—no baking required, just some quick prep and a freezer session. The idea likely stems from the classic icebox desserts of the past, but modernized with cooler flavors and creative toppings. Think of it as a frozen cheesecake, but way easier and way more fun for summer parties, family nights, or even impromptu gatherings. It’s so forgiving, too—whatever flavor ice cream or toppings you pick, it’s always a winner.
How do you make ice cream pie?
Quick Overview
This ice cream pie is all about simplicity. First, you prepare a crunchy crust using graham crackers or your favorite cookies, mixed with butter. Then, soften your ice cream (trust me, letting it sit at room temp for 5 minutes makes it way easier to spread), pour it into the crust, and smooth out the top. Freeze everything until it’s firm—that’s the hard part, but you can get it done in just a few hours or overnight if you’re planning ahead. Once frozen, you add your toppings—think whipped cream, sprinkles, fruit, or chocolate drizzle—and serve. It’s a no-bake masterpiece that’s surprisingly foolproof and perfect for just about any occasion. The creamy center with that irresistible crust make it a crowd-pleaser, and it’s a lifesaver on busy nights or when you want something homemade without the fuss.
Ingredients
For the Main Crust:
• 1 ½ cups graham cracker crumbs (or crushed cookies like Oreos or digestive biscuits)
• ½ cup melted unsalted butter (or coconut oil for dairy-free)
• 2 tablespoons sugar (optional, depending on your cookie choice)
For the Filling:
• 1 to 1 ½ quarts of your favorite ice cream (softened slightly for easy spreading)
• Variations: chocolate fudge ripple, strawberry swirl, or cookies ‘n’ cream for extra flavor
For the Glaze & Toppings:
• Whipped cream, sprinkles, chopped nuts, fresh berries, melted chocolate, caramel sauce—choose your favorites!
Step-by-Step Instructions
Step 1: Preheat & Prep Pan
No oven needed! Just grab a pie dish or a springform pan. Lightly grease it if you want, then set aside. Since we’re not baking, focus on making sure your crust ingredients are ready—crackers crushed into fine crumbs, melted butter at hand.
Step 2: Mix Dry Ingredients
Combine your graham cracker crumbs with sugar if using, then add the melted butter. Mix until everything resembles wet sand—a texture that sticks together when pinched. This helps form a firm, crunchy crust that will hold your ice cream beautifully.
Step 3: Mix Wet Ingredients
For this recipe, the “wet” is basically your melted butter. Make sure it’s cooled slightly so it doesn’t melt the ice cream when combined. If you’re feeling adventurous, a pinch of cinnamon or a dash of vanilla in the crust can add extra flavor.
Step 4: Combine
Press the crust mixture firmly into your pie dish, working evenly across the bottom and up the sides if desired. Use the back of a spoon or wet fingers to pack it tightly. Then, pop it in the freezer for about 10-15 minutes while you prepare the filling.
Step 5: Prepare Filling
Let the ice cream sit out for 5 minutes to soften just enough to spread easily. If it’s too hard, a quick stint in the microwave in 10-second bursts (be careful not to melt it!) does wonders. You can also mix in swirls or chopped candies at this stage for extra fun.
Step 6: Layer & Swirl
Spread the softened ice cream evenly over the crust. For a pretty marble effect, dollop spoonfuls of a different flavor or sauce and swirl gently with a toothpick or skewer. Keep it playful and relaxed—no one’s expecting Martha Stewart here!
Step 7: Bake? Nope! Freeze.
Instead of baking, this is the step where the magic happens—freeze for at least 4 hours, but overnight is better. The longer it freezes, the easier it is to cut perfect slices.
Step 8: Cool & Glaze
If you want to add a glaze, do it just before serving. Whipped cream, drizzle of warm fudge, or fruit preserves make fantastic toppings. For a smooth finish, thaw the pie slightly at room temp for 5-10 minutes before slicing.
Step 9: Slice & Serve
Use a sharp knife dipped in hot water for clean cuts. Serve straight from the fridge or freezer—either way, it’s irresistibly creamy and cool. Presentation tips: add extra toppings on each slice for that café-quality look.
What to Serve It With
This pie is delightful on its own, but for extra special occasions, I love pairing it with fresh berries, a sprig of mint, or a drizzle of caramel or chocolate sauce. My family often requests it as a summer treat after grilled dinners or as a chilly finale at birthday parties. During brunch, a small sliver with some coffee is heavenly—think of it like a modern ice cream sundae. You can also serve it as a casual weekend snack—just cut thick slices, add whipped cream, and sprinkle on some crushed nuts or colorful sprinkles for the kids. My kids actually ask for this all the time, and I’ve made it with everything from mint ice cream to vegan vanilla—trust me, the core technique stays the same, just swap out flavors. It’s one of those recipes that’s forgiving and always looks like you put in a lot of effort, even if it’s super simple.
Top Tips for Perfecting Your Ice Cream Pie
Over the years, I’ve picked up a few tricks that help make this perfect every time. First, when crushing the cookies, aim for fine crumbs; big chunks won’t hold the crust together as well. I learned the hard way that a super moist crust can turn soggy if the ice cream is too melty, so don’t skip the chilling step. To keep the swirl design pretty, work gently—going clockwise or counterclockwise helps your pattern stay clear. If you want to change flavor profiles, you can add chopped candies, toasted nuts, or even a splash of espresso in the crust for a mocha twist. When baking (not needed here, but for other crust types), oven temperature and timing are everything—too hot, and it burns, too cold, and it doesn’t crisp up. For toppings, warm sauces spread smoothly, but chilled fruit adds a nice contrast. I tested swapping out half the sugar with honey, and it added a lovely floral note—just go easy because it can make the crust softer. My biggest lesson? Patience is key—freezing overnight makes all the difference in slicing perfectly. And when in doubt, add a little more chocolate drizzle or whipped cream—that’s always a good call!
Storing and Reheating Tips
This ice cream pie is best enjoyed quite fresh, but here’s how to keep it in top shape. If you have leftovers, cover it tightly with plastic wrap or pop it into an airtight container. In the fridge, it’s good for up to 2 days—but honestly, it’s best eaten within 24 hours to keep the texture super creamy. If you want to store it longer, wrap it well in plastic and foil, and freeze for up to a month. Thaw it in the refrigerator for a few hours or at room temp for about 10-15 minutes before slicing—trust me, it makes a huge difference in the texture. As for reheating, it’s better to just enjoy it cold; microwaving or leaving it out too long can turn the ice cream into a soupy mess. If you’re craving a warm topper, do that just before serving: melt some chocolate or heat a bit of caramel to drizzle, then add immediately. When it’s time to serve again, just re-cut with a hot knife—the cuts will be cleaner, and you’ll impress everyone with that perfect wedge.
Frequently Asked Questions
Final Thoughts
This ice cream pie has become a kitchen staple for me because it’s so approachable and yet endlessly customizable. Whether I’m making it for a simple weeknight treat or a summer party, it always feels special. I love how it combines the creamy chill of ice cream with a crispy, buttery crust—every bite is a little bit of joy. And truthfully, I’ve learned to keep a few tubs of my favorite ice cream in the freezer just in case because this dessert can come together in literally minutes. Plus, the smiles it brings are contagious—I’ve never seen anyone turn down a slice! If you’re looking for a dessert that’s easy to make, delicious, and always a hit, give this ice cream pie a try. I’d love to hear how yours turns out—drop a comment or share your favorite flavor combos below! Happy baking, or rather, happy freezing!
ice cream pie
Ingredients
Main Ingredients
- 3 tablespoons honey
- 3 tablespoons salted butter melted
- 8 cones waffle cones broken into small pieces
- 1 cup sliced almonds
- 2 cups vanilla ice cream
- 0.25 cup chocolate syrup
- 2 cups chocolate ice cream
- 3 tablespoons chocolate syrup or caramel for topping
- whipped cream
Instructions
Preparation Steps
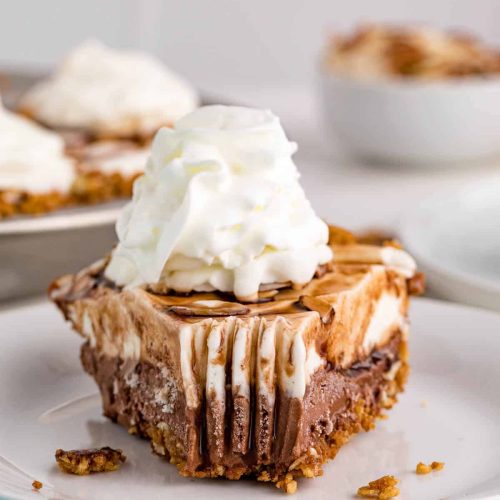
- In a bowl, combine honey, melted butter, broken waffle cones, and sliced almonds. Mix well.
- Press the mixture firmly into the bottom and sides of a 9-inch pie plate. Freeze for 30 minutes until firm.
- Spread softened chocolate ice cream evenly over the crust and drizzle with chocolate syrup. Freeze for 30 minutes.
- Layer softened vanilla ice cream over the chocolate layer, then cover and freeze for at least 4 hours or until firm.
- Before serving, drizzle with additional chocolate or caramel syrup. Top with whipped cream and remaining almonds.
Notes
Featured Comments
“Impressed! Clear steps and family favorite results. Perfect for busy nights.”
“New favorite here — perfect for busy nights. crowd-pleaser was spot on.”
“Super easy and turned out amazing! My family asked for seconds. Saving this one.”
“This sweet treat was absolutely loved — the fresh really stands out. Thanks!”
“Made it tonight and wow — turned out amazing! Will definitely make Easy Frozen Dessert Pie Recipe again.”
“Packed with flavor and so simple. Exactly what I wanted from Easy Frozen Dessert Pie Recipe.”


