

There’s something about a great ice cream pie that takes me way back — maybe to summer days spent at my grandma’s house or those late-night movie snacks with friends. Honestly, it’s like a cold, creamy hug wrapped in a buttery, crunchy crust. My kids ask for this all the time, especially when we have guests over or I want to whip up something impressive without spending hours fussing in the kitchen. And, trust me, this one’s a lifesaver on busy nights when craving something sweet hits and I don’t want to turn on the oven. It’s so simple to make, you’ll wonder why you didn’t think of it sooner. Plus, you can customize it endlessly with different ice cream flavors and toppings. Once I perfected this recipe, it disappeared in minutes at my house — poor kids get so sad when it’s gone! If you love indulgent, no-bake desserts that taste as good as they look, you’re going to fall in love with this ice cream pie.
What is Ice Cream Pie?
Think of ice cream pie as a sweet, chilly dessert where silky ice cream is nestled inside a crispy crust — kind of like a frozen cheesecake or a fancy layered bar, but way easier. It’s essentially a pie that doesn’t require baking or complicated ingredients; instead, you just assemble and freeze. The “pie” can be a classic combo of chocolate and vanilla, or switch it up with strawberry, cookies and cream, or even caramel swirls. The name’s simple because it really is just ice cream turned into a pie shape, but it feels fancy enough to serve at a special occasion, or, honestly, for a random Tuesday when you need a pick-me-up. The best part? You just need a few ingredients you probably already have in your freezer and pantry. The texture contrast — crunchy crust, gooey filling, and an icy burst — keeps everyone coming back for seconds.
How do you make ice cream pie?
Quick Overview
This ice cream pie recipe comes together in a flash. You start with a simple crust—crushed cookies mixed with butter—pressed into a pie dish. Then, soften your favorite ice cream, spread it over the crust, swirl in some sauces or add-ins, freeze until firm, and finish with your preferred toppings or glaze. It’s the perfect no-bake dessert that’s ready in just a few hours, making it great for last-minute entertaining or nights when you want a cool treat without the oven heat. The key is to use softened ice cream so you can spread it smoothly and get those pretty swirls or layers. And don’t forget to give it enough time in the freezer — patience is your friend here for that perfect scoopable texture.
Ingredients
For the Main Crust:
– 2 cups of graham cracker crumbs or crushed cookies (Oreos, digestive biscuits, or vanilla wafers work great)
– 1/2 cup unsalted butter, melted (or melted coconut oil for dairy-free)
– Optional: 2 tablespoons sugar if using plain crackers or cookies that aren’t sweet enough
For the Filling:
– 1 to 1.5 quarts of your favorite ice cream (vanilla, chocolate, strawberry, or a seasonal flavor)
– Optional mix-ins: chocolate chips, crushed nuts, or caramel swirls
– Optional: a splash of milk or cream if you want it more scoopable
For the Glaze or Topping:
– Chocolate ganache, caramel sauce, berry compote, or whipped cream
– Sprinkles, chopped nuts, or cookie crumbs for garnish
Step-by-Step Instructions
Step 1: Preheat & Prep Pan
No oven needed here! Just grab a 9-inch pie dish and line it with parchment paper for easy removal. If you’re feeling fancy, a simple spray of non-stick spray helps. Chill the dish to keep everything cold and ready for assembly. This process ensures your crust sticks perfectly and your toppings stay beautifully in place.
Step 2: Mix Dry Ingredients
Start by crushing your cookies really fine — I always do this in a zip-top bag with a rolling pin; it’s satisfying and mess-free. Mix the crumbs with the melted butter until the texture is crumbly but holds together when pressed. This step’s important because it helps the crust set nicely. Press the mixture firmly into your pie dish, working it evenly up the sides and across the bottom. Pop it in the fridge while you prep the ice cream.
Step 3: Mix Wet Ingredients
Not much here — just soften your ice cream at room temperature or microwave it for about 20 seconds to make it spreadable. I like to soften just enough so it’s still cold but easy to work with. If you’re adding chocolate syrup or fruit preserves, swirl them into the softened ice cream now for a marbled effect. Trust me, this adds so much flavor and visual appeal!
Step 4: Combine
Spread the softened ice cream over your crust, smoothing it with the back of a spoon or an offset spatula. If you want swirls or layers, you can add dollops of sauce or mix-ins now and swirl gently with a toothpick or skewer. Don’t overmix—just a gentle swirl creates that beautiful marbled look that makes the pie look store-bought but so much more special.
Step 5: Prepare Filling
If you’re adding a layer of fruit sauce or extra toppings, spread or sprinkle it on top of the ice cream now. Think strawberries, chocolate chips, or crushed cookies. This layer not only adds flavor but also texture. Cover with plastic wrap and pop into the freezer for at least 4 hours or overnight. I usually make mine the night before, so it’s perfectly firm come dessert time.
Step 6: Layer & Swirl
This is where the fun happens! If you’re doing multiple flavors or want a layered look, add each layer carefully, spreading evenly. For swirls, drizzle syrup or swirl peanut butter with a toothpick through the frozen ice cream for a beautiful marbled effect. The visual really makes this dessert special — almost like art!
Step 7: Bake
No baking needed here — just freeze until solid. Once fully frozen, usually after 4-6 hours, it’s ready for the final touches. If you’re in a hurry, you can also freeze it for a shorter time, but patience = better consistency.
Step 8: Cool & Glaze
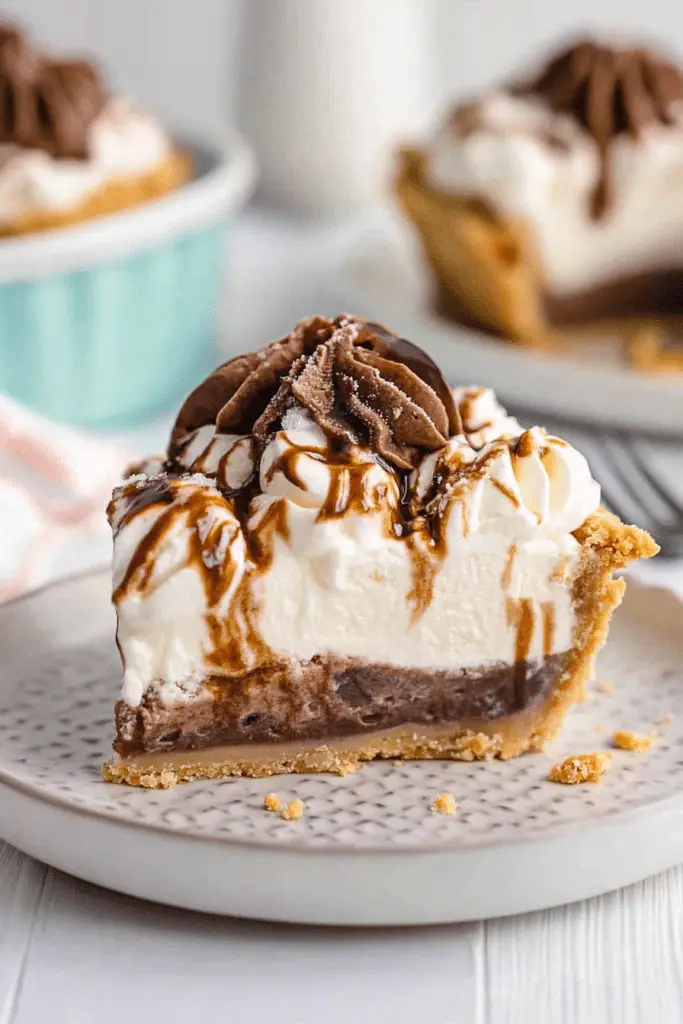
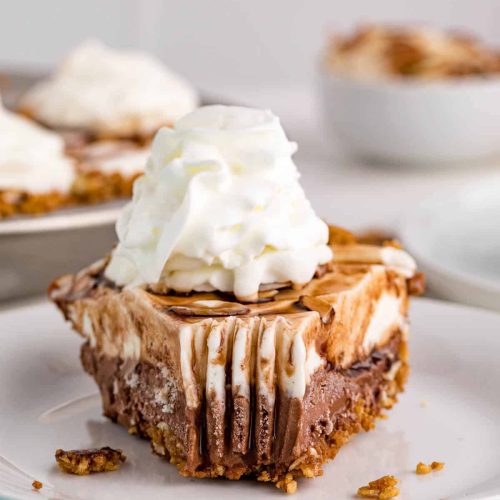
Just before serving, you can add a glossy chocolate glaze or a drizzle of caramel. Warm the sauce slightly for an even pour, then spread or drizzle over the top. For a lighter touch, whipped cream and sprinkles are perfect. Let the glaze set for 10-15 minutes before slicing.
Step 9: Slice & Serve
Use a sharp knife dipped in hot water for clean cuts, and serve this icy treat immediately. For beautiful slices, wipe the knife between cuts. Pair it with a dollop of whipped cream, a fresh berry, or a dusting of cocoa powder — whatever makes your heart happy. I love serving mine with a cup of strong coffee or a glass of milk — it’s the perfect finish!
What to Serve It With
This ice cream pie is so versatile, I’ve definitely served it differently depending on the occasion. For a casual family dinner, I love slicing it and letting everyone just dig in — no fuss. When I want to make it fancier for friends, I top it with whipped cream, chocolate shavings, and a sprig of mint for that restaurant-style presentation. For brunch, I’ve added fresh berries and a balsamic drizzle — unexpectedly delicious! This pie is perfect when you’re craving something cold and sweet after a spicy or savory meal, or even as a fun picnic dessert in the summer. It’s also my go-to for family birthday parties because everyone loves how much it reminds us of childhood but with a fancy, homemade touch. Plus, it keeps in the freezer like a little treasure chest of cold, creamy goodness. Trust me, this will be a new staple in your dessert rotation.
Top Tips for Perfecting Your Ice Cream Pie
Making this pie perfect each time is all about small details. First, when crushing your cookies, avoid overworking them — a coarse crumb works just as well as fine, and sometimes a little texture makes it more interesting. For the crust, I’ve tested with almond extract or cinnamon mixed into the butter, and it adds an extra layer of flavor. If your ice cream feels a little soft after softening, just pop it back in the freezer for 10-minute increments, and it’ll firm right up. When swirling sauces or add-ins, use a skewer or toothpick to create beautiful marbled patterns. My secret? Don’t rush the freezing process — a solid 4-6 hours, or overnight, really makes a difference in slicing cleanly. Want to make it dairy-free? Coconut milk ice cream works beautifully — it’s richer and less icy. For a richer finish, gently toast some nuts before crushing them into the crust or as a topping. I’ve learned that patience is key because if you try to cut into it too soon, it’ll melt or crack. Oh, and a quick tip — warming your knife in hot water and wiping it dry between slices gives perfect, smooth cuts every time. The little extra effort is so worth it for those gorgeous, clean slices!
Storing and Reheating Tips
This dessert holds up beautifully in the freezer, so you can make it ahead of time with no trouble. Keep it covered tightly with plastic wrap or a snug lid, and it will stay fresh for up to two months. If you plan to store leftovers, it’s best to do so in an airtight container or wrapped tightly to prevent freezer burn. When you’re ready to serve, just pop it into the fridge for a few minutes to soften slightly — this makes slicing much easier and ensures creamy consistency on each piece. If you’re reheating individual slices, I’ve found that a quick 10-second zap in the microwave helps melt the edges just enough that it’s as delicious as freshly made. Just be careful not to overheat — melting ice cream isn’t exactly a good look! For best presentation, serve immediately after slicing, topped with fresh garnishes or extra glaze. This pie is a make-ahead hero, especially because it actually tastes better after a night in the freezer — the flavors have a moment to meld, and the texture firms up perfectly.
Frequently Asked Questions
Final Thoughts
There you have it — a crowd-pleasing, incredibly easy ice cream pie that’s perfect for just about any occasion. Whether you’re celebrating a birthday, looking for a quick summer treat, or just need a dessert that impresses but doesn’t stress, this recipe has you covered. Over the years, I’ve made countless variations of this pie, experimenting with flavors and toppings, and let me tell you — it always delivers. The best part? It’s almost impossible to mess up. A little patience and a good quality ice cream are all you really need. I encourage you to give it your own spin — add your favorite candies, fruits, or sauces, and make it uniquely yours. Happy baking (or should I say, no-baking) and I can’t wait to hear how yours turns out! Drop a comment below or share your twists — I love hearing your ideas.
ice cream pie
Ingredients
Main Ingredients
- 3 tbsp honey
- 3 tbsp salted butter melted
- 8 pieces waffle cones broken into small pieces
- 1 cup sliced almonds
- 2 cups vanilla ice cream
- 0.25 cup chocolate syrup
- 2 cups chocolate ice cream
- 3 tbsp chocolate syrup or caramel syrup for topping
- whipped cream
Instructions
Preparation Steps
- In a bowl, combine honey, melted salted butter, broken waffle cones, and sliced almonds. Mix well.
- Firmly press the mixture into the bottom and along the sides of a 9-inch pie plate. Freeze for 30 minutes until firm.
- Layer softened chocolate ice cream evenly into the crust and spread with chocolate syrup. Freeze for 30 minutes until firm.
- Spread softened vanilla ice cream over the chocolate layer. Cover and freeze for 4 hours or until firm.
- Before serving, drizzle with additional toppings of choice. Top with dollops of whipped cream and remaining almonds.
Notes
Featured Comments
“Impressed! Clear steps and turned out amazing results. Perfect for busy nights.”
“New favorite here — family favorite. crowd-pleaser was spot on.”
“Super easy and turned out amazing! My family asked for seconds. Saving this one.”
“This sweet treat was absolutely loved — the silky really stands out. Thanks!”
“Made it tonight and wow — absolutely loved! Will definitely make Easy Frozen Dessert Pie Recipe again.”
“Packed with flavor and so simple. Exactly what I wanted from Easy Frozen Dessert Pie Recipe.”


