

Oh, these no bake cookies! They bring back so many memories. I swear, as soon as that familiar, sweet, chocolatey scent starts wafting from the stovetop, my kids come running from every corner of the house, eyes wide with anticipation. This recipe is a total lifesaver on those sweltering summer days when the last thing I want to do is turn on the oven, or on those ridiculously busy weeknights when a sweet craving hits hard and fast. Honestly, sometimes I whip up a batch just because. They’re so incredibly simple, you’ll wonder why you haven’t been making them forever. Forget those complicated Chocolate Chip Cookie recipes that require chilling and precise measurements; these no bake cookies are your happy place, your go-to, your secret weapon for instant gratification. They taste like pure, unadulterated joy, and the fact that they don’t even need an oven is just the cherry on top!
What is no bake cookie?
So, what exactly are these magical little treats we call no bake cookies? Think of them as little bites of pure bliss that skip the oven entirely. They’re essentially a stovetop concoction, cooked just long enough to melt everything together and reach the perfect consistency, then dropped by spoonfuls onto wax paper to set into fudgy, chewy delights. The magic happens as they cool; the sugar syrup crystallizes just enough to give them that signature chewy texture, while the chocolate and peanut butter create a rich, decadent flavor that’s just irresistible. They’re the ultimate comfort food, a nostalgic hug in cookie form. It’s like a Chocolate Peanut Butter candy bar had a baby with a cookie, and that baby was just ridiculously easy to make!
How do I make no bake cookies?
Quick Overview
The process for these no bake cookies is refreshingly straightforward. We’ll combine a few key ingredients in a saucepan, bring them to a boil for a short, precise time, then remove them from the heat and stir in the finishing touches before dropping them onto parchment or wax paper to set. The key is the timing of the boil – it’s what determines the final texture, making them perfectly chewy and not too hard or too soft. It’s a quick dance on the stovetop, leading to a delightful reward that doesn’t require a single moment in the oven!
Ingredients
For the Main Batter:
You’ll need 2 cups of granulated sugar – this is crucial for that chewy texture, so don’t try to cut it too much! Make sure it’s regular white sugar. Then, we’ve got ½ cup of unsalted butter, which adds richness and helps everything bind together. And for that unmistakable flavor, 2 tablespoons of unsweetened cocoa powder. I always opt for a good quality cocoa; it really makes a difference in the depth of flavor. You’ll also need ½ cup of milk – whole milk gives the best richness, but I’ve had good results with 2% too. Just avoid skim if you can. A little splash of Vanilla Extract, about 1 teaspoon, really rounds out the flavors.
For the Filling/Flavor Boost:
This is where the magic really happens! We need 3 tablespoons of creamy peanut butter. I prefer creamy because it blends in seamlessly, but crunchy works too if you like little nutty surprises. It adds that essential peanut butter flavor that pairs so perfectly with chocolate. Make sure it’s smooth and stir-able.
For Setting:
And finally, to soak up all that glorious mixture and create the cookies, we need 3 cups of quick-cooking oats. These are important; old-fashioned oats can make the cookies a bit too chewy and uneven. Quick oats absorb the liquid beautifully and give you that classic no bake cookie texture. Some people use rolled oats and have success, but I always stick with quick for guaranteed results.
Step-by-Step Instructions
Step 1: Preheat & Prep Pan
Before you even start thinking about mixing, grab a sheet of wax paper or parchment paper and line a baking sheet or your countertop with it. You want a nice, clean, non-stick surface ready to go. This is super important because once the mixture is ready, you need to work relatively quickly to get them dropped before they start to set too much in the pot. I usually just lay out a big sheet on my counter, but a baking sheet makes it easy to transfer them to the fridge later if you’re in a hurry.
Step 2: Mix Dry Ingredients
In a medium-sized saucepan (make sure it’s not too small, you’ll be stirring a lot!), combine the granulated sugar, cocoa powder, and milk. Give it a good whisk or stir with a wooden spoon to make sure the cocoa powder is fully incorporated and there are no dry lumps. This initial mix ensures that when we heat it up, everything melts together smoothly.
Step 3: Mix Wet Ingredients
Now, add the butter to the saucepan with the sugar, cocoa, and milk mixture. We haven’t actually added the wet ingredients *separately* in this recipe; they all come together in the pot from the get-go. The butter will melt as we heat everything up. Just get it all in there!
Step 4: Combine
This step is actually part of Step 3, as we’re combining everything into the saucepan. Once the butter has melted and everything is in the pot, place it over medium heat. Keep stirring constantly. You’ll see the butter melt and the sugar start to dissolve. It’s important to keep stirring to prevent scorching on the bottom. We want everything to become a smooth, glossy liquid.
Step 5: Prepare Filling
As the mixture in the saucepan is heating up, get your peanut butter and oats ready. Measure out your creamy peanut butter into a small bowl. Have your quick-cooking oats measured out right beside it. This prep work is key for the next few steps because things move fast once the mixture boils.
Step 6: Layer & Swirl
This is where the magic happens! Once the mixture in the saucepan reaches a rolling boil (that means it’s bubbling vigorously all over), let it boil for *exactly* 1 minute. This is the critical timing that determines the texture. After exactly one minute, remove the saucepan from the heat. Immediately stir in the peanut butter and vanilla extract until it’s completely melted and incorporated. Then, quickly stir in the quick-cooking oats until they are all coated. The mixture will start to thicken as it cools slightly. Work fast!
Step 7: Bake
Since these are no bake cookies, we don’t bake them! After you’ve stirred in the oats and everything is well combined, quickly drop spoonfuls of the mixture onto your prepared wax paper or parchment paper. I usually use a tablespoon or a small cookie scoop for uniform size. They’ll look a little messy at first, but they’ll firm up as they cool.
Step 8: Cool & Glaze
Let the cookies sit on the wax paper at room temperature for about 30-60 minutes, or until they are firm to the touch. If you’re impatient like me, you can pop them into the refrigerator for about 15-20 minutes to speed up the setting process. There’s no glaze involved in this recipe; the rich chocolate and peanut butter mixture *is* the delicious coating!
Step 9: Slice & Serve
Once they’re firm, gently peel them off the wax paper. They’re best served at room temperature for that perfect chewy consistency, but I’ve also enjoyed them slightly chilled on a hot day. Stack them up on a plate and watch them disappear!
What to Serve It With
These no bake cookies are pretty much a standalone star, but they do pair wonderfully with a few things, depending on the occasion! For a cozy breakfast treat (yes, I consider these a breakfast item sometimes!), a hot cup of coffee or a steaming mug of tea is perfect. Their richness cuts through the bitterness of coffee beautifully. For brunch, I love to serve them alongside fresh fruit salad. The bright, fresh flavors of the fruit are a lovely contrast to the deep, sweet cookie. They also look quite charming nestled on a platter with mini muffins or scones. As a dessert, they’re fantastic after a hearty meal. They’re a less formal, but equally satisfying, alternative to cake or pie. I often serve them with a small scoop of vanilla ice cream or a dollop of whipped cream. And for those late-night snack attacks? Honestly, just a glass of cold milk is perfection. It’s the classic pairing for a reason, and it never fails to hit the spot. My kids also love to eat them straight from the fridge on a warm afternoon. They’re just so adaptable!
Top Tips for Perfecting Your No Bake Cookies
Over the years, I’ve learned a few little tricks that make these no bake cookies absolutely sing. First, and this is probably the most important tip: accurate measurement of ingredients is key, especially the sugar and oats. Too much sugar and they can become hard; too few oats and they’ll be too soft and gooey. Second, don’t over-boil the mixture. That one minute of boiling is crucial for achieving the right chewy texture. If you boil it for too long, they’ll become hard and brittle. If you don’t boil it long enough, they’ll be too soft and won’t set properly. Trust me, I’ve had my share of rock-hard and overly gooey batches until I perfected the timing!
When it comes to mixing the oats, stir them in quickly and thoroughly right after you take the pot off the heat. You want every single oat to be coated in that delicious chocolatey mixture. If you let the mixture sit too long before adding the oats, it will start to set in the pot, and you’ll end up with clumps instead of smooth cookies. For swirl customization, well, this recipe doesn’t really have swirls since it’s mixed all together. However, if you wanted to add extra chocolate chips, stir them in right at the very end, after the oats, just as the mixture starts to cool. They won’t melt completely but will be soft and delicious.
Regarding ingredient swaps, while this recipe is fantastic as is, I’ve experimented a bit. If you’re not a peanut butter fan, almond butter or even sunflower seed butter works, though it will change the flavor profile. For the milk, I’ve tried almond milk and oat milk, and while they work, the cookies might be slightly softer, so a tiny bit less milk might be needed if you go dairy-free. The quick-cooking oats are really where you get the classic texture; rolled oats can make them a bit chewier and less uniform, so I recommend sticking with quick oats if you can. For baking tips, since we aren’t actually baking, the best advice is about the cooling. Give them enough time to set completely. If you’re in a rush, the refrigerator is your best friend. And for that perfect, smooth finish, make sure your wax paper or parchment paper is laid out flat and wrinkle-free!
Storing and Reheating Tips
Storing these delightful no bake cookies is quite simple, and they tend to stay fresh for a good few days if kept properly. At room temperature, they are best enjoyed within 2-3 days. Just keep them in an airtight container. I usually find they are perfect at room temperature for that ideal chewy texture. If your house is particularly warm, they might get a bit soft, so you could pop them in the fridge briefly if needed, but I try to avoid storing them in the fridge long-term if I want that classic chewiness.
For refrigerator storage, they’ll keep well for up to a week. Pop them into an airtight container, and they’ll maintain their firmness. However, be aware that refrigeration can sometimes make them a bit harder or chewier than they are at room temperature, so if you plan to eat them straight from the fridge, that’s your best bet. If they do get too hard, just let them sit on the counter for about 15-20 minutes before serving. For freezer instructions, these cookies freeze surprisingly well! I like to wrap individual cookies or small stacks tightly in plastic wrap, then place them in a freezer-safe bag or container. They can be stored in the freezer for up to 2-3 months. To thaw, simply remove them from the freezer and let them come to room temperature on a plate for a few hours. The texture is usually excellent after thawing.
Regarding glaze timing advice, since this recipe doesn’t have a separate glaze, the advice is more about when to add optional toppings. If you’re adding chocolate chips or nuts to the mixture, do it after the oats. If you want to drizzle with melted chocolate or add sprinkles *after* they’ve set, that’s best done once the cookies are firm and cool, just before serving or storing.
Frequently Asked Questions
Final Thoughts
So there you have it – the recipe for my absolute favorite no bake cookies! I really hope you give them a try. They’re more than just a sweet treat; they’re a little bit of magic that brings a smile to everyone’s face, requires zero oven time, and is ridiculously easy to whip up. Whether you’re looking for a quick dessert, a lunchbox surprise, or just a comforting snack to see you through the day, these no bake cookies are a winner. They remind me of simpler times, and every bite feels like a warm hug. If you love these, you might also enjoy my classic chocolate chip cookies or my chewy oatmeal raisin cookies – they’re other family favorites! I can’t wait to hear how yours turn out, so please leave a comment below and let me know your thoughts, or share any fun variations you tried. Happy cookie making!
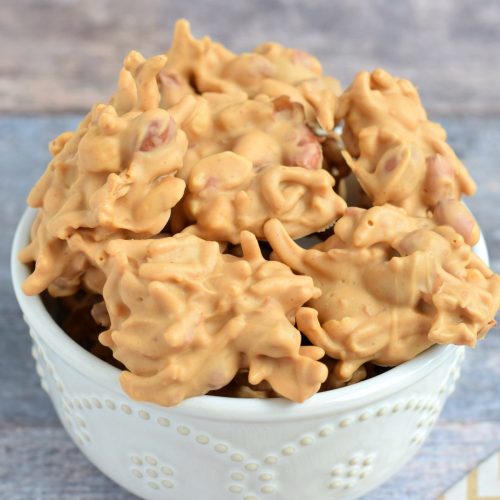
No Bake Haystack Cookies
Ingredients
Main Ingredients
- 11 ounces Butterscotch Chips
- 10 ounces Peanut Butter Chips
- 11 ounces White Chocolate Chips
- 12 ounces Spanish Peanuts The red-skinned peanuts
- 12 ounces Chow Mein Noodles
Instructions
Preparation Steps
- Line counter with parchment paper or wax paper.
- In a large saucepan, combine butterscotch morsels, peanut butter morsels, and white chocolate morsels. Heat on low, stirring constantly until smooth. Remove from heat and fold in peanuts and chow mein noodles. Stir until combined. Using a small cookie scoop (or two teaspoons), drop mixture onto parchment paper in small clumps.
- Allow to set, about 15-30 minutes. Store in airtight container. I prefer to keep mine in the refrigerator. I love eating these chilled, it brings out the butterscotch flavor!
Notes
Featured Comments
“These cookies always hit the spot—so simple and so comforting! I love how the smell alone brings everyone to the kitchen.”
“Impressed! Clear steps and so flavorful results. Perfect for busy nights.”
“New favorite here — super easy. crowd-pleaser was spot on.”
“Super easy and turned out amazing! My family asked for seconds. Saving this one.”
“This sweet treat was absolutely loved — the zingy really stands out. Thanks!”
“Made it tonight and wow — crowd-pleaser! Will definitely make Easy No Bake Cookies A Sweet Treat again.”


These cookies always hit the spot—so simple and so comforting! I love how the smell alone brings everyone to the kitchen.