


The Absolute Best Pumpkin Dump Cake
There is something absolutely magical about that first real chilly morning of the year. You know the one—where you finally have to grab a sweater before heading out the door, and suddenly, all you can think about is baking. For me, that exact moment means it is officially time to make my absolute favorite fall treat: a ridiculously easy Pumpkin Dump Cake. I’ve been making this for our annual Halloween party for years, and let me tell you, it is always the first dessert to completely disappear. People literally chase me down for the recipe, and they’re always shocked when I tell them how simple it is.
It gives you all those cozy, warm, comforting flavors of a classic pumpkin pie, but with a buttery, crunchy, toffee-pecan cake topping that is just out of this world. Best of all? You don’t need to dirty a million bowls to pull it off. If you have a box of spice cake mix, some pumpkin puree, and a few pantry staples, you’re already halfway to dessert heaven. Grab your favorite baking dish, and let’s get right into it!

What Is Pumpkin Dump Cake?
If you have never experienced the sheer joy of a dump cake, you are in for a serious treat. The name might sound a little funny, but the concept is pure baking genius. A dump cake is exactly what it sounds like—a dessert where you literally just “dump” your ingredients into a single baking pan and let the oven do all the heavy lifting. No complicated techniques, no stand mixers, and definitely no mountain of dirty dishes waiting for you in the sink.
For this Pumpkin Dump Cake, we’re creating a dreamy, velvety bottom layer that tastes exactly like the filling of a traditional homemade pumpkin pie. Then, instead of fussing with a finicky pie crust, we sprinkle a dry cake mix right over the top, followed by a generous pour of melted butter. As it bakes, that dry mix and butter magically transform into a golden, crumbly, cobbler-like topping. Add in some crunchy pecans and sweet toffee bits, and you get this incredible contrast of textures. It’s basically a pumpkin pie and a buttery coffee cake mashed into one glorious dessert.
How to Make Pumpkin Dump Cake
Quick Overview
Making this Pumpkin Dump Cake is incredibly straightforward. You’re essentially just making a quick pumpkin pie filling, pouring it into a dish, and layering your toppings. You don’t need to pre-bake any crusts or worry about a water bath. The whole process takes about an hour from start to finish, and most of that is just hands-off baking time while your house fills with the most amazing cinnamon and spice aromas. Just remember the golden rule of dump cakes: whatever you do, do not stir the cake mix into the pumpkin layer! You want those distinct layers so you get that perfect pie-like bottom and crunchy cake top.
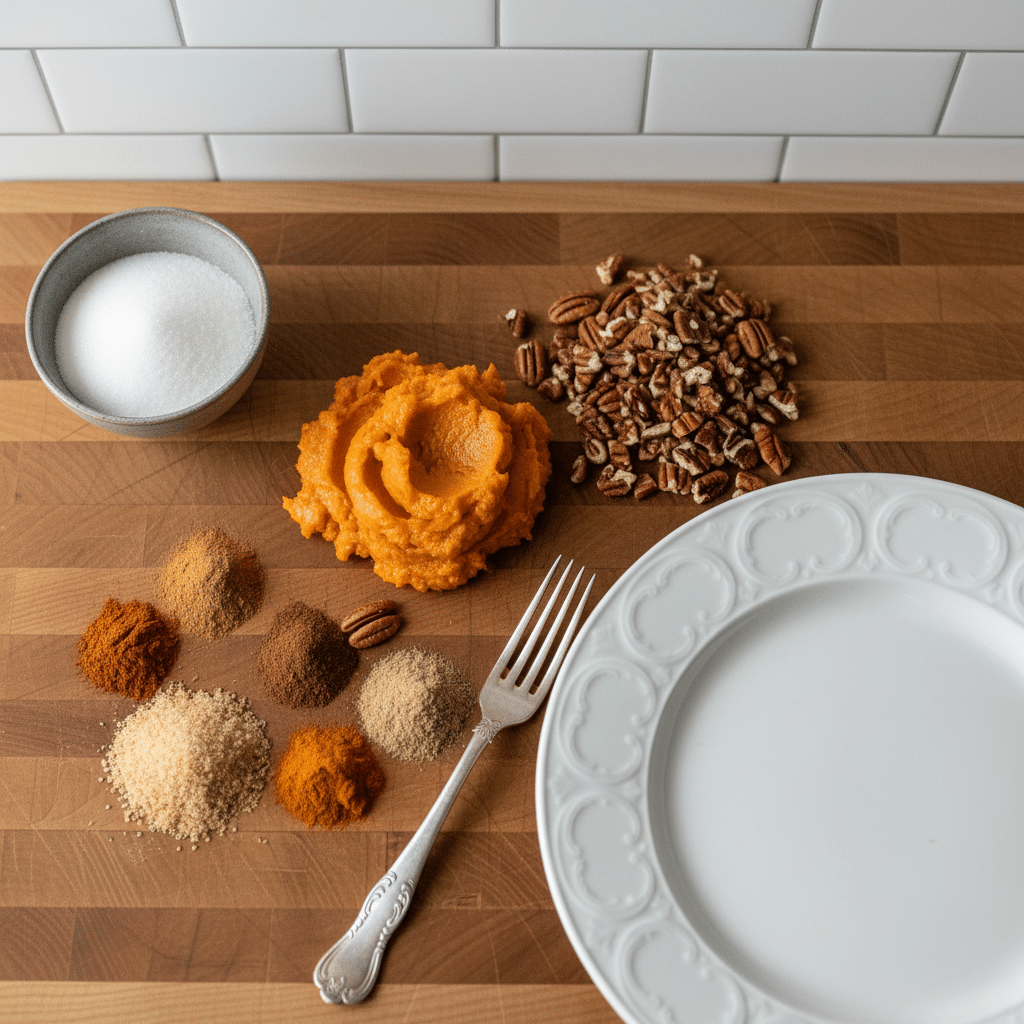
Ingredients
Here is everything you need to grab from the pantry and fridge to make this magic happen:
- Pumpkin Puree: One large 29-ounce can. Make sure it’s 100% pure pumpkin, not pumpkin pie filling!
- Evaporated Milk: One 12-ounce can to make the base rich and creamy.
- Light Brown Sugar: 1 cup, packed, for that deep, molasses-like sweetness.
- Eggs: 4 large eggs to bind the pumpkin layer together.
- Pumpkin Pie Spice: 2 teaspoons to bring all those cozy fall flavors.
- Cake Mix: One 13.25-ounce box of spice cake mix.
- Butter: 1 cup (2 sticks) of melted butter to create the crisp topping.
- Pecans: 1 cup of chopped pecans for crunch.
- Toffee Bits: 1 cup to add a sweet, buttery bite to the crust.
Step-by-Step Instructions
Start by preheating your oven to 350°F. Grab a 9×13 inch baking pan and give it a good spray with non-stick cooking spray so nothing sticks to the edges. Set it aside while you mix the filling.
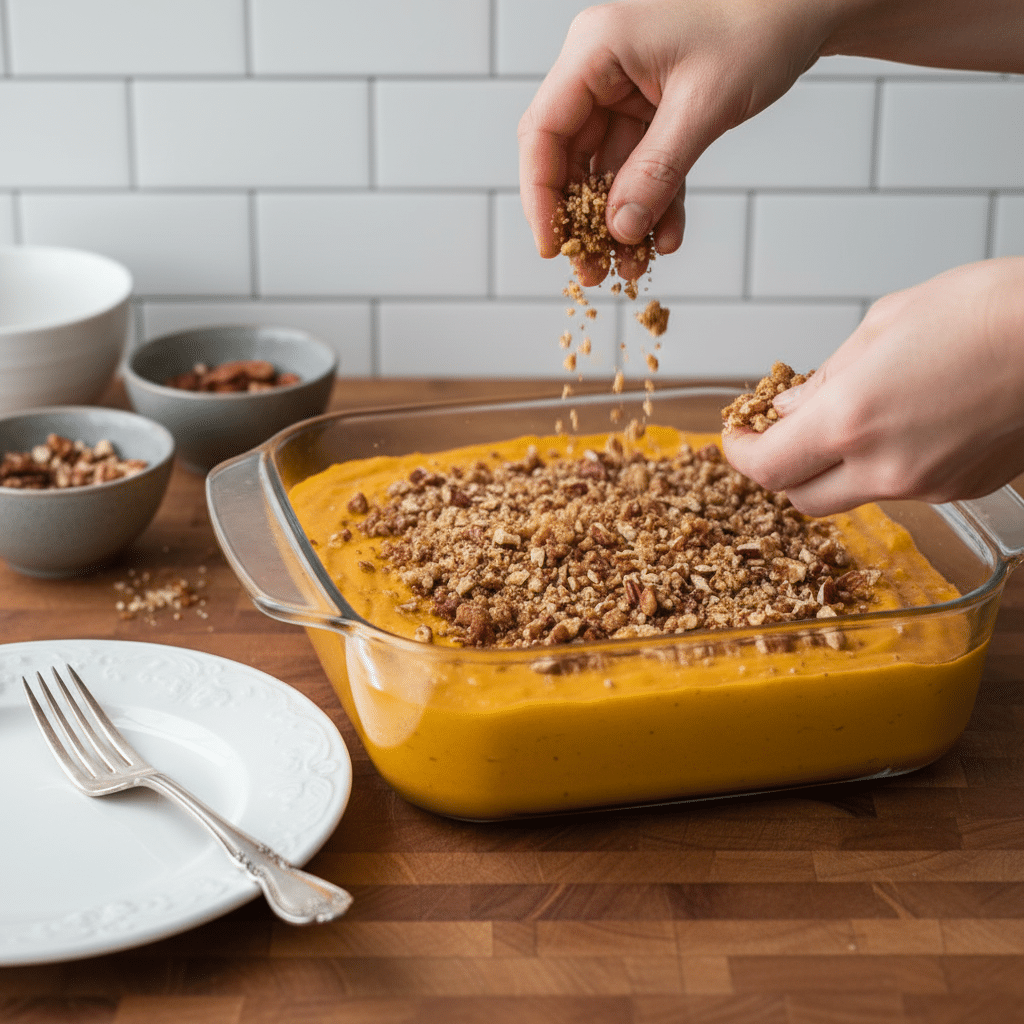
In a large mixing bowl, whisk together the pumpkin puree, evaporated milk, light brown sugar, eggs, and pumpkin pie spice. Keep whisking until it’s completely smooth and well combined. Pour this beautiful orange batter right into your prepared baking pan and spread it out evenly.
Here is the fun part! Open your box of spice cake mix and sprinkle the dry powder evenly over the entire surface of the pumpkin batter. Do not stir it! Once the cake mix is spread out, slowly drizzle your melted butter over the top, trying to cover as much of the dry mix as possible.
Sprinkle your chopped pecans and toffee bits evenly over the buttery cake mix layer. Pop the pan into your preheated oven and bake for 50 to 55 minutes. You’ll know it’s done when the edges are bubbly and the center is mostly set, though it will still have a slight jiggle to it.
What to Serve It With
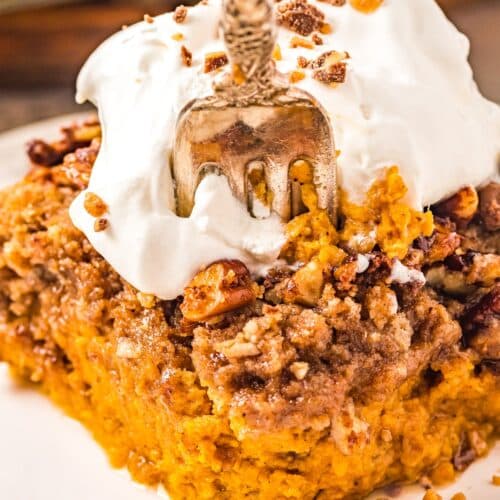
This cake is rich, warm, and deeply spiced, so it practically begs for a cool, creamy contrast. I highly recommend serving it fresh out of the oven while it’s still nice and warm. A big scoop of classic vanilla bean ice cream melting over the hot, crunchy toffee topping is an absolute must in our house.
If ice cream isn’t your thing, a generous dollop of freshly whipped cream or even a drizzle of salted caramel sauce takes this dessert over the top. Pair it with a hot cup of coffee or a mug of warm apple cider for the ultimate cozy fall experience.
Top Tips for Perfecting Your Pumpkin Dump Cake
Even though this recipe is incredibly forgiving, I’ve picked up a few helpful tricks over the years to make sure it comes out absolutely perfect every single time:
- Check Your Pumpkin: I can’t stress this enough—double-check your cans! You want pure pumpkin puree, not canned pumpkin pie filling. Pie filling already has sugar and spices mixed in, which would make this cake way too sweet and overpowering.
- The Foil Hack: Keep an eye on the cake around the 40-minute mark. If the pecans and toffee look like they are browning a little too quickly, just gently tent a piece of aluminum foil over the pan for the rest of the baking time.
- Trust the Jiggle: When you pull it out of the oven, the center will still look a bit jiggly if you shake the pan. Don’t panic! It’s supposed to look like that. It needs about 15 to 20 minutes to cool and set up on the counter before you slice into it.
Storing and Reheating Tips
If you actually have leftovers (which is a very rare occurrence around here!), this cake stores beautifully. Let it cool completely to room temperature, then cover the baking dish tightly with plastic wrap or aluminum foil. You’ll want to keep it in the refrigerator for up to 5 days. Since the bottom layer is essentially a pumpkin custard, it does need to be chilled.
When you’re ready for round two, you can absolutely eat it cold straight from the fridge, but I think it’s so much better warm. Just pop a slice in the microwave for about 10 to 15 seconds until it’s heated through. If you want to reheat the whole pan for a crowd, cover it lightly with foil and bake at 325°F for about 15 minutes until it’s warm and gooey again.
Frequently Asked Questions
Final Thoughts
There you have it—the easiest, most delicious fall dessert you will make all season. This Pumpkin Dump Cake has saved me on so many occasions when I needed a show-stopping treat without the stress of a complicated recipe. It truly delivers all the nostalgic, comforting flavors of the holidays with a fun, crunchy twist that everyone goes crazy for.
I hope you give this recipe a try the next time you’re craving something sweet, and I hope it brings as much joy to your family gatherings as it does to mine. Don’t forget to let me know how it turns out for you, and definitely tell me if you try any fun new toppings. Happy baking, friends!
Pumpkin Dump Cake
Ingredients
Main Ingredients
- 29 oz pumpkin puree 1 can
- 12 oz evaporated milk 1 can
- 1 cup light brown sugar
- 4 large eggs
- 2 teaspoons pumpkin pie spice or cinnamon
- 13.25 oz spice cake mix 1 box
- 1 cup chopped pecans
- 1 cup butter melted, 2 sticks
- 1 cup toffee bits optional
- Whipped cream or ice cream optional
Instructions
Preparation Steps
- Heat the oven to 350°F. Spray a 9x13 inch baking pan with cooking spray. Set aside.
- Whisk to combine the pumpkin puree, evaporated milk, brown sugar, eggs, and pumpkin pie spice together in a mixing bowl. Pour the pumpkin batter into the prepared baking pan.
- Spread the cake mix evenly over the pumpkin, then pour the butter over the top. Sprinkle the top with pecans and toffee pieces.
- Bake for 50 to 55 minutes, and then check for doneness with a toothpick. The cake is done when it is no longer super jiggly in the center, but it will still jiggle some. The toothpick may have a little bit of pumpkin residue, similar to a pumpkin pie, on it. This is normal, the cake will firm up as it cools!
- Remove the cake and let it cool for 15 minutes. Serve warm with whipped cream or ice cream on top.
Featured Comments
“This sounds cozy and delicious—pumpkin cake with coffee and a sleepy pup? Perfect autumn vibes!”
“Impressed! Clear steps and restaurant-level results. Perfect for busy nights.”
“New favorite here — turned out amazing. crowd-pleaser was spot on.”
“Super easy and turned out amazing! My family asked for seconds. Saving this one.”
“This sweet treat was absolutely loved — the light really stands out. Thanks!”
“Made it tonight and wow — quick weeknight win! Will definitely make Easy Pumpkin Cake Dump Dessert Delight again.”


This sounds cozy and delicious—pumpkin cake with coffee and a sleepy pup? Perfect autumn vibes!