

Oh, where do I even begin with this cake? It’s one of those recipes that, when I think about it, just makes my heart happy. You know those recipes that just *feel* like home? This is absolutely one of them for me. It’s the kind of cake that smells incredible while it’s baking, filling the entire house with this warm, comforting aroma. My kids, bless their little hearts, will actually sniff the air and ask, “Mom, what are you baking?” before they even see it. This take five cake recipe is seriously a lifesaver on busy weeknights when the craving for something sweet hits hard, but the idea of a complicated dessert feels impossible. It’s like a little slice of heaven that comes together surprisingly fast, and honestly, it’s so much simpler than some other popular bundt cakes or elaborate layer cakes out there. If you’re anything like me, you probably have a go-to Chocolate Chip Cookie or brownie recipe, but this cake? This one’s earned its permanent spot in my recipe rotation, and I have a feeling it’s going to do the same for you.
What is Take Five Cake?
So, what exactly *is* this “take five cake recipe”? Well, the name itself is a bit of a hint, isn’t it? It’s meant to be a cake that doesn’t require a huge time commitment. Think of it as your quick, reliable answer to a sweet tooth emergency or a spontaneous gathering. It’s essentially a tender, moist cake with a delightful swirl of caramel and Peanut Butter, often topped with a simple glaze or a drizzle of chocolate. It’s not overly fussy, and that’s precisely its charm. The “five” in the name often refers to the five core elements that make it so irresistible: the cake base, the peanut butter, the caramel, the chocolate, and that lovely glaze that pulls it all together. It’s a crowd-pleaser without being overly complicated, making it perfect for anyone who wants a delicious, homemade treat without spending hours in the kitchen. It’s like the ultimate comfort food baked into a cake!
How to Make Take Five Cake
Quick Overview
This take five cake recipe is all about making a moist, flavorful cake base, creating a luscious Peanut Butter and caramel swirl, and bringing it all together with a simple glaze. The magic really happens in how easily everything comes together. We’ll mix a few simple ingredients for the cake, prepare a quick swirl mixture, layer it into the pan, and bake until golden and fragrant. The result is a cake that looks and tastes impressive, but is honestly a breeze to put together. It’s designed for maximum flavor with minimal effort, which is exactly what we all need sometimes, right?
Ingredients
For the Main Batter:
Here’s what you’ll need for that super moist cake base:
- 2 ½ cups all-purpose flour
- 1 ½ teaspoons baking soda
- ½ teaspoon salt
- ½ teaspoon cinnamon (optional, but I love it!)
- ½ cup unsalted butter, softened
- 1 ½ cups granulated sugar
- 2 large eggs
- 1 teaspoon Vanilla Extract
- 1 cup buttermilk (or milk + 1 tbsp lemon juice/vinegar, let sit for 5 mins)
For the flour, I always go for a good quality all-purpose. For the butter, make sure it’s truly softened, not melted. And the buttermilk is key for that tenderness! If you don’t have any, the milk hack works like a charm. I’ve tested this with almond milk and it actually made it even creamier, which was a delightful surprise!
For the Filling:
This is where the “take five” goodness really comes into play:
- ½ cup creamy peanut butter
- ½ cup caramel sauce (store-bought or homemade)
- ¼ cup packed brown sugar
- 1 teaspoon vanilla extract
For the peanut butter, any creamy variety works. If you prefer a chunkier texture, you can use chunky peanut butter too. The caramel sauce can be store-bought – I often use the squeezable kind for ease. If you’re feeling ambitious and want to make your own caramel, go for it! Just make sure it’s not too thin, or it might get lost in the cake.
For the Glaze:
A simple sweet finish:
- 1 cup powdered sugar
- 2-3 tablespoons milk or cream
- ½ teaspoon vanilla extract
This glaze is pretty standard, but you can adjust the milk/cream to get your desired consistency. If you want it thinner, add a touch more liquid; for a thicker glaze, use a little less. I sometimes add a tiny pinch of salt to the glaze to enhance the flavors.
Step-by-Step Instructions
Step 1: Preheat & Prep Pan
First things first, let’s get the oven fired up to 350°F (175°C). This is a pretty standard temperature for most cakes, and it ensures even baking. While the oven heats, grab your favorite Bundt pan or a 9×13 inch baking dish. I always like to give mine a really good greasing and flouring – no one likes a cake stuck in the pan! You can use butter or cooking spray, and then dust it with a little flour, tapping out any excess. This step is crucial for an easy release later on.
Step 2: Mix Dry Ingredients
In a medium bowl, whisk together your flour, baking soda, salt, and cinnamon (if you’re using it – seriously, don’t skip the cinnamon if you can help it!). Whisking them together ensures everything is evenly distributed, so you don’t end up with pockets of baking soda or salt. This simple step helps create a uniform texture throughout the cake.
Step 3: Mix Wet Ingredients
In a large bowl, cream together the softened butter and granulated sugar until light and fluffy. This usually takes a few minutes with an electric mixer. Then, beat in the eggs one at a time, making sure each is fully incorporated before adding the next. Stir in the vanilla extract. This is where the cake starts to get its lovely flavor base.
Step 4: Combine
Now, it’s time to bring the wet and dry ingredients together. You’ll alternate adding the dry mixture and the buttermilk to the butter mixture, starting and ending with the dry ingredients. Mix until just combined – seriously, don’t overmix! Overmixing can develop the gluten too much and make your cake tough. A few small lumps are totally okay. I’ve learned this the hard way after making some truly dense cakes in my past!
Step 5: Prepare Filling
In a separate small bowl, combine the peanut butter, caramel sauce, brown sugar, and vanilla extract. Stir until it’s all well combined and forms a thick, gooey mixture. It should be spreadable, but not runny. This is the heart of our “take five” swirl! Taste it – I know, I know, you’re not supposed to eat raw dough, but a little lick of this filling is totally warranted. It’s divine.
Step 6: Layer & Swirl
Pour about half of the cake batter into your prepared pan. Dollop spoonfuls of the peanut butter filling mixture over the batter. Then, carefully pour the remaining batter over the filling. I like to use a knife or a skewer to gently swirl the filling into the batter. Don’t go too crazy; you want distinct ribbons of the filling, not for it to be completely blended. This swirling technique is what gives the cake its beautiful marbled appearance.
Step 7: Bake
Pop the cake into your preheated oven. Bake for about 30-40 minutes for a Bundt pan, or 35-45 minutes for a 9×13 pan. The exact time will depend on your oven. You’ll know it’s done when a toothpick inserted into the center comes out clean, or with just a few moist crumbs attached (not wet batter!). The aroma filling your kitchen at this point is pure magic.
Step 8: Cool & Glaze
Once baked, let the cake cool in the pan for about 10-15 minutes before inverting it onto a wire rack to cool completely. This is important! If you try to take it out too soon, it might break. While the cake cools, whisk together the powdered sugar, milk/cream, and vanilla extract for the glaze. Adjust the liquid until you reach your desired drizzling consistency. Once the cake is completely cool, drizzle that glorious glaze all over the top. Let the glaze set for a bit before slicing.
Step 9: Slice & Serve
And there you have it! The most incredible take five cake. Let it cool completely before slicing, especially if you want neat pieces. This cake is delicious at room temperature, but I also love it slightly warm, maybe with a scoop of vanilla ice cream. Cut generous slices and enjoy the layers of flavor. It’s perfect for sharing, but I won’t judge if you want to keep the whole thing to yourself!
What to Serve It With
This take five cake is a star all on its own, but pairing it with the right accompaniments can elevate the experience even further. For breakfast, a simple slice with a hot cup of coffee or a strong black tea is pure bliss. The sweetness is just enough to make your morning feel special. If you’re serving it for brunch, I love to present it on a nice cake stand with some fresh berries on the side. A glass of chilled orange juice or even a mimosa pairs wonderfully. As a decadent dessert, it’s fantastic served warm with a scoop of good quality vanilla bean ice cream or a dollop of whipped cream. A drizzle of extra chocolate sauce or caramel on top wouldn’t hurt either! And for those quiet, cozy snacks at home, just a slice with a glass of cold milk is pure comfort. My kids always go for the milk! I’ve also found that pairing it with a salted caramel latte when I’m feeling fancy is divine. It really is versatile enough for any occasion, big or small.
Top Tips for Perfecting Your Take Five Cake
I’ve made this take five cake recipe more times than I can count, and over the years, I’ve picked up a few tricks that really help ensure it turns out perfectly every single time. When it comes to the zucchini prep, if you’re using it (some variations of this cake include it for extra moisture!), make sure you squeeze out as much liquid as possible. Grating it finely helps too. For mixing advice, remember that “just combined” is your mantra for the batter. Overmixing is the enemy of a tender cake! You want to see streaks of flour disappear, but don’t keep going until it’s perfectly smooth. For the swirl, don’t overdo the swirl customization. You want distinct ribbons, not a muddy mess. A gentle swirl with a knife is all you need. When it comes to ingredient swaps, if you’re out of buttermilk, the milk and vinegar trick is a lifesaver, but you can also use plain yogurt or sour cream thinned with a little milk. For baking tips, always trust the toothpick test. Ovens can vary, so knowing your oven is key. If the top is browning too quickly, you can always loosely tent it with foil. And for glaze variations, if you prefer a chocolate glaze, just whisk in a tablespoon or two of unsweetened cocoa powder with the powdered sugar. Or, for a peanut butter glaze, add a tablespoon of peanut butter to the basic glaze. Experimenting is half the fun!
Storing and Reheating Tips
This take five cake is so delicious, you’ll want to make sure you can store it properly to enjoy it later. At room temperature, it will stay fresh for about 2-3 days, as long as it’s kept in an airtight container or well-wrapped. Make sure it’s completely cool before wrapping it up, otherwise, you’ll trap moisture and make it soggy. If you’ve glazed it, room temperature is best for the first day before the glaze fully sets. For refrigerator storage, it can last for up to a week. Just make sure it’s in a good airtight container. When you’re ready to enjoy a slice from the fridge, I personally find it best to let it sit out for about 30 minutes to come back to room temperature. If you’re short on time, you can gently warm a slice in the microwave for about 10-15 seconds – just enough to take the chill off. For freezer instructions, this cake freezes beautifully! Wrap individual slices or the whole cake tightly in plastic wrap, then in foil, and it can be frozen for up to 2-3 months. To thaw, unwrap it and let it come to room temperature, or thaw slices gently in the microwave. It’s wonderful to have a slice of this cake ready to go anytime!
Frequently Asked Questions
Final Thoughts
So there you have it – my beloved take five cake recipe! It’s more than just a cake; it’s a little bit of comfort, a dash of joy, and a whole lot of deliciousness that comes together with surprising ease. I truly believe that everyone needs a recipe like this in their repertoire, something that consistently delivers a fantastic result without all the fuss. It’s perfect for those moments when you want to bake something special but don’t have hours to spend in the kitchen. If you love this recipe, you might also enjoy my [Link to another recipe, e.g., “Chocolate Peanut Butter Swirl Brownies”] or my [Link to another recipe, e.g., “Quick Caramel Sauce”]. Give this take five cake a try, and I promise you won’t be disappointed. I can’t wait to hear how yours turns out! Please leave a comment below and let me know what you think, or share any of your own twists and turns. Happy baking!
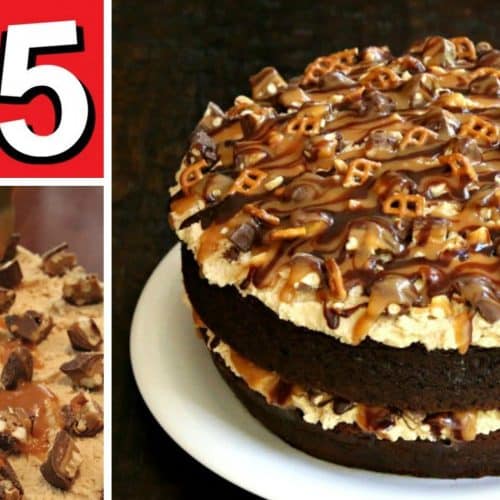
take five cake recipe
Ingredients
Main Ingredients
- 1 box Devils Food Cake Mix
- 1 teaspoon Instant Coffee Granules dry, added to batter
- 7 units Take 5 Candy Bars snack size, chopped
- 2 cups Pretzels mini, broken into pieces
Peanut Butter Filling
- 0.5 cup Butter softened
- 1 cup Creamy Peanut Butter
- 1 teaspoon Vanilla Extract
- 5 cups Powdered Sugar
- 0.5 cup Cream or milk as substitute
Caramel Layer
- 13 ounce Caramels unwrapped
- 0.25 cup Butter
- 0.333 cup Milk
Chocolate Ganache
- 12 ounce Milk Chocolate Chips
- 6 ounce Heavy Cream
Instructions
Preparation Steps
- Prepare the devil's food cake mix according to package directions, adding 1 teaspoon of instant coffee granules to the batter. Bake as directed for two 9-inch layers. Let cool completely before assembling.
- Cream together the softened butter and peanut butter until smooth. Mix in the vanilla extract. Gradually add the powdered sugar, one cup at a time, mixing until fully incorporated and smooth (filling will be thick).
- Add cream, a few tablespoons at a time, mixing well after each addition until the filling reaches a spreadable consistency (should remain stiff but smooth). Divide the filling in half and spread it onto the top of each cooled cake layer, all the way to the edge. Chop the snack-size Take 5 candy bars and press the pieces onto the peanut butter filling.
- In a small saucepan, melt the unwrapped caramels with 1/4 cup butter and 1/3 cup milk over low heat, stirring constantly until smooth. Drizzle the caramel mixture evenly over the chopped candy bars on both layers.
- Bring the 6 oz heavy cream to a boil and remove from heat. Pour the hot cream over the milk chocolate chips in a heatproof bowl. Let sit for 2 minutes, then stir slowly until all chocolate is melted and smooth. Let thicken slightly for a few minutes.
- Drizzle the chocolate ganache over the top of each cake layer, covering the caramel and candy. Reassemble the two layers with the filled sides facing up. Decorate the top with the broken pretzels, pressing lightly to adhere. Chill for 30 minutes before slicing to help layers set.
Notes
Featured Comments
“I’ve been craving this cake all week—your recipe sounds absolutely perfect! Can’t wait to try it.”
“Impressed! Clear steps and comforting results. Perfect for busy nights.”
“New favorite here — quick weeknight win. crowd-pleaser was spot on.”
“Super easy and turned out amazing! My family asked for seconds. Saving this one.”
“This sweet treat was absolutely loved — the buttery really stands out. Thanks!”
“Made it tonight and wow — absolutely loved! Will definitely make Easy Take Five Chocolate Cake Recipe again.”


I’ve been craving this cake all week—your recipe sounds absolutely perfect! Can’t wait to try it.