

Where do I start?French bread is fluffy and fluffy? It feels like just yesterday I was a kid, peering over the counter as my grandma kneaded dough, the scent of yeast and warm flour filling our tiny kitchen. There’s something so incredibly nostalgic and comforting about homemade bread, isn’t there? It’s more than just food; it’s a memory, a feeling, a warm hug in carbohydrate form. For years, I tried to recreate that magic, chasing that perfect crusty exterior and impossibly soft interior that only seemed to exist in bakeries. I’ve had my share of flat, dense loaves and brick-like disasters, but then, after countless tries and a few kitchen triumphs, I finally landed on *this* recipe. It’s the one that makes my family’s eyes light up and my neighbours knock on the door asking, “What smells so amazing?” If you’ve ever felt intimidated by bread-making, I promise you, this fluffy french Bread Recipe is the one to pull you in. It’s simpler than you think, and the results are absolutely worth every moment. It’s got that little something extra that makes it feel really special, like a fancy bakery treat, but made right in your own oven.
What is a fluffy French bread?
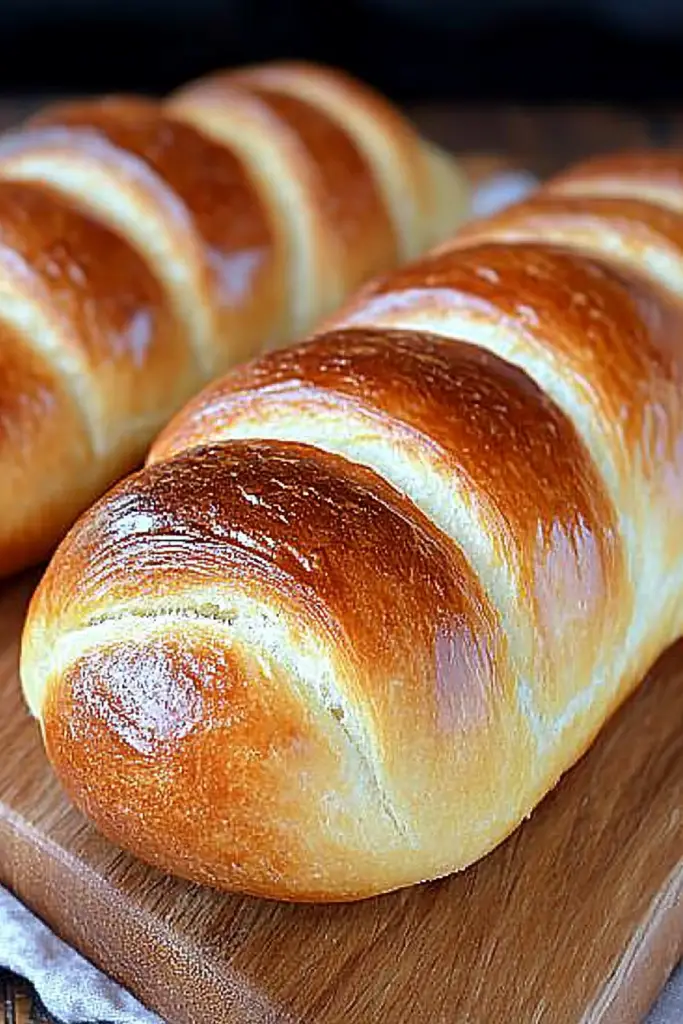
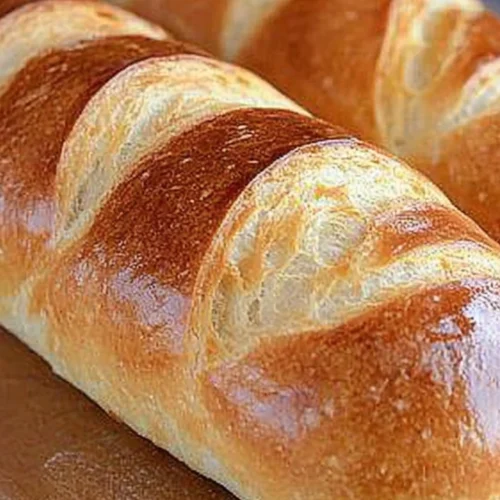
So, what exactly are we talking about when I say “fluffy french bread“? Think of it as the slightly more approachable, incredibly forgiving cousin to the traditional baguette. It’s still got that gorgeous golden crust and that satisfying chew, but the inside is what truly sets it apart. We’re aiming for an airy, cloud-like crumb that practically melts in your mouth. It’s not a dense, heavy loaf; it’s light, airy, and just begging to be slathered with butter. The “french bread” part refers to the general shape and the simple, clean flavour profile that’s a staple in French baking – relying on good quality ingredients to shine. But the “fluffy” is our special secret sauce. It comes from a combination of techniques and a touch of patience, resulting in a bread that’s both rustic and incredibly tender. It’s the kind of bread that makes you want to tear off a piece right away, still warm from the oven, and just savour it.
Why you’ll love
Honestly, there are so many reasons why this fluffy french bread has become my go-to, and I just know you’re going to feel the same way. First and foremost, the flavor. It’s pure, unadulterated bread goodness. The subtle sweetness from the hint of sugar, the richness from the butter, and that unmistakable yeasty aroma all combine into something truly divine. It’s comforting, familiar, and utterly delicious. Then there’s the simplicity. I know baking bread can sound daunting, but I’ve streamlined this so that even a beginner can tackle it with confidence. We’re not doing any crazy fancy techniques here. You mix, you let it rise, you shape, and you bake. That’s it! It’s genuinely one of the easiest bread recipes I’ve ever perfected, and it delivers every single time. And let’s talk about cost-efficiency. Flour, yeast, water, salt – these are all pantry staples that cost pennies compared to buying artisanal bread from the store. This recipe is a lifesaver for busy weeknights when you want something special without breaking the bank. Plus, the versatility! This fluffy french bread is a chameleon. It’s perfect for dipping into a hearty soup, making amazing sandwiches, or just enjoying on its own with a smear of butter. It’s the foundation for so many meals. What I love most, though, is the sheer joy it brings. The smell alone is enough to make any house feel like a home. It’s incredibly rewarding to pull a warm, golden loaf from your oven, knowing you made it yourself. It’s like a little edible accomplishment, and it makes even the simplest meal feel like a celebration. It’s a recipe that I’ve shared with friends, and they always come back raving about how easy and delicious it was, which just makes me beam.
How to Make Fluffy French Bread
Quick Overview
This recipe is all about a gentle approach to yeast and dough. We’ll be activating our yeast, creating a simple, soft dough, giving it time to rise beautifully, shaping it into classic loaves, and then baking it to golden perfection. The key is patience and minimal handling of the dough once it’s developed. It’s designed to give you that airy crumb without any fuss, making it incredibly accessible for any home baker. You’ll end up with two gorgeous loaves, perfect for sharing (or not!).
Ingredients
For the Main Dough:
You’ll need warm water (around 105-115°F or 40-46°C – think comfortably warm, not hot, otherwise it’ll kill your yeast!), active dry yeast (about 2 and 1/4 teaspoons, or one standard packet), a pinch of sugar (this feeds the yeast and gives it a little boost), all-purpose flour (about 3 to 3 and 1/2 cups, plus more for dusting), salt (1 and 1/2 teaspoons – don’t skip this, it’s crucial for flavour!), and a couple of tablespoons of unsalted butter, softened (this adds richness and tenderness). I always use good quality all-purpose flour; it makes a difference. Make sure your yeast is fresh! If it’s been lurking in the back of your cupboard for ages, it’s worth getting a new packet.
For the Egg Wash (Optional but Recommended):
One large egg, beaten with a tablespoon of water. This gives the crust that beautiful, shiny, golden-brown finish. It’s totally optional, but it really elevates the look.
Step-by-Step Instructions
Step 1: Preheat & Prep Pan
I like to get my oven preheated to 375°F (190°C) pretty early on. This gives it ample time to come up to temperature evenly. You don’t need a special pan for this, just a regular baking sheet. I like to line mine with parchment paper for easy cleanup, but you can also just lightly grease it. If you want to get fancy and create steam in your oven (which helps with the crust), you can place an empty metal pan on the rack below your baking sheet. We’ll add some hot water to it later.
Step 2: Mix Dry Ingredients
In a large mixing bowl (or the bowl of your stand mixer with the dough hook attachment), whisk together 3 cups of the all-purpose flour, the salt, and the granulated sugar. Give it a good mix to ensure everything is evenly distributed. This is your foundation!
Step 3: Mix Wet Ingredients
In a separate small bowl or liquid measuring cup, pour in your warm water. Sprinkle the active dry yeast over the top. Let it sit for about 5-10 minutes. You’ll see it get foamy and bubbly – that’s your yeast waking up and doing its thing! If it doesn’t foam, your yeast is probably dead, and you’ll need to start over with fresh yeast. Once foamy, stir in the softened butter until it’s mostly melted.
Step 4: Combine
Now, pour the wet yeast mixture into the bowl with your dry ingredients. If you’re using a stand mixer, start on low speed until the ingredients just come together. If you’re mixing by hand, use a wooden spoon or spatula to stir until no dry flour remains. The dough will be shaggy and sticky at this stage. Gradually add the remaining 1/2 cup of flour, a little at a time, until the dough starts to pull away from the sides of the bowl and forms a soft, slightly sticky ball. Be careful not to add too much flour; you want it soft and pliable for that fluffy interior. Knead on a lightly floured surface (or with your stand mixer on medium-low speed) for about 5-7 minutes, until the dough is smooth and elastic. It should feel soft and a little tacky, but not sticking excessively to your hands.
Step 5: Prepare Filling
Oops! This section isn’t needed for this specific recipe. French bread doesn’t typically have a filling. We’re focusing on the pure bread experience here!
Step 6: Layer & Swirl
This step is also not applicable to traditional French bread, which is typically unadorned. We’re aiming for that classic, simple beauty!
Step 7: Bake
Turn the dough out onto a lightly floured surface. Gently divide the dough in half. Shape each half into a long, rustic loaf, about 10-12 inches long. You can gently flatten the dough into a rectangle, then fold it over itself, pinching the seams closed, and then gently roll it out to your desired length. Place the loaves onto your prepared baking sheet, leaving some space between them. Cover the loaves loosely with plastic wrap or a clean kitchen towel and let them rise in a warm place for about 30-45 minutes, or until they’ve nearly doubled in size. They should look puffy and inviting. Preheat your oven to 375°F (190°C) if you haven’t already. Just before baking, gently brush the tops of the loaves with your egg wash, if using. For an extra crusty finish, carefully pour about a cup of hot water into the preheated steam pan on the bottom rack of your oven, then quickly close the oven door. Bake for 25-30 minutes, or until the loaves are golden brown and sound hollow when tapped on the bottom.
Step 8: Cool & Glaze
Once baked, transfer the fluffy french bread immediately to a wire rack to cool completely. This is super important! If you leave it on the hot baking sheet, the bottom can get soggy. Let it cool for at least 30 minutes before slicing. There’s no glaze needed for this traditional loaf!
Step 9: Slice & Serve
This is the best part! Once cooled enough to handle, use a serrated bread knife to slice your beautiful, fluffy french bread. Listen for that slight crunch as you cut through the crust. Serve warm with butter, or use it for your favourite sandwiches and meals.
What to Serve It With
Oh, this fluffy french bread is so versatile! For Breakfast, it’s divine toasted and slathered with butter and jam, or used as the base for some killer avocado toast. A cup of strong coffee and a slice of this bread is my go-to on a lazy weekend morning. For Brunch, imagine it sliced and served alongside a beautiful frittata or a platter of fresh fruit. It makes everything feel a little more elegant, doesn’t it? As Dessert, it might sound unusual, but a lightly toasted slice with a drizzle of honey and a dollop of mascarpone is absolutely heavenly. It’s a much lighter alternative to heavy cakes. And for those Cozy Snacks, well, this is where it truly shines. Dipping warm, crusty bread into a rich, creamy soup or a flavourful stew is pure comfort. Think French Onion Soup, creamy tomato bisque, or a hearty beef stew. It’s also fantastic for garlic bread – just slice, spread with garlic butter, pop under the broiler for a few minutes, and you’re in heaven. My family loves it with pasta nights; it’s perfect for soaking up all that delicious sauce.
Top Tips for Perfecting Your Fluffy French Bread
Okay, let’s dive into some of the things I’ve learned over the years that make this recipe truly shine. When it comes to Zucchini Prep – wait, that’s for a different recipe! For this fluffy french bread, let’s focus on the dough itself. For Mixing Advice, the absolute key is not to overwork the dough once the flour is added. You want to develop the gluten, yes, but a tough, overworked dough can lead to a dense loaf. Aim for that smooth, elastic texture in the kneading stage, and then let it be. Overmixing after the initial flour addition can make it tough. If your dough feels too wet and sticky when you’re kneading, resist the urge to dump in a ton of extra flour. Instead, use a bench scraper to help manage it and lightly flour your hands and surface as needed. For Swirl Customization, this isn’t really a swirl bread, but if you wanted to add something, you could gently press some herbs or a sprinkle of coarse sea salt into the top before baking. As for Ingredient Swaps, I stick pretty closely to this recipe for the best texture, but you could experiment with different flours for a slight variation. Using bread flour will give you a chewier crust. If you don’t have active dry yeast, instant yeast can be used, but you can mix it directly with the dry ingredients without proofing. For Baking Tips, the steam is your best friend for a fantastic crust. If you don’t have a steam pan, you can spray the oven walls with water a couple of times during the first 10 minutes of baking, but be quick and careful! Also, know your oven. Ovens can be finicky, so keep an eye on the bread towards the end of the baking time and adjust if needed. A good indicator of doneness is the colour and the sound when you tap the bottom – it should sound hollow. For Glaze Variations, while the egg wash is traditional, a simple milk wash can also give a nice sheen. Some people even like a little sprinkle of water on the loaves just before baking for a crispier crust. Remember, practice makes perfect, and even a slightly imperfect homemade loaf is a thing of beauty!
Storing and Reheating Tips
Let’s talk about keeping your beautiful fluffy french bread fresh. If you’re lucky enough to have leftovers (which is rare in my house!), storing it properly is key. At Room Temperature, I usually keep it in a paper bag or loosely wrapped in a clean kitchen towel for about 2 days. This allows the crust to stay a bit crispier. Avoid plastic wrap if you want to preserve that crust; it tends to make it soft and a bit chewy. For Refrigerator Storage, I don’t typically recommend it for this bread because the cold can dry it out and make the crust stale faster. However, if you must, wrap it tightly in plastic wrap and then in foil. It will last for about 3-4 days, but you’ll definitely want to reheat it. When it comes to Freezer Instructions, this is where you can really preserve your hard work. Let the bread cool completely, then wrap it very tightly in plastic wrap, followed by a layer of aluminum foil or a freezer bag. It will keep well in the freezer for up to 3 months. To thaw, unwrap it and let it come to room temperature for a few hours, or reheat it directly from frozen. For Glaze Timing Advice, you want to apply any glaze or egg wash just before baking, as we discussed. If you’re freezing the bread, do it *after* it’s baked and cooled. If you want to reheat frozen bread, a great trick is to lightly mist it with water before popping it into a 350°F (175°C) oven for about 10-15 minutes, or until heated through and the crust is re-crisped. This brings it back to life beautifully!
Frequently Asked Questions
Final Thoughts
There you have it – my tried-and-true recipe for the most wonderfully fluffy french bread. It’s a recipe that truly embodies the warmth and comfort of home baking. I hope you feel inspired to give it a try, whether you’re a seasoned baker or just starting your bread-making journey. Remember, the magic is in the simple ingredients and a little bit of patience. This bread is more than just a recipe; it’s an experience, a reminder of simple pleasures, and a delicious centerpiece for any meal. If you loved this recipe, you might also enjoy my Sourdough Starter Guide for Beginners or my Easy No-Knead Ciabatta. They’re all about bringing that artisanal bread experience right into your kitchen. I can’t wait to hear how your fluffy french bread turns out! Please leave a comment below and let me know your thoughts, or share your own tips and variations. Happy baking, my friends!
Fluffy French Bread
Ingredients
For the Dough
- 3.5 cups all-purpose flour
- 1.5 teaspoons instant yeast
- 1.5 teaspoons salt
- 1.25 cups warm water 105-115°F (40-46°C)
For Egg Wash (Optional)
- 1 egg large egg beaten
- 1 tablespoon water
Instructions
Preparation Steps
- In a large bowl, whisk together the flour, yeast, and salt.
- Pour in the warm water and mix until a shaggy dough forms.
- Turn the dough out onto a lightly floured surface and knead for 8-10 minutes, or until smooth and elastic. Alternatively, use a stand mixer with a dough hook for 6-8 minutes on medium speed.
- Lightly oil a clean bowl. Place the dough in the bowl, turning to coat. Cover with plastic wrap or a damp kitchen towel and let rise in a warm place for 1 to 1.5 hours, or until doubled in size.
- Punch down the dough and divide it into 3 equal pieces. Shape each piece into a log.
- Place the logs on a baking sheet lined with parchment paper. Cover and let rise for another 30-45 minutes.
- Preheat oven to 400°F (200°C).
- If using egg wash, whisk together the beaten egg and water, then brush over the tops of the loaves.
- Score the tops of the loaves with a sharp knife or razor blade. This helps the bread expand evenly.
- Bake for 20-25 minutes, or until golden brown and hollow-sounding when tapped on the bottom.
- Let cool on a wire rack before slicing and serving.
Notes
Featured Comments
“I love this memory! The smell of fresh bread baking always takes me back to those moments with my grandma too.”
“This brings back so many memories—the smell of fresh bread always feels like home. I’ve never tried making it myself, but I’d love to give it a shot!”
“Impressed! Clear steps and turned out amazing results. Perfect for busy nights.”
“New favorite here — quick weeknight win. crowd-pleaser was spot on.”
“Super easy and turned out amazing! My family asked for seconds. Saving this one.”
“This sweet treat was absolutely loved — the cozy really stands out. Thanks!”


This brings back so many memories—the smell of fresh bread always feels like home. I’ve never tried making it myself, but I’d love to give it a shot!
I love this memory! The smell of fresh bread baking always takes me back to those moments with my grandma too.