

You know those recipes that just feel like a warm hug? The ones that have a permanent spot in your baking rotation because they’re so reliably delicious and surprisingly easy? Well, this Banana Bread is exactly that for me. I remember my grandma making this when I was a kid, and the scent of cinnamon and ripe bananas filling her kitchen instantly transported me to a place of pure comfort. It’s not just a loaf of bread; it’s a memory, a feeling, and honestly, the best way to use up those overripe bananas that seem to multiply on the counter. If you’ve ever felt overwhelmed by complicated baking, or just want something incredibly satisfying without a ton of fuss, this is your recipe. It’s even better than those fancy bakery versions you find sometimes, and trust me, I’ve tried a lot!
What is banana bread?
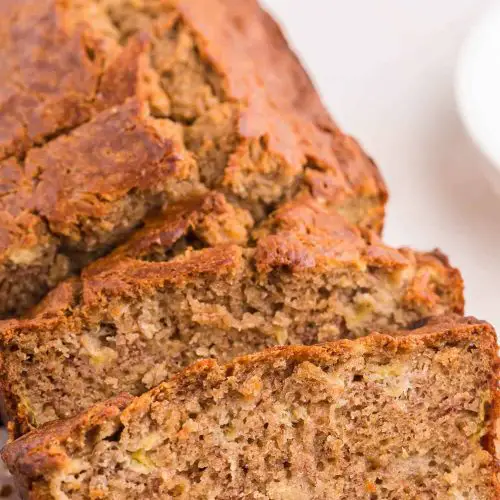
So, what exactly makes this Banana Bread so special? Think of it as the ultimate comfort food in cake form, but without the fuss of a layer cake. It’s essentially a moist, tender quick bread packed with sweet, ripe bananas, a hint of warm spice, and a beautiful, golden-brown crust. The magic really happens with the texture – it’s never dry or dense, always perfectly moist and almost fudgy in the best possible way. It’s the kind of recipe that doesn’t require any fancy equipment, just a couple of bowls and a whisk. The name itself is pretty straightforward, but the result is anything but ordinary. It’s what happens when simple ingredients come together to create something truly extraordinary. It’s the kind of bake that makes you feel like a baking pro, even if you’re just starting out.
How to Make This Banana Bread
Quick Overview
This banana bread recipe is all about simplicity and delicious results. You’ll mash your ripe bananas, whisk together the wet ingredients, combine them with the dry ingredients, and then bake until golden and fragrant. The key is not to overmix, which keeps the bread wonderfully tender. It’s a straightforward process that yields an incredibly moist and flavorful loaf every single time. It’s perfect for those moments when you need a little something sweet but don’t want to spend hours in the kitchen. Trust me, the aroma filling your house as it bakes is pure joy.
Ingredients
For the Main Batter:
* 3 very ripe bananas, mashed (about 1.5 cups) – the riper, the sweeter and more flavorful! Look for bananas with lots of brown spots. If they’re just yellow, they won’t give you that deep banana flavor.
* 1/2 cup (1 stick) unsalted butter, melted and slightly cooled – I prefer unsalted so I can control the salt level. Let it cool a bit so it doesn’t cook the eggs.
* 1/2 cup granulated sugar – you can adjust this slightly depending on how sweet you like your banana bread and how ripe your bananas are.
* 1 large egg, at room temperature – room temp eggs incorporate better.
* 1 teaspoon Vanilla Extract – a good quality vanilla makes a difference!
* 1.5 cups all-purpose flour – sifted is best for a lighter texture, but not strictly necessary if you’re in a hurry.
* 1 teaspoon baking soda – this is what gives it that lift! Make sure it’s fresh.
* 1/2 teaspoon salt – balances the sweetness and enhances the flavors.
* 1/2 teaspoon ground cinnamon – adds that classic warm spice.
* 1/4 teaspoon ground nutmeg (optional, but highly recommended!) – it adds such a lovely depth.
* 1/2 cup chopped walnuts or pecans (optional) – for a little crunch! I usually add these.
* 1/2 cup chocolate chips (optional) – because who doesn’t love chocolate in their banana bread? My kids go wild for these.
For the Filling:
* 1/4 cup brown sugar, packed – light or dark works fine.
* 1 teaspoon ground cinnamon – for that extra burst of flavor.
* 1/4 cup chopped nuts or chocolate chips (optional, can be the same as in the batter).
For the Glaze:
* 1 cup powdered sugar, sifted – sift to avoid lumps.
* 2-3 tablespoons milk (any kind will do, even water in a pinch) – start with 2 tablespoons and add more if needed to reach desired consistency.
* 1/2 teaspoon vanilla extract (optional) – for a little extra flavor.
Step-by-Step Instructions
Step 1: Preheat & Prep Pan
Preheat your oven to 350°F (175°C). Grease and flour a 9×5 inch loaf pan. You can also line it with parchment paper for super easy removal – I often do this because I hate stuck-on bits! If you’re using parchment, leave a little overhang on the sides to act as handles.
Step 2: Mix Dry Ingredients
In a medium bowl, whisk together the flour, baking soda, salt, cinnamon, and nutmeg (if using). Whisking ensures everything is evenly distributed, so you don’t get a pocket of baking soda or salt. This step is crucial for an even rise and consistent flavor.
Step 3: Mix Wet Ingredients
In a large bowl, mash the ripe bananas with a fork until mostly smooth, with a few small lumps remaining – those little banana bits are delicious! Then, whisk in the melted butter, granulated sugar, egg, and vanilla extract until well combined. It should look smooth and slightly thickened.
Step 4: Combine
Pour the dry ingredients into the wet ingredients. Gently fold them together with a spatula until just combined. Be careful not to overmix! A few streaks of flour are okay; they’ll disappear during baking. Overmixing develops the gluten too much, leading to a tough bread. This is probably the most important tip for tender banana bread!
Step 5: Prepare Filling
In a small bowl, combine the brown sugar and cinnamon for the filling. If you’re adding nuts or chocolate chips here, stir them in. This simple mixture will create little pockets of spiced sweetness throughout the bread.
Step 6: Layer & Swirl
Pour about half of the batter into your prepared loaf pan. Sprinkle half of the filling mixture evenly over the batter. Spoon the remaining batter on top, and then sprinkle the rest of the filling over that. Take a knife or skewer and gently swirl it through the batter to create a marbled effect. Don’t over-swirl, or the filling will just mix into the batter completely.
Step 7: Bake
Bake for 50-65 minutes, or until a toothpick inserted into the center comes out clean. The baking time can vary depending on your oven and how moist your bananas are. If the top starts browning too quickly, you can loosely tent it with aluminum foil for the last 15-20 minutes. I always test mine around the 50-minute mark to be safe.
Step 8: Cool & Glaze
Let the banana bread cool in the pan for about 10-15 minutes before carefully inverting it onto a wire rack to cool completely. Letting it cool in the pan for a bit prevents it from falling apart. Once completely cool, whisk together the sifted powdered sugar, milk, and vanilla extract until you have a smooth, pourable glaze. Drizzle it over the top of the cooled banana bread. If you prefer a thicker glaze, add more powdered sugar; if you want it thinner, add a touch more milk. I like to wait until it’s *fully* cool so the glaze doesn’t melt right off!
Step 9: Slice & Serve
Once the glaze has set a bit (about 15-20 minutes), slice the banana bread with a serrated knife for clean cuts. Serve at room temperature. It’s honestly perfect on its own, but a cup of coffee or tea is a must!
What to Serve It With
This banana bread is so versatile, you can enjoy it any time of day and for any occasion!
For Breakfast: It’s a fantastic grab-and-go option. I love having a slice toasted with a little butter while my coffee brews. It’s also wonderful served alongside scrambled eggs or a yogurt parfait for a more complete meal.
For Brunch: Elevate it with a sprinkle of fresh berries on the side or a dollop of cream cheese frosting. A mimosa or a fancy iced coffee pairs beautifully. You can even serve it as part of a sweet and savory platter.
As Dessert: This is where it truly shines! Warm it up slightly and serve with a scoop of vanilla bean ice cream or a drizzle of caramel sauce. A small dollop of whipped cream or a dusting of powdered sugar makes it feel extra special.
For Cozy Snacks: This is my go-to when I need a little pick-me-up. A warm slice with a glass of cold milk is pure comfort. My kids also love it with a smear of peanut butter. It’s the perfect accompaniment to a good book or a movie on a lazy afternoon.
Top Tips for Perfecting Your Banana Bread
After making this countless times, I’ve picked up a few tricks that make all the difference.
Banana Prep: The riper the bananas, the better! I’m talking full-on brown spots, maybe even a little black. They’ll mash easier and deliver a much more intense banana flavor and natural sweetness. If your bananas aren’t ripe enough, you can always speed up the process by baking them on a baking sheet at 300°F (150°C) for about 15-20 minutes until they’re soft and spotty. Just let them cool before using.
Mixing Advice: This is where most people go wrong. Overmixing is the enemy of tender quick breads. Mix the wet and dry ingredients until *just* combined. Seriously, don’t beat it into submission. A few little streaks of flour are perfectly fine; they’ll disappear in the oven. You want a tender, moist crumb, not a tough, chewy one.
Swirl Customization: The swirl is more for looks than anything else, but it does add little pockets of extra flavor. Don’t go overboard with it! Just a few gentle passes with a knife or skewer to create a marbled effect is perfect. You can also skip it entirely and just fold in your add-ins like chocolate chips or nuts directly into the batter.
Ingredient Swaps: If you don’t have butter, you can use a neutral oil like vegetable or canola oil (use about 3/4 cup oil for 1 cup butter). For the flour, a 1-to-1 gluten-free baking blend usually works well, though the texture might be slightly different. I’ve tested this with almond milk and it actually made it even creamier! You can also use half whole wheat flour for a slightly nuttier flavor, but it might make it a touch denser.
Baking Tips: Every oven is different, so get to know yours! Start checking for doneness around the 50-minute mark. A wooden skewer or toothpick should come out clean when inserted into the thickest part of the loaf. If the top is browning too fast, tent it loosely with foil. I usually bake mine on the middle rack for even heat distribution.
Glaze Variations: If you’re not a fan of sweet glazes, you can skip it entirely. Or, for a richer flavor, add a tablespoon of cream cheese to the glaze mixture. You can also add a pinch of espresso powder for a mocha twist, or a little lemon zest for brightness. Don’t want to glaze? A simple dusting of powdered sugar right before serving is lovely too.
Storing and Reheating Tips
This banana bread is delicious fresh, but it also stores beautifully and even improves in flavor over a day or two!
Room Temperature: Once completely cool, store the banana bread in an airtight container or wrap it tightly in plastic wrap. It will stay fresh at room temperature for about 2-3 days. The aroma is so inviting, though, it usually disappears much faster than that in my house!
Refrigerator Storage: If you live in a warmer climate or want it to last a bit longer, wrap it well in plastic wrap and then foil, or place it in an airtight container, and store it in the refrigerator for up to a week. The texture might become a little firmer, but it’s still perfectly good.
Freezer Instructions: This banana bread freezes wonderfully, making it perfect for baking ahead. Wrap the completely cooled loaf tightly in plastic wrap, then in foil, or place it in a freezer-safe bag. It will keep in the freezer for up to 3 months. Thaw overnight at room temperature, or gently warm it in a low oven (around 300°F/150°C) for about 10-15 minutes.
Glaze Timing Advice: If you plan to store the banana bread at room temperature or in the fridge for more than a day, I recommend adding the glaze just before serving or on the second day. If you glaze it right away and then wrap it up, the glaze can sometimes become sticky or rub off. For freezing, it’s best to freeze the loaf *without* the glaze and add it after thawing and warming.
Frequently Asked Questions
Final Thoughts
So there you have it – my tried-and-true banana bread recipe! It’s more than just a recipe to me; it’s a way to bring a little bit of sunshine and comfort into my kitchen, and hopefully yours too. The combination of moist, tender crumb and that irresistible banana flavor is just unbeatable. It’s the perfect antidote to a busy day, a lovely treat for a weekend morning, and always a hit with friends and family. If you give this a try, I truly hope you love it as much as my family and I do. It’s simple, it’s satisfying, and it always tastes like home. Don’t be afraid to experiment with add-ins like chocolate chips or nuts – they’re my personal favorites! If you make this, I’d absolutely love to hear about it in the comments below. What did you add? How did your family like it? Happy baking, and enjoy every delicious bite!
Banana Bread
Ingredients
Main Ingredients
- 0.5 cup salted butter softened
- 0.75 cup brown sugar
- 2 eggs
- 1 tsp vanilla extract
- 0.25 cup sour cream
- 2 cups bananas mashed
- 1.5 cups all-purpose flour
- 1 tsp baking soda
- 1 tsp cinnamon
- 0.5 tsp salt
Instructions
Preparation Steps
- Preheat oven to 350F. Grease a loaf pan.
- Add butter and brown sugar to a mixing bowl. Cream together with a hand mixer on medium low speed.
- Add eggs, sour cream, and vanilla. Beat together until combined.
- Stir in mashed bananas.
- In another mixing bowl, whisk together all-purpose flour, baking soda, cinnamon and salt.
- Add the dry mixture to the wet mixture and stir to combine.
- Pour mixture into greased loaf pan.
- Bake for 1 hour or until a toothpick comes out clean from the center of the loaf.
- Let cool a few minutes in the loaf pan. Remove and place on a cooling rack to cool. Slice into pieces and serve.
Notes
Featured Comments
“Impressed! Clear steps and perfect for busy nights results. Perfect for busy nights.”
“New favorite here — perfect for busy nights. crowd-pleaser was spot on.”
“Super easy and turned out amazing! My family asked for seconds. Saving this one.”
“This sweet treat was absolutely loved — the fresh really stands out. Thanks!”
“Made it tonight and wow — family favorite! Will definitely make Golden Loaf How to Bake Perfect Banana Bread again.”
“Packed with flavor and so simple. Exactly what I wanted from Golden Loaf How to Bake Perfect Banana Bread.”


