Oh, where do I even begin with this Hawaiian Banana Bread? It’s more than just a recipe to me; it’s a warm hug on a plate, a vacation for my taste buds, and frankly, the thing that gets me through a hectic week. I remember the first time I tasted a truly authentic version on a trip to Maui years ago. The air was thick with the scent of plumeria and the ocean breeze, and then I took a bite of this incredibly moist, subtly sweet banana bread, flecked with macadamia nuts and a hint of something tropical. It was pure bliss. Since then, I’ve tinkered and tested, experimenting with countless variations until I finally landed on this one. It’s the kind of treat that makes everyone who tries it ask, “What’s your secret?” Let me tell you, the secret isn’t some fancy technique; it’s just a whole lot of love and a few simple, brilliant ingredients that make this Hawaiian banana bread truly sing. It’s like a little slice of paradise, right in your own kitchen, and honestly, it’s a lifesaver when those sweet cravings hit and you need something comforting but surprisingly simple to whip up.
What is Hawaiian banana bread?
So, what exactly makes this Hawaiian banana bread different from the standard loaf you might find at your local bakery? Well, think of it as the tropical cousin to your everyday banana bread. While the core is still that wonderfully comforting sweet bread made from ripe bananas, Hawaiian banana bread often embraces a few signature ingredients that give it a distinctively island flair. The most common players you’ll find are creamy macadamia nuts, adding a rich, buttery crunch, and sometimes a touch of coconut or pineapple for an extra layer of island goodness. It’s essentially a celebration of the flavors that evoke the spirit of Hawaii – sunshine, warmth, and a little bit of exotic magic. It’s not overly complicated, but the subtle additions elevate it to something truly special. It’s less about a drastic overhaul and more about a gentle infusion of island vibes, making each bite a delightful escape.
How do you make Hawaiian banana bread?
Quick Overview
Whipping up this delicious Hawaiian banana bread is surprisingly simple! It’s a one-bowl wonder for the dry ingredients and another for the wet, making cleanup a breeze. You’ll mash your bananas, whisk in the wet ingredients, then combine with the dry. Fold in those lovely macadamia nuts, pour into your prepared pan, and bake until golden and fragrant. The hardest part? Waiting for it to cool before you can slice into its moist, tropical goodness!
Ingredients
For the Main Batter:
You’ll need about 3-4 very ripe bananas, mashed. The riper, the better – those brown spots are flavor gold! Make sure they’re nice and mushy. Then, we’ll add 1/2 cup (113g) unsalted butter, melted and slightly cooled. This is key for moisture. Next, 2 large eggs, lightly beaten. They help bind everything together. For sweetness, 3/4 cup (150g) granulated sugar. You can play with this a little, but this amount is perfect for that balanced sweetness. Then, 1 teaspoon Vanilla Extract – don’t skip this, it really enhances the banana flavor! And for that signature Hawaiian touch, 1/2 cup (50g) chopped macadamia nuts. I like to toast mine lightly beforehand for extra flavor and crunch, but it’s totally optional. Finally, the dry ingredients: 1 1/2 cups (190g) all-purpose flour. Sifted is always best for a lighter texture, but it’s not a deal-breaker if you don’t have time. 1 teaspoon baking soda, which acts as our leavening agent. A pinch of salt to balance the sweetness and bring out all the flavors. And for that extra subtle spice, 1/2 teaspoon ground cinnamon. You can also add a tiny pinch of nutmeg if you’re feeling fancy!
For the Filling (Optional but Recommended!):
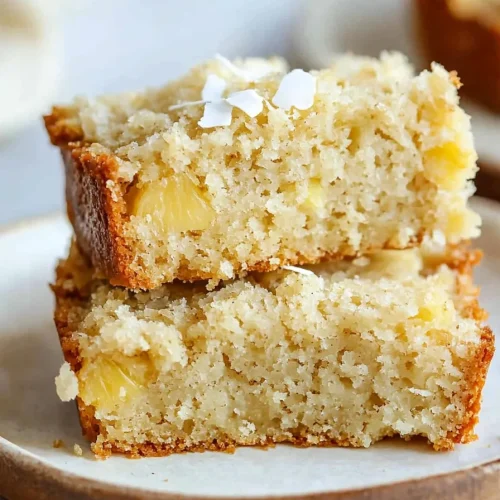
This is where we can really amp up the tropical vibes! You can add about 1/4 cup (40g) of shredded sweetened coconut. Make sure it’s finely shredded so it integrates well. And if you’re feeling extra adventurous, I love adding about 1/4 cup (40g) of finely diced canned pineapple, drained really well. It adds little bursts of sweetness and tang. You can also mix a little extra cinnamon and sugar together for a cinnamon swirl effect.
For the Glaze:
This is a simple powdered sugar glaze that really takes it over the top. You’ll need 1 cup (120g) powdered sugar, sifted to avoid lumps. Then, 2-3 tablespoons of milk (any kind works, even almond milk adds a nice touch). You want a consistency that’s pourable but not too thin. A tiny splash of vanilla extract or even a bit of lime juice can add a lovely zesty finish.
Step-by-Step Instructions
Step 1: Preheat & Prep Pan
First things first, get that oven preheating to 350°F (175°C). You’ll need a standard 9×5 inch loaf pan. Grease it really well with butter or cooking spray, and then I like to lightly flour it too. Or, for extra insurance against sticking, you can line it with parchment paper, leaving a little overhang on the sides to make lifting it out a breeze. Trust me, the last thing you want is your beautiful loaf stuck to the pan!
Step 2: Mix Dry Ingredients
In a medium bowl, whisk together your flour, baking soda, salt, and cinnamon. Give it a good mix until everything is evenly distributed. This ensures that your leavening agent and spices are spread out evenly throughout the batter, so you don’t get pockets of unmixed ingredients. If you’re using sifted flour, this step is even more crucial to avoid clumps.
Step 3: Mix Wet Ingredients
In a large mixing bowl, combine your mashed bananas, melted butter, beaten eggs, vanilla extract, and granulated sugar. Stir everything together until it’s well combined and smooth. It should look like a lovely, creamy mixture. Make sure your butter isn’t too hot when you add it, or it could scramble the eggs!
Step 4: Combine
Now, pour the dry ingredients into the wet ingredients. Using a spatula or a wooden spoon, gently fold them together until just combined. Be careful not to overmix! Overmixing can develop the gluten in the flour, resulting in a tough, dense bread. A few streaks of flour are perfectly fine – they’ll disappear as it bakes. Once the batter is mostly uniform, gently fold in your chopped macadamia nuts. If you’re adding shredded coconut or diced pineapple, this is also when you’d fold those in.
Step 5: Prepare Filling
If you’re doing a swirl, now’s the time to get that ready. You can mix a little extra cinnamon and sugar together, or even some melted chocolate chips if you want to get decadent. Just have it set aside and ready to go for the next step.
Step 6: Layer & Swirl
Pour about half of the batter into your prepared loaf pan and spread it out evenly. If you’re doing a filling, sprinkle about half of your chosen filling ingredients (like extra nuts, coconut, or the cinnamon-sugar mixture) over the batter. Then, spoon the remaining batter on top and spread it out. If you’re swirling, now is the time to drizzle your filling on top and use a knife or skewer to gently swirl it through the batter. Don’t over-swirl, or you’ll lose the distinct layers.
Step 7: Bake
Place the loaf pan in the preheated oven. Bake for 50-65 minutes. The exact time will depend on your oven, so start checking around the 50-minute mark. You’ll know it’s done when a wooden skewer or toothpick inserted into the center comes out clean, or with just a few moist crumbs attached. The top should be beautifully golden brown.
Step 8: Cool & Glaze
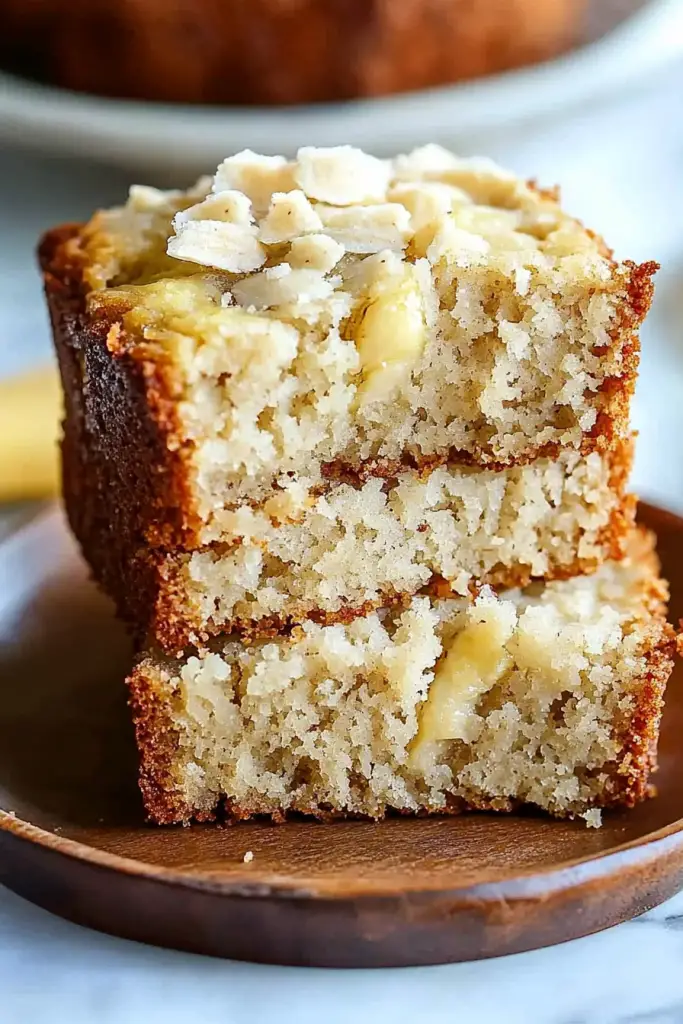
Once baked, let the banana bread cool in the pan for about 10-15 minutes. This allows it to set up properly. Then, carefully remove it from the pan (this is where the parchment overhang is a lifesaver!) and transfer it to a wire rack to cool completely. This is crucial – if you try to glaze it while it’s still warm, the glaze will melt and run right off. Once it’s completely cool, whisk together the powdered sugar, milk, and vanilla (or lime juice) for the glaze. Start with 2 tablespoons of milk and add more, a teaspoon at a time, until you reach your desired drizzling consistency. Drizzle generously over the top of the cooled loaf. Let the glaze set for about 15-20 minutes before slicing.
Step 9: Slice & Serve
Once the glaze has set, it’s time for the best part! Use a serrated knife to slice your Hawaiian banana bread. A sharp knife will give you clean slices, especially through the nuts. Serve at room temperature for the best flavor and texture. A warm slice with a cup of coffee or tea? Pure perfection.
What to Serve It With
This Hawaiian banana bread is so wonderfully versatile, it truly shines in so many settings. For a relaxed Breakfast, I love pairing a thick slice with a strong cup of Kona coffee. It’s a comforting start to the day that feels a little bit special without any fuss. Sometimes, I’ll toast a slice lightly and spread it with a thin layer of cream cheese – it’s surprisingly delicious! When it comes to Brunch, this bread elevates any spread. I like to arrange slices on a beautiful platter, perhaps with some fresh tropical fruit like pineapple and mango. It looks and tastes so elegant. For a more decadent Dessert, imagine this warm, slightly toasted, and served with a scoop of vanilla bean ice cream or a dollop of whipped cream. It’s also divine with a drizzle of honey or a light caramel sauce. And for those Cozy Snacks, which is honestly how I enjoy it most often, a simple slice with a glass of cold milk or a soothing cup of herbal tea is pure comfort. My family also loves it crumbled over yogurt for a quick, flavorful breakfast treat. I’ve even had friends use it as a base for a quick trifle, layering it with pudding and fruit – so creative!
Top Tips for Perfecting Your Hawaiian Banana Bread
After making this recipe more times than I can count, I’ve picked up a few tricks that I think really help make it truly exceptional. For the Zucchini Prep, if you decide to add zucchini for extra moisture (which I sometimes do!), make sure you squeeze out as much liquid as possible. Grate it on the large holes of a box grater, then wrap it in a clean kitchen towel or cheesecloth and wring it out. You’ll be surprised how much water comes out! This prevents a soggy bread. When it comes to Mixing Advice, I can’t stress enough the importance of not overmixing. Seriously, just combine until the streaks of flour are almost gone. Overmixing is the number one culprit for tough, dense quick breads. I’ve learned that lesson the hard way! For Swirl Customization, if you’re adding a cinnamon-sugar swirl, make sure your sugar mixture isn’t too wet, or it can make the bread gummy. For the patterns, use a knife and make gentle zig-zag motions. Don’t go too deep, or you’ll disrupt the layers too much. My favorite Ingredient Swaps? If you can’t find macadamia nuts, toasted pecans or walnuts work well, though they have a different flavor profile. For the dairy, I’ve tested this with almond milk in the glaze and it turned out beautifully creamy. For baking, I always use the middle rack of my oven. If you find the top is browning too quickly before the inside is cooked, you can loosely tent it with aluminum foil. And for the Glaze Variations, if you want something a little less sweet, try a lime glaze – just add a tablespoon of fresh lime juice to the powdered sugar and a tiny bit of milk until you get a drizzle-able consistency. It adds a lovely tangy counterpoint to the sweet banana.
Storing and Reheating Tips
Keeping this Hawaiian banana bread delicious is pretty straightforward, and I’ve found a few methods work best. For Room Temperature storage, once it’s completely cooled and any glaze has set, wrap the loaf tightly in plastic wrap or place it in an airtight container. It will stay wonderfully moist for about 2-3 days. If you’re keeping it longer than that, I highly recommend moving it to the refrigerator. For Refrigerator Storage, the same airtight container or plastic wrap works. It will stay fresh and moist for up to a week. When you want to enjoy a slice, you can eat it cold, or I love to gently warm it up. Just pop a slice in the toaster oven for a few minutes or microwave it for about 15-20 seconds – it brings back that fresh-baked aroma and texture beautifully! For Freezer Instructions, if you know you won’t get to it within a week, freezing is your best bet. Wrap the cooled loaf tightly in a layer of plastic wrap, then a layer of aluminum foil, or place it in a freezer-safe bag. It’ll keep well for up to 3 months. To thaw, simply unwrap it and let it come to room temperature on the counter, or thaw it overnight in the refrigerator. You can also reheat frozen slices directly in a toaster oven or microwave. For Glaze Timing Advice, if you plan to freeze the loaf, I strongly recommend waiting to add the glaze until *after* it has thawed. Glazing before freezing can sometimes make the glaze a bit sticky or uneven when thawed. It’s always best to glaze a fresh or thawed loaf.
Frequently Asked Questions
Final Thoughts
There you have it – my absolute favorite Hawaiian banana bread! It’s the kind of recipe that brings a little bit of sunshine into your life, no matter the weather. It’s comforting, bursting with flavor, and surprisingly simple to make. Whether you’re looking for a weekend treat, a bake-sale star, or just a way to use up those overripe bananas, this recipe is a winner. I truly hope you give it a try and that it becomes a cherished recipe in your home too. If you love this, you might also enjoy my recipe for Coconut Macadamia Nut Cookies – they have a similar tropical vibe! I can’t wait to hear what you think and see your creations. Please feel free to leave a comment below with your thoughts or any fun variations you try!
Hawaiian Banana Bread
Ingredients
Main Ingredients
- 3 ripe bananas bananas
- 0.5 cup unsalted butter melted
- 0.75 cup granulated sugar
- 2 large eggs
- 1 teaspoon vanilla extract
- 1.5 cups all-purpose flour
- 1 teaspoon baking soda
- 0.5 teaspoon salt
- 0.5 cup crushed pineapple drained
- 0.5 cup shredded coconut sweetened
Instructions
Preparation Steps
- Preheat your oven to 350°F (175°C). Grease and flour a 9x5 inch loaf pan.
- In a large bowl, mash the ripe bananas with a fork until smooth.3 ripe bananas bananas
- Stir in the melted butter, granulated sugar, eggs, and vanilla extract until well combined.3 ripe bananas bananas
- In a separate bowl, whisk together the flour, baking soda, and salt.3 ripe bananas bananas
- Gradually add the dry ingredients to the wet ingredients, mixing until just combined. Do not overmix.
- Gently fold in the crushed pineapple and shredded coconut.3 ripe bananas bananas
- Pour the batter into the prepared loaf pan and spread evenly.
- Bake for 55-65 minutes, or until a wooden skewer inserted into the center comes out clean.
- Let the banana bread cool in the pan for 10-15 minutes before transferring it to a wire rack to cool completely.
Notes
Featured Comments
“Impressed! Clear steps and turned out amazing results. Perfect for busy nights.”
“New favorite here — absolutely loved. crowd-pleaser was spot on.”
“Super easy and turned out amazing! My family asked for seconds. Saving this one.”
“This sweet treat was absolutely loved — the light really stands out. Thanks!”
“Made it tonight and wow — comforting! Will definitely make Hawaiian banana bread again.”
“Packed with flavor and so simple. Exactly what I wanted from Hawaiian banana bread.”