Oh, the smell! Seriously, the moment these start baking, my whole house transforms. It’s that warm, sweet, slightly cinnamon-y aroma that just wraps you up like a cozy blanket. If you’re anything like me, you probably have a soft spot for those flaky, buttery croissants and those impossibly rich muffins. Well, I’ve got a confession: I’ve been trying to capture the best of both worlds for years, and I think I’ve finally cracked it. My Homemade Cruffins are what happen when a croissant’s delicate layers meet a muffin’s comforting crumb, all swirled together into a delightful little package. They’re not just a treat; they’re an experience. Forget complicated croissant dough – this recipe is surprisingly approachable, and the result is pure magic. If you’ve ever found yourself staring longingly at the bakery counter, wondering if you can recreate that perfect hybrid, then pull up a chair, my friend, because you’ve come to the right place. These homemade cruffins are going to be your new go-to!
What is Cruffin?
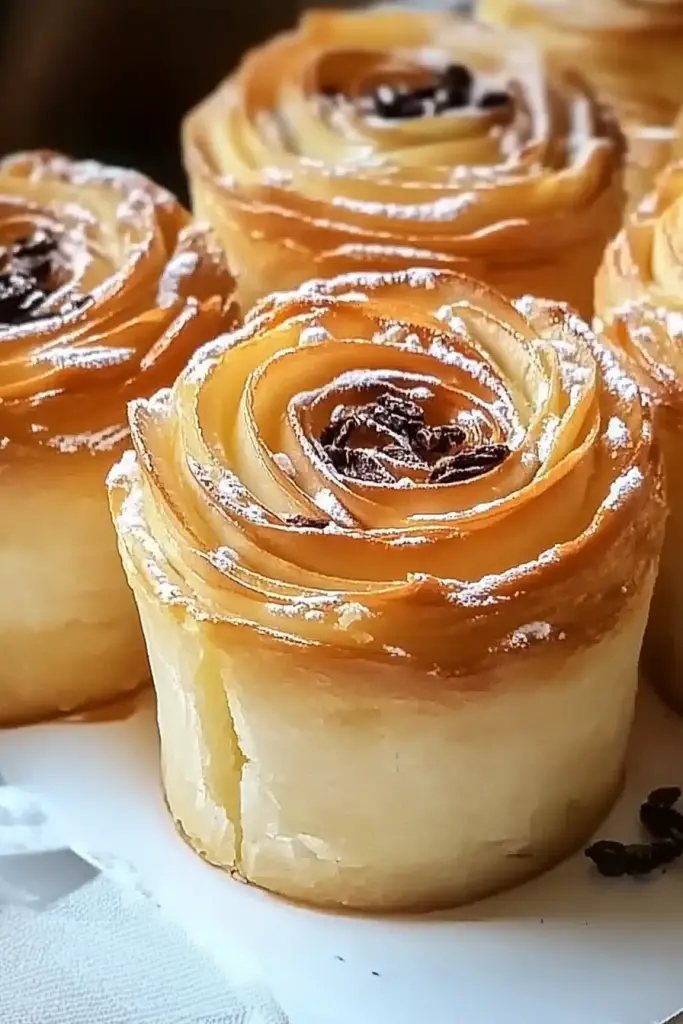
So, what exactly is this whimsical pastry I’m raving about? Think of a cruffin as the love child of a croissant and a muffin. It takes the incredibly flaky, laminated dough technique from croissants, but instead of folding and shaping it into traditional crescents, we’re going to pipe or spoon it into muffin tins. The result? Layers upon layers of buttery goodness, baked into a shape that’s wonderfully easy to handle and eat. It’s got that incredible, airy texture you expect from a croissant, but with a slightly more substantial, muffin-like structure that makes it perfect for fillings or simply enjoying on its own. The name itself, “cruffins,” is a delightful portmanteau that perfectly captures its dual heritage. It’s essentially a croissant’s soul in a muffin’s comforting body, and honestly, it’s a pastry innovation I can get behind wholeheartedly!
How do I make homemade cruffins?
Quick Overview
The process for making these cruffins involves creating a slightly enriched dough, then laminating it by folding in butter multiple times to build those signature flaky layers. We’ll then shape these layers into a swirl, place them in muffin tins, and bake them until golden and puffed. It sounds involved, but it’s broken down into simple, manageable steps. The key is patience during the folding and resting periods, which really builds the incredible texture. It’s a rewarding process that leads to a truly show-stopping treat, and you’ll feel like a pastry chef by the end of it!
Ingredients
For the Dough:
2 14 teaspoons active dry yeast.
¼ cup warm milk (about 105-115°F)
2 tablespoons granulated sugar, plus a pinch for the yeast
2 ½ cups all-purpose flour, plus more for dusting
½ teaspoon salt
½ cup unsalted butter, softened but not melted (about 1 stick)
½ cup cold unsalted butter, cut into small cubes (about 1 stick)
For the Filling (Optional but highly recommended!):
½ cup unsalted butter, melted
¼ cup granulated sugar
1 teaspoon ground cinnamon (or your favorite spice mix)
Optional additions: chocolate chips, fruit preserves, chopped nuts, a swirl of Cream Cheese Frosting.
For the Glaze (Optional):
1 cup powdered sugar
2-3 tablespoons milk or water
½ teaspoon Vanilla Extract (optional)
Step-by-Step Instructions
Step 1: Preheat & Prep Pan
First things first, let’s get our muffin tins ready. You’ll need a standard 12-cup muffin tin. Grease each cup generously with butter or non-stick cooking spray. This is super important to ensure your beautiful cruffins don’t stick. I like to use a pastry brush to get into all the nooks and crannies. Set this aside while we make our dough. No need to preheat the oven just yet; that comes later.
Step 2: Mix Dry Ingredients
In a large bowl, whisk together the 2 ½ cups of all-purpose flour and ½ teaspoon of salt. Make sure they are thoroughly combined. This forms the base of our delicious pastry. I always give the flour and salt a good whisk to ensure even distribution; it makes a difference in the final texture.
Step 3: Mix Wet Ingredients
In a small bowl, combine the warm milk, the pinch of sugar, and the active dry yeast. Give it a gentle stir and let it sit for about 5-10 minutes. You want to see a foamy layer on top – that’s your sign the yeast is alive and ready to work its magic! If it doesn’t foam, your yeast might be old, or the milk was too hot or too cold, so you’ll need to start this step again. Once foamy, add the remaining 2 tablespoons of granulated sugar and the softened ½ cup of butter to the yeast mixture. Stir until the butter is mostly incorporated and the sugar is dissolved. This forms our wet ingredients.
Step 4: Combine
Pour the wet ingredients into the bowl with the dry ingredients. Mix everything together with a spoon or a spatula until a shaggy dough forms. Don’t overmix at this stage! We’re not developing gluten here like in bread. Just get it to come together. Turn the dough out onto a lightly floured surface and knead gently for just a minute or two until it’s somewhat smooth. It will be a little sticky, and that’s okay. Cover the dough with plastic wrap or a damp kitchen towel and let it rest for about 10 minutes. This short rest helps the flour absorb moisture.
Step 5: Prepare Filling
While the dough rests, let’s get our filling ready if you’re using one. In a small bowl, whisk together the melted ½ cup of butter, ¼ cup of granulated sugar, and 1 teaspoon of cinnamon. If you’re adding chocolate chips or fruit preserves, have them ready to go. This simple cinnamon-sugar mixture is my go-to for that classic sweet pastry flavor. It’s so easy and really elevates the cruffins.
Step 6: Layer & Swirl
Now for the fun part – building those layers! On a lightly floured surface, roll out the rested dough into a large rectangle, about 12×18 inches. Aim for an even thickness. Brush the entire surface of the dough with the melted butter and cinnamon-sugar mixture (or your chosen filling). Sprinkle evenly. Starting from one of the long sides, tightly roll up the dough into a log. Pinch the seam to seal it. Now, this is where we get fancy. Using a sharp knife, slice the log into 12 equal pieces, about 1.5 inches thick. Take each piece and place it, cut-side up, into one of the prepared muffin cups. You should see those beautiful swirls forming already! If the dough feels too sticky, don’t be afraid to dust your hands and the surface lightly with more flour.
Step 7: Bake
Now, let’s get these beauties baked! Preheat your oven to 375°F (190°C). Place the muffin tin on a baking sheet (this catches any drips and makes for easier handling). Bake for 20-25 minutes, or until the cruffins are golden brown and puffed up beautifully. The exact baking time can vary depending on your oven, so keep an eye on them. You want them to be beautifully golden, with maybe a few crispy bits on the edges. A toothpick inserted into the center should come out mostly clean (a few moist crumbs are okay).
Step 8: Cool & Glaze
Once baked, carefully remove the muffin tin from the oven. Let the cruffins cool in the tin for about 5-10 minutes. This allows them to set up a bit. Then, gently transfer them to a wire rack to cool completely. While they’re cooling, you can whip up the glaze if you like. In a small bowl, whisk together the powdered sugar, 2-3 tablespoons of milk or water, and the vanilla extract until smooth and drizzle-able. Once the cruffins are completely cool, drizzle the glaze over the tops. Don’t over-glaze; a light drizzle looks elegant and doesn’t make them too sweet.
Step 9: Slice & Serve
And there you have it! Your glorious homemade cruffins. They are best served warm or at room temperature. You can slice them in half horizontally to admire the layers or just dive right in. They’re fantastic on their own, but even better with a cup of coffee or tea. Enjoy the fruits of your labor!
What to Serve It With
These homemade cruffins are so wonderfully versatile, they fit into almost any meal or occasion. For a delightful **Breakfast**, they’re simply divine alongside a hot cup of strong coffee. Imagine sinking your teeth into a warm cruffin with your morning brew – pure perfection. I often just serve them plain, letting that buttery goodness shine, but a tiny dollop of fresh whipped cream or a spoonful of berry compote on the side is never a bad idea. When it comes to **Brunch**, they really steal the show. You can elevate them further by pairing them with fresh fruit salad, a light yogurt parfait, or even a savory dish like scrambled eggs or a simple quiche. For a truly elegant presentation, arrange them on a tiered stand with other brunch favorites. If you’re looking for a sweet finale, these cruffins are absolutely wonderful **As Dessert**. I love serving them warm with a scoop of vanilla bean Ice Cream or a drizzle of warm caramel sauce. They’re also fantastic with a dollop of crème fraîche or a fruit coulis. My personal favorite is a rich chocolate ganache drizzled over the top. And for those moments when you just need a **Cozy Snack**, these cruffins are your answer. They’re comforting, satisfying, and the perfect accompaniment to a good book and a warm drink on a rainy afternoon. My kids absolutely adore them, especially with a little extra chocolate in the filling. They’re a treat that truly feels special, no matter how you serve it.
Top Tips for Perfecting Your Homemade Cruffins
I’ve made these cruffins more times than I can count, and through trial and error, I’ve picked up a few tricks that I think will really help you achieve pastry perfection. For the **Dough Prep**, make sure your butter for the dough is softened but not melted. It should be pliable. For the layering, the cold butter should be cubed small and be quite cold – almost frozen – this helps create those distinct layers as it melts in the oven. When it comes to **Mixing Advice**, remember that we’re not trying to develop a lot of gluten here. Just mix until the dough comes together. Overmixing can lead to tough cruffins, and nobody wants that! The dough will be a bit sticky, and that’s perfectly normal. A little flour on your hands and the surface is all you need to handle it. For **Swirl Customization**, don’t be afraid to get creative with your fillings! I’ve tried raspberry jam, Nutella, and even a savory mixture with cheddar and chives – they all work beautifully. Just ensure your fillings aren’t too wet, or they might make the dough soggy. When spreading, leave a small border free of filling on one edge so it seals well when rolled. For **Ingredient Swaps**, if you don’t have milk, you can use water or even a non-dairy milk like almond or oat milk, though the richness might be slightly different. For the butter, while unsalted is preferred for controlling salt levels, salted butter can work; just reduce the added salt in the dough slightly. When it comes to **Baking Tips**, using a light-colored muffin tin can help prevent the bottoms from browning too quickly. If your oven tends to have hot spots, rotating the tin halfway through baking can ensure even cooking. I always test for doneness by gently pressing the top; it should feel slightly firm and spring back. For **Glaze Variations**, if you prefer a less sweet topping, you can simply dust the cooled cruffins with powdered sugar. A lemon zest mixed into the powdered sugar glaze adds a lovely brightness, or for a chocolate lover, a simple chocolate glaze made with melted chocolate and a touch of oil or butter is divine. The key is to let the cruffins cool completely before glazing; otherwise, the glaze will just melt right off.
Storing and Reheating Tips
One of the best things about these homemade cruffins is that they store surprisingly well, which is a lifesaver for busy mornings or when you just want a quick treat. If you have any leftovers (which is rare in my house!), you can store them at **Room Temperature** for up to 2 days. Make sure to keep them in an airtight container or wrap them well in plastic wrap to prevent them from drying out. They’ll maintain their lovely texture for this period. For longer storage, **Refrigerator Storage** is your best bet. Pop them into an airtight container and they should stay good for up to 4-5 days. The texture might become a little denser, but they’ll still be delicious. If you find they’ve softened a bit, you can always pop them in the toaster oven for a few minutes to crisp them up. When it comes to **Freezer Instructions**, these cruffins freeze like a dream! Let them cool completely, then wrap each cruffin individually in plastic wrap, followed by a layer of aluminum foil or place them in a freezer-safe bag. They can be frozen for up to 2-3 months. To thaw, simply bring them out of the freezer and let them thaw at room temperature for a few hours. If you want that freshly baked texture, you can gently reheat them in a low oven (around 300°F or 150°C) for 5-10 minutes after thawing. The **Glaze Timing Advice** is important: if you plan to store them at room temperature or in the freezer, it’s best to add the glaze *after* thawing and just before serving. Glaze applied too early can become sticky or melt off during storage. If you’re refrigerating them for a day or two, glazing them before refrigerating is usually fine, but they’ll be at their best if you can add the glaze when you’re ready to eat.
Frequently Asked Questions
Final Thoughts
I really hope you give these homemade cruffins a try. They’re honestly one of my favorite things to bake because they feel so special, yet they’re so achievable. The way the layers puff up and the aroma that fills your kitchen is just pure joy. They represent that perfect balance of a decadent treat and a comforting bake. If you love the flaky layers of a croissant and the simple pleasure of a muffin, then these are truly going to be your new obsession. They’re a fantastic way to impress guests or just treat yourself to something truly wonderful. I’m already planning my next batch with a Salted Caramel swirl! If you do make them, please, please let me know how they turn out in the comments below! I’d love to hear about your favorite fillings or any fun twists you come up with. Your feedback and photos are what make this whole blogging thing so rewarding. Happy baking, my friends!

Homemade Cruffins
Ingredients
Dough Ingredients
- 3.5 cups all-purpose flour
- 0.25 cup granulated sugar
- 1.5 teaspoons instant yeast
- 1 teaspoon salt
- 1.25 cups warm milk about 105-115°F (40-46°C)
- 0.5 cup unsalted butter melted
Butter Layer
- 1 cup unsalted butter softened
Glaze
- 1 cup powdered sugar
- 2 tablespoons milk
- 0.5 teaspoon vanilla extract
Instructions
Preparation Steps
- In a large bowl, whisk together flour, sugar, yeast, and salt.
- Pour in the warm milk and melted butter. Mix until a shaggy dough forms.
- Turn the dough out onto a lightly floured surface and knead for 8-10 minutes until smooth and elastic.
- Place the dough in a lightly oiled bowl, cover, and let it rise in a warm place for 1-1.5 hours, or until doubled in size.
- Punch down the dough and turn it out onto a lightly floured surface. Roll it into a large rectangle, about 12x18 inches.
- Spread the softened butter evenly over the dough, leaving a small border.
- Roll the dough up tightly from the long edge.
- Cut the roll into 12 equal pieces.
- Place the cruffin pieces into greased muffin tins.
- Cover and let rise for another 30 minutes.
- Preheat oven to 375°F (190°C). Bake for 18-20 minutes, or until golden brown.
- While the cruffins are baking, whisk together powdered sugar, milk, and vanilla extract for the glaze.
- Once baked, remove cruffins from the oven and let them cool slightly before drizzling with glaze.
Notes
Featured Comments
“Impressed! Clear steps and absolutely loved results. Perfect for busy nights.”
“New favorite here — creamy. crowd-pleaser was spot on.”
“Super easy and turned out amazing! My family asked for seconds. Saving this one.”
“This sweet treat was absolutely loved — the balanced really stands out. Thanks!”
“Made it tonight and wow — creamy! Will definitely make Homemade cruffins again.”
“Packed with flavor and so simple. Exactly what I wanted from Homemade cruffins.”