

You know those moments? The ones where you’re about to serve dessert, and you realize you’re completely out of that fancy store-bought stuff? Or maybe you’re just craving something sweet, something light and airy, but don’t want to fire up the oven for a whole cake. That’s exactly when my go-to recipe for homemade Whipped Cream swoops in like a superhero. It’s so ridiculously simple, it feels like cheating, but the taste? Oh, the taste is pure magic. It’s the kind of thing that elevates a humble bowl of berries or a slice of pie into something truly special. I’ve tried all sorts of shortcuts and store-bought versions over the years, but nothing, and I mean NOTHING, compares to the fresh, cloud-like texture and pure, sweet dairy flavor of whipped cream made right in your own kitchen. This isn’t just a recipe; it’s a little bit of kitchen alchemy that I’m so excited to share with you all today. Forget the tubes and tubs – this is the real deal, and it’s surprisingly easy!
What is a homemade whipped cream?
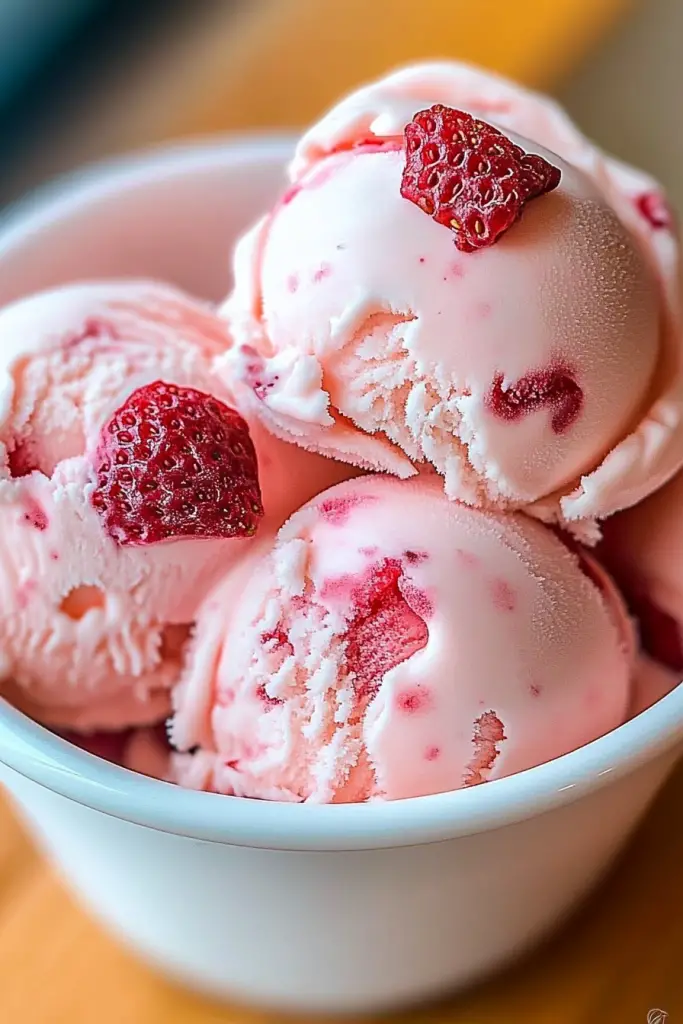
So, what exactly is this magical creation we’re talking about? At its heart, homemade whipped cream is simply heavy whipping cream that’s been agitated until it becomes thick, airy, and forms soft or stiff peaks. Think of it as capturing little pockets of air within the fat molecules of the cream, transforming it from a liquid into a luscious, spoonable delight. It’s the quintessential topping for countless desserts, from chocolate cakes and fruit tarts to Ice Cream sundaes and even a simple mug of hot cocoa. The beauty of making it yourself lies in the absolute purity of its flavor. You control the sweetness, the vanilla essence, and you get that incredible, melt-in-your-mouth texture that you just can’t replicate with anything processed. It’s essentially dessert in its most basic, unadulterated, and glorious form.
How do I make homemade whipped cream?
Quick Overview
Making this homemade whipped cream is surprisingly straightforward. You’ll need just a few simple ingredients and a way to whip them together – either a hand mixer or a stand mixer works wonders. The key is starting with very cold cream and chilled equipment. In just a few minutes, you’ll transform liquid cream into fluffy peaks, ready to adorn your favorite desserts. It’s a speedy process that delivers maximum flavor and texture, making it ideal for quick weeknight desserts or impressing guests with minimal effort.
Ingredients
What is the creamy base?
2 cups (1 pint) Heavy Whipping Cream (must be at least 30-35% fat content for proper whipping. Make sure it’s super cold!)
1/4 cup Powdered Sugar (also known as confectioners’ sugar or icing sugar. This dissolves easily and keeps the cream smooth. You can adjust this amount to your sweetness preference.)
1 teaspoon Pure Vanilla Extract (This adds that classic, warm flavor. Don’t skimp on the quality here; it makes a difference!)
Optional: A tiny pinch of salt (just a whisper, it really enhances the sweetness and creaminess!)
Step-by-Step Instructions
Step 1: Chill Everything
This is probably the MOST important step. Pop your bowl (a metal one is best, as it stays colder longer) and your whisk attachment for your mixer into the freezer for at least 15-20 minutes. The colder everything is, the faster and fluffier your cream will whip up. I usually do this while I’m getting out the other ingredients.
Step 2: Pour in the Cream
Once your bowl and whisk are nice and frosty, pour your very cold heavy whipping cream into the chilled bowl. Make sure there are no lingering ice crystals in the cream itself – you want it liquid but extremely cold.
Step 3: Add Sweetener and Flavor
Sprinkle the powdered sugar over the cold cream. Add the vanilla extract and the optional tiny pinch of salt. Powdered sugar is key here because it dissolves so easily, preventing any grainy texture that granulated sugar might leave behind.
Step 4: Whip It Good!
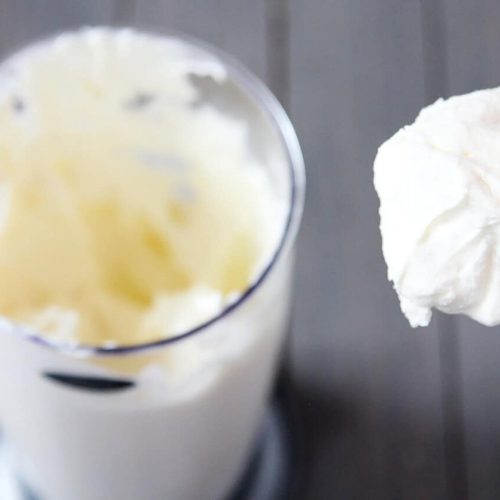
Start whipping on low speed with your electric mixer. As the cream begins to thicken slightly, gradually increase the speed to medium-high. Keep an eye on it! You’ll see it go from liquid to foamy, then to thicker and thicker. You’re looking for soft peaks to form – when you lift the whisk, the cream should form a peak that gently curls over. If you want it stiffer, keep going, but be careful not to over-whip, or you’ll end up with butter!
Step 5: Check for Peaks
The magic happens when you can lift the whisk and the cream forms a peak that holds its shape but the tip might curl slightly (soft peaks). If you continue whipping, you’ll reach medium peaks (holds shape with a slight curl) or stiff peaks (holds shape firmly). For most uses, soft to medium peaks are perfect. If you want to dollop it securely, go for stiff peaks. Just be sure to stop before it looks curdled or starts to separate – that’s the point of no return!
Step 6: Taste and Adjust (Optional)
Before you stop, give it a quick taste. Need a little more sweetness? Add another tablespoon of powdered sugar and whip briefly. Want more vanilla? Add a tiny splash more. This is your chance to customize!
Step 7: Serve Immediately or Chill
Your gorgeous homemade whipped cream is ready! For the best texture and flavor, serve it right away. If you need to store it for a little while, cover it gently and pop it back in the refrigerator. It’s best used within a few hours.
Step 8: Dollop and Enjoy!
Use a spoon to dollop generous amounts onto your desserts, or if it’s stiff enough, you can even pipe it using a pastry bag and tip. Enjoy that incredible homemade taste!
What to Serve It With
Oh, the possibilities! My homemade whipped cream is like the little black dress of toppings – it goes with absolutely everything and makes it look instantly more glamorous. For breakfast, I absolutely adore a dollop of this on warm, fluffy pancakes or waffles. It’s also divine on top of fresh fruit salads, especially berries, making a simple breakfast feel like a treat. For brunch gatherings, it’s the perfect accompaniment to a slice of my famous Lemon Poppy Seed loaf or even a rich chocolate cake. If you’re serving it as a more formal dessert, think of it as the ideal partner for a slice of warm apple pie, a decadent chocolate lava cake, or even just a simple bowl of fresh strawberries. The contrast of the warm dessert and the cool, creamy whipped topping is divine. For those cozy snack moments, it’s fantastic stirred into a mug of hot chocolate, spooned over a warm brownie, or simply enjoyed by the spoonful when you need a little pick-me-up. My kids actually ask for this on their scrambled eggs sometimes – yes, really! It just adds a touch of sweetness and creamy goodness to everything.
Top Tips for Perfecting Your Homemade Whipped Cream
I’ve definitely learned a few tricks over the years to ensure my homemade whipped cream is always perfect. First, and I can’t stress this enough, is the temperature. You absolutely MUST use cold heavy whipping cream and chilled equipment. I’m talking a cold bowl (metal ones are fantastic for this) and cold beaters. If anything is even slightly warm, your cream might not whip up properly, or it could take ages. Second, don’t be afraid to start slow. When you first begin whipping, start on a low speed to avoid splashing. As the cream starts to thicken, you can gradually increase the speed to medium-high. This helps build structure nicely. A common mistake is over-whipping. It happens so fast! One minute you have beautiful, soft peaks, and the next, it starts to look grainy and curdled, and you’ve made butter. My rule of thumb is to stop as soon as you achieve the consistency you need – usually soft to medium peaks for most desserts. If you do accidentally over-whip it a bit, don’t despair! You can sometimes salvage it by gently whisking in a tablespoon or two of *unwhipped* heavy cream to bring it back to a smoother consistency. For ingredient swaps, I’ve experimented with different sweeteners. While powdered sugar is my favorite for its smooth texture, you can use a little less granulated sugar if that’s all you have, but whisk it thoroughly to ensure it dissolves. For flavor variations, beyond vanilla, you can add a splash of almond extract, a hint of orange zest, or even a tablespoon of cocoa powder for a chocolatey twist. Just make sure to add any extra dry ingredients like cocoa powder with the sugar to prevent clumps. And remember, a little pinch of salt, even if you think it’s strange, really does make a difference in balancing the sweetness and bringing out the rich dairy flavor. Trust me on this one!
Storing and Reheating Tips
This homemade whipped cream is best enjoyed fresh, right after it’s made, because its texture is at its absolute peak. However, if you find yourself with leftovers, don’t worry! You can store it in the refrigerator for a short period. The best way to keep it fresh is to transfer it into an airtight container or cover it very snugly with plastic wrap, pressing the wrap directly onto the surface of the whipped cream to prevent air from getting to it. In the fridge, it will typically stay good and maintain a decent texture for about 12 to 24 hours. Beyond that, it might start to weep or lose its fluffiness. If it does start to look a little separated or watery after a day, you can sometimes revive it by giving it a quick whisk for a few seconds to bring it back together. I generally don’t recommend trying to freeze homemade whipped cream. While it’s technically possible, the texture really suffers upon thawing. It tends to become grainy and watery, and you lose that lovely airy quality. If you absolutely have to freeze it, it’s best used as a base for something else, like in a smoothie, rather than as a topping. For reheating, there’s no reheating needed since it’s served cold! The key is proper storage to maintain its cold, creamy state.
Frequently Asked Questions
Final Thoughts
There you have it – the simplest, most delightful homemade whipped cream that’s practically foolproof. It’s amazing how just a few ingredients and a few minutes can create something so incredibly delicious and versatile. This recipe is a testament to the fact that sometimes, the best things are the simplest. It’s perfect for adding that final touch of creamy luxury to any dessert, making everyday moments feel a little more special. If you love this, you might also enjoy my recipe for Easy Chocolate Mousse or my guide to the Perfect Fruit Tart, both of which are fantastic companions for a generous dollop of fresh whipped cream. I truly hope you give this a try and experience the magic of homemade whipped cream for yourself. Let me know in the comments below how it turns out for you, or if you have any fun flavor variations you’ve discovered! Happy whipping!
Homemade Whipped Cream
Ingredients
Main Ingredients
- 1 cup heavy whipping cream very cold
- 2 tablespoon powdered sugar
- 1 teaspoon vanilla extract
Instructions
Preparation Steps
- Ensure your heavy whipping cream is very cold. You can also chill your mixing bowl and whisk attachment in the freezer for 10-15 minutes.
- Pour the cold heavy whipping cream into the chilled mixing bowl.1 cup heavy whipping cream
- Add the powdered sugar and vanilla extract to the bowl.1 cup heavy whipping cream
- Using an electric mixer (or a whisk and some serious elbow grease), beat the mixture on medium-high speed. Start slowly and increase speed as it thickens. Continue beating until stiff peaks form. This usually takes about 30 seconds to 2 minutes, depending on your mixer.
- Be careful not to overbeat, or you'll end up with butter!
- Serve immediately or cover and refrigerate for later use.
Notes
Featured Comments
“Impressed! Clear steps and quick weeknight win results. Perfect for busy nights.”
“New favorite here — creamy. crowd-pleaser was spot on.”
“Super easy and turned out amazing! My family asked for seconds. Saving this one.”
“This sweet treat was absolutely loved — the balanced really stands out. Thanks!”
“Made it tonight and wow — quick weeknight win! Will definitely make homemade whipped cream again.”
“Packed with flavor and so simple. Exactly what I wanted from homemade whipped cream.”


