

There’s something truly magical about the aroma of baked apple butter filling the house on a chilly weekend afternoon. It’s like a warm hug that makes everything feel just a little bit cozier. I remember sneaking slices of this apple butter cake as a kid — the way the sweet, spiced apple swirl streaks through the moist batter, creating these beautiful, marbled patterns. My mom always made this during fall, when apples and cinnamon seem to dominate the air, but honestly, it’s a treat I crave all year round. Trust me, this apple butter cake is one of those recipes that feels like a little slice of nostalgia wrapped in a cozy blanket. It’s surprisingly simple to whip up, and the smell alone will bring everyone running into the kitchen. My kids ask for this all the time — and honestly, it’s pretty much gone in minutes at my house!
What is Apple Butter Cake?
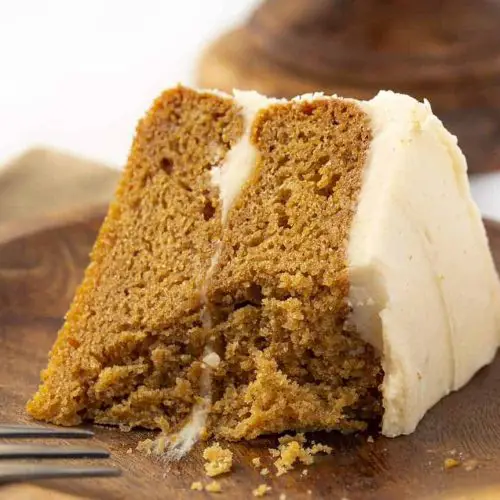
Think of apple butter cake as a moist, tender cake with swirls of rich, fragrant apple butter baked right into it. It’s essentially a cross between a spice cake and a quick bread, with the added decadence of that caramelized apple flavor running through every bite. The name might throw you off at first — after all, apple butter isn’t just apple jam; it’s a slow-cooked, intensely flavorful spread made from apples, sugar, and spices, simmered down until thick and velvety. When you swirl it into the batter before baking, it creates these gorgeous caramel streaks and infuses the cake with that cozy, autumnal flavor. Think of it as a fancy coffee cake, but with a rustic, homey twist that makes it perfect for breakfast, brunch, or just a sweet treat any time of day.
How do I make Apple Butter Cake?
Quick Overview
This cake starts with a simple batter that comes together quickly — just cream your butter and sugar, add eggs and dry ingredients, and swirl in the luscious apple butter. The secret to that stunning marbled look? Pour half the batter into your pan, spread a generous layer of apple butter over it, then top with the remaining batter. A quick swirl with a knife creates those charming streaks of apple goodness. Bake it until golden and a toothpick inserted in the center comes out clean. The smell alone is worth the effort, and it’s perfect served warm or at room temperature with a dusting of powdered sugar or a dollop of whipped cream.
Ingredients
For the Main Batter:
– 1 ½ cups all-purpose flour (I always opt for unbleached for a richer flavor)
– 1 teaspoon baking powder
– ½ teaspoon salt
– 1 teaspoon ground cinnamon (because you can’t have apple spice without it)
– ½ teaspoon ground nutmeg
– ½ cup unsalted butter, softened (but I’ve tested with almond or coconut oil, and it’s still lovely!)
– ¾ cup granulated sugar
– 2 large eggs
– ½ cup Greek yogurt or sour cream for extra moistness
– 1 teaspoon vanilla extract
For the Filling:
– ¾ cup quality apple butter (store-bought works great, or homemade if you’re feeling ambitious)
– Optional: a sprinkle of chopped walnuts or pecans for added crunch
For the Glaze:
– ½ cup powdered sugar
– 1-2 teaspoons milk or apple cider (adjust for desired drizzle consistency)
– A hint of vanilla or cinnamon (for extra warmth)
Step-by-Step Instructions
Step 1: Preheat & Prep Pan
I always start by preheating my oven to 350°F (175°C) — it’s the sweet spot for even baking. Grease a 9-inch round or square baking pan really well, and line it with parchment paper if you want easy removal. Trust me, nothing is worse than a sticky mess at the end! Just a quick spray of non-stick spray and a sprinkle of flour works perfectly.
Step 2: Mix Dry Ingredients
In a medium bowl, whisk together the flour, baking powder, salt, cinnamon, and nutmeg. This step is crucial because it evenly distributes the leavening and spices, ensuring your cake bakes uniformly. I’ve learned the hard way that skipping this step can result in uneven rise or spice pockets in the batter!
Step 3: Mix Wet Ingredients
In a large bowl, cream the softened butter and sugar with a hand mixer or whisk until light and fluffy. I do this for about 2-3 minutes, so it’s nice and airy. Add eggs one at a time, beating well after each addition. Then mix in the yogurt (or sour cream) and vanilla until smooth. The mixture should look creamy and slightly fluffy — I always keep an eye on not overbeating here, because that can toughen the batter later.
Step 4: Combine
Gradually add the dry ingredients to the wet, mixing just until combined. Be careful not to overmix — that’s how you get dense, tough cakes instead of moist, tender ones. Think of it as gently folding the ingredients in, just until they’re all coming together.
Step 5: Prepare Filling
Set aside about a cup of batter for the top layer. Take the remaining batter and spread half of it into your prepared pan. Then dollop about three tablespoons of apple butter randomly over the batter, spreading lightly but leaving some swirls. If you want a little crunch, sprinkle chopped nuts over the apple butter before adding the rest of the batter.
Step 6: Layer & Swirl
Pour the remaining batter over the apple butter layer. Using a knife or skewer, gently swirl through the batter to create beautiful marbled streaks. Don’t overdo it — you want the swirl to be pretty, not completely mixed into a mud-color mess.
Step 7: Bake
Pop the cake into the oven and bake for about 40-45 minutes. Keep an eye on it; if the top is getting too dark early, tent with foil. You know it’s done when a toothpick inserted in the center comes out clean or with just a few moist crumbs. The house will smell so good you won’t be able to resist sneaking a peek.
Step 8: Cool & Glaze
Let the cake cool in the pan for at least 15 minutes before transferring to a wire rack. This helps it set and makes slicing easier. Once cooled, drizzle with a simple glaze made from powdered sugar and a splash of milk or cider. This adds just a touch of sweetness and a pretty shine.
Step 9: Slice & Serve
Slice with a sharp knife — I like to wipe the blade between slices for the cleanest cut. Serve slightly warm or at room temperature, maybe with a dollop of whipped cream or a dusting of cinnamon sugar. It’s amazing with a cup of strong coffee or a glass of cold milk.
What to Serve It With
This apple butter cake is a little chameleon — it can shine in many different settings. For breakfast, pair it with a cup of steaming coffee and a smear of butter. My family loves it for brunch alongside some fresh fruit and a drizzle of honey; it’s hearty enough to stand on its own but elegant enough for special mornings. As a dessert, I like it warm, topped with vanilla ice cream or whipped cream — the contrast of cold and warm is divine. It’s also perfect for a cozy afternoon snack; just a slice and a mug of herbal tea, and you’re set. Over the years, I’ve learned that this cake tastes even better the next day after the flavors meld — so make it ahead if you can! I’ve also served it with caramel sauce or even a sprinkle of crumbled shortbread for extra indulgence. Honestly, this cake feels like a little piece of fall inside every bite, but it’s so comforting, I make it year-round.
Top Tips for Perfecting Your Apple Butter Cake
From my experience, a few small tricks really make all the difference. First, when prepping your apples, I always squeeze out excess moisture if using grated zucchini or fresh fruit — extra moisture can make your batter runny. When mixing, don’t overbeat — just enough to combine everything; otherwise, the cake might turn out dense rather than light and fluffy. For that perfect marbled pattern, I recommend pouring half the batter, dolloping the apple butter, then carefully adding the rest and swirling gently with a skewer or knife. You want distinct streaks that look pretty but don’t blend completely. If you want a deeper caramel flavor, try heating your apple butter slightly before swirling it into the batter; it’ll seep into the cake better. For ingredient swaps, I sometimes use honey or maple syrup instead of sugar, and it adds a subtle depth — but be mindful to adjust the liquid slightly. When baking, oven positioning can matter — middle rack is usually best unless your oven runs hot or uneven. Keep an eye on the cake after about 35 minutes; you don’t want it to overbake and dry out, but you want that toothpick to come out clean. And don’t forget the glaze — it adds that finishing touch of sweetness and a glossy finish, but you can skip it for a lighter option or sprinkle a little cinnamon on top instead.
One lesson I’ve learned is to let the cake cool completely before slicing — warm slices tend to fall apart. And I always recommend storing leftovers in an airtight container at room temp for 2 days, then move to the fridge if you want to keep it fresh longer. I’ve found that warming slices briefly in the microwave before serving brings back that just-baked moisture — it’s like the cake is alive again. Trust me, every time I make this, I learn something new — but one thing’s for sure: it never disappoints.
Storing and Reheating Tips
This cake is pretty forgiving in storage. If you plan to serve it within a day or two, keep it in an airtight container at room temperature — it stays moist and tasty for about 2 days. Just make sure it’s covered well to prevent it from drying out. For longer storage, pop it into the fridge; it’ll last about 4 days. In that case, I like to warm individual slices in the microwave for about 10-15 seconds, just enough to revive that tender crumb. Freezing is also an option — wrap slices tightly in plastic wrap and then foil, and they’ll keep for up to 3 months. Thaw overnight in the fridge, then reheat gently. If you want to add the glaze later, just sprinkle it on when you’re ready to serve — it’s a nice touch that keeps everything looking fresh and appetizing.
Important tip: wait to glaze until just before serving if you’re refrigerating or freezing, so you get that beautiful glossy shine and fresh flavor.
Frequently Asked Questions
Final Thoughts
This apple butter cake is a real treasure in my baking arsenal. Its rustic beauty, combined with that incredible aroma and cozy flavor, makes it a must-try for any baker, beginner or seasoned. Whether you’re craving comfort, celebrating fall festivities, or just looking for something a little different, this recipe never disappoints. I love how adaptable it is — you can swap ingredients, add nuts, or layer it with cream cheese for even more indulgence. Most importantly, it’s one of those recipes that creates memories around the table — a cake that smells like childhood but tastes like love. If you give it a try, I’d love to hear how yours turns out! Drop a comment, share your tweaks, or snap a pic — I’ll be waiting to see your beautiful slices. Happy baking!
apple butter cake
Ingredients
Main Ingredients
- 1 cup unsalted butter
- 1 cup whole milk
- 0.5 cup apple butter
- 1 cup granulated sugar
- 1 cup light brown sugar
- 2 large eggs
- 1 teaspoon vanilla extract
- 2 cups all-purpose flour
- 1 teaspoon baking soda
- 1 teaspoon apple pie spice
Instructions
Preparation Steps
- Preheat the oven to 350°F. Spray two 8-inch round pans with nonstick spray and line with parchment paper.
- In a large bowl, whisk together melted butter, milk, apple butter, granulated sugar, and brown sugar.
- Add eggs and vanilla extract; beat until smooth.
- Add flour, baking soda, and apple pie spice; mix until just combined.
- Divide batter evenly between prepared pans. Bake for 16 minutes or until a toothpick inserted comes out clean. Let cool.
Notes
Featured Comments
“I’ve always loved the cozy scent of baking apples—this sounds like a perfect comfort treat!”
“Impressed! Clear steps and so flavorful results. Perfect for busy nights.”
“New favorite here — so flavorful. crowd-pleaser was spot on.”
“Super easy and turned out amazing! My family asked for seconds. Saving this one.”
“This sweet treat was absolutely loved — the balanced really stands out. Thanks!”
“Made it tonight and wow — family favorite! Will definitely make How to Bake Delicious Spiced Apple Butter Cake again.”


I’ve always loved the cozy scent of baking apples—this sounds like a perfect comfort treat!