


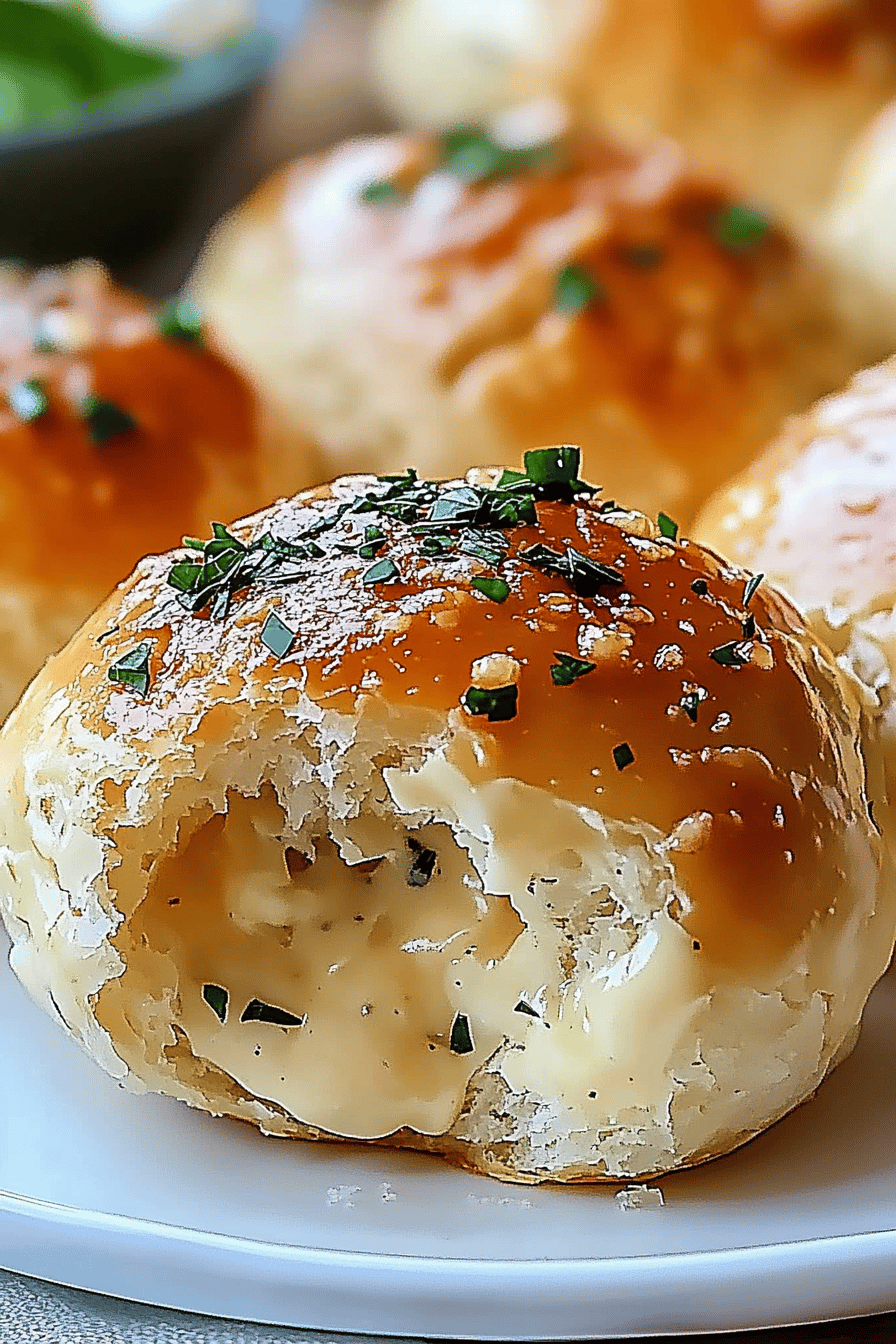
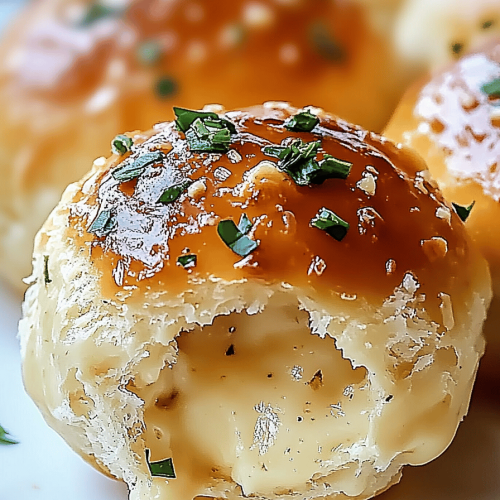
Okay, friends, let me tell you about these **Garlic Butter Cheese Bombs**. Think of them like if a fluffy dinner roll and cheesy garlic bread decided to have a baby… a ridiculously delicious, melt-in-your-mouth baby! I swear, the first time I made these, they disappeared faster than a plate of cookies at a holiday party. It’s one of those recipes that I keep coming back to, and I always make sure to double or triple the batch because everyone fights over them! Seriously, if you love garlic and cheese, you *need* these in your life. This recipe is right up there with my grandma’s famous cinnamon rolls, but on the savory side. And trust me, that’s saying something!
What Is Garlic Butter Cheese Bombs?
Simply put, Garlic Butter Cheese Bombs are little balls of yeasty dough, stuffed with gooey cheese, and then slathered in a garlicky, buttery glaze. It’s essentially a savory, bite-sized treat that’s incredibly satisfying. Think of it as a cross between a dinner roll and cheesy garlic bread, all rolled into one convenient and utterly addictive package. The name pretty much says it all, right? They’re a bomb of flavor, a cheesy explosion, and an absolute must-try if you’re a garlic lover like me. And the best part? They’re surprisingly easy to make, even if you’re not a seasoned baker.
How to Make Garlic Butter Cheese Bombs
Quick Overview
Making these amazing Garlic Butter Cheese Bombs is much easier than you might think! You’ll start by making a simple yeast dough, letting it rise until fluffy. Then, you’ll punch it down, stuff it with your favorite cheese, and bake until golden brown. Finally, you’ll brush them with a generous amount of garlic butter. The secret is in not overworking the dough and being generous with the cheese and butter! It’s so simple it becomes almost therapeutic, and the smell that fills your kitchen is enough to make anyone happy.
Ingredients
For the Main Batter:
- 1 cup warm water (about 110°F) – Make sure it’s not too hot, or it will kill the yeast!
- 2 1/4 teaspoons active dry yeast – One packet is perfect.
- 1 tablespoon granulated sugar – This feeds the yeast and adds a touch of sweetness.
- 2 1/2 cups all-purpose flour, plus more for dusting – I prefer unbleached for a better flavor.
- 1 teaspoon salt – Balances the sweetness and enhances the other flavors.
- 2 tablespoons olive oil – Adds moisture and helps create a soft dough.
For the Filling:
- 8 ounces mozzarella cheese, cut into 1/2-inch cubes – You can also use shredded mozzarella if that’s what you have on hand. Pro tip: use fresh mozzarella for the best melt!
- Optional: 1/4 cup grated Parmesan cheese – Adds a salty, nutty flavor that complements the mozzarella.
For the Glaze:
- 1/2 cup (1 stick) unsalted butter, melted – Don’t skimp on the butter! It’s what makes these bombs so delicious.
- 4 cloves garlic, minced – Use fresh garlic for the best flavor. I always use more than the recipe calls for!
- 1/4 teaspoon garlic powder – Adds an extra punch of garlic flavor.
- 1/4 teaspoon dried parsley – Adds color and freshness.
- Pinch of salt – Enhances the flavors.

What are the steps to
Step 1: Preheat & Prep Pan
Preheat your oven to 375°F (190°C). Grease a 9×13 inch baking pan or line it with parchment paper. I prefer parchment paper for easy cleanup. Trust me on this one!
Step 2: Mix Dry Ingredients
In a large bowl, whisk together the flour, sugar, and salt. Set aside. Make sure everything is well combined so that the salt is evenly distributed.
Step 3: Mix Wet Ingredients
In a separate bowl, dissolve the yeast in warm water. Add the olive oil. Let it sit for 5 minutes until foamy, this step ensures your yeast is alive and will give you the yeast.
Step 4: Combine
Mix wet ingredients into dry ingredients and mix until a shaggy dough forms. Turn out the dough onto a lightly floured surface and knead for 5-7 minutes, until smooth and elastic. How do I make a dough that’s soft and not overmixed?
Step 5: Prepare Filling
If you’re using block mozzarella, cut it into small cubes. If you’re using shredded mozzarella, you are good to go! Is Parmesan cheese good for cooking?
Step 6: Layer & Swirl
Place dough in a lightly oiled bowl, turning to coat. Cover with plastic wrap and let rise in a warm place for about 1 hour, or until doubled in size. How do you get the bombs nice and fluffy?
Step 7: Bake
What is the best way to divide dough into 12 equal pieces? How do I make a circle of mozzarella cheese? The center, and pinch the edges to seal. Place the seam-side down in the prepared baking pan. Let the dough sit for 10 minutes before baking!
Step 8: Cool & Glaze
Bake for 20-25 minutes, or until golden brown. Do not overbake. While the bombs are baking, melt the butter in a small saucepan. Add the minced garlic, garlic powder, parsley, and salt to a bowl. Mix well. Cook for 2 minutes, until garlic is fragrant. Remove from heat.
Step 9: Slice & Serve
How do I remove the bombs from the oven and brush generously with the garlic butter mixture? Let them cool before serving. These are best served warm!
What should I serve it with?
What are Garlic Butter Cheese Bombs? How do I serve them, depending on the occasion?
For Breakfast:Serve warm with scrambled eggs and coffee. What are some great ways to start the day with a savory taste?
For Brunch:Arrange them beautifully on a platter with fresh fruit, cheese board, and mimosa bar. They add a touch of elegance to any brunch spread.
As Dessert:Okay, maybe not *as* dessert, but alongside a savory dessert cheese plate with some creamy brie and ham. The contrast is surprisingly delicious!
For Cozy Snacks:Serve warm with a bowl of soup or chili. What are some good dips to add to a chilly evening?
I’ve even served these at barbecues alongside grilled meats. They go with anything. They’re always a crowd pleaser!
Top Tips for Perfecting Your Garlic Butter Cheese Bombs
Want to take your Garlic Butter Cheese Bombs to the next level? Here are a few of my top tips:
Yeast Prep: Make sure your water is warm enough to activate the yeast, but not too hot, or you’ll kill it! I always aim for around 110°F (43°C). This is a critical step.
Mixing Advice: Don’t overwork the dough! Overmixing will result in tough, dense bombs. Mix until just combined, then knead until smooth and elastic.
Cheese Customization: Feel free to experiment with different cheeses! Provolone, cheddar, or even a blend of cheeses would be delicious. I once added some pepper jack for a spicy kick, and it was a hit!
Ingredient Swaps: If you don’t have olive oil, you can use melted butter or another vegetable oil in the dough. For a richer flavor, try using milk instead of water.
Baking Tips: Keep an eye on the bombs while they’re baking. If they start to brown too quickly, tent them with foil to prevent burning.
Garlic Butter Variations: Add a pinch of Red Pepper flakes to the garlic butter for a little heat, or mix in some fresh herbs like rosemary or thyme for extra flavor. I also sometimes throw in a squeeze of lemon juice to brighten things up.
Storing and Reheating Tips
Want to make these Garlic Butter Cheese Bombs ahead of time? Here’s how to store and reheat them:
Room Temperature: Store in an airtight container for up to 2 days. They’re best enjoyed fresh, but they’ll still be delicious the next day.
Refrigerator Storage: Store in an airtight container in the refrigerator for up to 5 days. Reheat in the oven or microwave before serving. Be sure the container is sealed tight to keep the moisture in and the flavor preserved.
Freezer Instructions: Wrap the bombs individually in plastic wrap, then place them in a freezer bag. They can be frozen for up to 2 months. Thaw overnight in the refrigerator before reheating. These are great to have on hand for a quick snack.
Glaze Timing Advice: If you’re freezing the bombs, I recommend waiting to glaze them until after they’ve been reheated. This will prevent the glaze from becoming soggy.
Frequently Asked Questions
Final Thoughts
These Garlic Butter Cheese Bombs are truly something special. The combination of fluffy dough, gooey cheese, and garlicky butter is simply irresistible. It’s a recipe That’s Sure to impress your family and friends, and it’s so easy to make that you’ll find yourself making it again and again. If you love garlic and cheese as much as I do, you absolutely have to try these! And if you enjoy this recipe, be sure to check out my other bread recipes for more delicious inspiration. I can’t wait to hear how yours turn out! Happy baking!
How to Make 5-Minute Garlic Butter Cheese Bombs with Pillsbury Biscuits
Ingredients
Main Ingredients
- 1 can Pillsbury Grands! Biscuits
- 0.25 cup Butter Melted
- 2 tablespoons Garlic Minced
- 0.5 cup Mozzarella Cheese Shredded
- 1 teaspoon Italian Seasoning
Instructions
Preparation Steps
- Preheat oven to 375°F (190°C).
- In a small bowl, combine melted butter, minced garlic, and Italian seasoning.
- Separate each biscuit and flatten slightly. Place a small amount of mozzarella cheese in the center of each biscuit.
- Fold the biscuit around the cheese to form a ball, pinching the seams to seal.
- Dip each cheese bomb into the garlic butter mixture, coating all sides.
- Place the cheese bombs on a baking sheet lined with parchment paper. Bake for 10-12 minutes, or until golden brown.
- Serve warm and enjoy!
Notes
Featured Comments
“Impressed! Clear steps and creamy results. Perfect for busy nights.”
“New favorite here — turned out amazing. crowd-pleaser was spot on.”
“Super easy and turned out amazing! My family asked for seconds. Saving this one.”
“This sweet treat was absolutely loved — the fresh really stands out. Thanks!”
“Made it tonight and wow — absolutely loved! Will definitely make How to Make 5-Minute Garlic Butter Cheese Bombs with Pillsbury Biscuits again.”
“Packed with flavor and so simple. Exactly what I wanted from How to Make 5-Minute Garlic Butter Cheese Bombs with Pillsbury Biscuits.”


