

You know those recipes that just feel like a hug? The ones you whip up when you need a little cheer, or when unexpected guests pop by, and you want to impress them without breaking a sweat? Well, THIS is one of those for me. These mini fruit pizzas are just pure joy in edible form. They remind me so much of summer afternoons at my grandma’s house, with sunlight streaming through the kitchen window and the sweet, fresh scent of berries filling the air. Honestly, they’re my go-to when I’m craving something sweet but don’t want anything too heavy or complicated. They’re sort of like a deconstructed dessert pizza, but so much more delicate and delightful. If you’ve ever loved a good cookie bar or a slice of cheesecake, you’re going to fall head over heels for these mini fruit pizzas. They’re a family favorite, and my kids practically beg for them all the time!
What are mini fruit pizzas?
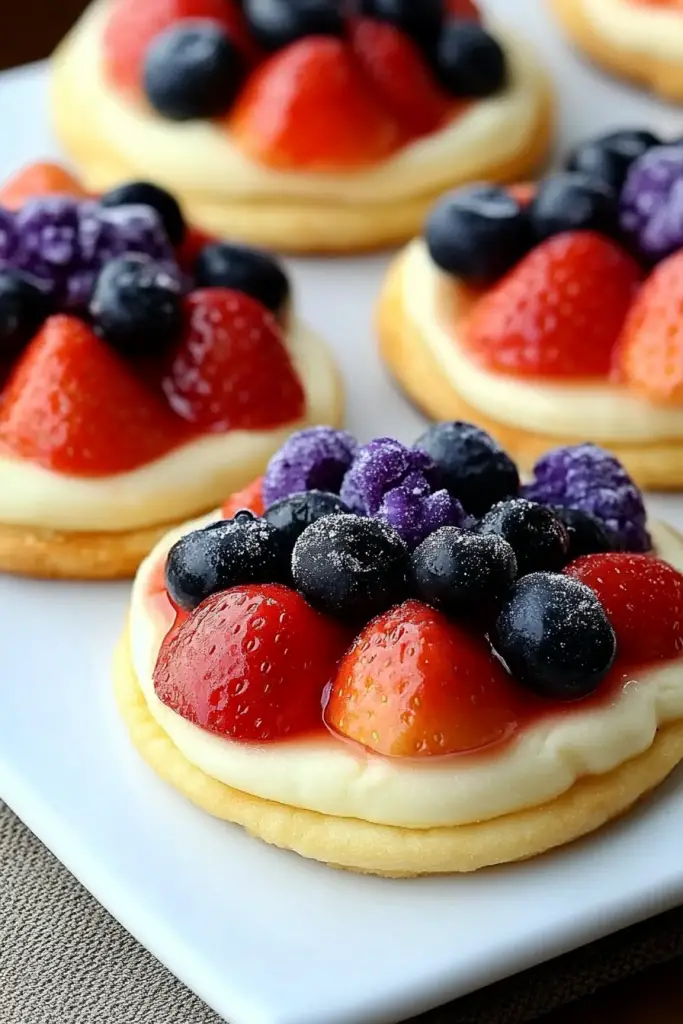
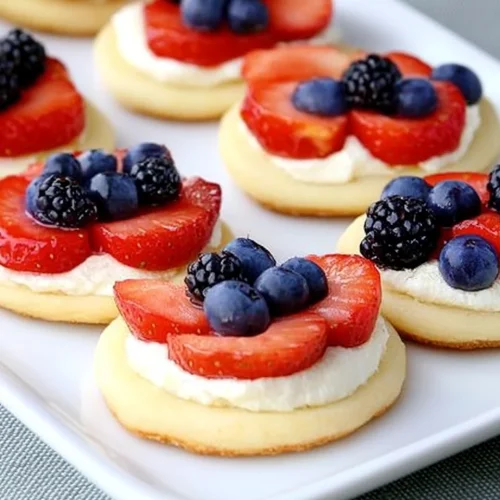
So, what exactly are these little wonders? Think of them as individual, bite-sized delights built on a soft, slightly sweet cookie crust. Instead of a traditional tomato sauce and cheese, we’re talking a creamy, dreamy, almost cheesecake-like spread, topped with a vibrant medley of fresh, colorful fruits. The “pizza” part comes from the circular shape and the way we arrange the toppings, but that’s where the comparison to a savory pizza ends! It’s essentially a delightful fusion of a cookie and a fruit tart, all made incredibly easy and adorable. The name itself, “mini fruit pizzas,” just perfectly captures what they are: small, delightful servings that look like tiny pizzas but taste like heaven. They’re the perfect canvas for whatever beautiful fruits you have on hand!
How do I make mini fruit pizzas?
Quick Overview
Making these mini fruit pizzas is surprisingly straightforward. We start by mixing up a simple, press-in cookie crust, baking it just until lightly golden. While that cools slightly, we whip together a super-creamy, no-bake filling. Then, it’s all about spreading that luscious filling onto the cooled crusts and artfully arranging your favorite fresh fruits on top. The whole process is really quick, and the results are always stunning. It’s a recipe that practically guarantees smiles.
Ingredients
For the main battery (Cookie Crust):
This is where the magic begins! We want a crust that’s tender but sturdy enough to hold all that yummy topping. It’s a pretty standard cookie dough, but the trick is in the texture.
- 1 cup (2 sticks) unsalted butter, softened: Make sure it’s nice and soft, not melted. It makes all the difference in how easily it mixes.
- 1 cup granulated sugar: For that perfect sweetness.
- 2 large eggs: These bind everything together beautifully.
- 1 teaspoon Vanilla Extract: A must for that classic cookie flavor!
- 2 ½ cups all-purpose flour: Spooned and leveled, please! Don’t pack it down.
- 1 teaspoon baking soda: Just a little lift.
- ½ teaspoon salt: To balance out the sweetness.
For the Filling:
This is the creamy dream that holds it all together. It’s so simple, but oh-so-good.
- 2 (8-ounce) packages Cream Cheese, softened: Let it sit out for at least an hour. Cold cream cheese is NOT your friend here!
- ½ cup powdered sugar: For sweetness and a smooth texture.
- 1 teaspoon lemon juice: A little tang to cut through the richness and brighten the flavors.
- ½ teaspoon vanilla extract: Just a hint more vanilla love.
For the Glaze (Optional but Recommended!):
This adds a lovely shine and keeps the fruit looking fresh. It’s super easy!
- ¼ cup apricot jam or apple jelly: I usually use apricot because it has a lovely, subtle flavor that doesn’t overpower the fruit.
- 1 tablespoon water: To thin it out just right.
For the Toppings:
This is where you get to play! I love using a variety of colors.
- Assorted fresh fruits: Such as strawberries, blueberries, raspberries, kiwi slices, mandarin orange segments, grapes (halved if large), sliced peaches, or mango chunks. Whatever looks beautiful and tastes delicious!
Step-by-Step Instructions
Step 1: Preheat & Prep Pan
First things first, let’s get our oven ready. Preheat it to 350°F (175°C). Now, for the “mini” part, I usually use a standard 9×13 inch baking pan for this. I like to line it with parchment paper, letting the ends hang over the sides like little handles. This makes lifting the whole thing out to slice so much easier. If you don’t have parchment, just grease and flour the pan really well. We want to avoid any sticking, ever!
Step 2: Mix Dry Ingredients
In a medium bowl, whisk together the flour, baking soda, and salt. Just a quick whisk to make sure they’re evenly distributed. This is a simple step, but it ensures your leavening agents and salt are spread throughout the dough, leading to a more consistent texture in your crust. Nobody wants a bite that’s too salty or doesn’t rise properly!
Step 3: Mix Wet Ingredients
In a large bowl, using an electric mixer (or a whisk and some elbow grease!), cream together the softened butter and granulated sugar until the mixture is light and fluffy. This usually takes a couple of minutes. Beat in the eggs one at a time, making sure each is fully incorporated before adding the next. Then, stir in the vanilla extract. You should have a beautifully smooth, pale yellow mixture.
Step 4: Combine
Now, gradually add the dry ingredients to the wet ingredients, mixing on low speed (or stirring gently) until just combined. It’s really important not to overmix here! Overmixing develops the gluten in the flour, which can lead to a tough crust. Stop mixing as soon as you no longer see streaks of dry flour. The dough will be soft and a bit sticky.
Step 5: Prepare Filling
While the crust mixture is chilling slightly (I usually pop it in the fridge for about 10 minutes if it’s very soft), let’s make the filling. In a separate bowl, beat the softened Cream Cheese until it’s perfectly smooth and creamy. Add the powdered sugar, lemon juice, and vanilla extract. Beat again until everything is well combined and silky smooth. Taste it – it should be just a hint sweet with a lovely tang. Adjust the powdered sugar if you prefer it sweeter, or add a tiny bit more lemon juice for extra zing.
Step 6: Layer & Swirl
Take your prepared baking pan. Spoon the Cookie Dough evenly into the bottom and press it down with your fingers or the bottom of a glass to form a uniform layer. Make sure it goes all the way to the edges. Don’t worry if it’s not perfectly flat; a little rustic charm is good! Now, gently spread the cream cheese filling evenly over the cookie crust. Don’t worry about getting it perfectly smooth, as the fruit will cover most of it.
Step 7: Bake
Pop the pan into your preheated oven. Bake for about 20-25 minutes, or until the edges of the cookie crust are lightly golden brown and the cream cheese filling is set. It shouldn’t be jiggly in the center. Keep an eye on it, as oven temperatures can vary. I usually check around the 20-minute mark. You want it baked, but not browned too much!
Step 8: Cool & Glaze
Once baked, remove the pan from the oven and let it cool completely on a wire rack. This is crucial! Trying to add the toppings while it’s warm will just make everything melt and slide off. Once it’s completely cool (I often let it cool for at least an hour, or even pop it in the fridge for a bit to speed things up), you can prepare the glaze. In a small saucepan or microwave-safe bowl, gently heat the apricot jam and water until it’s pourable. Stir until smooth. Brush this glaze lightly over the cooled cream cheese filling. This adds a beautiful sheen and helps keep the fruit from drying out. If you’re not using the glaze, just proceed to decorating!
Step 9: Slice & Serve
Now for the fun part! Arrange your beautiful fresh fruits over the glazed cream cheese layer. Get creative with patterns and colors! Once decorated, use the parchment paper handles to lift the entire dessert out of the pan onto a cutting board. Slice it into mini “pizzas” – I usually cut mine into 12 or 16 squares or rectangles. Serve immediately or chill until ready to serve. They’re best enjoyed the same day, but they’ll keep for a little while!
What to Serve It With
These mini fruit pizzas are so versatile, they fit in anywhere! For a delightful BREAKFAST, I love serving them alongside a steaming mug of coffee or a refreshing glass of iced tea. The sweetness is just enough to wake you up without being over the top. You can even cut them into smaller, more delicate pieces for a lighter start to the day. For BRUNCH, they’re a showstopper! I usually arrange them on a tiered stand or a beautiful platter, surrounded by other brunch favorites like quiche or fresh pastries. A mimosa or a sparkling cider pairs perfectly. As a DESSERT, they are simply divine. Serve them after a light meal, perhaps with a scoop of vanilla bean ice cream on the side for an extra treat. The contrast of the warm (or room temp) pizza and cold ice cream is heavenly. And for COZY SNACKS, this is my absolute favorite. I’ll just cut a few squares and curl up on the couch with a good book and a cup of tea. They’re so comforting and satisfying. My family also loves them with a side of yogurt, just to make it feel a *little* healthier, though I’m not sure that counts!
Top Tips for Perfecting Your Mini Fruit Pizzas
After making these more times than I can count, I’ve picked up a few tricks that I think really make a difference. For the crust, make sure your butter is truly softened. If it’s too cold, it won’t cream properly, and if it’s melted, your crust will be greasy and spread too much. When mixing the dough, seriously, don’t overdo it! Stop as soon as the flour is incorporated. A few little streaks of flour are fine; they’ll disappear as you press it into the pan. Overmixing is the quickest way to a tough crust, and we definitely don’t want that. For the cream cheese filling, room temperature cream cheese is NON-NEGOTIABLE. Cold cream cheese will result in a lumpy filling, no matter how much you beat it. Take the time to let it soften properly! I’ve learned this the hard way, believe me. When it comes to the fruit, fresh is best! Try to use fruits that are ripe but still firm. Overly soft fruits can get mushy. Also, consider the colors and textures. A mix of berries, kiwi, and maybe some melon looks absolutely stunning. If you’re using the glaze, make sure it’s warm but not boiling hot when you brush it on. You want it to be spreadable but not so hot that it melts the cream cheese layer. I’ve experimented with other jams for the glaze, like raspberry or even a light peach preserves, and they all work beautifully. For ingredient swaps, if you’re out of all-purpose flour, you can try a good quality gluten-free blend, but you might need to adjust the liquid slightly depending on the blend. Also, if you’re not a fan of cream cheese, a thick Greek yogurt mixed with a little honey can be a lighter, tangier alternative, though the texture will be different. Baking time can vary, so always trust your eyes over the clock. You want that golden-brown edge on the crust and a set filling. If your oven tends to run hot, maybe check it a few minutes earlier.
Storing and Reheating Tips
These mini fruit pizzas are definitely best enjoyed fresh, but if you happen to have any leftovers (which is rare in my house!), storing them properly will keep them tasting good. For ROOM TEMPERATURE storage, I would say they’re best eaten within 2-3 hours of being made. If you need to store them for a bit longer at room temperature, cover them loosely with plastic wrap or place them in an airtight container, but be aware the crust might start to soften. For REFRIGERATOR STORAGE, this is your best bet for keeping them longer. Place them in an airtight container, separating layers with parchment paper if you’re stacking them. They should last for about 2-3 days in the fridge. The crust will likely be a bit firmer when cold, so you might want to let them sit out for about 15-20 minutes before serving if you prefer them at room temperature. FREEZER INSTRUCTIONS are a bit tricky because of the fresh fruit and cream cheese filling, and I generally don’t recommend freezing them once assembled, as the texture can suffer. However, you could potentially bake the crusts, let them cool completely, and freeze those layers individually. Then, when you’re ready to serve, thaw the crusts, whip up fresh filling, and top with fruit. For the glaze, it’s really best applied right before serving if you want that fresh, shiny look. If you are storing assembled pizzas, I would recommend applying the glaze *after* you take them out of the fridge and have let them sit for a bit, just before topping with fruit.
Frequently Asked Questions
Final Thoughts
Seriously, if you’re looking for a dessert that’s as beautiful as it is delicious, and incredibly easy to make, then these mini fruit pizzas are your answer! They are perfect for potlucks, birthday parties, or just because you deserve a treat. The combination of that tender cookie crust, creamy filling, and vibrant fresh fruit is just unbeatable. It’s a recipe that always brings a smile to my face, and I just know it will do the same for you and your loved ones. If you love this, you might also enjoy my No-Bake Berry Cheesecake or my Easy Lemon Bars – they have a similar vibe of simple, delightful sweetness. I truly hope you give these mini fruit pizzas a try. I can’t wait to hear how yours turn out and what fruit combinations you get creative with! Happy baking!
Mini Fruit Pizzas
Ingredients
Cookie Base
- 0.5 cup unsalted butter, softened
- 0.33 cup granulated sugar
- 1 large egg
- 1 teaspoon vanilla extract
- 1.5 cup all-purpose flour
- 0.5 teaspoon baking powder
- 0.25 teaspoon salt
Cream Cheese Frosting
- 8 ounces cream cheese, softened
- 0.5 cup unsalted butter, softened
- 1 cup powdered sugar
- 1 teaspoon vanilla extract
Toppings
- 2 cups mixed fresh fruit, sliced or diced such as strawberries, blueberries, kiwi, mandarin oranges
Instructions
Preparation Steps
- Preheat oven to 375°F (190°C). Line baking sheets with parchment paper.
- In a large bowl, cream together the softened butter and granulated sugar until light and fluffy.0.5 cup unsalted butter, softened
- Beat in the egg and vanilla extract until well combined.0.5 cup unsalted butter, softened
- In a separate bowl, whisk together the flour, baking powder, and salt.0.5 cup unsalted butter, softened
- Gradually add the dry ingredients to the wet ingredients, mixing until just combined. Do not overmix.
- Drop rounded tablespoons of dough onto the prepared baking sheets, spacing them about 2 inches apart.
- Using the bottom of a glass or a small measuring cup, gently flatten each dough ball into a circle about 3 inches in diameter.
- Bake for 10-12 minutes, or until the edges are lightly golden brown.
- Let the cookies cool on the baking sheets for a few minutes before transferring them to a wire rack to cool completely.
- While the cookies cool, prepare the cream cheese frosting. In a medium bowl, beat together the softened cream cheese, softened butter, powdered sugar, and vanilla extract until smooth and creamy.0.5 cup unsalted butter, softened
- Once the cookies are completely cool, spread a layer of cream cheese frosting over the top of each cookie.
- Decorate each "pizza" with fresh fruit of your choice.0.5 cup unsalted butter, softened
- Serve immediately or refrigerate until ready to serve.
Notes
Featured Comments
“Impressed! Clear steps and comforting results. Perfect for busy nights.”
“New favorite here — comforting. crowd-pleaser was spot on.”
“Super easy and turned out amazing! My family asked for seconds. Saving this one.”
“This sweet treat was absolutely loved — the cozy really stands out. Thanks!”
“Made it tonight and wow — family favorite! Will definitely make Mini Fruit Pizzas again.”
“Packed with flavor and so simple. Exactly what I wanted from Mini Fruit Pizzas.”


