

Oh, you guys. I have to tell you about something I’ve been absolutely obsessed with lately. It’s one of those things that sounds maybe a little… extra? But trust me, it is SO worth it. I’m talking about crispy pork belly bites. If you’ve ever had those little cubes of pork belly at a restaurant that just melt in your mouth, then get incredibly crispy on the edges, you know what I’m talking about. This recipe is my take on that, and honestly, it’s become my go-to for when I want something seriously decadent but surprisingly manageable to make at home. Forget those complicated braised pork dishes; these little bites are pure, unadulterated joy. They’re like the gourmet version of your favorite crispy snack, and they’ve quickly become a hit with everyone I’ve shared them with. I first tried making something similar after a trip where we had these incredible appetizers, and I basically dreamt about them until I figured out how to replicate that magic in my own kitchen. It’s become a bit of a family secret, but I’m sharing it with you all today because, well, life’s too short not to have unbelievably delicious crispy pork belly bites!
What are Crispy Pork Belly Bites?
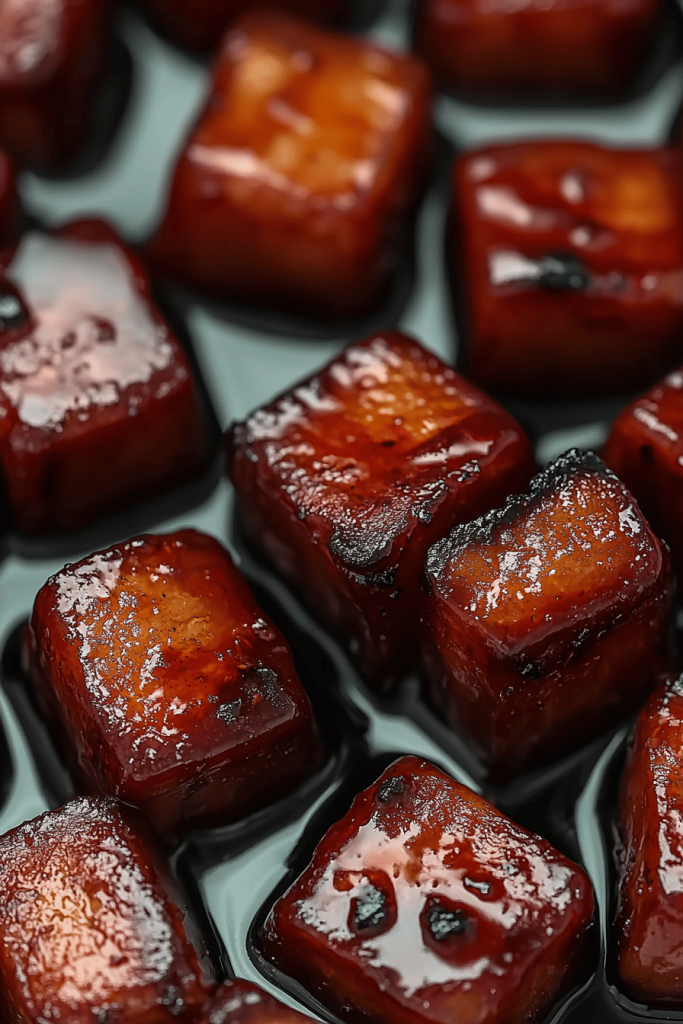
So, what exactly *are* these magical morsels? Think of them as little treasures of slow-cooked pork belly that have been transformed into crispy, crunchy delights. We’re taking a beautiful cut of pork belly, giving it a long, gentle cook to tenderize it perfectly, and then finishing it off at a higher temperature to get that irresistible crunch on all sides. The name itself, “crispy pork belly bites,” really says it all, doesn’t it? It’s not a complicated dish in terms of technique, but it’s all about patience and letting the pork do its thing. The magic happens in the dual cooking process: first, we tenderize it so it’s fall-apart soft inside, and then we crisp it up so you get that satisfying crunch. It’s the textural contrast that makes these so addictive. They’re essentially concentrated little pockets of pure porky goodness, meant to be devoured one by one, maybe with a little glaze or sauce to take them over the top. It’s the kind of food that makes you close your eyes with the first bite!
How do I make crispy pork belly bites?
Quick Overview
This recipe is all about patience and precision, but don’t let that scare you! We’re going to slow-roast the pork belly until it’s incredibly tender, then blast it with heat to get that glorious crispy skin and edges. The result is succulent, flavorful bites with a satisfying crunch that’ll have everyone begging for the recipe. It’s a two-stage cooking process that ensures maximum flavor and the perfect texture, and I promise, it’s easier than it sounds. The smell alone that fills your kitchen during the final crisping stage is enough to make you want to dive right in!
Ingredients
For the Pork Belly: For the Pork Belly: For the Pork Bell
1 kg pork belly, skin on (look for a good balance of meat and fat)
2 tablespoons coarse sea salt (this is key for crisping the skin!)
1 tablespoon black peppercorns, crushed (freshly crushed makes a world of difference)
2 sprigs fresh rosemary, finely chopped (optional, but adds a lovely aroma)
1 teaspoon garlic powder
For the Glaze (Optional, but highly recommended!):
1/4 cup soy sauce
2 tablespoons honey or maple syrup
1 tablespoon rice vinegar
1 teaspoon grated fresh ginger
1 clove garlic, minced
For Serving:
Fresh cilantro or green onions, chopped (for garnish)
Step-by-Step Instructions
Step 1: Preheat & Prep Pan
First things first, let’s get our oven ready. We’re going to preheat it to a moderate 160°C (320°F). While the oven is heating up, take your pork belly and pat it thoroughly dry with paper towels. This is super important, especially for getting crispy skin later on. Make sure you get into all the nooks and crannies. Then, place the pork belly, skin-side up, in a roasting pan. You can add a little bit of water to the bottom of the pan (about 1cm deep) to help keep the meat moist during the slow cook, but it’s not strictly necessary if you’re watching it closely.
Step 2: Mix Dry Ingredients
In a small bowl, mix together the coarse sea salt, crushed black peppercorns, chopped rosemary (if you’re using it – it’s a lovely addition!), and garlic powder. This simple rub is going to work wonders for flavor and texture. The coarse salt is really important here; it helps to draw moisture out of the skin, which is crucial for achieving that perfect crispiness later on. Don’t skimp on the salt!
Step 3: Mix Wet Ingredients
If you’re going for the glaze, let’s get that prepped now. In a small saucepan, combine the soy sauce, honey or maple syrup, rice vinegar, grated ginger, and minced garlic. We’re going to gently heat this mixture over low heat, just until the honey or syrup has dissolved and everything is well combined. We don’t want it to boil or thicken too much at this stage; it’s just to meld the flavors. Once combined, take it off the heat and set it aside. The aroma alone is enough to make your mouth water!
Step 4: Combine
Now it’s time to season our pork belly. Rub the salt, pepper, rosemary, and garlic powder mixture all over the skin of the pork belly. Make sure you get an even coating. Gently press the seasoning into the skin. This initial seasoning is key to building that delicious crust. The slower cooking process will allow these flavors to penetrate the meat, but the salt will also start its magic on the skin right away.
Step 5: Prepare Filling
This step is more about preparing the pork for its next stage. After seasoning, we’re going to place the pork belly into the preheated oven. We’ll be cooking it low and slow for about 2 to 2.5 hours, or until the meat is tender when pierced with a fork. The skin should be starting to puff up slightly. This slow cooking is what breaks down the connective tissues, making the pork incredibly succulent and tender. It’s the foundation for those amazing bites.
Step 6: Layer & Swirl
Once the pork belly has had its slow-roast and is wonderfully tender, it’s time to bring on the crisp! Carefully remove the pork belly from the oven. Increase the oven temperature to a much hotter 220°C (425°F) or even use the broiler function if you’re confident with it. While the oven is heating up, you can brush a little bit of the prepared glaze over the *meat* side of the pork belly (avoiding the skin if you want maximum crispiness on top). Some people like to flip the pork belly over at this stage so the skin is on the bottom for the crisping, but I often leave it skin-side up and just let the intense heat work its magic. If you do flip it, make sure your pan can handle the heat and doesn’t have any plastic parts. I find leaving it skin-up and turning up the heat is the easiest way to get that crackling.
Step 7: Bake
Place the pork belly back into the super hot oven. Now, we’re going to bake it for another 20-30 minutes, or until the skin is beautifully puffed and golden brown and crackling. Keep a close eye on it, as it can go from perfectly crisp to burnt very quickly! You want it to be like little golden pillows. If you notice some spots browning faster than others, you can rotate the pan. This is the moment of truth – where all that slow cooking pays off with incredible texture.
Step 8: Cool & Glaze
Once you’ve achieved that glorious crackling, take the pork belly out of the oven. Let it rest for about 10-15 minutes. This is crucial for the juices to redistribute, making the meat even more tender and moist. After resting, you can brush the *meat* sides again with any leftover glaze. If you want to serve them with the glaze, you can toss the crisped pork belly pieces in the glaze right before serving. For extra flavor, you can even toss them in the warm glaze for a minute or two after cutting them into bites. This step adds another layer of sweet and savory goodness. The glaze can sometimes soften the crisp if left too long, so timing is key.
Step 9: Slice & Serve
Now for the best part! Once the pork belly has rested, use a sharp knife or a cleaver to cut it into bite-sized pieces. You want them small enough to pop into your mouth easily. If the skin is very crisp, you might hear a satisfying shatter as you cut. Arrange the crispy pork belly bites on a serving platter. Drizzle with any extra glaze if you like, and sprinkle generously with fresh cilantro or chopped green onions for a pop of freshness and color. Serve immediately while they’re still warm and gloriously crispy!
What to Serve It With
These crispy pork belly bites are so versatile, they can truly elevate any meal or occasion. For a delicious BREAKFAST treat, imagine these little flavor bombs scattered over scrambled eggs or avocado toast – pure decadence! They add a savory crunch that’s miles better than bacon. If you’re hosting BRUNCH, these are an absolute showstopper. Serve them in a small bowl with toothpicks for easy grabbing, or arrange them artfully on a platter with a small dish of extra glaze for dipping. They pair wonderfully with mimosas or a good cup of coffee. As a decadent DESSERT, it might sound unusual, but a small plate of these with a drizzle of something sweet like a balsamic glaze or even a chili-lime sauce can be incredibly satisfying. It’s that perfect salty-sweet combination that works surprisingly well after a meal. And for those COZY SNACKS, well, these are king! I love having them while watching a movie or just as a treat with a cold beer. They’re the ultimate comfort food that feels a little fancy. My family loves them piled into soft bao buns with some pickled cucumbers and hoisin sauce – it’s like a mini char siu bao but with that amazing crispy pork belly texture. Another favorite is simply serving them alongside a crisp, fresh salad with a tangy dressing to balance out the richness.
Top Tips for Perfecting Your Crispy Pork Belly Bites
I’ve made these countless times, and through trial and error (mostly delicious error!), I’ve picked up a few tricks that really make a difference. First, when it comes to the ZUCCHINI PREP – wait, I’m getting confused with another recipe! Let me refocus. For the PORK BELLY PREP, the most important thing is to ensure the skin is DRY. I can’t stress this enough. Pat it down, let it air dry in the fridge for a few hours uncovered if you have time – the drier the skin, the crispier it will get. Don’t skip the coarse sea salt; it acts like a little exfoliant and helps draw out moisture. For MIXING ADVICE, remember that the initial rub is pretty simple. The magic is in the cooking. Make sure you rub it in well, especially into any scored parts of the skin if you’ve done that. For SWIRL CUSTOMIZATION (again, thinking of another recipe!), let’s stick to the pork. The glaze is where you can really play. I like a classic soy-honey combo, but you could easily add a touch of sriracha for heat, or even some five-spice powder for an Asian twist. Just make sure you’re applying the glaze to the *meat* sides after the initial cook, not the skin, if you want to maintain maximum crispiness. For INGREDIENT SWAPS, if you can’t find pork belly, thick-cut pork shoulder could work, but the texture won’t be quite the same – it won’t have that glorious layer of fat and crispy skin. It’s worth seeking out good quality pork belly! For BAKING TIPS, pay attention to your oven. Ovens can be finicky! If your oven tends to run hot, you might need to slightly reduce the initial slow-roasting time. And always, always keep an eye on it during the final crisping stage. It can burn faster than you think! For GLAZE VARIATIONS, remember that the glaze is primarily for flavor and a little sticky sweetness. You can make it as thick or as thin as you like by adjusting the honey/syrup and liquid. If it’s too thin, a quick simmer will thicken it. If it’s too thick, a splash of water or broth will loosen it up. I’ve found that a quick toss in the warm glaze right before serving gives a beautiful sheen and extra flavor boost without making the skin soggy.
Storing and Reheating Tips
Okay, so if by some miracle you have leftovers (which, let’s be honest, is rare in my house!), here’s how to keep them tasting their best. For ROOM TEMPERATURE storage, I honestly wouldn’t recommend leaving them out for more than an hour or two, especially if they’ve been glazed. They’re best enjoyed fresh. If you need to store them briefly, just cover them loosely. For REFRIGERATOR STORAGE, this is your best bet for leftovers. Let them cool completely first, then store them in an airtight container. They should be good for about 2-3 days. The skin might lose a little bit of its crispiness, but don’t worry, we can fix that! For FREEZER INSTRUCTIONS, I’d recommend freezing them *before* glazing, if possible, to maintain the best texture. Let them cool completely, then wrap them tightly in plastic wrap, followed by a layer of foil or a freezer-safe bag. They can be stored in the freezer for up to 2-3 months. For REHEATING, this is where we bring back that glorious crispiness. If reheating from the fridge, pop them on a baking sheet in a preheated oven at around 180°C (350°F) for about 10-15 minutes, or until heated through and crispy again. If reheating from frozen, it will take a bit longer, perhaps 20-25 minutes, and you might want to add a few extra minutes if you plan to glaze them after reheating. The key is to get them hot enough that the fat renders a bit and the skin re-crisps. I sometimes give them a quick blast under the broiler for the last minute or two for extra crisp. For GLAZE TIMING ADVICE, if you plan to store leftovers, it’s usually best to glaze them *after* reheating, right before serving, to avoid sogginess. If you must glaze them before storing, make sure they are completely cool and stored in an airtight container, but be prepared for a slightly less crisp result.
Frequently Asked Questions
Final Thoughts
Honestly, making these crispy pork belly bites is one of those kitchen wins that just makes you feel good. They’re a testament to how simple, quality ingredients, treated with a little patience, can create something truly extraordinary. The combination of that tender, succulent pork with the shatteringly crisp exterior is just pure magic, and the optional glaze adds that perfect sweet and savory finish. It’s the kind of dish that feels fancy enough for guests but is totally doable for a weeknight treat if you plan ahead a little. I really hope you give these a try. They’ve become a staple in my home, and I can’t wait to hear what you think! If you loved these, you might also enjoy my recipe for [Link to another recipe, e.g., Crispy Chicken Wings] or my [Link to another recipe, e.g., Honey Garlic Salmon Bites]. Let me know in the comments below how yours turned out, and if you tried any fun glaze variations! Happy cooking!

Crispy Pork Belly Bites
Ingredients
Main Ingredients
- 1.5 pounds pork belly patted dry, cut into 1-inch pieces
- 3 tablespoons canola oil
- 1 tablespoon brown sugar
- 1 teaspoon garlic powder
- 1 teaspoon kosher salt
- 1 teaspoon pepper
Instructions
Preparation Steps
- Preheat the air fryer to 400°F.
- In a large bowl, combine the oil, brown sugar, garlic powder, salt, and pepper.
- Add the pork belly pieces to the oil mixture, coating each piece.
- Lay the pork belly pieces in a single layer in the basket of your air fryer. You may need to cook in batches depending on the size of your air fryer.
- Air fry the pork belly cubes for 18-20 minutes, shaking and flipping them a couple of times throughout the cooking time. Cooking times will vary based on the size of your pieces and air fryer.
- Remove from the air fryer and serve warm.
Notes
Featured Comments
“These pork belly crisps look amazing! I’ve been craving something crunchy and salty—definitely trying this recipe soon.”
“Impressed! Clear steps and absolutely loved results. Perfect for busy nights.”
“New favorite here — restaurant-level. crowd-pleaser was spot on.”
“Super easy and turned out amazing! My family asked for seconds. Saving this one.”
“This sweet treat was absolutely loved — the hearty really stands out. Thanks!”
“Made it tonight and wow — absolutely loved! Will definitely make Mouthwatering Pork Belly Crisps Easy Recipe again.”


These pork belly crisps look amazing! I’ve been craving something crunchy and salty—definitely trying this recipe soon.