You know those moments? The ones where a craving hits you like a lightning bolt, and you *need* something sweet, something comforting, something utterly delicious, but the thought of preheating the oven and waiting for a cake to bake feels like an Olympic event? Yeah, I’ve been there more times than I can count. And that’s exactly why I practically guard this recipe for my No-Bake Coconut Pecan Dream Bars. They are, hands down, my go-to when I need a serious dose of happy. I first stumbled upon something similar years ago, but like any good cook, I tinkered and tweaked until it was *just right*. This isn’t just a dessert; it’s a little hug in bar form. Forget complicated layers or fussy decorations – these bars are all about pure, unadulterated flavor and surprising ease. They’re the answer to those late-night sweet tooth attacks and the hero of potlucks when you forgot you signed up to bring something. Trust me, once you try these, they’ll become your secret weapon too.
What is a no-bake coconut pecan bar?
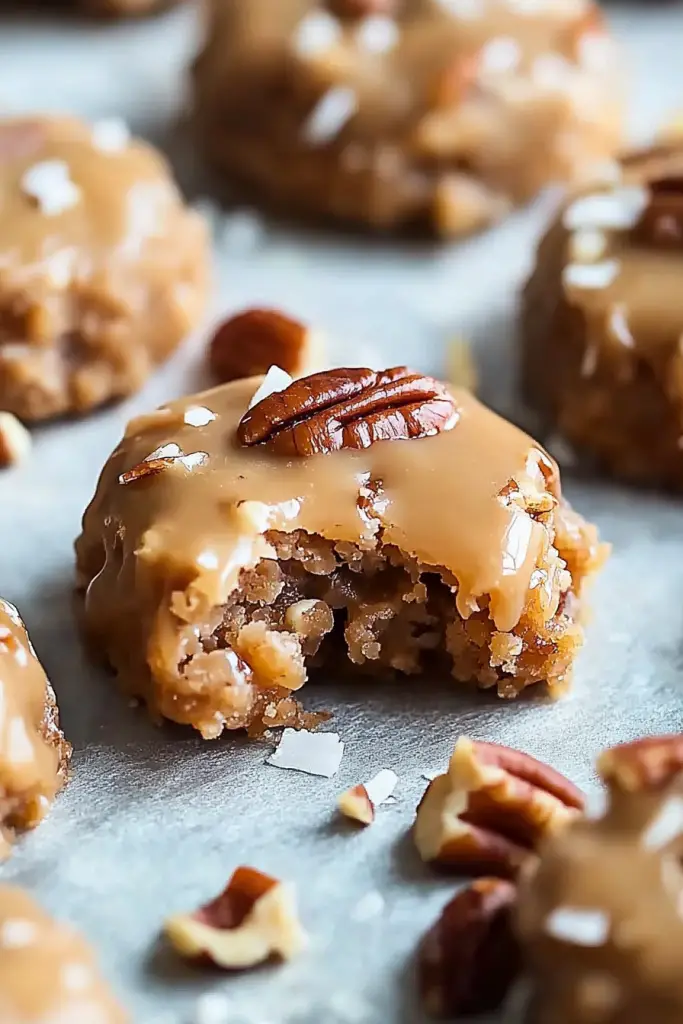
So, what exactly are these “Dream Bars” I’m raving about? Think of them as a delightful mashup of your favorite chewy cookie bar and a decadent, nutty confection, all without ever seeing the inside of an oven. They’re built on a foundation of buttery crushed cookies, bound together with a rich, gooey mixture that’s studded with toasted pecans and sweet shredded coconut. Then, for that extra touch of magic, they’re often topped with a luscious, simple glaze that hardens just enough to give you a satisfying texture contrast. It’s essentially the best parts of a no-bake cookie and a pecan pie, all rolled into one portable, incredibly satisfying bar. The beauty of it is in its simplicity; it tastes like you spent hours slaving away, but in reality, it comes together in a flash. It’s the kind of treat that makes people say, “Wow, you *made* these?” It’s the epitome of effortless indulgence.
How do I make no-bake coconut pecan bars?
Quick Overview
Making these dream bars is a breeze! You’ll start by crushing up some cookies to form the base, then mix up a quick, gooey filling packed with all the delicious coconut and pecan goodness. Press that base into a pan, pour the filling over, maybe swirl in some extra magic, and then let it work its magic to set. A simple glaze finishes them off, making them look as good as they taste. It’s almost ridiculously easy, which is exactly why I love it when I need a fast, impressive dessert.
Ingredients
For the Main Batter:
2 cups crushed graham crackers (about 14 full crackers)
½ cup unsalted butter, melted
¼ cup granulated sugar
Pinch of salt
*Tip:* I love using graham crackers because they give a nice, neutral base that lets the coconut and pecan flavors shine. You can also experiment with digestive biscuits or even vanilla wafers if you want a slightly different profile. Make sure they’re finely crushed – no one wants big chunks in their base!
For the Filling:
1 cup (2 sticks) unsalted butter, softened
1 ½ cups packed light brown sugar
2 large eggs, at room temperature
1 teaspoon Vanilla Extract
1 cup shredded sweetened coconut, lightly toasted if you have time (optional, but recommended!)
1 cup chopped pecans, lightly toasted (highly recommended!)
*Preparation Notes:* Toasting the nuts and coconut really brings out their flavor and adds a wonderful depth. Just pop them on a baking sheet in a 350°F (175°C) oven for about 5-8 minutes, watching them carefully so they don’t burn. For variations, you could add a pinch of cinnamon to the filling, or even a tablespoon of cocoa powder if you’re feeling adventurous!
For the Glaze:
1 cup powdered sugar
2-3 tablespoons milk (or half-and-half for extra richness)
½ teaspoon vanilla extract (optional)
*Consistency Tips:* You want the glaze to be pourable but not too thin. Start with 2 tablespoons of milk and add more, a teaspoon at a time, until you reach your desired consistency. It should drizzle nicely without running off the bars completely.
Step-by-Step Instructions
Step 1: Preheat & Prep Pan
First things first, grab an 8×8 inch baking pan. Line it with parchment paper, leaving some overhang on the sides. This is my secret to getting those bars out super cleanly. You can also lightly grease the pan if you don’t have parchment paper. You don’t need to preheat the oven for this recipe, which is part of its charm!
Step 2: Mix Dry Ingredients
In a medium bowl, combine your crushed graham crackers, melted butter, granulated sugar, and a pinch of salt. Give it a really good stir until all the crumbs are moistened and the mixture looks like wet sand. This is your base, and it needs to be sturdy!
Step 3: Mix Wet Ingredients
In a separate, larger bowl, cream together the softened butter and packed light brown sugar until they’re light and fluffy. This step is important for getting that tender texture. Then, beat in the eggs one at a time, mixing well after each addition. Stir in the vanilla extract. Make sure your butter and eggs are at room temperature; this helps everything emulsify properly and avoid a greasy texture.
Step 4: Combine
Now, pour the graham cracker mixture into the butter and sugar mixture. Stir everything together until it’s just combined. Be careful not to overmix here! We want a nice, cohesive texture. The mixture will be thick and fudgy-looking.
Step 5: Prepare Filling
Gently fold in your toasted shredded coconut and chopped pecans into the batter. Make sure they’re evenly distributed. This is where the magic happens – all those lovely textures and flavors coming together!
Step 6: Layer & Swirl
Press about two-thirds of the mixture evenly into the bottom of your prepared pan. Use the back of a spoon or a flat-bottomed glass to really pack it down. This forms your delicious crust. Then, carefully spread the remaining one-third of the mixture evenly over the top. If you want to get fancy, you can take a knife and swirl it gently to create some pretty patterns, but it’s totally optional!
Step 7: Bake
Okay, here’s the fun part: no baking! These are no-bake bars, so after pressing them into the pan, you’ll pop the whole pan into the refrigerator for at least 2 hours, or until firm. This allows the butter and sugar to firm up and create a delicious, chewy bar. Some people prefer to freeze them for about 30-45 minutes if they’re in a real hurry, but chilling them in the fridge gives the best texture.
Step 8: Cool & Glaze
Once the bars are firm and set, whisk together the powdered sugar, 2 tablespoons of milk, and vanilla extract (if using) in a small bowl. You’re looking for a thick but pourable consistency. If it’s too thick, add more milk, a teaspoon at a time. If it’s too thin, add a bit more powdered sugar. Drizzle the glaze evenly over the chilled bars. You can use a spoon or a piping bag for a neater look. Let the glaze set for about 15-20 minutes in the fridge, or until it’s no longer sticky to the touch.
Step 9: Slice & Serve
Once the glaze has set, use the parchment paper overhang to lift the entire slab out of the pan. Place it on a cutting board and slice into bars. I usually cut mine into 16 squares, but you can make them bigger or smaller depending on how you like them. They’re best served chilled or at room temperature. Enjoy the instant gratification!
What to Serve It With
These no-bake coconut pecan dream bars are incredibly versatile and fit into almost any eating occasion you can imagine! For a quick and satisfying breakfast, I love pairing a bar with a steaming mug of strong black coffee. The sweetness of the bar cuts through the bitterness of the coffee beautifully. Sometimes, I’ll even crumble a bit over my morning yogurt for a special treat. For a lovely brunch spread, these bars are a fantastic addition. They look so appealing arranged on a platter, and they offer a delightful chewiness that complements lighter pastries or fruit salads. A mimosa or a fresh juice would be the perfect beverage pairing. If you’re serving them as a dessert, they’re a showstopper on their own, of course. But for an extra touch, a small scoop of homemade vanilla bean Ice Cream or a dollop of lightly sweetened whipped cream takes them to another level. And for those cozy, quiet moments when you just need a little pick-me-up, these bars are perfect. They’re ideal with a cup of herbal tea or even just a tall glass of cold milk. My family traditions often involve these bars appearing unannounced on a rainy afternoon, or being the go-to treat for movie nights. They just have a way of making ordinary moments feel a little bit more special.
Top Tips for Perfecting Your No-Bake Coconut Pecan Dream Bars
I’ve made these bars more times than I can count, and over the years, I’ve picked up a few tricks that really help elevate them from good to absolutely divine. First, when it comes to the crushed cookies for the base, aim for a fine crumb. If you have a food processor, that’s your best friend for this step. If you’re crushing them by hand or in a bag with a rolling pin, just keep going until there are no large cookie chunks left. This ensures a compact, even base that holds together well. For the filling, toasting your pecans and coconut is non-negotiable in my kitchen. It takes an extra few minutes, but the difference in flavor is phenomenal. It brings out a nutty depth and a subtle toasted sweetness that you just can’t get otherwise. Just keep a close eye on them; they go from perfectly toasted to burnt in a blink! When you’re combining the wet and dry ingredients for the filling, don’t overwork it. You want to mix until everything is just incorporated. Overmixing can make the bars tough once they set. My personal favorite swirl technique involves using a small offset spatula or even a butter knife to gently drag lines through the filling after you’ve spread it over the base. It creates beautiful, rustic patterns. For ingredient swaps, if you’re not a fan of pecans, walnuts are a fantastic substitute, or you could even try adding some chopped almonds or macadamia nuts for a different flavor profile. If you don’t have graham crackers, digestive biscuits work wonderfully, and if you want something a bit richer, shortbread cookies can be used for a more decadent base. When it comes to setting the bars, patience is key. While freezing can speed things up, letting them chill in the refrigerator for at least 2 hours (or even overnight!) allows the flavors to meld and the texture to become perfectly chewy and firm. For the glaze, if it seems too thick, add milk *very* slowly – a teaspoon at a time. If it’s too thin, don’t panic! Just whisk in a bit more powdered sugar until you get that perfect drizzling consistency. Remember, these are forgiving! They might not always look identical, but they will always taste delicious.
Storing and Reheating Tips
These no-bake coconut pecan dream bars are fantastic for making ahead, which is why they’re such a lifesaver! For storing them at room temperature, as long as the glaze has fully set and your kitchen isn’t excessively warm, they should be fine covered tightly for about 2-3 days. I usually store them in an airtight container. If it’s warm out or you want them to last longer, your refrigerator is your best friend. Store them in an airtight container in the fridge for up to a week. They’ll stay perfectly chewy and delicious. I actually prefer them slightly chilled! If you find they get too hard in the fridge, just let them sit at room temperature for about 15-20 minutes before serving. Can you freeze them? Absolutely! Wrap the slab (before slicing is often easiest) or individual bars tightly in plastic wrap, then in foil or an airtight container. They can be frozen for up to 2-3 months. To thaw, transfer them to the refrigerator overnight. You can also thaw them at room temperature for a couple of hours. Regarding the glaze, I always add it *after* the bars have set in the fridge. If you freeze them with the glaze on, it can sometimes crack a bit when thawing, so if you plan on freezing, you might want to add the glaze after they’ve thawed. For reheating, these bars really don’t need it, but if you do want them a bit softer, a few seconds in the microwave can work wonders. Just be careful not to overheat them, or they can become gooey and messy!
Frequently Asked Questions
Final Thoughts
So there you have it – my beloved No-Bake Coconut Pecan Dream Bars! I truly hope you give these a try. They’re more than just a recipe; they’re a little slice of happiness that’s incredibly easy to make. They prove that you don’t need a lot of time or fancy ingredients to create something truly special. Whether you need a quick dessert for unexpected guests, a treat for your lunchbox, or just a moment of sweet indulgence for yourself, these bars deliver. They’re the perfect balance of chewy, crunchy, sweet, and nutty, and the fact that they require zero oven time is just the icing on the cake (or, well, the glaze on the bar!). If you love these, you might also enjoy my other no-bake treats or my classic pecan pie recipe for when you *do* feel like baking. I can’t wait to hear what you think! Please leave a comment below and let me know how your bars turn out, or if you try any fun variations. Happy no-baking!
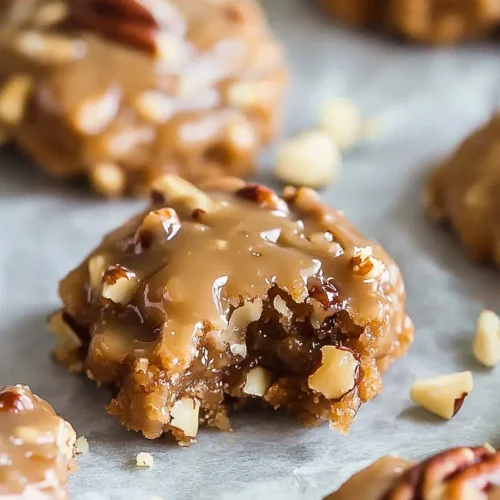
No-Bake Coconut Pecan Praline Cookies
Ingredients
Cookie Dough
- 0.5 cup butter, unsalted
- 1 cup granulated sugar
- 0.5 cup milk
- 1 teaspoon vanilla extract
- 2.5 cups quick-cooking oats
- 0.5 cup sweetened shredded coconut
- 0.5 cup chopped pecans
Instructions
Preparation Steps
- In a medium saucepan, combine the butter, granulated sugar, and milk. Bring to a boil over medium heat, stirring constantly. Boil for 1 minute.
- Remove from heat and stir in the vanilla extract.
- Add the quick-cooking oats, shredded coconut, and chopped pecans to the saucepan. Stir until well combined.
- Drop spoonfuls of the mixture onto parchment paper-lined baking sheets. Let them cool completely and set.
- Once set, store in an airtight container at room temperature.
Notes
Featured Comments
“Impressed! Clear steps and creamy results. Perfect for busy nights.”
“New favorite here — spot on. crowd-pleaser was spot on.”
“Super easy and turned out amazing! My family asked for seconds. Saving this one.”
“This sweet treat was absolutely loved — the light really stands out. Thanks!”
“Made it tonight and wow — super easy! Will definitely make No-bake coconut pecan again.”
“Packed with flavor and so simple. Exactly what I wanted from No-bake coconut pecan.”