

I still remember the first time I tasted an orange creamsicle cake—the sun was in the blinds, the kitchen smelled like orange blossoms and vanilla, and my grandma’s wooden spoon tap-tap-tapped the rhythm of a family Sunday. There’s something magical about taking a childhood favorite and turning it into a coffee-table cake that still feels like a hug. This orange creamsicle cake is that feeling condensed into layers: bright citrus, creamy center, and a glaze that tastes like summer in a jar. It’s incredibly forgiving, too—flour, sugar, and a splash of orange juice come together in a breeze. This version is my go-to for birthdays, potlucks, or when I simply crave something sunny that doesn’t require hours in the kitchen. If you’ve got a craving for something sweet at 10pm but don’t want to bake a whole cake, this is the perfect compromise—though I won’t blame you if you sneak a sample while the glaze firms.
What is [Recipe Name]?
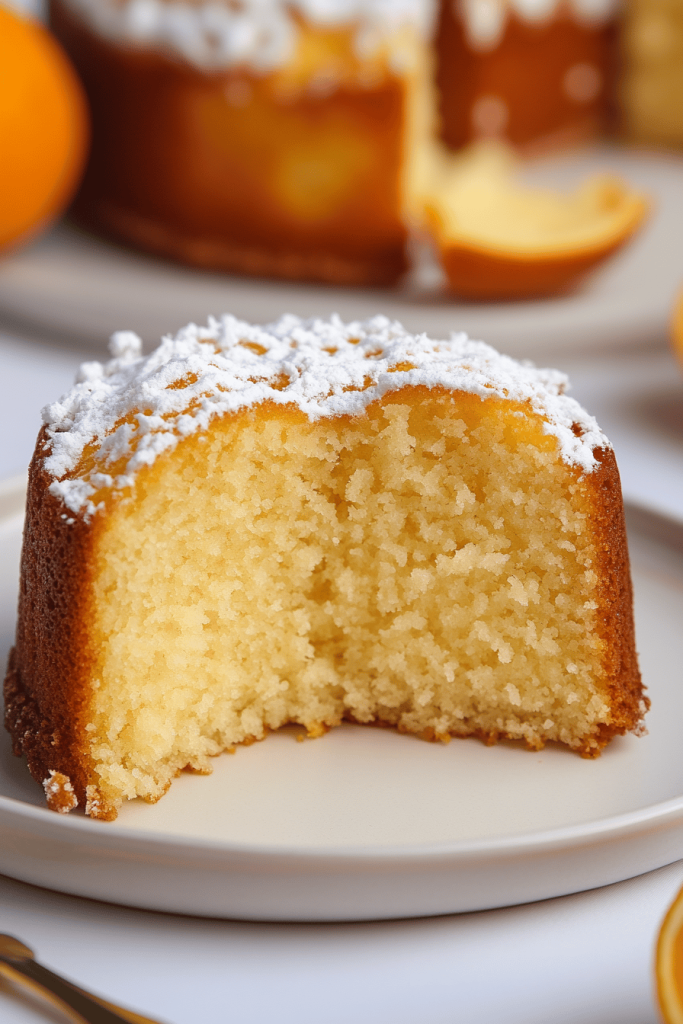
Think of orange creamsicle cake as a bright, citrus-kissed vanilla cake with a playful, creamy filling and a glaze that glows like a summer sunset. It’s essentially a two-layer vanilla sponge spiked with orange zest and juice, then sandwiched with a light orange-cream filling that’s tangy, not heavy. The name itself nods to the classic Ice Cream bar—the kind that disappears from the freezer in minutes at my house—only here we’re serving it as a celebration-worthy cake. It’s not overly sweet, and the citrus keeps the texture surprisingly light and refreshing. I love how the orange aroma blooms as soon as you cut into the first slice, and the glaze adds just the right amount of glossy sweetness without weighing things down. It’s a simple concept, but when you bite in, you’ll feel that nostalgic zing and comfort all at once.
How do I make [Recipe Name]?
Quick Overview
This is the kind of cake that makes you feel like a pro without breaking a sweat. We start with a soft vanilla sponge scented with orange zest, then split and fill with a light orange cream that’s whipped to cradle the cake in a fluffy embrace. A glossy orange glaze blankets the top, giving it that glossy, party-ready finish. The beauty of this method is its flow: whisk dry ingredients, whisk wet ingredients, fold together, bake, layer with the filling, chill, glaze, and slice. It’s simple enough for weeknights and polished enough for weekend ceremonies. The whole process from start to finish takes under two hours, with most of that time resting in the oven or chilling in the fridge. Trust me, this orange creamsicle cake comes out tasting bright, creamy, and exactly how you remember your first bite of summer.
Ingredients
For the Main Batter:
- 2 cups (250 g) all-purpose flour, sifted
- 1 1/2 cups (300 g) granulated sugar
- 1/2 cup (115 g) unsalted butter, softened
- 3 large eggs
- 3/4 cup (180 ml) whole milk or almond milk
- 1/2 cup (120 ml) fresh orange juice
- 2 tsp orange zest
- 2 tsp baking powder
- 1/2 tsp salt
- 1 tsp Vanilla Extract
For the Filling:
- 8 oz (226 g) Cream Cheese, softened
- 1/2 cup (60 g) powdered sugar, sifted
- 1/2 cup (120 ml) heavy cream, cold and whipped to soft peaks
- 2 tbsp orange juice or 1 tbsp orange liqueur (optional)
- 1–2 tsp orange zest, to taste
For the Glaze:
- 1 cup (120 g) powdered sugar
- 2–3 tbsp fresh orange juice, plus more to reach desired consistency
- 1/2 tsp vanilla extract
- Optional: a pinch of finely grated orange zest for extra brightness
Step-by-Step Instructions
Step 1: Preheat & Prep Pan
Heat the oven to 350°F (175°C). Grease and flour two 8-inch round cake pans, then line the bottoms with parchment rounds. This is the moment I tell myself to double-check the pans—nothing ruins a perfect layer like a sticking edge. If you’ve got parchment rounds, use them; they’re the little trick that saves you from wrestling a cake out of the pan in one piece.
Step 2: Mix Dry Ingredients
In a medium bowl, whisk together flour, baking powder, and salt. Sifting is optional but it helps keep the batter light and airy. You want a smooth, pale mixture with no visible clumps. I always do this step with a smug little smile, because it signals the cake’s about to behave nicely.
Step 3: Mix Wet Ingredients
In a separate large bowl, cream the butter and sugar until pale and fluffy. Beat in the eggs one at a time, then add vanilla, orange zest, and orange juice. The mixture should look glossy and smell like bright citrus—the moment you get that orange perfume rising, you know you’re doing it right. If your butter is a touch soft, don’t worry; you want it to emulsify with the sugar and eggs smoothly, not curl up into a greasy mess.
Step 4: Combine
Alternately add the dry ingredients and milk to the wet mixture, starting and ending with the dry. Mix just until combined; a few streaks are fine. Overmixing makes the cake dense, which is the opposite of what we want here. The batter should be thick but pourable—think slow, luxurious ribbons when you lift the spoon.
Step 5: Prepare Filling
In a stand mixer or with a hand mixer, beat the Cream Cheese with powdered sugar until smooth. Gently fold in the whipped cream and orange zest, and a splash of orange juice if you like it looser. The goal is a light, fluffy filling that holds its shape but tastes irresistibly creamy. This is the part where I sneak a little taste—the tart-sweet balance always makes me grin. If you’re not into dairy, you can swap in coconut cream whipped to soft peaks for a dairy-free filling that still feels indulgent.
Step 6: Layer & Swirl
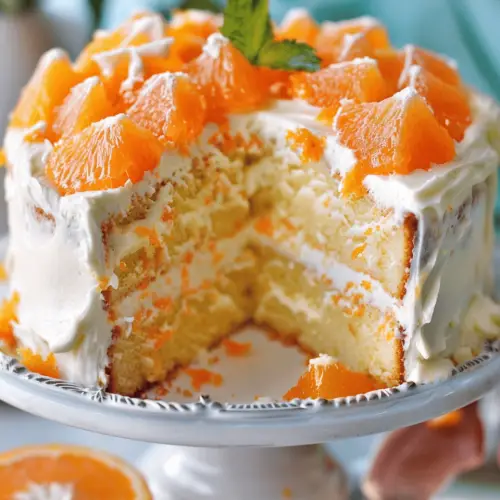
Divide the batter evenly between the prepared pans and smooth the tops. Bake 25–30 minutes, or until a toothpick inserted into the center comes out clean. Let the cakes cool in the pans for about 10 minutes, then invert onto cooling racks. While they’re cooling, you can prepare your filling and glaze. Once completely cool, place one layer on your serving plate and spread a generous layer of filling over the surface. Top with the second layer and lightly press. If you like a little marbling, dollop some filling on top of the second layer and swirl gently with a spatula for a playful look that tastes just as good as it looks.
Step 7: Bake
Whole cake baking only happens once you’ve got the layers ready. The key is even heat and not opening the oven door too often. If your oven runs hot, you may need to rotate the pan halfway through. If you’re convection-baking, reduce the temperature by about 25 degrees and watch for faster color development. The cake should be pale-golden with a springy feel when touched in the center. Avoid a dense crumb by not overmixing and by measuring your flour accurately—just a light touch of spoon and level.
Step 8: Cool & Glaze
Let the assembled cake chill in the fridge for at least 30 minutes to set the filling. While it’s cooling, whisk together the glaze ingredients until smooth. It should be pourable but not runny; if it’s too thick, add a touch more juice; if too thin, add a touch more powdered sugar. Pour the glaze over the cooled cake, letting it drizzle down the sides for a glossy finish. If you want a brighter finish, add a few drops of orange extract, but go easy—the orange zest and juice already carry a lot of flavor.
Step 9: Slice & Serve
Before slicing, give the glaze a few minutes to set. A sharp knife helps keep clean edges, and a quick wipe between cuts keeps the slices neat. This orange creamsicle cake is best served at room temperature, since the filling tastes lighter and the glaze shimmers beautifully. I like to garnish with a little extra zest or a tiny orange slice on the side for a playful pop of color. It looks festive on a cake stand, and the aroma makes everyone wander to the kitchen with a grin.
What to Serve It With
This orange creamsicle cake shines on its own, but you’ll find it tastes especially wonderful with a few careful accompaniments. It’s a beautiful centerpiece for a brunch or a casual celebration, and the citrus notes pair surprisingly well with a couple of simple sides. Here are some ideas that have become family favorites for us, organized by occasion.
For Breakfast: A slice alongside a cup of strong coffee or a glass of cold milk is pure nostalgia. I like pane di surgelato crusty bread with a smear of good butter and a thin layer of orange marmalade on the side—the brightness of the cake offsets the richness of the butter so nicely. If you’re feeling fancy, serve it with a dollop of vanilla yogurt, a few fresh berries, and a drizzle of honey. It’s not overly sweet and gives your morning a sunny start.
For Brunch: A light, citrus-forward spread works wonders. Pair the cake with a sparkling orange tea, a pot of coffee, and a small fruit salad featuring grapefruit segments and mint. A simple rosemary-scented syrup on the berries can echo the citrus notes without overpowering the cake. If you want a more brunchy vibe, offer a brunch-punch made with orange juice, prosecco, and a splash of orange zest for aroma that plays nicely with the cake’s flavors.
As Dessert: Serve with a dollop of lightly sweetened whipped cream and a few thin orange twists for color. A side of chocolate-dipped orange zest cookies or almond biscotti adds textural contrast that your guests will notice. If you’re entertaining, set the cake on a pedestal, add a few edible flowers, and let the glaze catch the light as it catches the sugar-sparkle in your guests’ eyes.
For Cozy Snacks: A quick, petite slice with a cup of herbal tea is such a comforting moment. If you’re between meals and need a little sweetness, this cake adapts to a smaller portion, served cold in the afternoon with a cap of whipped cream. My family loves when I slice it into thin wedges and refrigerate for an hour; the texture becomes almost mousse-like and extra refreshing on a hot day.
Top Tips for Perfecting Your [Recipe Name]
These little adjustments have saved me countless times—they’re the things I wish I’d known when I started baking this orange creamsicle cake. Treat them as your personal cheat sheet, and you’ll nail it every time.
Orange Zest Prep: Zest the orange before juicing. The zest oils carry a big, bright aroma, and you’ll use less zest if you do it first. If you’re short on zest, a touch of orange extract can lift the citrus without tasting artificial. Avoid zesting white pith; it’s bitter and will throw off the balance.
Mixing Advice: Don’t overmix after adding the dry ingredients. Overmixing develops gluten and makes the crumb tougher. Mix just until you see no visible flour pockets, then stop. If your batter looks a little lumpy, that’s okay—the lumps don’t travel into the finished texture the way they do with bread dough.
Swirl Customization: For a more marbled look, reserve a small portion of the filling and drop it in dollops across the top of the bottom cake layer before placing the second layer. Gently swirl with a toothpick to create ribbons that look like sunshine peeking through clouds. You can even tint the filling with a pinch of turmeric for a sunset gradient if you’re feeling playful (keep it small—the flavor should still stay harmonious).
Ingredient Swaps: Want dairy-free? Use coconut cream whipped to soft peaks in place of heavy cream, and almond milk in the batter. For a richer mouthfeel, swap half of the butter with 2–3 tablespoons of neutral oil. To cut sweetness, reduce the sugar in the batter by 2–3 tablespoons, and adjust the glaze with extra lemon juice to balance. The cake still tastes like an orange creamsicle with these tweaks; it just fits your dietary needs a bit better.
Baking Tips: Oven temperatures vary. If you’ve got an oven that runs cool, give the cakes a few extra minutes, but start checking at 25 minutes. Use a light-colored pan to prevent scorching and keep the center moist. Place the rack in the center for even heat distribution. When a cake tests with a clean toothpick, it’s done—the toothpick should come out with a few crumbs, not wet batter.
Glaze Variations: If you want a glossier finish, whisk in a teaspoon of corn syrup or light corn starch slurry to the glaze. For a dairy-free glaze, mix powdered sugar with orange juice and a teaspoon of coconut milk for richness without dairy. A splash of vanilla or almond extract can add depth; use sparingly so the orange flavor remains the star. If you’d like a cinnamon note, a small pinch works surprisingly well with the orange—just don’t overdo it, or you’ll shift the flavor profile away from creamsicle nostalgia.
[Lessons learned: I learned to chill the filling just slightly before assembly to help it hold a clean line between layers. Also, letting the glaze rest for a few minutes after whisking helps it thicken a touch for easier pouring. And yes, I’ve burned the glaze by adding too much juice—start with less and add as needed.]
Storing and Reheating Tips
Storing this orange creamsicle cake properly keeps the flavors tasting bright and the texture perfectly light. Here’s how I keep it fresh and delicious for as long as possible.
Room Temperature: If you’re serving within a day, you can store the cake loosely covered at room temperature for up to 2 days. I usually cover with a breathable cake dome to protect the glaze while letting it shine. The cake tastes best within the first 48 hours, when the citrus aroma is at its peak.
Refrigerator Storage: Refrigerate slices or the entire cake, tightly wrapped or in an airtight container, for up to 4–5 days. The chilling helps the filling firm a touch and keeps the glaze glossy. Let slices come to room temperature for 15–20 minutes before serving to soften the cream filling slightly and wake the orange notes.
Freezer Instructions: You can freeze the fully assembled cake, or freeze the layers separately for a longer shelf life. Wrap slices or the whole cake tightly in plastic wrap, then in foil, and freeze up to 2–3 months. Thaw in the fridge overnight or at room temperature for a few hours. The filling holds up remarkably well to freezing, though you may notice the texture soften a touch; a quick whisk or a gentle fold when layering can help restore its creaminess.
Glaze Timing Advice: If you’re freezing the cake, consider glaze-once-thawed for best texture. Glaze can crack a bit when frozen, so you might prefer to apply glaze after thawing. If you’re storing unfrosted layers, you can glaze when you assemble to keep the surface pristine. Fresh glaze is always a little shinier and more appealing at serving time.
In our house, this cake disappears in minutes when friends drop by, so I usually bake a double batch and freeze the extra layers for a spontaneous celebration later in the month. It’s a simple, comforting treat that travels well and still feels like a little party in your kitchen.
Frequently Asked Questions
Final Thoughts
There’s something about the orange creamsicle cake that always makes me smile—the way the citrus lifts a bite, the gentle creaminess in the middle, and that glossy top that catches the light just right. It’s a dessert you can pull together with pantry staples, yet it feels special enough for a celebration. I love that you can tailor it to a dairy-free or gluten-free crowd without losing its sunny soul, and I’m always surprised by how many friends tell me it reminds them of summers past. If you’re craving something sweet with a bright, nostalgic edge, this is the cake to try next. Grab a cup of coffee, bake a cake, and invite someone you love to share a slice. Happy baking! And please, drop a comment below with your tweaks and flavor twists—I can’t wait to hear how yours turns out.
Orange Creamsicle Cake
Ingredients
Cake Ingredients
- 15.25 ounces vanilla cake mix
- 3 eggs (room temperature)
- 1 cup milk or vanilla almond milk
- 0.5 cup vegetable oil
- 1 tablespoon orange zest
Jello Layer
- 3.4 ounces orange JELLO
- 1.25 cup boiling water
- 0.33 cup fresh squeezed orange juice
- 15 ounces can of mandarin oranges (do not drain)
Frosting Ingredients
- 3 ounces vanilla instant pudding mix
- 8 ounces Cool Whip
Instructions
Preparation Steps
- Preheat the oven and prepare the cake mix according to the package directions, using a 9x13 inch baking pan. Replace the water with vanilla almond milk (or regular milk), and add the orange zest to the batter.
- Bake the cake following the instructions on the box. After baking, allow the cake to cool for approximately 10 minutes on a wire rack.
- Once the cake is cool enough to handle, use a skewer to poke holes across the entire surface of the cake.
- In a heatproof bowl, combine the orange JELLO mix with boiling water. Whisk until the JELLO is completely dissolved.
- Stir in the fresh orange juice and carefully pour the JELLO mixture over the top of the cake, making sure it seeps into the holes.
- Refrigerate the cake for at least 3 hours to allow the JELLO to set.
- For the frosting, beat together the mandarin oranges and vanilla pudding mix until fully combined.
- Gently fold in the Cool Whip (or whipped cream) until the frosting is smooth and fluffy.
- Spread the frosting over the cooled cake.
- Refrigerate the frosted cake for at least 30 minutes before serving to let the flavors meld together.
Notes
Featured Comments
“That sounds like such a cozy, sweet memory—I can almost smell the kitchen right now! Thanks for sharing.”
“Impressed! Clear steps and creamy results. Perfect for busy nights.”
“New favorite here — perfect for busy nights. crowd-pleaser was spot on.”
“Super easy and turned out amazing! My family asked for seconds. Saving this one.”
“This sweet treat was absolutely loved — the balanced really stands out. Thanks!”
“Made it tonight and wow — quick weeknight win! Will definitely make orange creamsicle cake again.”


That sounds like such a cozy, sweet memory—I can almost smell the kitchen right now! Thanks for sharing.