

Okay, so I have to tell you about these incredible Patriotic Ice Cream sandwiches. Seriously, they are such a hit every single year around the Fourth of July, and honestly, any time we have a reason to celebrate. I remember the first time I made them; it was a scorching summer day, and the kids were driving me absolutely bonkers. I needed something to cool them down, something fun, and something that felt a little special. I whipped these up, and the look on their faces when they saw the red, white, and blue layers? Priceless! They devoured them in minutes, and since then, it’s become a non-negotiable summer tradition. They’re way more fun than your average store-bought ice cream sandwich, and honestly, so much better tasting!
What is Patriotic Ice Cream Sandwich?
So, what exactly are these magical things? Think of them as a homemade, super-charged Ice Cream sandwich. Instead of those slightly cardboard-y cookies you get in the freezer aisle, we’re talking about soft, chewy, almost cake-like cookies, layered with luscious ice cream, and then… well, the patriotic part comes in with some delicious swirls and colors. It’s essentially a DIY ice cream sandwich that lets you play with your food in the best possible way. The name itself just screams summer fun, doesn’t it? It’s the kind of dessert that brings a smile to your face before you even take a bite, and trust me, the taste lives up to the visual promise.
How to Make Patriotic Ice Cream Sandwiches
Quick Overview
The process is simpler than you might think! We’ll whip up a quick, tender cookie dough, spread it into a pan, layer it with softened ice cream, add our colorful swirls, freeze it solid, and then slice it into perfect, handheld sandwiches. The magic is in the layering and freezing, creating those beautiful stripes of red, white, and blue. It’s a little bit of patience involved in the freezing, but the payoff is so worth it!
Ingredients
For the Cookie Dough:
Flour: 2 ½ cups all-purpose flour. I always use a good quality all-purpose flour. For best results, spoon it into your measuring cup and level it off; don’t scoop directly from the bag, as that can pack it too much.
Baking Soda: 1 teaspoon. This gives the cookies their slight lift and chewiness.
Salt: ½ teaspoon. Balances out the sweetness and enhances all the other flavors.
Unsalted Butter: 1 cup (2 sticks), softened. Make sure your butter is truly softened, not melted! It should give slightly when you press it with your finger. This is key for a tender cookie.
Granulated Sugar: 1 ½ cups. For sweetness and structure.
Eggs: 2 large. Room temperature eggs incorporate much better into the batter.
Vanilla Extract: 2 teaspoons. Use good quality vanilla; it really makes a difference!
For the Ice Cream & Swirls:
Vanilla Ice Cream: 1.5 quarts, softened. Let it sit out on the counter for about 20-30 minutes until it’s spreadable but not melted. I like to use a good premium vanilla; it has the best flavor and texture.
Red Food Coloring: A few drops. For that festive red stripe!
Blue Food Coloring: A few drops. For the cool blue stripe!
Strawberry Jam or Puree (optional): For a natural red swirl. If you use this, you might need slightly less ice cream as it adds volume.
Blueberry Jam or Puree (optional): For a natural blue swirl. Again, this can affect the ice cream quantity slightly.
White Chocolate Chips (optional): For a little extra texture and flavor in the white layers.
Step-by-Step Instructions
Step 1: Preheat & Prep Pan
Preheat your oven to 350°F (175°C). Line a 9×13 inch baking pan with parchment paper, leaving an overhang on the sides. This makes it SO much easier to lift the whole slab out later. Lightly grease the parchment paper too, just for extra insurance. Trust me, sticky cookies are no fun!
Step 2: Mix Dry Ingredients
In a medium bowl, whisk together the flour, baking soda, and salt. This ensures the leavening agents are evenly distributed, which helps the cookies bake up beautifully. Set this aside.
Step 3: Mix Wet Ingredients
In a large bowl, cream together the softened butter and granulated sugar with an electric mixer until light and fluffy. This usually takes about 3-5 minutes. Then, beat in the eggs one at a time, followed by the vanilla extract. Make sure each egg is fully incorporated before adding the next.
Step 4: Combine
Gradually add the dry ingredients to the wet ingredients, mixing on low speed until just combined. Be careful not to overmix! Overmixing can lead to tough cookies, and we definitely don’t want that. The dough should be soft and pliable, but not sticky.
Step 5: Prepare Filling
Take your softened vanilla ice cream and divide it into three roughly equal portions. In one bowl, stir in a few drops of red food coloring (or the strawberry jam/puree) until you achieve a nice red hue. In another bowl, stir in a few drops of blue food coloring (or blueberry jam/puree) for the blue. Leave the third portion plain white. If you’re using white chocolate chips, gently fold them into the plain vanilla ice cream.
Step 6: Layer & Swirl
Spread about half of the cookie dough evenly into the prepared baking pan, pressing it down gently. Then, spread the plain white ice cream layer over the dough. Dollop spoonfuls of the red and blue ice cream over the white layer. Now, this is the fun part! Take a knife or a skewer and gently swirl the colors together to create a marbled effect. Don’t over-swirl, or the colors will just blend into purple! Then, take the remaining cookie dough and dollop it over the ice cream, gently spreading it to cover as much as possible. It doesn’t have to be perfect; a rustic look is charming.
Step 7: Bake
Bake for 30-35 minutes, or until the edges of the cookie dough are golden brown and a toothpick inserted into the dough comes out clean. The center might still look a little soft, but it will firm up as it cools. Keep an eye on it; ovens can vary!
Step 8: Cool & Glaze
Let the entire slab cool completely in the pan on a wire rack. This is crucial! Once it’s fully cooled, carefully lift it out using the parchment paper overhang. Now, for the icing on the cake, or rather, the glaze on the sandwich! I like to make a simple glaze for a bit of extra sweetness and shine. Whisk together 1 cup of powdered sugar with 1-2 tablespoons of milk until smooth and pourable. Drizzle this over the cooled cookie slab. You can even add a tiny bit of red or blue food coloring to a portion of the glaze for extra festive accents!
Step 9: Slice & Serve
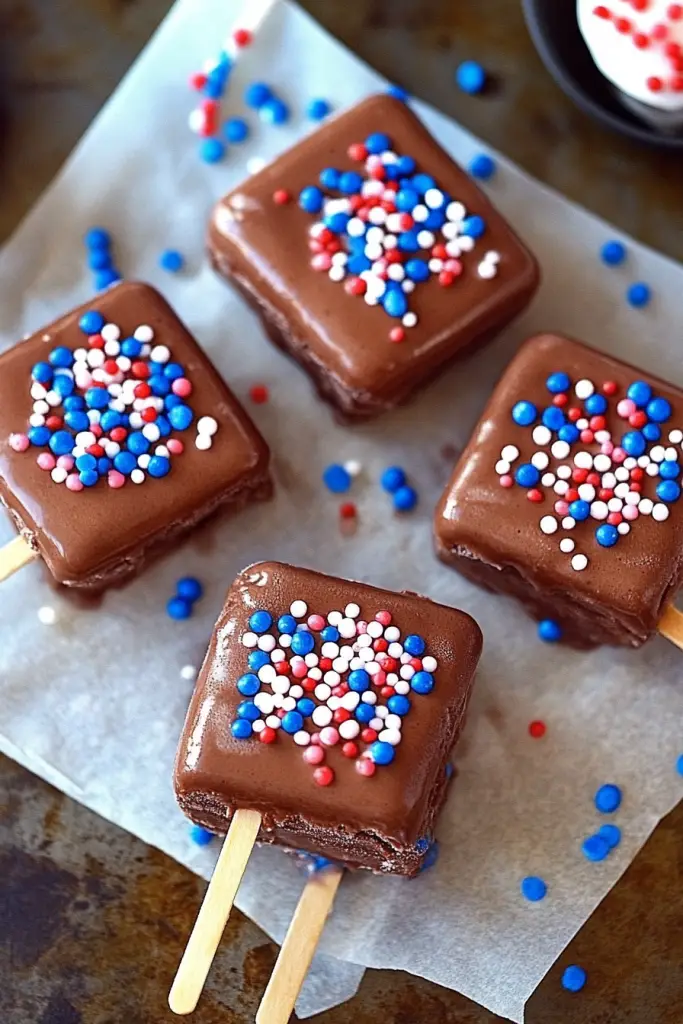
Once the glaze has set, use a sharp knife to cut the slab into squares or rectangles. I like to use a long, serrated knife for a clean cut. For the best texture, I usually pop these back into the freezer for at least 1-2 hours before serving. This ensures the ice cream is firm and the cookie is perfectly chewy. Slice them up, and enjoy your homemade Patriotic ice cream sandwiches!
What to Serve It With
These Patriotic ice cream sandwiches are really a star all on their own, but if you’re looking to round out a meal or create a fun dessert spread, here are a few ideas:
For Breakfast (yes, really!): I know, I know, ice cream for breakfast sounds crazy, but if you’re having a special occasion brunch, a small square of this with a cup of strong coffee is a delightful treat. It feels decadent but manageable. You could also serve it with some fresh berries to balance out the sweetness.
For Brunch: If you’re hosting a weekend brunch, cut these into smaller, bite-sized pieces and arrange them on a platter with some fresh fruit like strawberries, blueberries, and raspberries. They look so festive and make for a fantastic dessert after some savory brunch fare.
As Dessert: This is the obvious one! Serve them after a barbecue or a picnic. They’re perfectly portable and always a crowd-pleaser. I like to serve them with a tall glass of cold milk or even a summery lemonade. For an extra touch, you could add a dollop of whipped cream or a sprinkle of patriotic-colored sprinkles.
For Cozy Snacks: Sometimes, you just need a sweet treat! These are perfect for a movie night or just an afternoon pick-me-up. They feel special without requiring a lot of fuss. My kids love them straight from the freezer on a hot afternoon, and I can’t say I blame them!
Top Tips for Perfecting Your Patriotic Ice Cream Sandwiches
I’ve made these countless times, and over the years, I’ve picked up a few tricks that I think make a big difference. These aren’t complicated, but they’ll help ensure your ice cream sandwiches are absolutely perfect:
Cookie Dough Consistency: The key here is to not overwork the dough. Mix until *just* combined. If it feels too wet, you can add a tablespoon of flour at a time, but err on the side of slightly soft. Too much flour will make them cakey rather than chewy. Also, make sure your butter is truly softened, not melted or too cold. That’s the secret to tenderness!
Ice Cream Softening: You want the ice cream to be spreadable but not drippy. If it’s too hard, you’ll struggle to spread it evenly. If it’s too soft, it will melt into the cookie dough too much. About 20-30 minutes on the counter usually does the trick on a warm day. You can also speed this up slightly by breaking up the ice cream into chunks in a bowl.
Swirl Technique: For those vibrant stripes, don’t go overboard with the swirling. Think gentle figure-eights or swooshes with your knife. You want distinct ribbons of color, not a muddy mix. If you’re using natural fruit purees, they might not give as vibrant a color as food coloring, but they add a lovely natural flavor. You might need slightly less of the puree than food coloring to achieve a good consistency.
Freezing is Key: This is probably the most important tip. You *must* let the assembled sandwiches freeze until completely solid. I usually pop them back into the freezer for at least 2-4 hours, sometimes even overnight. This ensures clean cuts and that classic ice cream sandwich texture. If you try to cut them too soon, you’ll just have a melty mess!
Glaze Application: Make sure the cookie slab is completely cool before adding the glaze. If it’s warm, the glaze will just melt and disappear. You can adjust the thickness of the glaze by adding more powdered sugar for a thicker consistency or a touch more milk for a thinner, runnier glaze. If you want extra decorative swirls, reserve a little bit of the glaze and tint it with food coloring to drizzle on top.
Cutting for Clean Slices: A sharp, long knife is your best friend here. A serrated bread knife works wonders. For the cleanest cuts, warm your knife slightly under hot water, dry it thoroughly, and then slice. Wipe the knife clean between cuts if needed. This prevents the ice cream from sticking and makes for beautiful, presentation-ready squares.
Storing and Reheating Tips
These Patriotic ice cream sandwiches are best enjoyed fresh, but they do store surprisingly well! The key is proper wrapping to prevent freezer burn and maintain that delicious texture.
Room Temperature: Honestly, these don’t do well at room temperature for long, especially with the ice cream! If you’ve just sliced them and are serving them immediately, that’s fine. But for storing, you’ll want to keep them cold.
Refrigerator Storage: If you plan to eat them within a day or two, you can store them in an airtight container in the refrigerator. They’ll stay soft enough to eat without needing to refreeze, but the ice cream won’t be as firm as when frozen. This is a good option if you prefer a softer sandwich.
Freezer Instructions: This is my preferred method. Once sliced, I like to wrap each individual sandwich tightly in plastic wrap, then place them in a freezer-safe bag or container. This two-layer protection is fantastic against freezer burn. They should stay delicious for up to 2-3 weeks. Thawing is simple: just let them sit at room temperature for about 5-10 minutes until they’re easy to bite into, or enjoy them straight from the freezer if you like them super firm!
Glaze Timing Advice: If you plan to freeze your ice cream sandwiches for longer than a day, I recommend glazing them right before you plan to serve them. The glaze can sometimes get a little sticky or crackly when frozen for extended periods. If you do freeze them with the glaze on, ensure they are very well wrapped to protect it.
Frequently Asked Questions
Final Thoughts
There you have it – my absolute favorite way to make Patriotic ice cream sandwiches! They’re more than just a dessert; they’re a memory-maker, a tradition starter, and a guaranteed way to bring smiles to faces. The combination of that tender, slightly chewy cookie with the cold, creamy ice cream is just heavenly, and the colorful swirls make them so much fun. I really hope you give these a try for your next celebration, or honestly, just because you deserve a treat! It’s one of those recipes that feels special but is so approachable for home bakers. If you love this, you might also enjoy my No-Bake Berry Trifle or my Lemon Blueberry Scones for more summery goodness.
I can’t wait to hear how yours turn out! If you make these, please let me know in the comments below, and feel free to share your own colorful variations. Happy baking, and happy celebrating!
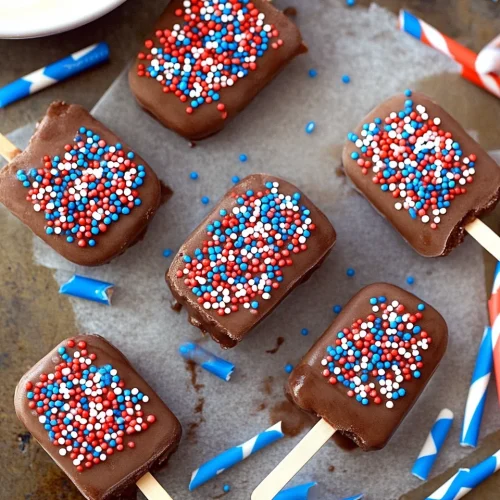
Patriotic Ice Cream Sandwiches
Ingredients
Main Ingredients
- 24 graham crackers graham cracker squares
- 1.5 quarts vanilla ice cream softened
- 1 cup red sprinkles
- 1 cup blue sprinkles
- 0.5 cup white nonpareils
Instructions
Preparation Steps
- Line a baking sheet with parchment paper.
- Spread about 0.5 inch of softened vanilla ice cream onto the flat side of 12 graham cracker squares. Work quickly so the ice cream doesn't melt too much.24 graham crackers graham cracker squares
- Top each with another graham cracker square, pressing gently to form a sandwich.24 graham crackers graham cracker squares
- In separate shallow dishes, place the red sprinkles, blue sprinkles, and white nonpareils.24 graham crackers graham cracker squares
- Gently roll the edges of each ice cream sandwich in the sprinkles to coat. You can use a mixture of colors or keep them separate for a striped effect.
- Place the decorated ice cream sandwiches back onto the parchment-lined baking sheet.
- Freeze for at least 1 hour, or until firm.
- Serve immediately and enjoy the patriotic fun!
Notes
Featured Comments
“Impressed! Clear steps and absolutely loved results. Perfect for busy nights.”
“New favorite here — restaurant-level. crowd-pleaser was spot on.”
“Super easy and turned out amazing! My family asked for seconds. Saving this one.”
“This sweet treat was absolutely loved — the zingy really stands out. Thanks!”
“Made it tonight and wow — quick weeknight win! Will definitely make Patriotic ice cream sandwiches again.”
“Packed with flavor and so simple. Exactly what I wanted from Patriotic ice cream sandwiches.”


