

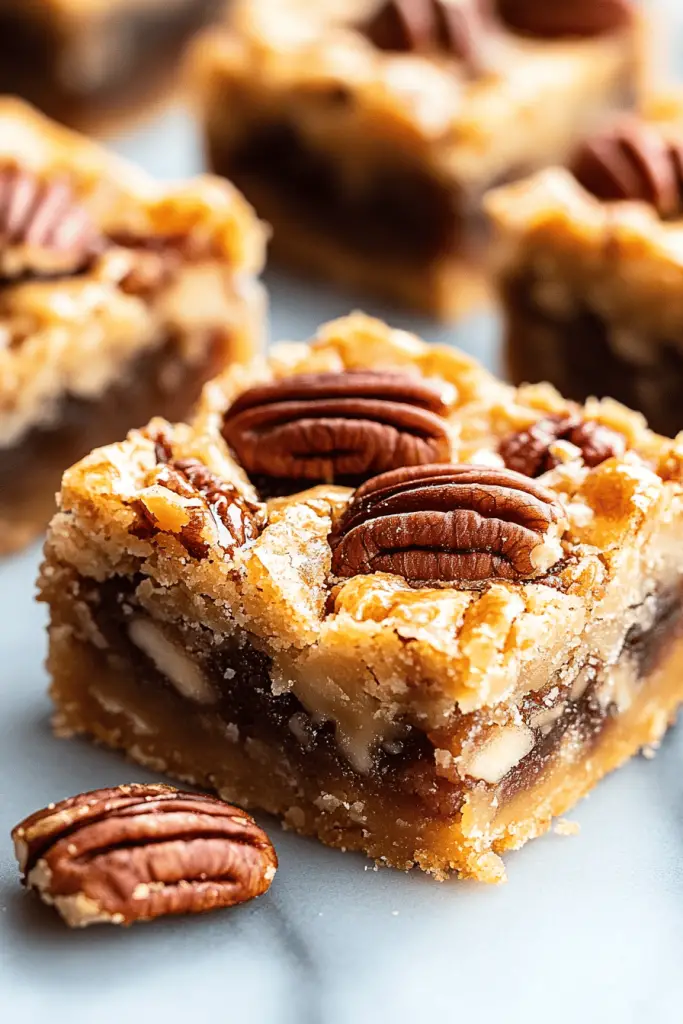
I still remember the scent that melted into the kitchen floorboards—toasty pecans, caramel-burnished edges, and a crust that looks shyly golden when the timer goes off. It was my grandmother’s kitchen, and she would say, “If you can share a little sweetness, you should.” So I started making pecan tartlets, tiny personal pies that taste like fall in a single bite. These little shells are forgiving enough for a casual weeknight dessert, yet polished enough for guests—think of them as pecan pie’s elegant, bite-sized cousin. I’ll be honest: I’m obsessed with how the crust flakes just right while the filling stays creamy and glossy. This is the kind of recipe that disappears in minutes at my house, especially when I drizzle a little maple glaze over the top. Pecan tartlets have become a little ritual for me—a cozy moment between chores, a small celebration after dinner, a treat I know I can pull off even on a busy weekend. It’s comfort, it’s nostalgia, and it’s deliciously simple all at once.
What is a pecan tartlet?
Think of pecan tartlets as a mini, more approachable version of a classic pecan pie. They’re essentially shortcrust shells brimming with a pecan-filled, caramelized center, then finished with a glossy glaze or a simple dusting of confectioners’ sugar. The name hints at their bite-sized nature—perfect for sharing or for saving a few as a personal Sunday reward. It’s essentially the same flavor profile as a pecan pie, but you don’t have to cut and plate an entire pie. I love how the mini format makes the nutty, sweet filling feel intimate and luxurious, a little dessert to savor in the moment. A warm cinnamon aroma rises as they bake, and the first bite delivers that familiar caramel-nut balance that always reminds me of holidays and long evenings spent around the table with loved ones.
Why you’ll love this recipe?
What I love most about these pecan tartlets is how they strike that perfect balance between indulgent and doable. They’re not fussy, but they feel special enough to share with friends, neighbors, or that person who always cools their heels at the door with a dessert craving. Here’s why they’re such a joy to bake:
- Flavor: The filling is a warm, toasty blend of brown sugar, butter, and pecans that caramelizes just right as it bakes. When you bite in, you get that nutty punch with a hint of vanilla and a sigh of maple or corn syrup sweetness—a little complexity in a tiny package.
- Simplicity: The crust comes together quickly, and you can do the dough ahead of time. I’ve learned to chill the dough so it’s easy to roll and fit into mini tart pans without shrinking. It’s the kind of dessert you can assemble in stages, which is a lifesaver on busy nights.
- Cost-efficiency: What is the best way to measure cost-efficiency?What are some pantry-friendly ingredients that don’t break your grocery budget?
- Versatility: The filling is adaptable—swap maple for vanilla, add a pinch of espresso powder for depth, or fold in a ribbon of orange zest for brightness. It’s easy to dress up with a glaze, or keep simple with a dusting of powdered sugar.
What makes this recipe truly special is the way a handful of humble ingredients come together to feel like a warm hug. It pairs beautifully with tea or coffee, and I’ve found it’s a crowd-pleaser for both kids and adults. If you’ve ever swooned for a pecan pie but wanted something a little neater and less overwhelming, this is your gateway Mini Pie. If you’ve made pecan pie before, you’ll recognize the flavors here—caramel, vanilla, and toasted nuts—but the texture is lighter, the bite-size presentation just right for nibbling. It’s a recipe that travels well too, staying tender at room temperature for a few hours, which makes it perfect for potlucks or picnics.

How to Make Pecan Tartlets
Quick Overview
This is a straightforward project that rewards you with a flaky crust and a glossy, nutty filling. You’ll start by chilling a quick shortcrust dough, roll it into slim rounds, and press them into mini tart pans. While the crust sets, you’ll whisk a lush pecan filling with eggs, brown sugar, butter, and vanilla; pour it into the shells, bake until the centers are barely set, then glaze and cool. The beauty is in the balance—the crust holds up to the smooth filling, the nuts toast to a fragrant warmth, and a simple glaze brings a polished finish. The method is forgiving, and once you’ve got your dough chilling, you can prep the filling while the oven preheats. It’s one of those recipes you can batch‑make for a party, freeze for last-minute cravings, or gift in a little tin to someone you’re fond of.
Ingredients
[Organize ingredients by purpose with detailed explanations:]
For the Main Batter:
– 1 1/4 cups all-purpose flour
– 2 tablespoons granulated sugar
– 1/2 cup unsalted butter, cold and cubed
– 1/4 teaspoon salt
– 2–3 tablespoons ice water, as needed
For the Filling:
– 1 cup pecans, toasted and chopped (plus 1/2 cup for topping)
– 1 cup light corn syrup (or 3/4 cup maple syrup + 1/4 cup corn syrup for a different sweetness)
– 1/2 cup packed light brown sugar
– 2 large eggs
– 1/4 cup unsalted butter, melted
– 1 teaspoon Vanilla Extract
– Pinch of salt
For the Glaze:
– 1/2 cup powdered sugar
– 1–2 tablespoons milk (or cream for richness)
– 1/2 teaspoon vanilla extract
– Optional: a squeeze of lemon juice or a tablespoon of maple syrup for depth

Step-by-Step Instructions
Step 1: Preheat & Prep Pan
Preheat your oven to 350°F (175°C). Lightly grease miniature tart pans or line them with parchment circles if you don’t have a full set. I love pre-baking the crusts just a touch for a crisper edge—about 6 minutes—so the shells hold their shape when the filling goes in.
Step 2: Mix Dry Ingredients
In a bowl, whisk together the flour, sugar, and salt. This step ensures the crust won’t taste flat or one-note. The sugar helps with a touch of browning in the crust, which I adore for the color and flavor.
Step 3: Mix Wet Ingredients
In a separate bowl, combine the cold melted butter with ice water. You want a sandy texture at first, then the dough comes together as you blend. I always use a fork to cut the butter into the flour until pea-sized bits of fat remain—that’s the trick to a tender crust that still holds its shape when baked.
Step 4: Combine
Pour the wet mixture into the dry and stir just until a shaggy dough forms. If it looks dry, sprinkle in a teaspoon more ice water, one teaspoon at a time. Don’t overwork it; we want a dough that’s pliable but not tough. Turn the dough onto a lightly floured surface and pat it into a disc. Wrap and chill for at least 30 minutes. This rest period is where the magic happens—flavor develops and the crust stays tender after baking.
Step 5: Prepare Filling
While the dough rests, toast the pecans until fragrant and golden (about 6–8 minutes at 350°F). Then chop them coarsely. In a bowl, whisk together the corn syrup, brown sugar, eggs, melted butter, vanilla, and a pinch of salt. The mixture should be smooth and glossy; if you notice a streak of raw egg, give it another whisk. Taste as you go; a touch more vanilla can brighten the filling nicely.
Step 6: Layer & Swirl
Roll the chilled dough on a lightly floured surface to about 1/8-inch thickness. Gently press rounds into the mini tart pans, trimming the edges so they’re flush with the rim. Prick the base with a fork to prevent air bubbles. Spoon a portion of the filling into each crust, then sprinkle with about a teaspoon of chopped pecans. If you like a pretty marbled effect, drizzle a small amount of additional filling on top and swirl in a toothpick for a gentle pattern. Don’t overfill; the filling will puff slightly as it bakes.
Step 7: Bake
Bake for 18–22 minutes, until the edges are golden and the centers look just set. If your oven runs hot, start checking at 15 minutes. The filling should be barely jiggle-proof—resist the urge to overbake, or the texture can become dense. If you’re making a double batch, rotate the pans halfway through for even browning.
Step 8: Cool & Glaze
Let the tartlets cool in the pans for about 10 minutes, then transfer to a wire rack to cool completely. While they’re cooling, whisk together the glaze ingredients until smooth. Drizzle the glaze over the tops while they’re still slightly warm so it sets with a glossy finish. If you prefer a lighter finish, dust with a touch of powdered sugar instead. The glaze is optional but adds that little glossy finish everyone loves on a dessert that’s already irresistible.
Step 9: Slice & Serve
These are best served at room temperature or slightly warm with a dollop of whipped cream or a scoop of vanilla ice cream if you’re feeling extra indulgent. Since they’re bite-size, you can plate a few on a platter with fresh berries for color. Trust me, these little beauties disappear fast—my friends always grab seconds, and my kids pretend they’re the best treasure they’ve found all week.
What to Serve It With
These pecan tartlets shine on their own, but some thoughtful pairings take them to the next level. Here are a few ideas to suit different occasions:
For Breakfast: A light drizzle of maple syrup and a strong cup of coffee. The sweetness of the tartlets pairs beautifully with a bold roast, and you can set out a few extra berries for color and brightness.
For Brunch: Serve with a dollop of cinnamon whipped cream and a side of citrus zest for brightness. A simple sparkling cider or a spiced chai rounds out the flavors without stealing the show from the pecans.
As Dessert: Pair with espresso for a coffee-kissed finish, or with vanilla bean ice cream for a classic contrast between hot-sweet and cold-creamy. A wedge of sharp cheddar on the side is unlikely, but surprisingly delightful if your friends are feeling adventurous.
For Cozy Snacks: Keep a batch in the fridge for quick snacks after school. The crust remains crunchy when warmed briefly in a low oven, and the filling stays creamy. It’s a comforting bite that feels like a warm hug during chilly evenings.
In our house, a tray of pecan tartlets is a favorite potluck addition—they travel well and the short prep time means you’re not stuck in the kitchen all night. A traditional friend once told me, “If you can dream up a small dessert that satisfies, you’ve cracked something wonderful.” These tartlets feel exactly like that—simple, cozy, and happily crowd-pleasing. They’re a little ritual I rely on, especially when I want to finish a meal with something that whispers, “you did good.”
Top Tips for Perfecting Your Pecan Tartlets
[Expert advice organized by technique:]
Crust Prep: Keep the butter cold and cut the dough with a light touch. If the dough cracks when you roll, chill it a bit longer or re-warm your hands with a quick knead. A still-air fridge is your friend here, and you’ll notice the crust becomes more forgiving as it rests.
Mixing Advice: Don’t overmix the filling once you combine wet and dry ingredients. A few gentle folds ensure the texture stays smooth and creamy rather than airy or dense. If your filling looks a touch thick, whisk in a tablespoon of milk or corn syrup to loosen it slightly.
Swirl Customization: For a pretty pattern, reserve a small portion of the filling and drizzle it in a circular motion over the top, then swirl with a toothpick. This creates a marbled effect that’s both appealing and delicious.
Ingredient Swaps: You can swap in maple syrup for all the corn syrup for a deeper maple flavor, or add a pinch of espresso powder to intensify the toasty notes. If you’re gluten-free, use a 1:1 gluten-free flour blend with a touch more butter in the dough to maintain tenderness.
Baking Tips: If your oven runs hot, reduce the temperature by 25°F and bake a few minutes longer. You want the edges to crisp without browning the centers too much. Use a light-colored pan to prevent over-browning on the bottom.
Glaze Variations: A lemon glaze offers a bright finish if you want something tangy to cut the sweetness, or you can brush with a warm 2:1 ratio of maple syrup to cream for a glossy gloss that’s extra silky.
Over the years I’ve learned a few small things that make these tartlets consistently good: chill the dough, toast the pecans for depth, and don’t rush the glaze—glaze at the right warmth so it sets smoothly. My mom always says the best desserts are those you can finish in a single afternoon with friends and family around the counter. This recipe checks that box—easy enough for a weeknight, special enough for guests, and unfussy enough to enjoy with a mug of coffee as the sun slides down.
Storing and Reheating Tips
Make-ahead magic is the hallmark of good baking. Here’s how to keep pecan tartlets tasting perfect from the oven to your next snack session.
Room Temperature: In an airtight container, they stay fresh for about 2 days. If it’s humid or warm, consider a light tent of parchment to protect the glaze and prevent sogginess.
Refrigerator Storage: Refrigerate for up to 5 days. They’ll firm up a bit in the fridge, which some people actually love—the extra chill makes the crunchy crust feel even more distinct from the soft interior.
Freezer Instructions: Freeze baked tartlets in a single layer, then transfer to a freezer bag for up to 2 months. Thaw at room temperature and re-glaze for a fresh look. If you’re freezing unbaked shells, keep them wrapped tight and bake straight from the freezer, adding a few minutes to the bake time.
Glaze Timing Advice: If you’re freezing, glaze after thawing so the glaze doesn’t crack with temperature changes. If you’re storing at room temperature, glaze within 1–2 hours of baking to keep that luscious shine.
From my kitchen to yours, these guidelines have kept pecan tartlets tasting freshly baked even days after they left the oven. They’re sturdy enough to travel, gentle enough to share, and always a little celebration when they appear on a plate.
Frequently Asked Questions
Final Thoughts
These pecan tartlets are the kind of recipe I reach for when I want something comforting without spending the day in the kitchen. They’re approachable, reliable, and irresistibly cozy—the kind of dessert you bring to a gathering and end up sharing with laughter, not with a sigh. The crust gives you that delicate snap, the filling stays wonderfully creamy and nut-forward, and the glaze ties everything together with a glossy, inviting finish. I love that you can tailor them to your mood—more maple for a warm, Sunday vibe, a touch of espresso for a grown-up twist, or a bright lemon zest for a fresh finish. If you try this, I’d love to hear which tweak became your favorite. Did you swirl a little cinnamon into the filling, or go for a bold citrus note in the glaze? Happy baking, friends—may your kitchen always smell like a celebration, even on ordinary days. If you enjoyed them, please leave a comment, rate the recipe, and share your own variations. I can’t wait to hear how yours turns out!
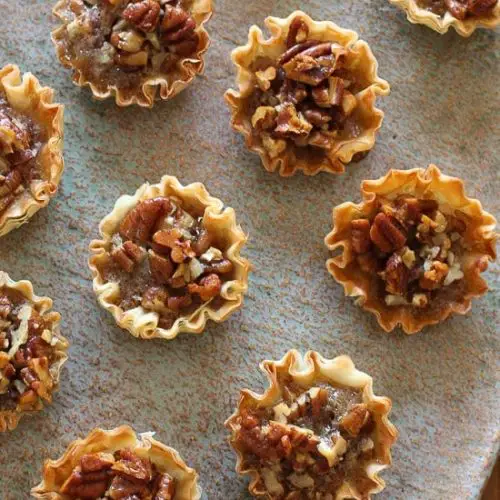
Mini Pecan Phyllo Tarts
Ingredients
Main Ingredients
- 1 tablespoon butter, melted
- 1 large egg
- 4 teaspoons brown sugar
- 2 tablespoons honey
- 0.25 teaspoon vanilla extract
- 0.5 cup pecans, chopped
- 15 count mini phyllo shells Athens brand recommended
Instructions
Preparation Steps
- Preheat oven to 350°F (175°C).
- In a medium mixing bowl, combine the melted butter, egg, brown sugar, honey, and vanilla extract. Mix well.
- Stir in the chopped pecans into the mixture.
- Arrange the mini phyllo shells on a baking sheet. Fill each shell with about one heaping teaspoon of the pecan mixture. If any mixture remains, distribute it evenly among the shells.
- Bake for 10-15 minutes, or until the filling is set and lightly golden.
- Let the tarts cool before serving.
Notes
Featured Comments
“Impressed! Clear steps and so flavorful results. Perfect for busy nights.”
“New favorite here — restaurant-level. crowd-pleaser was spot on.”
“Super easy and turned out amazing! My family asked for seconds. Saving this one.”
“This sweet treat was absolutely loved — the light really stands out. Thanks!”
“Made it tonight and wow — super easy! Will definitely make pecan tartlets again.”
“Packed with flavor and so simple. Exactly what I wanted from pecan tartlets.”


