You know those days? The ones where the afternoon slump hits hard, the kids are bouncing off the walls, and you just need something that feels like a warm hug but doesn’t require a whole production? That’s exactly when I find myself craving these pretzel dogs. They’re not just a snack; they’re a memory maker. I remember making these with my grandma when I was little, the kitchen filled with the most incredible, yeasty aroma. They’re like the love child of a soft, chewy pretzel and a perfectly cooked hot dog, all rolled into one glorious package. Honestly, they’re worlds away from those sad, soggy versions you sometimes get. These are the real deal, and I’m so excited to share them with you because they’re seriously a lifesaver on busy nights. Forget complicated baking projects; this is comfort food at its finest, and I guarantee they’ll disappear faster than you can say “more, please!”

What are pretzel dogs?
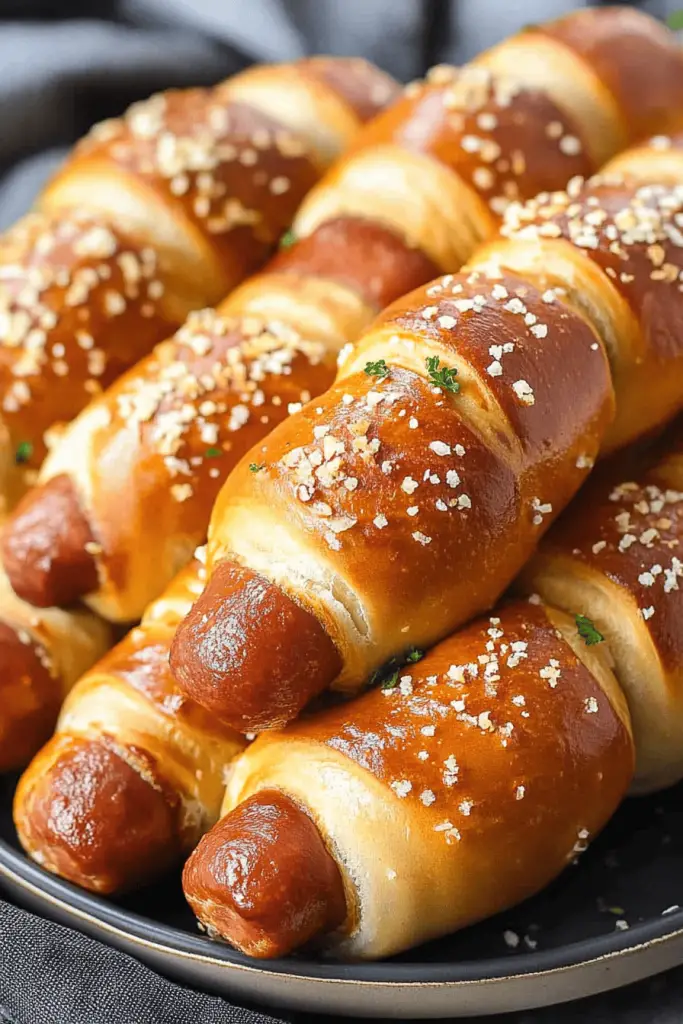
So, what exactly are these magical little things? Think of it as taking everything you love about a classic soft pretzel – that slightly chewy exterior, that hint of salt, that comforting doughiness – and wrapping it around a juicy hot dog. It’s essentially a hot dog enveloped in a homemade pretzel dough, baked to golden perfection. The magic happens when the dough bakes up around the dog, creating this amazing contrast of textures and flavors. It’s more than just a wrapped hot dog; the dough itself is made with that signature pretzel taste, and when it’s all baked together, it’s pure bliss. They’re surprisingly simple to make, and honestly, they’re way more satisfying than anything you can grab from a concession stand. It’s the kind of food that brings smiles to faces, no matter how old you are.
Why you’ll love this recipe?
Oh, where do I even begin with why you’ll adore these pretzel dogs? First off, the flavor! It’s just out of this world. You get that amazing salty, slightly malty taste of the pretzel dough perfectly complementing the savory, juicy hot dog. The contrast between the soft, yielding dough and the snap of the hot dog is something else. And don’t even get me started on the aroma while they’re baking – it fills your whole house with pure happiness. What I love most, though, is how surprisingly simple this recipe is. I know homemade dough can sound intimidating, but this one is really forgiving and straightforward. Even if you’ve never made bread dough before, I promise you can nail this. Plus, let’s talk budget. Hot Dogs are pretty affordable, and the dough ingredients are pantry staples. This batch makes a ton, so it’s incredibly cost-efficient for feeding a crowd or just stocking your freezer for those “I need a quick fix” moments. They’re also ridiculously versatile! Serve them as a fun appetizer, a kid-friendly lunch, or even a hearty snack. They stand on their own, but I’ll give you some ideas for what to serve them with later. They truly are a step above your average hot dog or pretzel, combining the best of both worlds into something utterly irresistible.
How do I make a dog a pretzel?
Quick Overview
The process for these pretzel dogs is really quite simple and rewarding. You’ll mix up a quick, easy pretzel dough, let it rise briefly, then wrap it around your favorite hot dogs. After a short bake, you’ll finish them off with a gorgeous glaze. The result is a batch of warm, chewy, savory delights that are perfect for any occasion. What makes this method special is how manageable the dough is, making it totally approachable even for beginner bakers. You get that authentic pretzel flavor and texture without all the fuss.
Ingredients
For the Main Batter:
You’ll need about 1 ½ cups of warm water (around 105-115°F – think warm bathwater, not hot). This is crucial for waking up the yeast. Next, 2 ¼ teaspoons of active dry yeast – that’s one standard packet. Don’t skimp on the yeast; it’s what gives us that wonderful rise and fluffy texture. Then, we have 1 tablespoon of granulated sugar. This feeds the yeast and adds a tiny hint of sweetness to the dough, balancing out the salt. About 1 ½ teaspoons of salt is essential for flavor – it really brings out the pretzel taste. And finally, for the body of the dough, 4 ½ to 5 cups of all-purpose flour. I usually start with 4 ½ cups and add more as needed, as humidity can sometimes affect how much flour you need. It’s always better to add flour gradually!
For the Filling:
This one is super simple: 8-10 high-quality hot dogs or sausages. I love using all-beef franks, but feel free to use your favorite. If you’re using larger sausages, you might get fewer pretzel dogs, but they’ll be extra hearty! Make sure they’re not too thick, or the dough might struggle to cook through properly.
For the Glaze:
For that gorgeous, glossy finish and classic pretzel flavor, you’ll need about ½ cup of water mixed with 2 tablespoons of baking soda. Yes, baking soda! This is the secret ingredient that gives pretzels their unique color and chewy texture. It sounds weird, but trust me on this one. After baking, you’ll want about 1 tablespoon of melted butter, brushed on warm. This adds richness and helps hold any extra salt you might want to sprinkle on top.

Step-by-Step Instructions
Step 1: Preheat & Prep Pan
First things first, let’s get our oven ready. Preheat it to a nice 400°F (200°C). While the oven is heating up, grab a couple of baking sheets and line them with parchment paper. This is a lifesaver for cleanup, trust me! If you don’t have parchment paper, you can lightly grease the sheets, but parchment is definitely the way to go for easy release.
Step 2: Mix Dry Ingredients
In a large mixing bowl, whisk together 4 ½ cups of your all-purpose flour, the sugar, and the salt. Give it a good mix to make sure everything is evenly distributed. This ensures your pretzel dogs have consistent flavor throughout.
Step 3: Mix Wet Ingredients
In a separate, smaller bowl or a measuring cup, combine the warm water and the active dry yeast. Give it a gentle stir and let it sit for about 5-10 minutes. You want to see it get foamy and bubbly. If it doesn’t foam up, your yeast might be old, or the water wasn’t the right temperature, and you’ll need to start again with fresh yeast. Once foamy, pour this yeasty mixture into the bowl with your dry ingredients.
Step 4: Combine
Now, let’s bring it all together. Using a wooden spoon or a stand mixer with a dough hook attachment, start mixing the wet and dry ingredients. Mix until a shaggy dough starts to form. If it seems too sticky, gradually add the remaining ½ cup of flour, a tablespoon at a time, until the dough pulls away from the sides of the bowl. Be careful not to add too much flour, or your pretzel dogs will be tough! Turn the dough out onto a lightly floured surface and knead for about 5-7 minutes (or about 5 minutes in a stand mixer). You’re looking for a smooth, elastic dough. It should feel soft and slightly tacky, but not stick to your hands too much.
Step 5: Prepare Filling
While your dough is having its little rest (we’ll get to that!), unwrap your hot dogs. If you want to make sure they cook evenly inside the dough, you can lightly score them with a knife in a criss-cross pattern. This also gives them a nice rustic look. Pat them dry with a paper towel – this helps the dough adhere better.
Step 6: Layer & Swirl
Now for the fun part! Divide your dough into 8-10 equal portions, depending on how many hot dogs you’re using. Take one portion of dough and flatten it out on a lightly floured surface into a long strip, about 8-10 inches long and roughly ½ inch thick. You can gently stretch it or roll it with a rolling pin. Then, carefully wrap this strip of dough around one hot dog, overlapping slightly to seal the seam. Pinch the ends firmly to prevent the hot dog from peeking out during baking. Place the wrapped hot dog seam-side down on your prepared baking sheet. Repeat with the remaining dough and hot dogs. Make sure they have a little space between them on the baking sheet.
Step 7: Bake
Before they go into the oven, we need to give them that classic pretzel treatment. In a shallow bowl, mix ½ cup of water with 2 tablespoons of baking soda. Dip each pretzel-dog into this solution for about 30 seconds, making sure it’s fully coated. This is what gives them that distinctive chewy crust and beautiful brown color. Carefully place them back on the baking sheet. Now, bake them in your preheated oven at 400°F (200°C) for about 15-20 minutes, or until they’re a lovely golden brown color. The exact time will depend on your oven, so keep an eye on them! You want them to be puffed up and golden all over.
Step 8: Cool & Glaze
Once they’re out of the oven, let them cool on the baking sheet for just a few minutes. While they’re still warm, brush them all over with the melted butter. This adds a wonderful richness and shine. If you like, sprinkle them with coarse sea salt or pretzel salt while the butter is still wet. This extra touch really takes them to the next level!
Step 9: Slice & Serve
Let them cool just enough so you don’t burn your fingers, but honestly, they are *best* served warm! You can slice them in half lengthwise if you want to make them a bit easier to eat, or just serve them whole. The inside should be soft and steamy, with the hot dog perfectly cooked.
What to Serve It With
These pretzel dogs are fantastic on their own, but they can also be the star of a meal or a fantastic snack! For breakfast, I love pairing them with a perfectly brewed cup of coffee. They’re surprisingly satisfying to start the day with, especially if you’ve got a busy morning ahead. For brunch, they can be presented a bit more elegantly. I sometimes serve them cut in half on a platter with a side of my homemade Dijon mustard dip or a creamy avocado crema. They’re a fun twist on traditional brunch fare! As a dessert, this might sound a little unusual, but hear me out. If you use a slightly sweeter sausage or even a cheese-filled frank, and skip the coarse salt, they can be a surprisingly fun dessert option, especially for kids’ parties! Think of them as a savory-sweet treat. For cozy snacks, these are just unbeatable. I love serving them with a big bowl of homemade potato chips or a simple side salad. They’re perfect for movie nights, game days, or just a casual get-together with friends. My kids also love them dipped in ketchup, of course!
Top Tips for Perfecting Your Pretzel Dogs
Over the years, I’ve picked up a few tricks that make these pretzel dogs even better, and I’m happy to share them with you! For the dough, the temperature of the water is key. If it’s too hot, it’ll kill the yeast, and if it’s too cold, it won’t activate properly. Aim for that ‘warm bath’ temperature. Also, don’t be afraid of a slightly sticky dough; adding too much flour is a common mistake that leads to tough pretzels. When you’re kneading, just keep going until it feels smooth and elastic. It’s worth the little bit of effort! For wrapping the dogs, make sure you seal the ends really well. I like to pinch them together firmly and sometimes even tuck them under a bit. This prevents the hot dog from escaping its doughy blanket during baking. The baking soda bath is non-negotiable for that authentic pretzel flavor and texture. Make sure your baking soda is fresh, too. A quick dip is all they need; don’t let them soak for too long, or the dough can get mushy. When it comes to baking, ovens can be quirky! Keep an eye on them after about 15 minutes. If they’re browning too quickly on top but not done inside, you can loosely tent them with foil. For variations, you can absolutely switch up the type of hot dog you use – cheese dogs are a family favorite here! Some people also like to add a sprinkle of Everything Bagel seasoning on top after the butter glaze for an extra flavor boost. If you find your dough is a bit too dry when wrapping, just have a tiny bit of water on your fingertips to help seal those seams. And a final tip: these are truly best served fresh and warm, but they do reheat surprisingly well. I’ll cover that in the next section!
Storing and Reheating Tips
Now, let’s talk about what to do with any leftovers, though I have to admit, there are rarely any in my house! If you have a few pretzel dogs that didn’t get gobbled up, they’re best stored at room temperature for up to 2 days. Just keep them in an airtight container or wrap them tightly in plastic wrap. They’ll maintain their chewiness for a good while. If you need to store them for longer, the refrigerator is your friend. Pop them into an airtight container or a resealable bag, and they should stay good for up to 4-5 days. They might lose a little bit of their initial chewiness in the fridge, but they’ll still be delicious. For long-term storage, these freeze beautifully! Let them cool completely, then wrap each pretzel dog individually and tightly in plastic wrap, followed by a layer of aluminum foil or placing them in a freezer-safe bag. They can stay frozen for up to 2-3 months. For the glaze, I always apply the butter and salt right after they come out of the oven, so that’s done fresh. If you plan to freeze them, you can skip the butter and salt until after reheating, or apply a light buttering and salt sprinkle then for the freshest flavor.
Reheating is super simple! For those at room temperature or from the fridge, you can pop them back into a preheated oven at around 300°F (150°C) for about 5-10 minutes, or until heated through. This helps bring back some of that lovely crispness. If they’re frozen, thaw them overnight in the refrigerator, then reheat as above. You can also reheat them in a toaster oven or even briefly in a microwave (though be careful not to overdo it in the microwave, as they can get a bit rubbery). If you’re reheating frozen ones and want that fresh-baked feel, you can reheat them directly from frozen at a slightly lower temperature, say 275°F (135°C), for a bit longer, maybe 10-15 minutes. Then, you can brush with melted butter and salt if desired.
Frequently Asked Questions
Final Thoughts

So there you have it – my absolute favorite pretzel dogs! I truly believe this recipe is something special because it brings together that nostalgic comfort of a warm pretzel with the satisfying goodness of a hot dog. They’re easy enough for a weeknight but impressive enough for guests. What I love most is seeing the delight on people’s faces when they take that first bite. It’s just pure joy! If you enjoy these, you might also like my Cheesy Garlic Breadsticks or my Soft dinner rolls – they use a similar dough-making process and are just as comforting. Give these pretzel dogs a try; I promise you won’t regret it. I can’t wait to hear how yours turn out! Let me know in the comments below if you tried them, what your favorite way to serve them is, or any fun variations you came up with. Happy baking, and happy eating!

Pretzel Dogs
Ingredients
Pretzel Dough
- 1.5 cup warm water
- 2.25 teaspoon active dry yeast
- 0.5 cup granulated sugar
- 3 tablespoon olive oil
- 4.5 cup all-purpose flour
- 1.5 teaspoon salt
For Assembly
- 10 ounces hot dogs
- 0.5 cup baking soda
- 1 large egg beaten, for egg wash
- coarse salt for sprinkling
Instructions
Preparation Steps
- In a large bowl, combine warm water, yeast, and sugar. Let it sit for 5-10 minutes until foamy.
- Stir in olive oil. Gradually add flour and salt, mixing until a shaggy dough forms. Knead on a floured surface for 5-7 minutes until smooth and elastic.
- Place dough in a greased bowl, cover, and let rise in a warm place for 1 hour, or until doubled in size.
- Punch down dough and divide into 10 equal pieces. Roll each piece into a rope about 10-12 inches long.
- Wrap each dough rope around a hot dog, pressing the ends to seal.
- Preheat oven to 400°F (200°C). Line a baking sheet with parchment paper. In a large pot, bring 8 cups of water and the baking soda to a boil.
- Boil each pretzel dog for 30 seconds, then place on the prepared baking sheet.
- Brush with egg wash and sprinkle with coarse salt.
- Bake for 12-15 minutes, or until golden brown.
Notes
Featured Comments
“Impressed! Clear steps and quick weeknight win results. Perfect for busy nights.”
“New favorite here — spot on. crowd-pleaser was spot on.”
“Super easy and turned out amazing! My family asked for seconds. Saving this one.”
“This sweet treat was absolutely loved — the silky really stands out. Thanks!”
“Made it tonight and wow — so flavorful! Will definitely make Pretzel dogs again.”
“Packed with flavor and so simple. Exactly what I wanted from Pretzel dogs.”


