

There are certain smells that just wrap you up like a warm hug, aren’t there? For me, that smell is always baking. Especially when it’s something cozy and familiar, like pumpkin Banana Bread. It’s the perfect marriage of two fall favorites, and honestly, it’s become my go-to for just about everything. Whether it’s a weekend treat, a quick breakfast before school drop-off, or even something to whip up when unexpected guests arrive, this pumpkin banana bread is a lifesaver. It’s richer and more flavorful than your average banana bread, but not as heavy as a full-blown cake. It strikes that perfect balance, and the aroma that fills the house while it’s baking? Pure magic. My family devours it, and I always feel a little smug knowing how simple it actually is to create this deliciousness.
What is pumpkin banana bread?
So, what exactly *is* pumpkin banana bread? Think of it as your favorite, super-Moist Banana Bread‘s incredibly charming, slightly spiced cousin who knows how to dress up for fall. It’s essentially a quick bread batter that gets a delightful upgrade from the addition of pureed pumpkin and, of course, ripe bananas. This dynamic duo brings an amazing moistness and a subtle sweetness that’s just divine. It’s not overwhelmingly pumpkin-y, nor does it taste like plain banana bread; it’s a beautiful symphony of both. It’s the kind of bread that’s perfect sliced thick, perhaps with a smear of butter, and enjoyed with a hot cup of coffee or tea. It’s comfort in loaf form, really.
How to Make Pumpkin Banana Bread
Quick Overview
This recipe is all about Simple Steps that lead to maximum flavor and moisture. You’ll essentially mix your dry ingredients, whisk your wet ingredients, combine them gently, then swirl in a luscious pumpkin filling. The oven does the rest, transforming this simple batter into a fragrant, golden-brown loaf. It’s designed to be forgiving, so even if you’re new to baking, you’ll find success here. The key is not to overmix, and the result is always a beautifully moist and flavorful loaf that smells like pure happiness.
Ingredients
For the Main Batter:
2 cups all-purpose flour (I often use unbleached for a slightly better texture)
1 teaspoon baking soda (this helps it rise beautifully)
1/2 teaspoon salt (balances the sweetness)
1 teaspoon ground cinnamon (for that classic warm spice)
1/2 teaspoon ground nutmeg (a little goes a long way for depth)
1/4 teaspoon ground cloves (optional, but adds a lovely warmth)
1 cup granulated sugar (or a mix of granulated and brown for extra moisture and depth)
1/2 cup unsalted butter, softened (or you can use a neutral oil like canola or vegetable)
2 large eggs, at room temperature (helps them incorporate better)
1 teaspoon vanilla extract (a must for good flavor)
3 ripe bananas, mashed (the riper, the better! Black spots are your friend here)
1/4 cup milk (any kind works, even almond or oat milk adds a nice creaminess)
For the Filling:
1/2 cup pumpkin puree (NOT pumpkin pie filling – just the pure pumpkin)
1/4 cup packed light brown sugar (for a caramel-like sweetness)
1 tablespoon all-purpose flour (helps thicken the filling)
1 teaspoon pumpkin pie spice (or a mix of cinnamon, nutmeg, ginger, and cloves)
For the Glaze (Optional but highly recommended!):
1 cup powdered sugar
2-3 tablespoons milk (or half-and-half for extra richness)
1/2 teaspoon vanilla extract
Step-by-Step Instructions
Step 1: Preheat & Prep Pan
First things first, get your oven preheated to 350°F (175°C). Now, grab a standard 9×5 inch loaf pan. The best way to ensure your beautiful loaf doesn’t stick is to grease it really well with butter or cooking spray, and then lightly dust it with flour. You can also line it with parchment paper, leaving an overhang on the sides – this makes lifting the finished loaf out a breeze!
Step 2: Mix Dry Ingredients
In a medium-sized bowl, whisk together the flour, baking soda, salt, cinnamon, nutmeg, and cloves (if using). Giving them a good whisk ensures everything is evenly distributed, which means no pockets of baking soda or spice. You want that flavor and rise to be consistent throughout the loaf.
Step 3: Mix Wet Ingredients
In a larger bowl, cream together the softened butter and sugar until it’s light and fluffy. This is where you really incorporate air, which contributes to the bread’s texture. Beat in the eggs, one at a time, making sure each is fully incorporated before adding the next. Stir in the vanilla extract. Then, add the mashed bananas and milk, and mix until just combined. Don’t worry if it looks a little lumpy at this stage; that’s normal with bananas!
Step 4: Combine
Now, it’s time to bring the wet and dry ingredients together. Pour the dry ingredients into the wet ingredients. Using a spatula or wooden spoon, mix until just combined. This is super important: Do NOT overmix! A few streaks of flour are okay. Overmixing develops the gluten too much, which can lead to a tough, dense bread. We want tender and moist!
Step 5: Prepare Filling
In a small bowl, whisk together the pumpkin puree, brown sugar, flour, and pumpkin pie spice. This filling is going to give you those gorgeous swirls and an extra burst of flavor and moisture. It should be thick enough to swirl but not so stiff that it’s hard to work with.
Step 6: Layer & Swirl
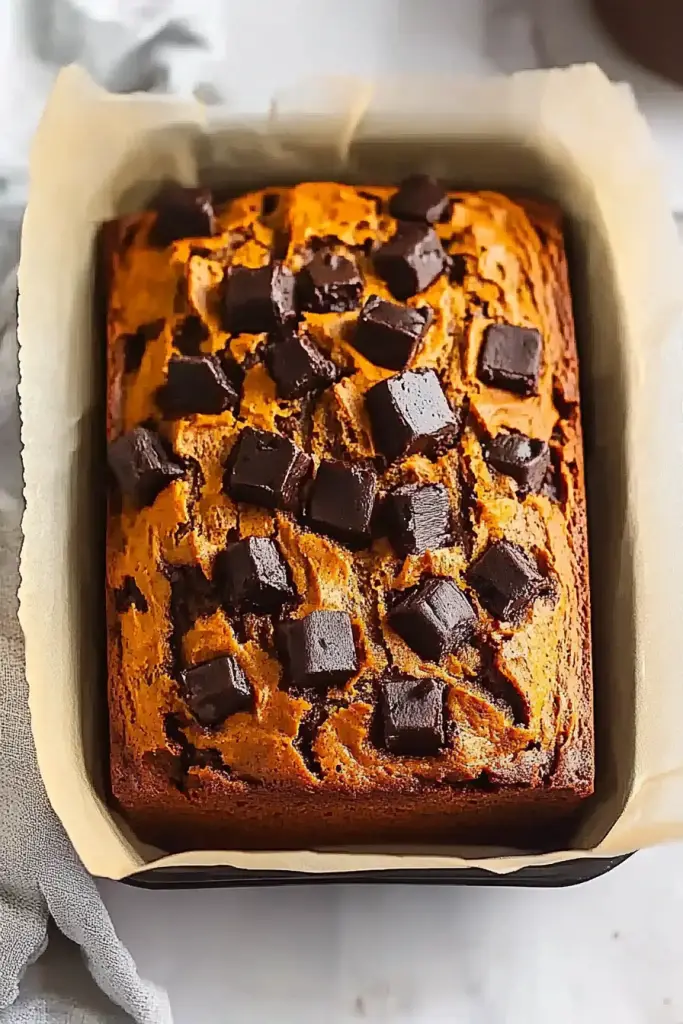
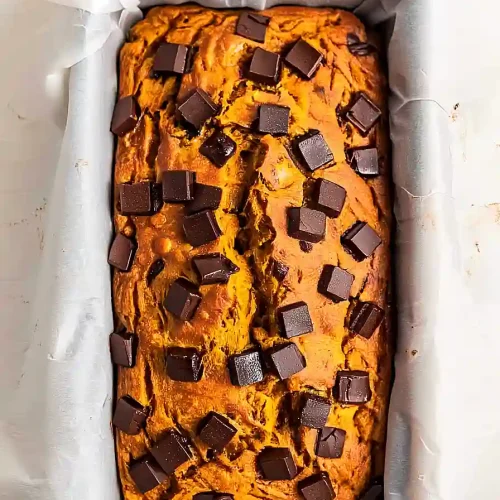
Pour about half of the banana bread batter into your prepared loaf pan. Dollop spoonfuls of the pumpkin filling over the batter. Then, pour the remaining banana bread batter over the filling. You can add a few more dollops of filling on top if you like. Now, grab a knife or a skewer and gently swirl the filling through the batter. Don’t over-swirl; you want distinct ribbons of pumpkin, not a completely uniform mixture. This is where the pretty patterns come from!
Step 7: Bake
Bake in your preheated oven for 50-65 minutes. The baking time can vary depending on your oven. To check for doneness, insert a toothpick or a thin knife into the center of the loaf. If it comes out clean (or with just a few moist crumbs attached), it’s ready. If it comes out with wet batter, give it a few more minutes and check again. If the top is browning too quickly, you can loosely tent it with aluminum foil.
Step 8: Cool & Glaze
Once baked, let the loaf cool in the pan for about 10-15 minutes. This allows it to set up. Then, carefully invert it onto a wire rack to cool completely. If you used parchment paper, this is where that overhang comes in handy! Once the loaf is completely cool, it’s time for the glaze. Whisk together the powdered sugar, milk, and vanilla extract until smooth and pourable. Drizzle it over the top of the cooled bread. Let the glaze set for about 15-20 minutes before slicing.
Step 9: Slice & Serve
Once the glaze has set, use a serrated knife to slice your beautiful pumpkin banana bread. Serve it at room temperature for the best flavor and texture. Enjoy!
What to Serve It With
This pumpkin banana bread is pretty much a star all on its own, but here are some of my favorite ways to serve it, depending on the occasion:
For Breakfast: My kids are obsessed with this as a weekend breakfast. I like to slice it thick, toast it lightly, and serve it with a tiny pat of butter. It’s hearty enough to keep everyone satisfied until lunch. A simple black coffee or a glass of cold milk is the perfect accompaniment.
For Brunch: If I’m having friends over for a leisurely brunch, I’ll slice it a bit thinner and arrange it on a nice platter. Sometimes, I’ll serve it with a side of Greek yogurt and a drizzle of honey or maple syrup for those who want something a little extra. It pairs beautifully with a mimosa or a festive cranberry spritzer.
As Dessert: This is where it gets fun! For a simple, comforting dessert, I love serving a warm slice with a scoop of vanilla bean ice cream or a dollop of freshly whipped cream. A sprinkle of chopped toasted pecans or walnuts on top is also a lovely touch. It’s a much lighter option than a full-on cake, but still feels incredibly indulgent.
For Cozy Snacks: This is probably my most frequent use! When that 3 pm craving hits, or I need something to fuel my afternoon work, a slice of this pumpkin banana bread is pure bliss. It’s perfect with a steaming mug of chai tea or a rich hot chocolate. It’s the ultimate comfort food for a quiet moment.
My absolute favorite family tradition is to have this on a Saturday morning. We’ll make a big batch, and the smell alone is enough to get everyone out of bed. We’ll sit around the table, chat, and enjoy our slices before we tackle the day. It’s those simple moments, made a little sweeter by this delicious bread, that I cherish most.
Top Tips for Perfecting Your Pumpkin Banana Bread
Over the years, I’ve learned a few tricks that make this pumpkin banana bread consistently amazing. Here are my top tips to help you achieve bakery-worthy results every time:
Banana Ripeness is Key: Don’t even think about using those firm, yellow bananas. You want them to be speckled, practically black! The riper they are, the sweeter they are, and they break down beautifully to add moisture and that classic banana flavor. Mash them really well; a few small lumps are fine, but you don’t want huge chunks.
Don’t Overmix the Batter: This is probably the most crucial tip for any quick bread. Mix the wet and dry ingredients only until *just* combined. A few streaks of flour left are perfectly fine. Overmixing develops the gluten in the flour, which will result in a tough, dense loaf instead of a tender, moist one. Gentle is the name of the game here.
Master the Swirl: For that beautiful marbled effect, don’t go crazy with the swirling. Pour your filling dollops and then make just a few passes with a knife or skewer, lifting and turning gently. You want distinct pockets and ribbons of the pumpkin mixture, not a uniform blend. It’s more about creating visual interest than thoroughly mixing.
Pumpkin Puree vs. Pie Filling: This is a common mistake! Make sure you’re using 100% pure pumpkin puree, not pumpkin pie filling. The pie filling already has sugar and spices added, which will throw off the balance of your recipe and make it too sweet and potentially watery. You can often find cans labeled “100% Pure Pumpkin.”
Baking Wisdom: Ovens can be fickle, so always test for doneness. A toothpick inserted into the center is your best friend. If it comes out with wet batter, bake longer in 5-minute increments. If the top is getting too dark before the inside is cooked, loosely tent the loaf pan with aluminum foil. This prevents the outside from burning while the inside finishes baking.
Glaze Consistency is Everything: For the glaze, start with the lower amount of milk and add more by the teaspoon until you reach your desired drizzling consistency. Too thin, and it’ll run off. Too thick, and it’ll be clumpy. You want it pourable but still substantial enough to coat the bread nicely.
Ingredient Swaps I’ve Tested: If you’re out of butter, a neutral oil like canola or vegetable oil works well, using about 3/4 cup for the 1/2 cup of butter. I’ve also tried using whole wheat flour, replacing up to half of the all-purpose flour, which adds a nice nutty flavor but can make it a little denser. For a dairy-free option, unsweetened almond or oat milk works perfectly in the batter, and for the glaze, use a dairy-free milk and ensure your powdered sugar is fine.
Storing and Reheating Tips
I get asked about storing this pumpkin banana bread all the time because, well, sometimes you just can’t eat the whole loaf in one sitting (though I’ve come close!). Here’s how I keep it fresh and delicious:
Room Temperature Storage: Once the loaf is completely cool (this is crucial, especially if you’ve glazed it!), you can store it at room temperature. The best way is to wrap it tightly in plastic wrap or place it in an airtight container. At room temperature, it will stay wonderfully moist and delicious for about 2-3 days. If you’ve glazed it, let the glaze set completely before wrapping.
Refrigerator Storage: If you live in a warmer climate or just want to extend its life, the refrigerator is your friend. Wrap it tightly, again, once it’s fully cooled. In the fridge, it will keep well for up to a week. I find that it’s actually even better on day two or three, as the flavors meld together. Just be aware that refrigeration can sometimes slightly alter the texture, making it a bit firmer.
Freezer Instructions: This is a fantastic make-ahead option! Once the loaf is completely cool and any glaze is set, wrap it very tightly in plastic wrap, then in aluminum foil. You can also store it in a freezer-safe bag. It will keep well in the freezer for up to 3 months. To thaw, unwrap it and let it sit at room temperature for several hours, or thaw it overnight in the refrigerator. For a quick thaw, you can reheat individual slices.
Glaze Timing Advice: If you plan to freeze the bread, I highly recommend baking it *without* the glaze. Once it’s thawed and you’re ready to serve, whip up a fresh glaze and apply it then. This ensures the glaze is nice and fresh. If storing at room temperature or in the fridge, you can glaze it before storing, as long as it’s completely cooled.
When reheating, I love to pop a slice in the toaster oven for a few minutes until it’s gently warmed through. It brings back that fresh-from-the-oven aroma and texture beautifully. If it’s been in the fridge, a quick zap in the microwave (about 10-15 seconds) can also work, but I find the toaster oven gives a superior result.
Frequently Asked Questions
Final Thoughts
So there you have it – my absolute favorite pumpkin banana bread recipe! It’s more than just a recipe to me; it’s a little bit of comfort, a reminder of cozy days, and a surefire way to bring a smile to my family’s faces. The incredible moistness, the perfect balance of pumpkin and banana, and that hint of spice just make it irresistible. It’s proof that you don’t need to be a master baker to create something truly special. If you love classic banana bread and the warm flavors of fall, you are going to adore this. I truly hope this recipe becomes a beloved staple in your kitchen too. Don’t forget to tell me how yours turns out in the comments below – I’m always so eager to hear about your baking adventures! Happy baking, my friends!
Pumpkin Banana Bread
Ingredients
Main Ingredients
- 0.5 cup unsalted butter melted
- 0.75 cup granulated sugar
- 2 large eggs lightly beaten
- 0.5 cup pumpkin puree
- 2 medium ripe bananas mashed
- 1.5 teaspoon vanilla extract
- 1.5 cup all-purpose flour
- 1 teaspoon baking soda
- 0.5 teaspoon salt
- 1 teaspoon ground cinnamon
- 0.25 teaspoon ground nutmeg
- 0.25 teaspoon ground ginger
- 0.125 teaspoon ground cloves
Instructions
Preparation Steps
- Preheat oven to 350°F (175°C). Grease and flour a 9x5 inch loaf pan.
- In a large bowl, whisk together the melted butter and granulated sugar until well combined.
- Stir in the beaten eggs, pumpkin puree, mashed bananas, and vanilla extract until smooth.
- In a separate bowl, whisk together the flour, baking soda, salt, cinnamon, nutmeg, ginger, and cloves.
- Gradually add the dry ingredients to the wet ingredients, mixing until just combined. Do not overmix.
- Pour the batter into the prepared loaf pan and spread evenly.
- Bake for 55-65 minutes, or until a wooden skewer inserted into the center comes out clean.
- Let the bread cool in the pan for 10-15 minutes before inverting it onto a wire rack to cool completely.
Notes
Featured Comments
“I love this so much—baking always feels like home to me, too. The aroma alone makes the whole house smell amazing!”
“I totally agree—the smell of banana bread baking is pure comfort. Every bite brings back such happy memories.”
“Impressed! Clear steps and quick weeknight win results. Perfect for busy nights.”
“New favorite here — creamy. crowd-pleaser was spot on.”
“Super easy and turned out amazing! My family asked for seconds. Saving this one.”
“This sweet treat was absolutely loved — the fresh really stands out. Thanks!”


I totally agree—the smell of banana bread baking is pure comfort. Every bite brings back such happy memories.
I love this so much—baking always feels like home to me, too. The aroma alone makes the whole house smell amazing!