

Oh, friend, if you’re anything like me, sometimes you just need a little burst of sunshine in your day. And for me, that often comes in the form of something sweet, a little bit tart, and oh-so-pretty. That’s where these Raspberry Swirl Cookies come in. They’re not just cookies; they’re little edible works of art! I remember the first time I made these for a bake sale years ago. I was so nervous, but people went absolutely wild for them! They’re a bit like a fancy shortbread met a jammy biscuit, but way, way better because you get that beautiful marbling that makes each cookie so unique. If you’ve ever loved a good raspberry thumbprint cookie or a marbled brownie, then you are going to be obsessed with these raspberry swirl cookies.
What are Raspberry Swirl Cookies?
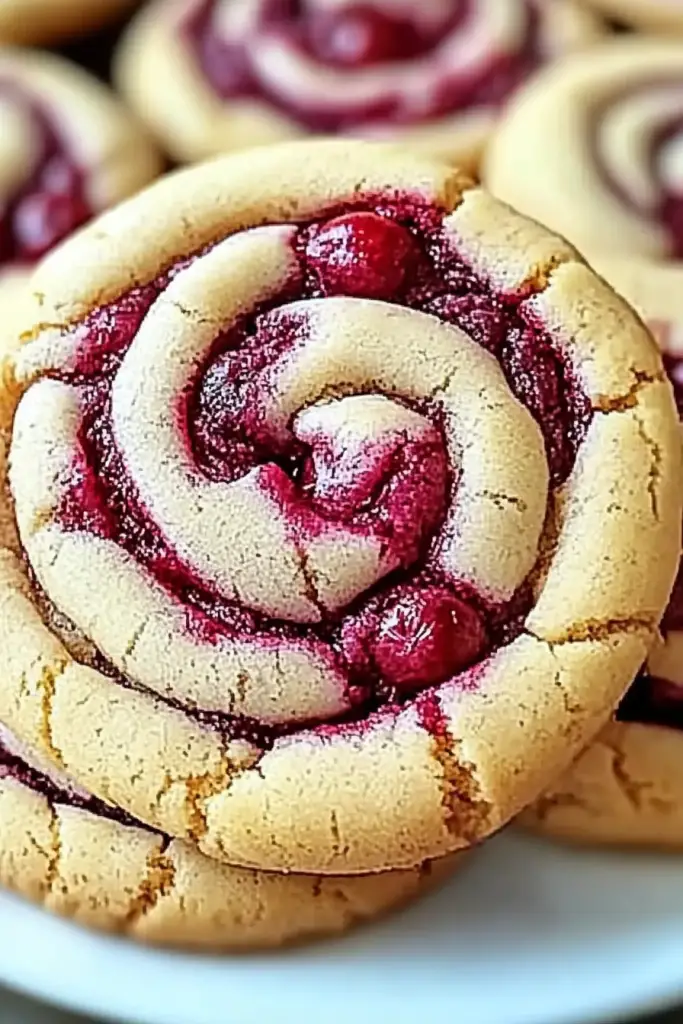
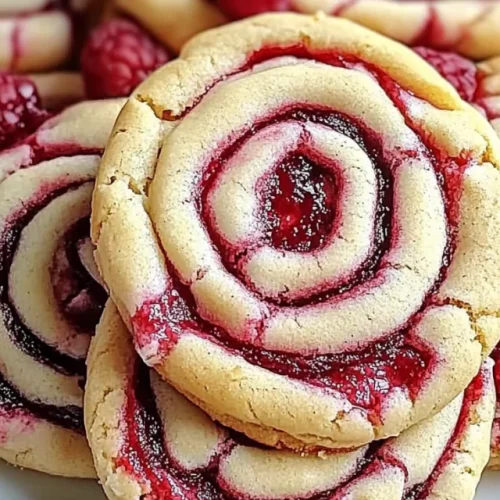
So, what exactly are these delightful little treats we’re talking about? Think of them as a wonderfully tender, buttery Cookie Dough that gets a beautiful, vibrant swirl of homemade raspberry filling. It’s not a sticky jam, and it’s not a super-sweet icing; it’s more like a concentrated, slightly tart raspberry ribbon that bakes right into the cookie itself. The result is a cookie that’s soft on the inside, slightly crisp on the edges, and bursting with that bright, unmistakable raspberry flavor. The “swirl” part is what makes them so special – no two cookies look exactly alike, which I just adore. It’s like a little surprise waiting in every bite. They’re basically magic in cookie form!
How do I make Raspberry Swirl Cookies?
Quick Overview
We’re essentially making a simple, buttery cookie dough, preparing a vibrant raspberry filling, and then layering and swirling them together before baking. It’s a straightforward process that yields incredibly beautiful and delicious results. You’ll mix your dry and wet ingredients for the dough separately, then bring them together. While the dough chills briefly, you’ll whip up a quick raspberry filling. Then comes the fun part: layering the dough and filling and swirling them into gorgeous patterns. You’ll bake them until they’re golden and set, then let them cool before a simple glaze finishes them off. It sounds like a lot, but each step is super manageable, and the payoff is totally worth it!
Ingredients
For the Main Batter:
2 ½ cups all-purpose flour, plus more for dusting. Always use good quality flour; it makes a difference! I like King Arthur’s for most of my baking.
1 teaspoon baking powder. This gives them just a little lift.
½ teaspoon salt. Balances out the sweetness perfectly.
1 cup (2 sticks) unsalted butter, softened. Make sure it’s truly softened, not melted! This is key for that tender texture.
1 cup granulated sugar. You can also use a mix of granulated and a little brown sugar for extra depth, but classic granulated is wonderful here.
2 large eggs. Room temperature eggs incorporate better.
1 teaspoon pure Vanilla Extract. Don’t skimp on good vanilla; it adds so much warmth!
For the Filling:
1 ½ cups fresh or frozen raspberries. If using frozen, no need to thaw!
¼ cup granulated sugar. Adjust to your sweetness preference. Some raspberries are tarter than others.
1 tablespoon cornstarch. This will help thicken it up so it doesn’t spread too much.
1 tablespoon fresh lemon juice. Brightens up the raspberry flavor wonderfully.
For the Glaze:
1 cup powdered sugar. Sifted is best for a smooth glaze.
2-3 tablespoons milk (any kind works, dairy or non-dairy). Start with 2 and add more if needed to reach desired consistency.
½ teaspoon vanilla extract (optional, but nice!).
Step-by-Step Instructions
Step 1: Preheat & Prep Pan
First things first, let’s get our oven ready. Preheat it to 350°F (175°C). Then, line a couple of baking sheets with parchment paper. This is a game-changer for easy cleanup and ensures your cookies won’t stick. You can also lightly grease your baking sheets if you don’t have parchment, but parchment is definitely my preferred method.
Step 2: Mix Dry Ingredients
In a medium bowl, whisk together your flour, baking powder, and salt. Give it a good whisk to make sure everything is evenly distributed. This little step ensures your cookies have a nice, consistent texture. Set this bowl aside for now.
Step 3: Mix Wet Ingredients
In a large bowl, cream together the softened butter and granulated sugar using an electric mixer until light and fluffy. This usually takes about 3-4 minutes. Then, beat in the eggs one at a time, making sure each is fully incorporated before adding the next. Stir in the vanilla extract. The mixture should look smooth and creamy.
Step 4: Combine
Gradually add the dry ingredients to the wet ingredients, mixing on low speed until just combined. Be careful not to overmix here! Overmixing can lead to tough cookies, and we want these to be tender. Stop mixing as soon as you no longer see streaks of flour. The dough will be soft and a little sticky – that’s exactly what we want.
Step 5: Prepare Filling
While the dough is chilling briefly (yes, we’re going to chill it for just about 15 minutes – it makes it much easier to handle!), let’s make our raspberry filling. In a small saucepan, combine the raspberries, sugar, cornstarch, and lemon juice. Cook over medium heat, stirring frequently, until the raspberries break down and the mixture thickens into a jam-like consistency. This usually takes about 5-8 minutes. Remove from heat and let it cool completely. It will thicken up even more as it cools. If you’re using frozen raspberries, this step is super easy!
Step 6: Layer & Swirl
Now for the fun part! Lightly flour your work surface and your rolling pin. Divide the cookie dough in half. Roll out one half into a rectangle, about ¼-inch thick. Spread half of the cooled raspberry filling evenly over the dough, leaving a small border around the edges. Then, gently roll out the second half of the dough and place it on top of the filling. Carefully spread the remaining raspberry filling over the top layer of dough. Now, here’s where the magic happens: using a knife or a bench scraper, gently swirl the dough and filling together. You can do this by dragging your tool in sweeping motions, creating a marbled effect. Don’t over-swirl, or the colors will blend too much. Just a few gentle passes are perfect. Then, use a knife to cut the swirled dough into about ½-inch thick strips. From each strip, roll it up tightly like a jelly roll, then twist it gently to create a spiral. Place the rolled cookies onto your prepared baking sheets, leaving some space between them.
Step 7: Bake
Bake for 12-15 minutes, or until the edges are lightly golden brown and the centers are set. Keep an eye on them, as oven temperatures can vary. You want them to be cooked through but not overdone, as they’ll continue to firm up as they cool.
Step 8: Cool & Glaze
Let the cookies cool on the baking sheets for about 5 minutes before transferring them to a wire rack to cool completely. This is important so they don’t fall apart. Once they’re completely cool, it’s time for the glaze! Whisk together the powdered sugar, milk, and vanilla extract (if using) until smooth. You want a drizzly consistency. Drizzle the glaze over the cooled cookies. If you prefer a thicker glaze, add more powdered sugar. If you want it thinner, add a tiny bit more milk. Let the glaze set before serving.
Step 9: Slice & Serve
Once the glaze is set, your beautiful raspberry swirl cookies are ready to be enjoyed! They’re perfect served as they are, but you could also add a dusting of powdered sugar or a sprinkle of freeze-dried raspberry crumbles for extra flair. Slice them neatly if you made them into rolls, or just admire the unique swirl on each one before taking that first delicious bite!
What to Serve It With
These raspberry swirl cookies are honestly fantastic on their own, but they also pair wonderfully with all sorts of beverages and occasions. For a cozy breakfast, I love them with a steaming mug of coffee or a simple glass of cold milk. They’re just sweet enough to start the day without being overwhelming. If you’re hosting a brunch, these cookies look absolutely stunning on a platter. They add a pop of color and elegance that guests always rave about. I like to serve them alongside fresh fruit and maybe some yogurt parfaits.
As a dessert, they’re a lighter option than a heavy cake. They’re perfect after a rich meal, or for those moments when you just need something sweet but don’t want to go overboard. I sometimes serve them with a tiny scoop of vanilla bean Ice Cream, which is pure heaven. And for those spontaneous, cozy snack moments? These are your go-to. Curl up on the couch with a good book and a few of these cookies – pure bliss! My family tradition is to have them on hand for impromptu playdates with neighbors. They’re always a guaranteed crowd-pleaser, and they make me look like I’ve got it all together, even on the busiest days!
Top Tips for Perfecting Your Raspberry Swirl Cookies
Over the years, I’ve picked up a few tricks that make these raspberry swirl cookies even better, and I just have to share them with you! First off, for the raspberry filling, don’t be afraid to cook it down a little longer than you might think. You want it to be thick and jammy, almost like a fruit preserve. If it’s too runny, it’ll make your dough soggy and the swirl won’t hold its shape. I’ve found that using a mix of fresh and frozen raspberries can sometimes give you a really vibrant color and a great balance of tartness and sweetness.
When it comes to mixing the dough, the golden rule is: don’t overmix! Seriously, as soon as you don’t see any dry flour, stop. Overmixing develops the gluten in the flour, which can make your cookies tough and less tender. A slightly sticky dough is actually a good sign. For the swirling, practice makes perfect. You don’t need to be an artist! Just gentle, sweeping motions with a knife or spatula will create a beautiful marbled effect. The goal is streaks of color, not a muddy mess. Experiment with different patterns – some people like to do a figure-eight motion, others just simple lines.
Ingredient swaps can work too! If you don’t have raspberries, other berries like strawberries or blackberries would be lovely, though you might need to adjust the sugar slightly. For the glaze, I’ve found that using a good quality milk makes a difference. If you’re dairy-free, almond milk or oat milk works beautifully. And if you’re craving something different, instead of a glaze, try a light dusting of powdered sugar or even a drizzle of white chocolate. For baking, always keep an eye on your oven. Ovens can be quirky! If yours tends to run hot, you might want to reduce the baking time by a minute or two. The cookies should be set but not browned too much around the edges. My biggest lesson learned? Patience! Let them cool completely before glazing. It makes all the difference in the final appearance and texture.
Storing and Reheating Tips
One of the best things about these raspberry swirl cookies is how well they store. If you’ve managed to keep any leftovers, store them in an airtight container at room temperature for up to 3 days. They tend to stay nice and soft this way. If your kitchen is particularly warm or humid, you might want to pop them in the refrigerator, but honestly, for short periods, room temp is usually just fine and keeps their lovely texture.
For longer storage, the refrigerator is your friend. They’ll keep well in the fridge for up to a week, though they might become a little firmer. Just let them come to room temperature for about 15-20 minutes before serving for the best texture. If you want to freeze them, I highly recommend doing so *before* glazing. Wrap them tightly in plastic wrap, then place them in a freezer-safe bag or container. They’ll last in the freezer for up to 2-3 months. When you’re ready to enjoy them, thaw them overnight in the refrigerator, then bring them to room temperature. Once thawed and at room temp, you can then add the glaze. If you glaze them before freezing, the glaze can sometimes become a bit sticky or weepy when thawed. Trust me on this one – freeze them plain for best results!
Frequently Asked Questions
Final Thoughts
I really hope you give these Raspberry Swirl Cookies a try. They’re more than just a recipe to me; they’re a little bit of joy, a burst of color, and a whole lot of deliciousness all rolled into one. The way the bright raspberry cuts through the buttery sweetness of the cookie is just perfection. They’re elegant enough for a special occasion but simple enough for a Tuesday afternoon treat. They’re proof that you don’t need complicated techniques to create something truly beautiful and incredibly tasty. If you enjoyed this recipe, you might also love my classic Sugar Cookies or my Lemon Blueberry Scones for more delightful baked goods! I can’t wait to hear what you think and see your beautiful creations. Happy baking, my friend!
Raspberry Swirl Cookies
Ingredients
Cookie Dough
- 1 cup unsalted butter softened
- 0.75 cup granulated sugar
- 0.5 cup light brown sugar packed
- 1 large egg
- 1 teaspoon vanilla extract
- 2.5 cups all-purpose flour
- 0.5 teaspoon baking soda
- 0.25 teaspoon salt
Raspberry Swirl
- 0.5 cup raspberry jam
Instructions
Preparation Steps
- In a large bowl, cream together the softened butter, granulated sugar, and brown sugar until light and fluffy.
- Beat in the egg and vanilla extract until well combined.
- In a separate bowl, whisk together the flour, baking soda, and salt.
- Gradually add the dry ingredients to the wet ingredients, mixing until just combined. Do not overmix.
- Divide the dough in half. Place one half on a piece of plastic wrap, flatten into a disk, and wrap tightly. Repeat with the second half. Refrigerate for at least 1 hour.
- Preheat your oven to 375°F (190°C). Line baking sheets with parchment paper.
- On a lightly floured surface, roll out one disk of dough into a rectangle, approximately 10x12 inches.
- Spread half of the raspberry jam evenly over the rolled-out dough, leaving a small border.
- Starting from the long side, tightly roll up the dough. Slice the roll into 1/2-inch thick slices.
- Place the slices onto the prepared baking sheets, about 2 inches apart.
- Repeat steps 7-10 with the second disk of dough and remaining jam.
- Bake for 10-12 minutes, or until the edges are lightly golden brown.
- Let the cookies cool on the baking sheets for a few minutes before transferring them to a wire rack to cool completely.
Notes
Featured Comments
“Impressed! Clear steps and perfect for busy nights results. Perfect for busy nights.”
“New favorite here — crowd-pleaser. crowd-pleaser was spot on.”
“Super easy and turned out amazing! My family asked for seconds. Saving this one.”
“This sweet treat was absolutely loved — the cozy really stands out. Thanks!”
“Made it tonight and wow — absolutely loved! Will definitely make Raspberry Swirl Cookies again.”
“Packed with flavor and so simple. Exactly what I wanted from Raspberry Swirl Cookies.”


