

I’ll tell you a secret I’ve tucked into my kitchen for years: raw carrot cake is my go-to when I want something that feels celebratory but doesn’t demand turning on the oven. It’s got all the warm spice and sunshine-y sweetness of a traditional carrot cake, but with a bright, clean bite that’s just as happy on a weeknight as it is on a weekend brunch. The scent of cinnamon and toasted nuts lingers like a hug, and you don’t have to worry about rising times or pesky frosting messes. This version, the raw carrot cake, comes together in a snap—think no-bake, no-fuss, and still deeply-needs-ceremony delicious. I first baked this in a tiny kitchen, then watched it disappear in minutes at my house, the way family favorites do. It’s incredibly flexible, too—perfect for when you crave something sweet after dinner, or when you want to tuck a little “cake” into a lunchbox without turning on the oven. I’m sharing my best-never-fail method, with tips from years of testing, so you can grab a spoon and start scooping right away.
What is a carrot cake?
Think of this as a modern twist on a carrot cake, where every bite is bright, nutty, and creamy from real ingredients rather than heavy frosting. It’s essentially a compact, no-bake cake made from dates, nuts, shredded carrots, and spices, all pulsed together into a cake-form that holds its shape when chilled. The name “raw carrot cake” comes from the way the flavors are built—no baking required, just a bit of processing and layering. It’s a simple concept: you blend the base until it’s cohesive, press it into a pan, whip up a silky filling, and swirl a glossy glaze over the top. The result is cake-like enough to feel special, but approachable enough to whip up on a whim. If you love carrot cake but want something lighter and texture-rich, you’ve found your new favorite. Think of it as a healthy indulgence that tastes like a sunny afternoon in a bite-sized piece.
How to Make raw carrot cake
Quick Overview
This raw carrot cake hugs your pantry staples and a food processor. You’ll pulse a date-and-nut crust until it’s sticky enough to press into a pan, then whip up a velvety cashew-lemon filling with a touch of coconut cream. Layer, swirl with a carrot-ginger glaze, and chill until firm. It’s satisfying without being heavy, and because it’s no-bake, the oven can stay off even on the hottest days. The beauty of this method is that you can taste and adjust as you go—add a pinch more cinnamon, a splash more vanilla, or a whisper more lemon in the glaze to suit your mood.
Ingredients
For the Main Batter:
- 2 cups medjool dates, pitted
- 1 cup almonds or walnuts, toasted and cooled
- 1 cup rolled oats (certified gluten-free if needed)
- 1 teaspoon ground cinnamon
- 1/2 teaspoon ground ginger
- 1/4 teaspoon nutmeg
- Pinch of salt
- 1 cup finely shredded carrot (about 2 medium carrots)
- 1/4 cup shredded coconut (optional, for extra texture)
- 2 tablespoons maple syrup or honey (optional for extra stickiness)
For the Filling:
- 1 cup raw cashews, soaked 4–6 hours or 1 hour hot water
- 1/3 cup coconut cream (the thick part from a can)
- 2–3 tablespoons lemon juice (to brighten)
- 1 teaspoon vanilla extract
- 2–3 tablespoons maple syrup or honey (adjust to sweetness)
- Pinch salt
For the Glaze:
- 2 tablespoons coconut oil, melted
- 2–3 tablespoons lemon juice or orange juice
- 1–2 tablespoons maple syrup
- 1/4 teaspoon vanilla extract
- 1/4 teaspoon finely grated orange or lemon zest (optional)
Step-by-Step Instructions
Step 1: Preheat & Prep Pan
Since this is a no-bake cake, you don’t need your oven on. Line a 9-inch springform pan with parchment paper and give it a light spray of oil if you have it. You want easy release, not a stuck catastrophe. I usually keep the pan lined and ready while I gather the rest of my ingredients—the prep goes smoother when everything is at arm’s reach.
Step 2: Mix Dry Ingredients
In the bowl of your food processor, pulse toasted nuts until they resemble coarse crumbs. Add oats, cinnamon, ginger, nutmeg, and a pinch of salt. Pulse just until everything smells nutty and well mixed. You don’t want a flour-like texture; the little bits of nut are what give the crust its heart and bite.
Step 3: Mix Wet Ingredients
In a separate bowl, mash the dates with a fork if they’re a little firm, or pulse them with the nuts for a finer texture. If your dates aren’t sticky enough, you can soak them in warm water for 5–10 minutes and drain. Stir in shredded carrot, coconut (if using), and a splash of maple syrup. You’re aiming for a cohesive mass that holds its shape when pressed. If it feels too dry, a teaspoon of water at a time does the trick.
Step 4: Combine
Pour the dry mixture into the wet, and blend until evenly incorporated and sticky. You want it to press into the pan with minimal crumbling. If you have a vibe that it’s a touch dry, that’s where the syrup or a little bit of extra moisture from the carrot comes in—trust your hands and taste as you go. Press the crust firmly into the bottom of the pan and smooth the surface with the back of a glass or a flat spatula.
Step 5: Prepare Filling
Drain and rinse the cashews if you haven’t soaked them yet. In a blender or high-powered processor, combine cashews, coconut cream, lemon juice, vanilla, maple, and salt. Blend until ultra-smooth and creamy—this can take a minute or two, stopping to scrape down the sides as needed. If your filling seems too thick, whisk in a teaspoon of water or coconut milk at a time until you reach a luscious, pudding-like texture. You’re aiming for a velvety cast that will hold its shape when spread and swirled.
Step 6: Layer & Swirl
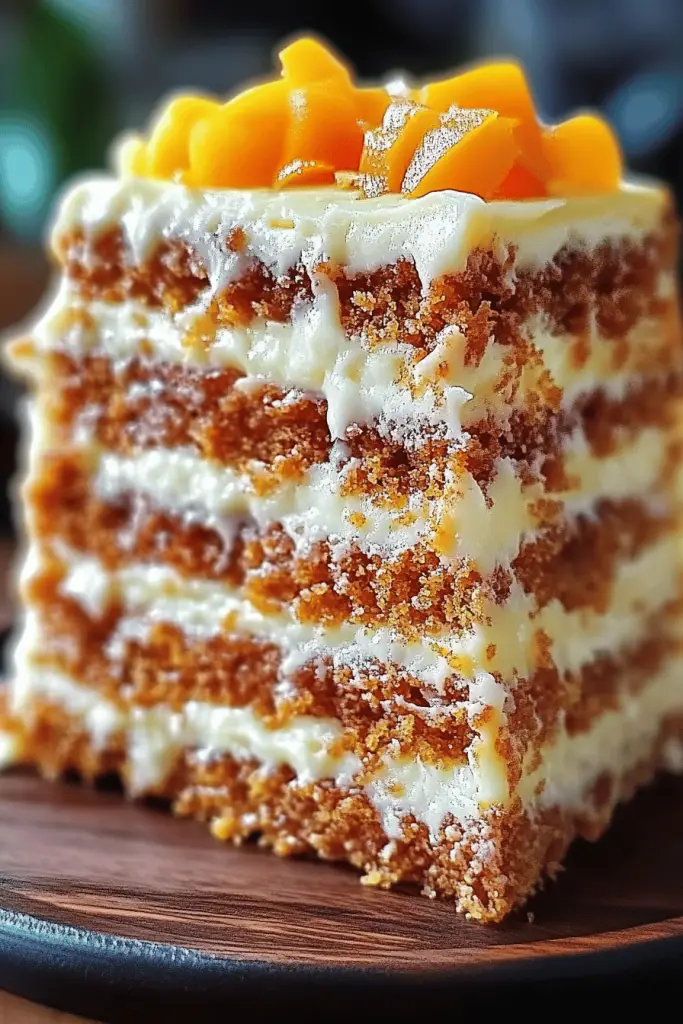
Spread the filling evenly over the crust. If you’re feeling playful, dollop a few spoonfuls in the center and swirl with a knife to create a marble effect. This is where you can add a hint of color with a touch of finely grated carrot on top, or a light dusting of cinnamon. The goal is a pretty, inviting layer that hints at the flavors beneath.
Step 7: Bake
In a traditional sense, you’d bake now, but with raw carrot cake, you’ll chill to set. Place the pan in the fridge for at least 4 hours, or ideally overnight, until the filling is fully firm and the flavors have mellowed into something magical. If you crave a little warmth, you can briefly warm a tiny corner of the crust with your fingertips to test the texture, but in practice this cake shines cold and refreshing. If you really want to bake something, a gentle bake at 250°F for 8–10 minutes is possible, but you’ll miss the classic no-bake texture that makes this cake so bright and fresh.
Step 8: Cool & Glaze
Whisk together your glaze ingredients until shiny and smooth. Pour and drizzle over the top, then use a spatula or the back of a spoon to create delicate lines that resemble a sunlit glaze. Chill again for 30–60 minutes to set the glaze so it doesn’t run off when you cut slices. The glaze is optional if you like a lighter finish, but I find it adds a zing of brightness that makes every bite feel celebratory.
Step 9: Slice & Serve
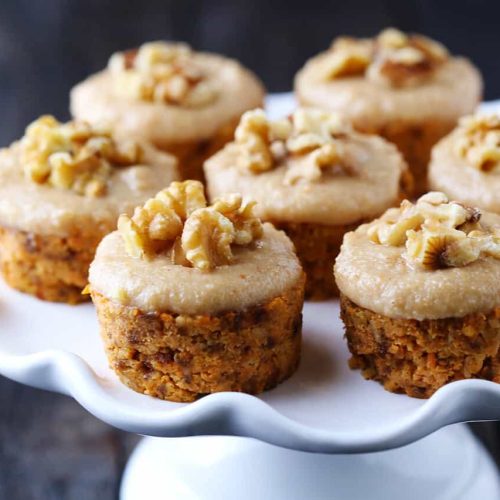
Run a warm knife blade around the edge of the pan to loosen, then remove the sides of the springform. Slice into generous wedges and serve chilled. I love finishing with a sprinkle of extra cinnamon or a few chopped nuts for texture. A dollop of coconut Whipped Cream or a few fresh carrot ribbons make it extra special. My kids actually ask for seconds, and that never gets old—this raw carrot cake has a way of earning its spot at the dessert table every time.
What to Serve It With
This cake is delightfully versatile, so here are a few easy ways to present it for different moments. It travels well enough for a picnic or a potluck, and it’s just as at-home on a quiet Sunday breakfast plate.
For Breakfast: A slice with a dollop of yogurt and a cup of strong coffee. The tang of the citrus glaze wakes up a sleepy morning, and the carrot sweetness pairs beautifully with a splash of espresso.
For Brunch: Layered atop a platter with sliced fresh fruit, a few edible flowers, and a pot of citrus tea. If you’re feeling fancy, add a mini dutch baby on the side for a little extra crunch against the creamy filling.
As Dessert: Pair with a lightly spiced chai or a glass of sparkling lemon water. The glaze adds a glossy finish that makes it feel like a special occasion, even when you’re just winding down after a busy day.
For Cozy Snacks: A quick mid-afternoon bite with a mug of herbal tea. It’s substantial enough to curb a craving without weighing you down, and the no-bake texture makes it approachable for kids to help with.
I’ve served this at family gatherings, and the reactions are priceless. The aroma alone brings everyone to the kitchen, and the first bite usually starts a chorus of “mmms.” It’s become a little family tradition—a treat that signals slow Sunday afternoons and joyful conversation. If you’re craving something that tastes like homemade warmth without spending hours in the kitchen, raw carrot cake is your friend. And yes, you can customize the filling or glaze to echo holidays or birthdays—that’s part of the charm.
Top Tips for Perfecting Your raw carrot cake
These nuggets come from countless trials and a few happy accidents in the middle of busy weeks. I’ve learned to trust texture, taste as you go, and lean into the no-bake ease that makes this cake special.
Carrot Prep: Grate the carrots finely but not so fine they disappear. The shreds should be visible in the crust and bite-sized in the filling so you get that fresh carrot flavor with every bite.
Nut Grinding: Toasting nuts adds depth, but don’t over-process them into flour. A few chunky bits give crunch and dimension that keeps the crust from feeling too dense.
Mixing Timing: There’s a sweet spot between fully integrated filling and over-processing. If you overblend the cashews, you risk a pasty texture. Stop as soon as you see it become smooth and creamy.
Texture Indicators: When pressing the crust, aim for a surface that’s even and compact. If your hand leaves an imprint, it needs a touch more press-and-pat before chilling.
Swirl Patterns: For a pretty marble effect, drop the filling in spoonfuls onto the crust and drag a knife through in a gentle figure-eight. It’s less about perfection and more about a homey, swirled look.
Ingredient Swaps: If you’re out of walnuts, almonds work beautifully. If you’re avoiding dairy, coconut cream can be swapped for a thick cashew cream with a touch more lemon. Try swapping the citrus for a splash of orange for a bright, tangy twist.
Baking Tips (optional): If you do decide to bake a version, keep the temperature low (around 250°F) and monitor closely. You’ll get a slightly crisper crust but may compromise the gentle, raw texture that makes this treat so light.
Glaze Variations: For a richer glaze, whisk in a tablespoon of almond butter or cashew butter. If you prefer lighter flavor, use just lemon juice with a pinch of zest and a touch more maple syrup.
Storing and Reheating Tips
Storing this cake is a breeze, and it actually tastes better after some time in the fridge—the flavors mingle and mellow in a way that’s comforting and familiar.
Room Temperature: If you live in a cool kitchen, you can keep slices out for a couple of hours, but I don’t recommend longer; fresh fillings can soften and glaze may run.
Refrigerator Storage: Store covered, in a container or wrapped tightly, for up to 5 days. The flavors deepen as it sits, and the texture remains sliceable and creamy.
Freezer Instructions: You can freeze slices for up to 1 month. Wrap well in parchment, then place in a sealed container. Thaw overnight in the fridge for best texture; the filling stays velvety even after freezing.
Glaze Timing Advice: If you’re freezing, you can add the glaze after thawing to preserve its glossy finish. Otherwise, glaze right before serving for the most vibrant appearance and fresh taste.
Frequently Asked Questions
Final Thoughts
There’s something about raw carrot cake that feels like a secret between friends—the kind of recipe you pull out when you want to show you care without being fussy. It’s built for sharing, and it travels well to potlucks or family gatherings. The no-bake approach is forgiving, yet the results feel polished enough to serve to guests who expect a little something special. If you’re craving a cake that celebrates carrot in a lighter, more vibrant way, this one will become a staple in your repertoire. It’s a dish that proves comfort can be clean, quick, and totally delicious. I’d love to hear how you customize yours—tell me in the comments what swap you tried, what glaze you preferred, or which add-ins you swore by. Happy baking and really, enjoy every bite of this sunny raw carrot cake!
raw carrot cake
Ingredients
Crust
- 1.5 cups raw walnuts
- 8 medjool dates pitted dates soaked in hot water for 10 minutes if too dry
- 0.5 teaspoon cinnamon
- 0.25 teaspoon nutmeg
- 0.25 teaspoon salt
Filling
- 1.5 cups shredded organic carrots moisture lightly squeezed if too wet
- 0.75 cup raw cashews soaked in boiling water for 15 minutes
- 6 medjool dates pitted dates
- 0.5 teaspoon vanilla extract
- 0.5 tablespoon lemon juice freshly squeezed
- 1 teaspoon cinnamon
- 0.25 teaspoon cardamom
- 0.25 cup dried unsweetened coconut
- 0.5 cup raisins or chopped dried apricots optional
Cream Cheese Frosting (Optional)
- 1 cup raw cashews soaked for 30 minutes and drained
- 0.25 cup water as needed for blending
- 2 tablespoons lemon juice freshly squeezed
- 2 tablespoons coconut oil melted
- 1 teaspoon vanilla extract
- 2 tablespoons maple syrup adjust to taste
- 0.25 teaspoon salt
Instructions
Crust Preparation
- In a food processor, pulse walnuts until they form a crumb-like consistency.
- Add pitted dates and continue processing until the mixture sticks together when pressed.
- Add cinnamon, nutmeg, and salt, and pulse to combine.
- Press the mixture firmly into the bottom of an 8x8-inch lined square pan. Set aside.
Filling and Assembly
- In the same food processor (no need to clean), add soaked cashews and blend until smooth, scraping down sides as needed.
- Add shredded carrots, dates, lemon juice, vanilla, cinnamon, cardamom, coconut, and raisins. Blend until thick and creamy.
- Spread the filling evenly over the crust. Smooth the top with a spatula.
- For best results, cover and freeze for at least 2 hours to set (or refrigerate for 4 hours).
Optional Frosting
- Drain soaked cashews and place in a high-speed blender with lemon juice, coconut oil, vanilla, maple syrup, salt, and water.
- Blend until completely smooth and creamy. Add more water if needed for desired consistency.
- Spread frosting over chilled cake. Cut into 8 equal bars and serve.
Notes
Featured Comments
“I’ve been making this raw carrot cake for years—it’s so rich and moist without any cooking, perfect for a guilt-free treat!”
“This sounds amazing! I’ve been wanting to try a raw dessert that still feels special—definitely saving this recipe.”
“Impressed! Clear steps and turned out amazing results. Perfect for busy nights.”
“New favorite here — quick weeknight win. crowd-pleaser was spot on.”
“Super easy and turned out amazing! My family asked for seconds. Saving this one.”
“This sweet treat was absolutely loved — the zingy really stands out. Thanks!”


This sounds amazing! I’ve been wanting to try a raw dessert that still feels special—definitely saving this recipe.
I’ve been making this raw carrot cake for years—it’s so rich and moist without any cooking, perfect for a guilt-free treat!