

The Most Nostalgic Strawberry Shortcake Ice Cream
I don’t know about you, but my absolute favorite childhood summer memory involves sprinting down the street after the neighborhood ice cream truck. I always, without fail, ordered the exact same thing: that iconic strawberry crunch bar on a stick. You know the one. It had that magical, buttery, fruity crumble on the outside and a creamy center that melted all over your hands before you could finish it.
For years, I wondered if I could recreate that exact flavor profile at home. After a whole lot of testing (and eating way more ice cream than I probably should have), I finally nailed it. This homemade Strawberry Shortcake Ice Cream gives you all those nostalgic, carefree summer vibes, but in a totally scoopable, rich, and creamy format.
The best part? You don’t even need a fancy ice cream maker to pull this off. It’s a simple, no-churn recipe that comes together so easily, you’ll be making excuses to whip up a batch every single weekend. Grab a spoon, because you’re going to fall head over heels for this one.
What Is Strawberry Shortcake Ice Cream?
If you’ve never had the pleasure of tasting it, Strawberry Shortcake Ice Cream is basically a deconstructed version of the classic novelty dessert, transformed into a decadent scoopable treat. It takes the bright, juicy flavors of fresh strawberries and marries them with the comforting, buttery taste of vanilla shortcake.
Instead of a traditional custard base that requires tempering eggs and churning in a machine, we use a brilliantly easy no-churn base made from whipped heavy cream and sweetened condensed milk. This creates a velvety, rich texture that stays perfectly soft in the freezer.
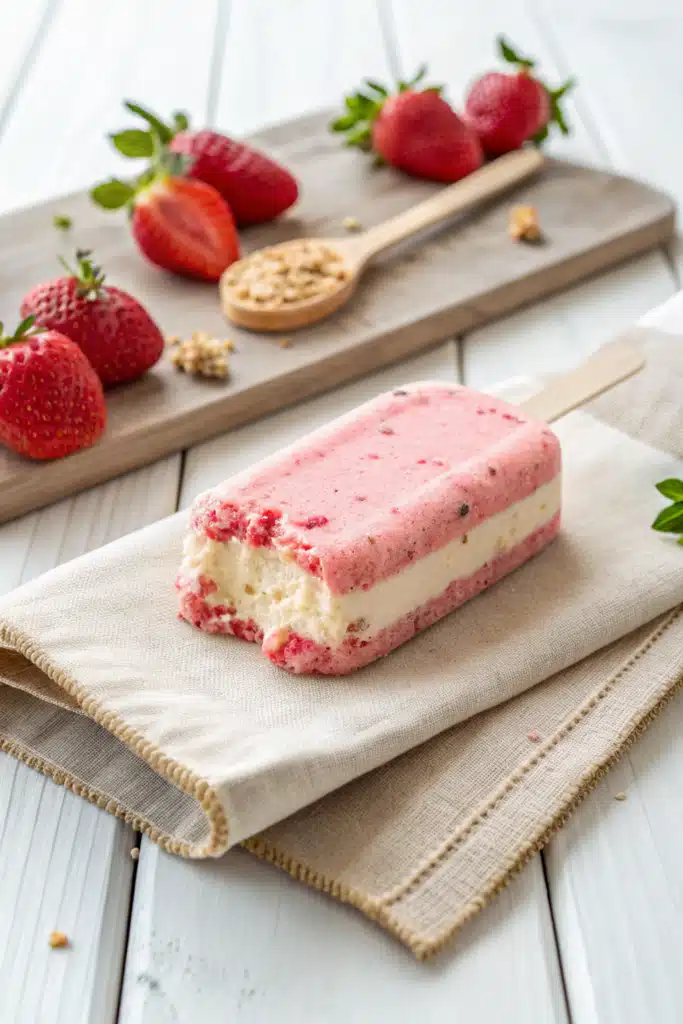
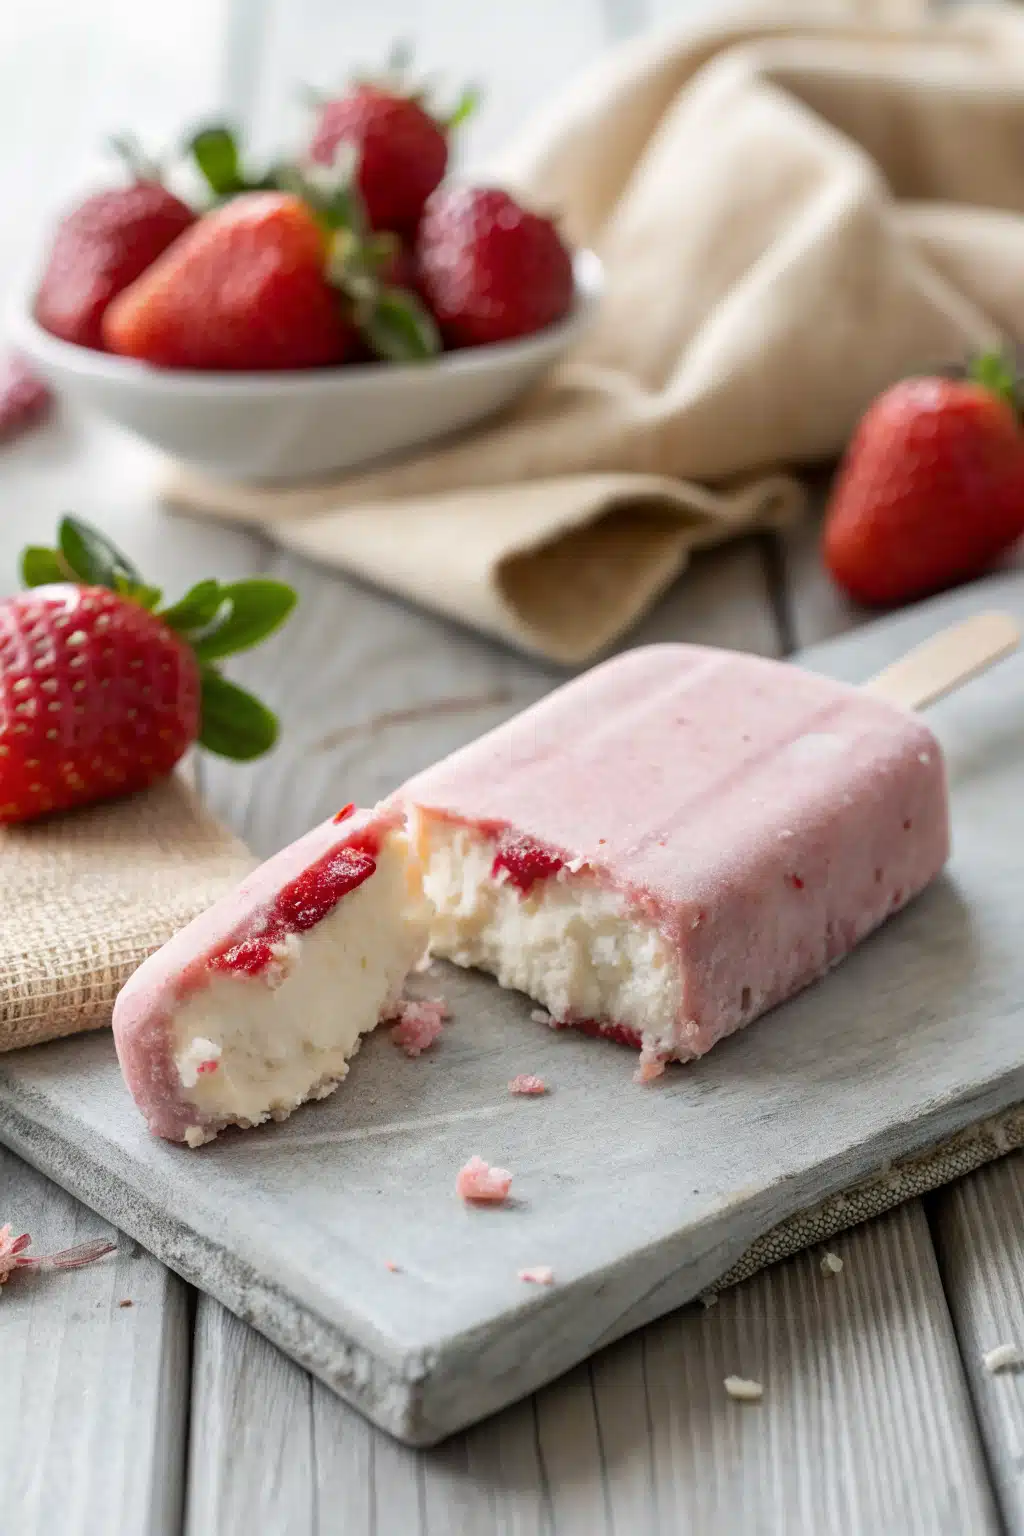
But what really makes this recipe special is the mix-ins. We swirl in a homemade, jammy strawberry reduction that brings a punch of authentic fruit flavor. Then, we fold in generous handfuls of a buttery, golden cookie crumble that mimics the outside of those famous ice cream bars. Every single bite is an irresistible mix of creamy, fruity, and crunchy textures.
How to Make Strawberry Shortcake Ice Cream
Quick Overview
Making this ice cream is delightfully straightforward. We’ll start by prepping our two key mix-ins: the roasted strawberry jam and the buttery cookie crumble. Roasting the berries concentrates their flavor and removes excess water, which prevents your ice cream from getting icy. While those cool, we’ll whip up our simple two-ingredient cream base until it’s light and fluffy.
Once everything is prepped and cooled, the fun part begins! We’ll gently fold the ingredients together in a loaf pan, layering the sweet cream, the vibrant strawberry jam, and the crunchy shortcake pieces. After a quick trip to the freezer overnight, you’ll be rewarded with the most gorgeous, scoopable masterpiece.
Ingredients
Here is what you will need to grab from the store to make this magic happen:
- Heavy whipping cream: Make sure it’s very cold! This is the foundation of our creamy base.
- Sweetened condensed milk: One standard can brings the perfect amount of sweetness and keeps the ice cream soft.
- Fresh strawberries: About two cups, hulled and diced. Fresh is best for roasting!
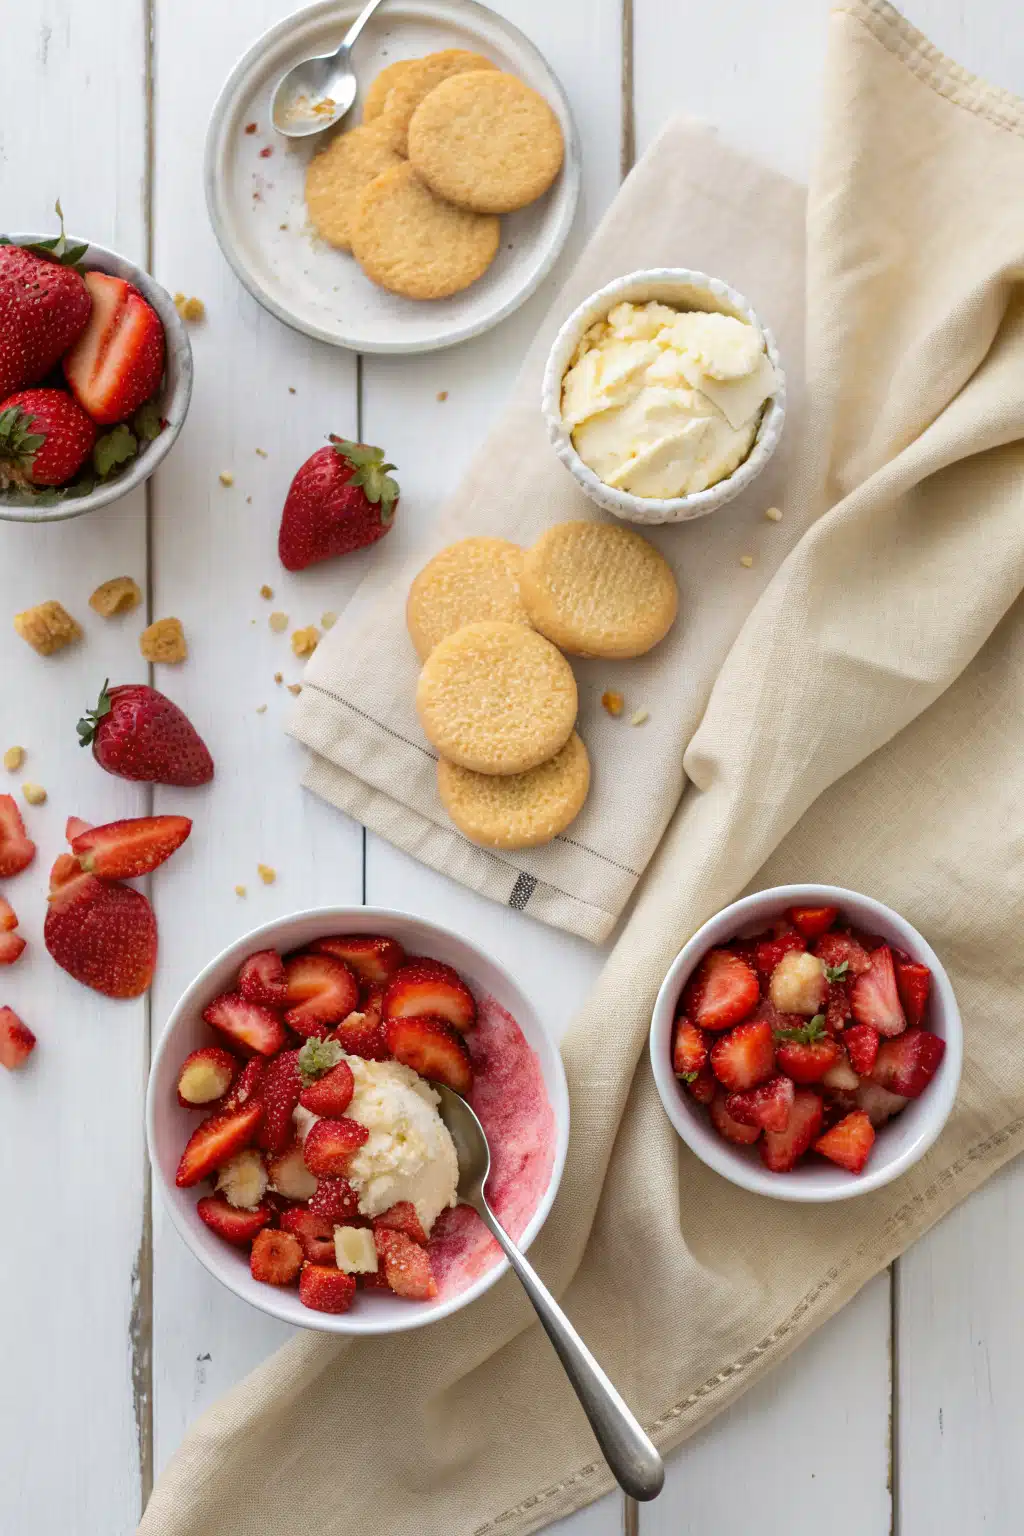
- Golden sandwich cookies: Think golden Oreos or vanilla wafers. We need about 20 of them for our crunch.
- Unsalted butter: Melted, to bind our cookie crumbles together.
- Vanilla extract: Just a splash to enhance all the flavors.
- A pinch of salt: To balance the sweetness.
Step-by-Step Instructions
Step 1: Preheat & Prep Pan
I know preheating the oven for ice cream sounds a little crazy, but trust me on this! Preheat your oven to 375°F (190°C). Line a large baking sheet with parchment paper. This is where we’ll roast our strawberries and bake our shortcake crumble. Roasting the berries evaporates their water content, ensuring your ice cream stays creamy instead of turning into a block of fruit-flavored ice.
Step 2: Roast the Strawberries
Toss your diced strawberries with a tiny sprinkle of sugar and spread them on one half of your prepared baking sheet. Let them roast for about 15 minutes until they are soft, bubbly, and releasing their juices. Mash them slightly with a fork and let them cool completely. You want a jam-like consistency.
Step 3: Make the Shortcake Crunch
While the berries roast, crush your golden cookies in a zip-top bag with a rolling pin until you have coarse crumbs. Toss them in a bowl with your melted butter. Spread this mixture onto the other half of your baking sheet and bake for 5-7 minutes until golden and fragrant. Let this cool completely, too.
Step 4: Whip the Cream Base
In a large, chilled mixing bowl, whip your cold heavy cream until stiff peaks form. Be careful not to over-whip, or you’ll end up with butter! Gently fold in the sweetened condensed milk, vanilla extract, and a pinch of salt. Use a rubber spatula and a light hand to keep the mixture airy.
Step 5: Assemble and Freeze
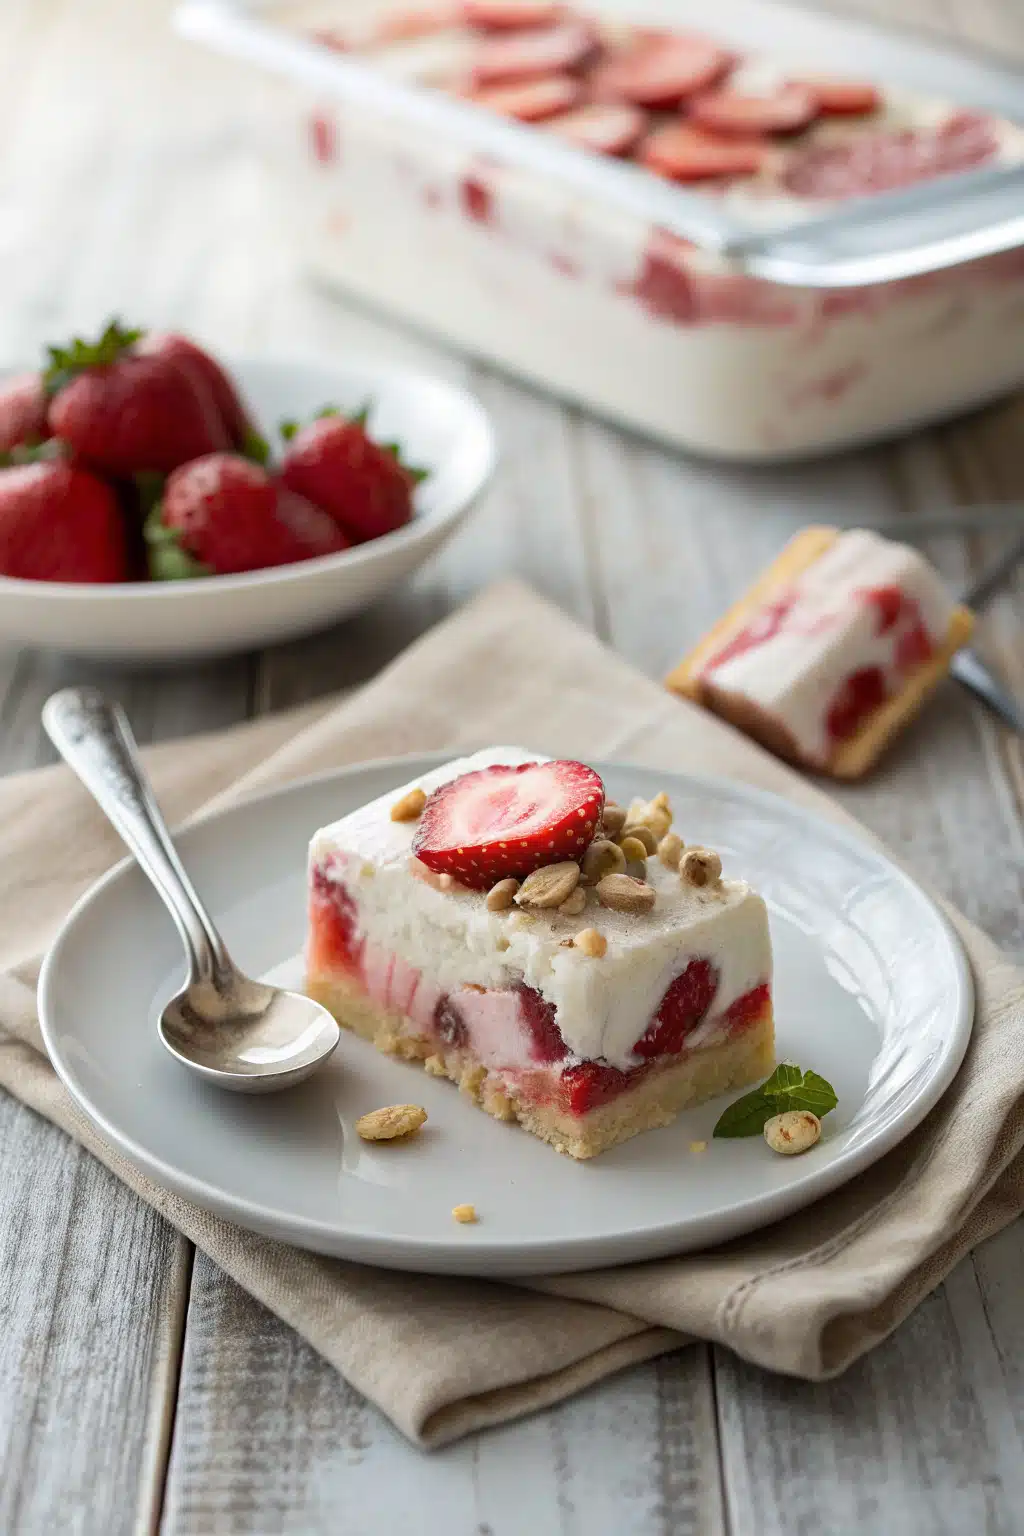
Grab a 9×5 inch metal loaf pan. Pour in a third of your cream base. Drop spoonfuls of the roasted strawberries over the cream, then sprinkle a generous handful of the cookie crunch. Repeat these layers two more times. Take a butter knife and gently swirl the mixture to create beautiful ribbons. Cover tightly with plastic wrap and freeze for at least 8 hours, preferably overnight.
What to Serve It With
This Strawberry Shortcake Ice Cream is honestly a showstopper all on its own, but if you want to take things over the top, you have some fun options. I love serving this scooped into a freshly made waffle cone—the crunch of the cone plays so nicely with the cookie crumbles inside the ice cream.
If you’re hosting a summer dinner party, try serving a generous scoop over a slice of warm, buttery pound cake or angel food cake. The contrast between the warm cake and the cold ice cream is out of this world. You can also drizzle a little extra strawberry syrup on top and add a dollop of fresh whipped cream for the ultimate sundae experience!
Top Tips for Perfecting Your Strawberry Shortcake Ice Cream
Even though this recipe is incredibly forgiving, I’ve picked up a few tricks along the way to make sure it turns out flawless every single time.
First, temperature is everything when it comes to your heavy cream. Keep it in the fridge right until the second you are ready to whip it. If you have the space, you can even pop your mixing bowl and beaters into the freezer for ten minutes beforehand. Cold cream whips up faster and holds its volume much better.
Second, do not rush the cooling process for your strawberries and cookie crumble. If you fold warm berries into your whipped cream base, it will deflate the cream and create an icy texture. Pop them in the fridge to speed up the cooling if you’re feeling impatient!
Lastly, when layering your ice cream in the loaf pan, don’t over-swirl! If you mix it too much with your knife, you’ll end up with a solid pink ice cream instead of those beautiful, distinct ribbons of vanilla and strawberry.
Storing and Reheating Tips
Okay, I know “reheating” ice cream sounds hilarious—please don’t put this in the microwave! But dealing with temperature is actually really important for homemade ice cream.
Because this no-churn base doesn’t have the commercial stabilizers that store-bought ice cream does, it can freeze quite firmly. For the absolute perfect, photogenic scoop, pull your loaf pan out of the freezer and let it sit on the kitchen counter for about 10 to 15 minutes before you plan to serve it. This “thawing” time softens the cream just enough to make it beautifully scoopable.
To store leftovers (if you have any!), press a piece of plastic wrap directly against the surface of the ice cream to prevent ice crystals from forming, then wrap the entire pan tightly in foil. It will stay fresh and delicious in the freezer for up to a month.
Frequently Asked Questions
Final Thoughts
There is just something so incredibly satisfying about making your own ice cream from scratch, especially when it turns out this good. This Strawberry Shortcake Ice Cream is more than just a dessert; it really is a little bowl of pure nostalgia. Every time I make a batch, it transports me right back to those lazy July afternoons, sitting on the curb and listening for the ice cream truck.
I really hope you give this recipe a try the next time you’re craving something sweet, creamy, and totally comforting. It’s so much fun to make, and even more fun to share with the people you love. If you do whip this up, I’d love to hear how it turned out for you. Grab your favorite ice cream scoop, dig in, and enjoy every single bite!

Strawberry Shortcake Ice Cream
Ingredients
Main Ingredients
- 2 cups fresh strawberries diced
- 2 tbsp strawberry jam
- 3 tbsp granulated sugar
- 3 tbsp lemon juice
- 8 oz cream cheese room temperature
- 14 oz sweetened condensed milk
- 1 tbsp pure vanilla extract
- 2 cups heavy whipping cream
- 1 cup crumbled cake or 0.75 cup crushed shortbread cookies
Instructions
Preparation Steps
- Add strawberries, jam, sugar, and lemon juice to a medium-sized pot and bring to a boil over medium-high heat, stirring occasionally. Continue to boil for an additional 8-10 minutes until juices have released, strawberries have softened and the sauce has thickened quite a bit to concentrate the berries. Remove strawberries from heat and allow them to cool. Then place them in the refrigerator for 1 hour to completely cool them down.
- Whip heavy cream to stiff peaks and set aside. Add cream cheese to the bowl of a stand mixer or a medium-sized bowl if using a hand mixer. Beat on medium-high speed, then slowly add in condensed milk and vanilla extract, and mix until completely smooth.
- Turn off the mixer and fold whipped cream into the cream cheese mixture using a spatula.
- Once whipped cream is folded in, carefully fold in the strawberries into the batter, only folding 3-4 times just until the strawberries have distinctly swirled through the batter (don't over fold the strawberries because you will turn the entire ice cream mixture pink).
- To freeze, alternate adding ice cream mixture and crumbled cake to freezer-safe containers. Freeze for at least 5-7 hours then serve.
- Let the ice cream sit out for 5-10 minutes before serving.
Notes
Featured Comments
“This looks amazing—definitely one of those recipes that hits just right! Can’t wait to try it.”
“Impressed! Clear steps and creamy results. Perfect for busy nights.”
“New favorite here — family favorite. crowd-pleaser was spot on.”
“Super easy and turned out amazing! My family asked for seconds. Saving this one.”
“This sweet treat was absolutely loved — the light really stands out. Thanks!”
“Made it tonight and wow — so flavorful! Will definitely make Strawberry shortcake ice cream again.”


This looks amazing—definitely one of those recipes that hits just right! Can’t wait to try it.