

Every year, as the holiday season rolls around, I find myself craving that nostalgic, joy-filled feeling of childhood. And honestly, nothing sparks that quite like a plate of Candy Christmas Trees. Growing up, these sweet little treats were everywhere — on the counter, at school bake sales, and especially in my grandma’s cozy kitchen. The smell of chocolate and peppermint still takes me back to those chilly December mornings, bundled up with a mug of hot cocoa at my side. I always do this when I want something festive and fun without all the fuss—making Candy Christmas Trees has become my little tradition. They’re surprisingly simple to whip up, and my kids ask for these all the time, especially when they’re craving something sweet but don’t want me to turn on the oven. Trust me, once you taste these, they’ll be part of your holiday lineup too. Plus, they look adorable on any treat platter—like tiny evergreen forests! I’m pretty sure this one’s a lifesaver on busy nights, especially when friends drop by unexpectedly and you want to wow them with minimal effort.
What is candy Christmas tree?
Think of Candy Christmas Trees as a charming, edible holiday decoration that’s as tasty as it is adorable. The name pretty much says it all: these are chocolate-covered treats shaped like tiny Christmas trees, decorated with colorful candies and sprinkles to resemble miniature pine trees. It’s essentially a fun twist on classic holiday confections—think of them like a cross between a sweet cookie and a festive candy, but easier than you might imagine. The concept is simple: a sturdy base, like a homemade or store-bought cookie or cake pop, gets coated in rich chocolate. Then, you decorate the “tree” with tiny candies, adding that whimsical, colorful touch that makes them irresistible. They’re perfect for making with kids, as a last-minute gift, or a cheerful snack to spread holiday cheer at your gatherings. What I love most about these is how they combine sweetness, crunch, and just a pop of color—everything you want in a holiday treat but with a playful, homemade vibe.
How do I make candy Christmas trees?
Quick Overview
This treat is honestly one of the easiest holiday recipes you’ll ever do. It starts with a firm base, like a cookie or cake pop, which you dip into melted chocolate. Once coated, you decorate with colorful candies, sprinkles, or other fun toppers to mimic tiny Christmas trees. You can customize the decorations to match your theme or go wild with creative ideas—layer different colors, add edible glitter, or use mini marshmallows for snow. The whole process takes about 30 minutes if you’re fast, and no baking involved. It’s perfect for last-minute holiday gifting or a quick craft project with kids. Plus, I like to make a big batch because they disappear in minutes at my house—seriously, my kids ask for seconds before I’ve even had a chance to clean up!
Ingredients
For the Main Base:
– Store-bought cookies (like shortbread or sugar cookies), or cake pops for a sturdier feel
– Or you can use rice cereal treats shaped into mini trees
– Optional: small sturdy confections or homemade cookies if you prefer from-scratch
For the Filling (if making your own base):
– 2 cups crushed cookies or cereal
– ½ cup melted butter or marshmallow glue (for cereal treats)
– ¼ cup powdered sugar (for extra sweetness, optional)
For the Glaze:
– 1 ½ cups semi-sweet or milk chocolate chips
– 1 tablespoon coconut oil or shortening (for smooth melting)
– Optional flavorings: a drop of peppermint extract or vanilla
Step-by-Step Instructions
Step 1: Preheat & Prep Pan
While you don’t need an oven, line a baking sheet with parchment paper or a silicone mat. If you’re using cookie bases or cake pops, make sure they’re ready to dip—if you’re shaping cereal treats, press your mixture into a mini tree shape or small cones. Chill the shapes for a few minutes to firm up. Trust me, this little step makes dipping and decorating way easier.
Step 2: Mix Dry Ingredients
If you’re making your own bases, combine crushed cookies or cereal with powdered sugar and melted butter until it holds together. For store-bought cookies, just make sure they’re sturdy enough to hold a coat of chocolate. This is just a quick blend to ensure your “trees” won’t crumble when coated.
Step 3: Mix Wet Ingredients
For the chocolate coating, melt your chocolate chips with coconut oil over low heat or in short bursts in the microwave, stirring until smooth. I always do this in 20-second intervals; it’s the best way to prevent burning. The smell alone of melting chocolate is enough to get everyone in the room excited!
Step 4: Combine
Dip your bases into the melted chocolate, using a fork or dipping tool for even coverage. Let the excess drip off—this is crucial for a neat finish. Place the coated “trees” on your prepared tray. If the coating is too thick, add a tiny splash of milk or coconut oil to loosen it up. Remember, patience is key—work one at a time for the best results.
Step 5: Prepare Filling
Now, this is where you can get creative. If you want to add extra sparkle, sprinkle crushed candies or mini chocolate chips onto the wet chocolate, pressing gently so they stick. For a snowy effect, plenty of white sprinkles work beautifully. To mimic the look of tiny ornaments or snow, consider piping small dots of white icing or melted white chocolate after the initial coat sets.
Step 6: Layer & Swirl
For a swirl effect, dip the tip of the coated tree into contrasting colored chocolate and give it a gentle swirl before it hardens. You can also use a toothpick to add lines or patterns—think of it as painting with chocolate! The key is to work quickly before the coating sets.
Step 7: Bake
No baking here—just chilling! Once all your trees are decorated, pop the tray into the fridge for about 15-20 minutes to set everything firm. If you’re in a hurry, a quick blast in the freezer can do the trick, but don’t forget to watch closely so the chocolate doesn’t crack.
Step 8: Cool & Glaze
Once set, drizzle or brush a thin layer of glaze over the trees for that shiny, finished look. If you prefer, skip the glaze and just add a dusting of powdered sugar or edible glitter. Waiting until they’re fully chilled before glazing keeps things neat and prevents the coating from sliding off.
Step 9: Slice & Serve
Though they’re tiny, these Candy Christmas Trees are best served at room temperature or slightly chilled. Arrange them on a festive platter, add a sprinkle of extra candies, and watch as everyone’s eyes light up. They’re perfect as a quick gift, a fun party favor, or just a cheerful treat for the kiddos. Trust me, once you see how adorable they look, you’ll want to make a batch every holiday season.
What to Serve It With
This sweet little treat pairs beautifully with a cup of hot cocoa or a mug of spiced apple cider — anything warm and cozy, really. For breakfast on Christmas morning, sprinkle a few tiny trees over a plate of fluffy pancakes, and add a dab of whipped cream for that extra indulgence. They make a fantastic addition to a dessert table at holiday parties, especially when paired with cookies, fudge, or a cheesecake platter. My favorite way to serve them is to set them on a rustic wooden board sprinkled with cinnamon-dusted chestnuts or mini gingerbread houses—they add charm and flavor. During family brunch, I love embedding these in a jar of homemade hot chocolate mix for a festive gift. Truly, these little trees just scream holiday fun, and everyone leaves with a smile—kids and adults alike.
Top Tips for Perfecting Your Candy Christmas Trees
If you want to take your Candy Christmas Trees from good to spectacular, here are a few tips from my own baking adventures:
Zucchini Prep: Not applicable here, but if you try a cereal treat base, make sure to let the mixture cool slightly before shaping to avoid burns or messes. Also, if you want a greener “tree,” adding a tiny drop of green food coloring to your chocolate dip can give a festive touch—just keep it subtle!
Mixing Advice: Use a gentle folding motion when combining your ingredients to keep your treats light and airy. Overmixing can lead to dense or crumbly bases, which aren’t ideal for dipping.
Swirl Customization: To get neat swirls, pour contrasting chocolate into a piping bag or plastic bag with the corner cut off. Apply gentle, steady pressure as you pipe it over the coated trees, swirling as you go.
Ingredient Swaps: Want dairy-free? Use coconut or almond chocolate chips. No candy sprinkles? Crushed peppermint candies or chopped nuts work beautifully, too. Just keep your textures fun and colorful.
Baking Tips: If you’re working with homemade bases, bake them until lightly golden—not too brown—to avoid dryness. When dipping, work on a cool surface to help the chocolate set quickly.
Glaze Variations: For a glossy, more festive look, mix a bit of vegetable shortening into your melted chocolate. For a holiday twist, try adding a tiny splash of peppermint or orange extract to your glaze.
Overall, I’ve learned that patience is everything—chilling the treats well, working quickly with the chocolate, and decorating with love make all the difference. Don’t be scared to experiment with colors and toppings—this is your holiday canvas!
Storing and Reheating Tips
These little treats store surprisingly well, and once you get the hang of it, they last quite a few days—if they make it that long! Keep them in an airtight container at room temperature for up to 3 days, sealed tightly to prevent them from becoming sticky or melting. If it’s warm where you are, refrigerator storage is a safe bet—just take them out about 10 minutes before serving so they can come to room temp. For longer storage, pop the treats into a single layer in an airtight container and freeze for up to a month—just thaw at room temp before presenting. As for glazes or toppings, I recommend adding them right before serving to keep the shine and crunch intact. If you made a simple glaze or drizzle, you can re-melt it gently and reapply if needed, but I find that once set, they’re happiest at room temp with their shiny coating still gleaming.
Frequently Asked Questions
Final Thoughts
There’s just something magical about making Candy Christmas Trees—watching simple ingredients transform into miniature, edible holiday decorations is so rewarding. They’re not just adorable, but also bursting with flavor and nostalgia. Over the years, these treats have become a staple at my family gatherings, often stealing the show from more elaborate desserts. The kids love helping decorate, and honestly, I enjoy the little moments of joy and laughter that come with it. Whether you’re looking for a quick project, a thoughtful homemade gift, or just a fun way to add some sparkle to your holiday table, these Candy Christmas Trees are a win. I encourage you to experiment with colors, toppings, and even bases—make them your own! Remember, imperfections are part of the charm. Happy baking, and I can’t wait to hear how yours turn out!

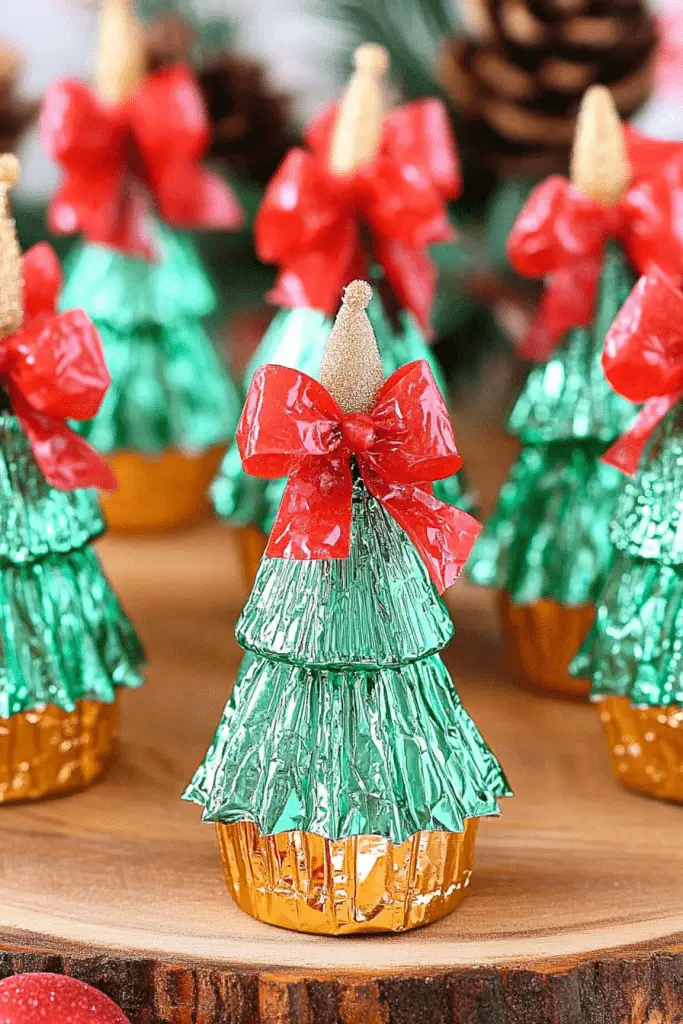
Candy Christmas Trees
Ingredients
Main Ingredients
- 20 pieces mini Reese’s Peanut Butter Cups
- 10 pieces gold Rolos
- 10 pieces Hershey’s Kisses
- 1 cup green melted chocolate
- 0.5 cup red decorative bows
Instructions
Preparation Steps
- Start by melting the green chocolate and preparing your workspace with all ingredients ready.
- Use a small dab of melted chocolate to attach a Rolos on a flat surface, pointing the small end upward.
- Place a mini Reese’s peanut butter cup on top of the Rolo with the flat end facing upward. Hold until set.
- Add another mini Reese’s on top of the first, pressing gently to secure.
- Finally, affix a Hershey’s Kiss on the top of the stacked Reese’s to resemble a Christmas tree tip.
- Decorate the base of the tree with a small bow and repeat for all pieces.
Notes
Featured Comments
“Impressed! Clear steps and perfect for busy nights results. Perfect for busy nights.”
“New favorite here — turned out amazing. crowd-pleaser was spot on.”
“Super easy and turned out amazing! My family asked for seconds. Saving this one.”
“This sweet treat was absolutely loved — the cozy really stands out. Thanks!”
“Made it tonight and wow — family favorite! Will definitely make Sweet Holiday Trees A Simple Treat again.”
“Packed with flavor and so simple. Exactly what I wanted from Sweet Holiday Trees A Simple Treat.”


