

When the kitchen fills with the warm scent of vanilla and melting chocolate, I’m transported to rainy afternoons at my grandmother’s table. We’d bake a batch of thick chewy cookies and she’d swear the longer they slept on the rack, the better they got. I’ve learned a few tricks since those days, and I’ll tell you mine: this version stays fudgy in the center, but with edges that hold their shape just right. It’s basically the goldilocks of cookies—soft, rich, and not too sweet. If you’ve ever compared a regular Chocolate Chip Cookie to something with real heft, you know the difference. These thick chewy cookies strike that perfect balance, and yes, they’re surprisingly forgiving for busy weeknights. I always say they taste better with a mug of strong coffee, but they’re equally perfect with a glass of milk or a scoop of vanilla ice cream. The first bite is all about that intimate, cocoa-scented hug that makes you smile before your brain catches up.
What is a Thick Chewy Cookie?
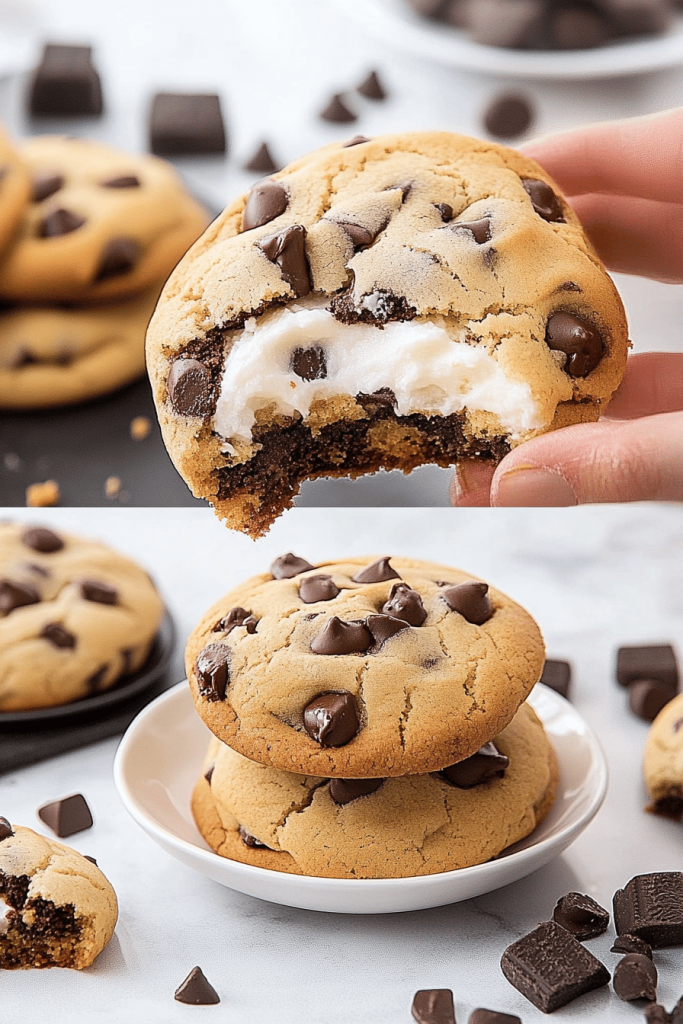
Think of thick chewy cookies as the love-child of a fudgy brownie and a classic drop cookie. It’s essentially a cookie that’s built to stay soft in the middle, with a slightly crisp edge that you can hear giving way when you bite into it. The name isn’t a fancy culinary term; it’s more of a promise you make to your taste buds: “these are going to be thick, rich, and wonderfully chewy.” The concept comes from dialing up moisture and fat, using brown sugar for that molasses-y depth, and letting the dough rest so the flavors relax and mingle. This particular approach is perfect for home bakers who want a cookie that feels luxurious but is still straightforward to pull off on a weeknight. And yes, it’s the kind of recipe that makes your kitchen smell like a cozy bakery the moment the oven warms up.
How do I make thick Chewy Cookies?
Quick Overview
This recipe starts with a rich, butter-forward batter that’s sweetened with brown sugar to coax chewiness. We whisk the dry ingredients, cream the butter and sugars until pale and fluffy, then fold everything together with a few smart tricks—like a touch of corn syrup for extra softness and a gentle rest after mixing. The cookies bake into thick rounds with a lightly domed center, and you can swirl in a filling or glaze for a little extra indulgence. It’s simple, reliable, and deeply comforting. If you’ve ever tried a “soft-centered” cookie and felt like it lacked body, you’ll appreciate how this version stays substantial while remaining melt-in-your-mouth soft inside. The extra rest time truly makes a difference, so don’t skip it.
Ingredients
For the Main Batter:
- 1 cup (230 g) packed light brown sugar
- 1/2 cup (100 g) granulated sugar
- 1 cup (227 g) unsalted butter, softened
- 2 large eggs
- 2 teaspoons Vanilla Extract
- 2 cups (250 g) all-purpose flour
- 1/2 cup (60 g) unsweetened cocoa powder (optional for a richer chocolate flavor)
- 1/2 teaspoon baking soda
- 1/2 teaspoon salt
- 2 tablespoons light corn syrup or honey (for extra chew)
- 1 cup (170 g) chocolate chips or chunks
For the Filling:
- Optional chocolate ganache swirl: 1/2 cup chocolate chips + 1/4 cup heavy cream
- Or peanut butter swirl: 1/4 cup Creamy Peanut Butter + 1 tablespoon powdered sugar
For the Glaze:
- 1 cup powdered sugar
- 2–3 tablespoons milk or cream
- 1/2 teaspoon vanilla extract
- Optional: a pinch of espresso powder for depth
Step-by-Step Instructions
Step 1: Preheat & Prep Pan
Preheat your oven to 350°F (175°C). Line two baking sheets with parchment or silicone mats. This is the moment when the kitchen starts to smell like someone’s favorite bakery, and you know the cookies are destined to be good. If you’re making bars first, you can grease a 9×13-inch pan instead and bake a thick slab that you’ll later slice into rounds. Either way, a well-prepped pan is the secret to easy, even cookies.
Step 2: Mix Dry Ingredients
In a medium bowl, whisk together the flour, cocoa powder (if using), baking soda, and salt. Sifting is great for a lighter texture, but a whisk works just fine if you don’t have a sifter handy. The cocoa powder deepens the chocolate experience, but if you prefer a classic, skip it. You want the dry mix to be evenly distributed so every bite has a consistent chocolate note.
Step 3: Mix Wet Ingredients
In a large bowl, cream the butter and both sugars until the mixture is light and fluffy. This usually takes 3–4 minutes with an electric mixer on medium speed. Beat in the eggs one at a time, then add the vanilla and corn syrup. The batter should look glossy and feel pleasantly soft—not greasy, not stiff.
Step 4: Combine
Gradually add the dry ingredients to the wet, mixing on low until just combined. You’re aiming for a cohesive dough with a little jiggle in the center—overmixing here makes the cookies tough rather than tender. If you’re adding chocolate chips, fold them in now with a light hand so they distribute evenly without sinking to the bottom.
Step 5: Prepare Filling
If you’re going for the filling swirl, heat a few spoonfuls of the ganache until it’s glossy and smooth, or whisk together the peanut butter and powdered sugar until it’s thick but spreadable. Let the mixture sit a minute or two so it’s easy to dollop. This step is optional, but it gives you that extra wow factor when you bite through a cookie that hides a soft center within.
Step 6: Layer & Swirl
To create a luscious swirl, scoop a generous spoonful of dough, place a small indentation in the middle, and add a tiny amount of filling. Cover with another small scoop of dough, pinching the edges to seal. Gently roll into a ball if you prefer uniform rounds. If you’re baking bars, press the dough into an even layer and spread a thin swirl of filling across the surface before you bake.
Step 7: Bake
Scoop or portion the dough onto the prepared pans, leaving about 2 inches between cookies. Bake 10–12 minutes, or until the edges look set and the centers still look a touch soft. Every oven is different, so you may need a minute or two less or more. The cookies will look slightly puffy and glossy on top; they’ll deflate as they cool, which is how you know they’re thick and chewy inside.
Step 8: Cool & Glaze
Let the cookies cool on the pans for 5 minutes before transferring to a rack. If you’re glazing, whisk together the powdered sugar, milk, and vanilla. Drizzle or spoon a thin layer over the cooled cookies; the glaze should be barely there so the cookies’ center remains the star. For a more dramatic look, you can dust with a pinch of espresso powder or cocoa powder to accent the chocolate flavor.
Step 9: Slice & Serve
If you baked bars, allow the slab to cool completely, then slice into thick rounds. If you made individual cookies with a filling, you can serve them as sandwich cookies or simply stack them on a platter for friends to pick from. These thick chewy cookies are best with a cooling sigh and a warm mug. They’re sturdy enough to be shared, but they disappear quickly, especially when someone’s asking for a second batch before the night ends.
What to Serve It With
These thick chewy cookies pair with a lot of things, and the occasion can guide your presentation. Here are a few ideas to keep the vibe just right.
For Breakfast: A robust cup of coffee or a latte, a small plate of cookies alongside a bowl of mixed berries, and perhaps a smear of cream cheese on a warm cookie half for a mini “sandwich.” They’re rich enough to feel indulgent first thing, yet not so heavy that you’ll regret starting your day with them.
For Brunch: A dessert-worthy spread that still feels casual. Arrange the cookies with citrus zest-dusted cookies or biscotti, and offer a light vanilla yogurt dip for dipping and a splash of milk or a cold brew on the side.
As Dessert: Serve with berries, a scoop of vanilla ice cream, or a warm chocolate sauce for dipping. A simple drizzle of the glaze over half of each cookie makes them look like a little edible presentation on a plate—party-ready, but homey at heart.
For Cozy Snacks: Pair with warm milk, a mug of chai, or a small wedge of cheese board for a surprising balance between sweet and savory. You’ll find these thick chewy cookies disappear in minutes when friends pop by after work.
In my family, these cookies are a “come-as-you-are” treat: casual enough for after-school chaos, but special enough for weekend gatherings. We’ve swapped in hazelnut butter, swapped out some of the sugar for a touch of maple, and always come back to the same core: a cookie that feels like a hug. If you’ve got a favorite add-in—peanut butter swirl, toffee bits, or a pinch of chili for a grown-up kick—try it. The base dough loves a little experimentation, and you’ll see how the thick chewy texture holds up with each variation. This is a recipe that travels well, too. I’ve tucked a batch into a jar for road trips, and the scent alone makes the passengers grin before the first bite.
Top Tips for Perfecting Your Thick Chewy Cookies
These notes come from years of testing and tasting with family and friends. They’re little adjustments that yield big results.
Zucchini Prep: Not part of this recipe, but if you ever use zucchini in cookies, you’ll want to squeeze out as much moisture as you can and pat dry. The moisture is a moody guest—and too much of it can turn a cookie from chewy to gooey in the wrong way.
Mixing Advice: Cream the butter and sugars thoroughly; under-creaming can leave a flat, cakier texture. Overmixing after adding flour is another common mistake—gentle is best here. You want a dough that looks like it can hold its own shape but stays soft to the touch. If the dough feels too stiff, add a teaspoon of milk or a splash of water to loosen it a touch.
Swirl Customization: When you add a filling, don’t go overboard. A little goes a long way. Aim for a 1:4 filling-to-dough ratio so the cookie remains thick but doesn’t split during baking. For a marbled effect without forcing uniformity, scoop a small amount of filling onto the center of the dough portion and fold a second dough ball on top, then gently press and twist to create a ripple look.
Ingredient Swaps: You can swap half of the all-purpose flour for whole-wheat flour for a nuttier flavor and a bit more bite, but expect a touch more density. If you’re avoiding dairy, substitute coconut oil (softened, not melted) for butter and use almond milk. The texture shifts a little but you’ll still get thick, chewy results.
Baking Tips: If your oven tends to run hot, rotate the pans halfway through the bake to ensure even browning. For a softer center, pull the cookies when the edges are set but the centers look just barely underdone. For a crisper edge, bake 1–2 minutes longer. The difference is subtle but noticeable once you taste the contrast.
Glaze Variations: If you prefer a glaze that’s not too sweet, cut the powdered sugar by a third and whisk with a little more milk. For a bold chocolate finish, whisk in a teaspoon of cocoa powder to the glaze and dust with a touch of sea salt. You can also top with crushed nuts for a little crunch in every bite.
One lesson I’ve learned after making these countless times: patience is part of the process. A half-hour rest in the fridge before baking helps the dough hydrate and the flavors to intensify. The dough remains pliable enough to scoop, but resting gives you a stronger, chewier result. Trust me on this one—your cookies will look more even, and the centers will stay extra fudgy.
Storing and Reheating Tips
Storage can make or break a cookie tangent, especially with thick, chewy treats. Here’s how I keep them tasting fresh and delicious.
Room Temperature: In an airtight container, layer parchment between batches to prevent sticking. They stay chewy for up to 4 days if you resist the urge to gobble them all at once. Keep them away from direct sunlight to prevent the glaze from losing its gloss.
Refrigerator Storage: If you’ve baked more than you’ll eat in a short window, refrigerate the dough (well wrapped) for up to 3 days before baking. The chill helps the dough maintain its shape and chewiness. If you’ve already baked, store cooled cookies in an airtight container for up to a week in the fridge; reheat briefly in a 300°F oven to revive that fudgy center.
Freezer Instructions: Freeze dough balls on a baking sheet first, then transfer to a freezer bag for up to 3 months. Bake frozen dough balls for 2–3 minutes longer than the recipe states. If you freeze baked cookies, place parchment between layers and freeze for up to 2 months; reheat for a few minutes in a low oven to refresh the texture.
Glaze Timing Advice: If you plan to glaze, glaze cookies just before serving. If you’re freezing cookies, skip the glaze and add it just before serving for best texture and shine.
These tips help you keep the thick chewy cookies tasting as good on day two as they do fresh from the oven. The best part is sharing them—there are always a few hungry volunteers ready to test the next batch, and the kitchen becomes a warm, sweet sanctuary.
Frequently Asked Questions
Final Thoughts
These thick chewy cookies have earned a place in my rotation because they feel special without needing long, complicated steps. They’re the kind of treat that makes the kitchen feel like a warm hug, and they’re endlessly adaptable to taste and occasion. If you’re new to this style of cookie, give them a try exactly as written first, then start playing with fillings, glazes, or swirl patterns. My friends and family love when I bring a tray to a gathering and let them pick their favorite pairing—plain with a glass of milk, or with a soft kiss of ganache that hides inside a thick bite. It’s a simple, joyful dessert that tastes like home. Happy baking, friend, and I can’t wait to hear how yours turns out!

Thick and Chewy Chocolate Chip Cookies
Ingredients
Main Ingredients
- 0.75 cup unsalted butter cold, cut into cubes
- 1 cup light brown sugar packed
- 0.25 cup granulated sugar
- 1 large egg
- 1 large egg yolk
- 2 teaspoons vanilla extract
- 2.25 cups all-purpose flour
- 0.67 cups cake flour
- 1 teaspoon kosher salt
- 1 teaspoon baking powder
- 0.5 teaspoon baking soda
- 1 cup semi-sweet chocolate chips
- 1 cup milk chocolate chips
Instructions
Preparation Steps
- Preheat oven to 400°F (204°C). Line two baking sheets with parchment paper and set aside.
- Using a stand mixer with the paddle attachment, combine cold butter, brown sugar, and granulated sugar. Beat on medium speed until no visible butter chunks remain and the mixture is creamy.
- Add the egg and egg yolk and mix until combined. Add the vanilla extract and continue mixing, scraping down the sides of the bowl as needed, until combined.
- In a medium bowl, whisk together flour, cake flour, salt, baking powder, and baking soda.
- With the mixer on low, gradually add the flour mixture to the wet ingredients. Mix until mostly incorporated.
- Add the chocolate chips. Mix just until the flour is fully incorporated and the chocolate chips are evenly distributed.
- Shape the dough into 8 large balls.
- Place 4 cookie dough balls onto each lined baking sheet, spacing them out evenly.
- Bake for about 12-13 minutes, or until the edges are golden brown.
- Let the cookies cool on the baking sheet for 10 minutes before transferring to a wire rack.
- Serve warm.
Notes
Featured Comments
“This brings back such sweet memories—baking with family is the best kind of therapy!”
“Impressed! Clear steps and comforting results. Perfect for busy nights.”
“New favorite here — comforting. crowd-pleaser was spot on.”
“Super easy and turned out amazing! My family asked for seconds. Saving this one.”
“This sweet treat was absolutely loved — the balanced really stands out. Thanks!”
“Made it tonight and wow — family favorite! Will definitely make thick chewy cookies again.”


This brings back such sweet memories—baking with family is the best kind of therapy!