


Okay, confession time. I have a slight obsession with Girl Scout cookies. Like, a serious one. And if you’re anything like me, Thin Mints are probably at the top of your list too, right? That perfect combination of crisp cookie and cool, refreshing mint chocolate. Well, imagine that glorious flavor explosion… but in Puppy Chow form! Yep, we’re talking about the most addictive, melt-in-your-mouth concoction I call Thin Mint Puppy Chow. It’s ridiculously easy to whip up, and I swear it disappears faster than a box of Samoas at a cookie booth. This recipe came about because I was craving that Thin Mint flavor desperately outside of cookie season, and let me tell you, it hit the spot. It’s the kind of treat that makes people ask for the recipe before they’ve even finished their first handful – and that, my friends, is the mark of a truly great snack.
What is a thin mint dog chow?
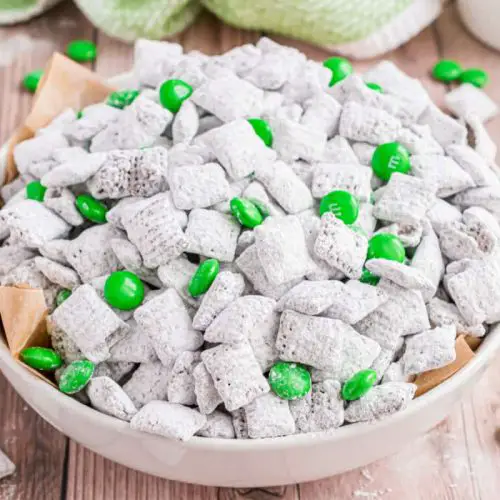
So, what exactly *is* Thin Mint puppy chow? Think of it as your favorite childhood cereal treat, but elevated. Instead of plain Chex cereal, we’re using those delightful crispy rice squares, and then we’re bathing them in a decadent chocolate and mint mixture that’s absolutely divine. It’s coated in a fine dusting of powdered sugar, just like classic puppy chow, but the real magic happens with the addition of peppermint extract and a good quality dark chocolate. The result is a crunchy, chewy, chocolatey, and wonderfully minty snack that tastes uncannily like its cookie namesake. It’s not complicated, it’s not fussy, it’s just pure, unadulterated snacking joy. It’s basically a party in a bowl that you can whip up in under 15 minutes, which is a lifesaver on those busy nights when you need a sweet fix!
How do I make thin mint chow?
Quick Overview
This Thin Mint Puppy Chow recipe is all about minimal effort for maximum flavor. You’ll start by melting your chocolate and butter together, stirring in your minty goodness, and then coating crispy rice cereal. A good shake in a bag with powdered sugar, and voila! You’ve got a batch of pure deliciousness. It’s the easiest way to get that beloved Thin Mint flavor without any fuss, perfect for spontaneous cravings or when you need a crowd-pleasing snack in a flash. The beauty of this method is how quickly it comes together, making it accessible for everyone, no matter your kitchen confidence level.
Ingredients
For the Main Batter:
9 cups crispy rice cereal squares (I find the name brand works best for texture, but generics are fine too!)
1 cup semi-sweet chocolate chips (use good quality ones, it makes a difference!)
1/2 cup unsalted butter, cut into cubes (this helps it melt more evenly)
1 teaspoon peppermint extract (this is key for that Thin Mint flavor! Don’t skimp here.)
1/2 teaspoon Vanilla Extract (enhances the chocolate)
For the Coating:
1 and 1/2 cups powdered sugar (also known as confectioners’ sugar)
For the Optional Minty Dusting:
1/4 cup finely crushed mint cookies (like, actual Thin Mints if you have some lingering, or similar chocolate-mint sandwich cookies)
Step-by-Step Instructions
Step 1: Preheat & Prep Pan
Honestly, there’s no oven involved in this recipe, which is one of the many reasons I adore it! The only “prepping” you need to do is to make sure you have a large bowl ready and a couple of big zip-top bags. I always have a few gallon-sized ones on hand for just these sorts of snacking adventures. Having everything ready to go makes the process so much smoother.
Step 2: Mix Dry Ingredients
Pour your 9 cups of crispy rice cereal into your largest mixing bowl. Make sure it’s a really big one; you’ll need plenty of room to stir everything together without making a huge mess. We’re not mixing anything dry here just yet; the cereal is our base, and we want to keep it as intact as possible.
Step 3: Mix Wet Ingredients
Now, grab a microwave-safe bowl or a small saucepan. If you’re using the microwave, combine the chocolate chips and butter. Microwave in 30-second intervals, stirring in between, until everything is smooth and melted. If you’re using the stovetop, melt them over low heat, stirring constantly, until smooth. Once melted, stir in the peppermint extract and vanilla extract. The aroma that fills your kitchen at this stage is just heavenly – it smells exactly like a freshly opened box of Thin Mints!
Step 4: Combine
Pour the melted chocolate mixture over the crispy rice cereal in your large bowl. Using a spatula, gently fold and stir until every single piece of cereal is coated in that luscious chocolatey goodness. It’s important to do this gently so you don’t crush the cereal too much. I usually find myself doing this for a minute or two, just making sure all those little crevices get filled.
Step 5: Prepare Filling
This step is actually about preparing the powdered sugar coating. Take one of your large zip-top bags and pour the 1 and 1/2 cups of powdered sugar into it. If you’re feeling extra ambitious, or if you have some actual Thin Mints on hand that you’re willing to sacrifice (I know, it’s tough!), you can add the finely crushed mint cookies to the powdered sugar. This adds an extra layer of minty crunch and flavor that is just divine. Seal the bag securely, making sure no air is trapped inside.
Step 6: Layer & Swirl
Now it’s time to get everything coated! Carefully transfer the chocolate-covered cereal into the bag with the powdered sugar. Seal the bag *very* securely (you don’t want powdered sugar explosions!). Then, the fun part: shake, shake, shake! Gently toss and turn the bag until the cereal is completely coated in the powdered sugar. You can also do this in two batches if your bowl or bag is too full. The goal is an even, powdery coating on every single piece. It’s a little messy, but so worth it.
Step 7: Bake
No baking required for this Thin Mint Puppy Chow! Once everything is coated, simply spread the puppy chow out in a single layer on parchment paper or wax paper. Let it sit for about 10-15 minutes to set slightly. This helps prevent it from being too sticky and makes it easier to handle and store.
Step 8: Cool & Glaze
The cooling step is crucial for the texture. Once the puppy chow has set for about 10-15 minutes, you can transfer it to an airtight container. I usually wait until it’s completely cooled before I seal the container, just to prevent any condensation from forming.
Step 9: Slice & Serve
You don’t “slice” puppy chow, you just dive in! Serve it up in bowls, or even just eat it straight from the container (no judgment here!). It’s perfect for snacking while watching a movie, as a party treat, or just when that sweet craving hits. It’s best enjoyed at room temperature.
What to Serve It With
Honestly, Thin Mint Puppy Chow is a star all on its own, but if you want to get creative with serving, I’ve got a few ideas! For breakfast (yes, I’ve totally eaten this for breakfast!), a small bowl alongside a strong cup of coffee is absolute heaven. The bitterness of the coffee cuts through the sweetness perfectly, and it’s like having a dessert for breakfast without the guilt… well, mostly! For brunch, I love to serve it in small, decorative cups or as part of a larger snack board. It looks so festive, and it’s always a hit with guests. Think of it as a fun, unexpected addition that adds a playful element to your spread. As a dessert, it’s perfect for casual gatherings. I’ll often serve it in a big bowl for people to help themselves to after dinner, especially if we’ve had a heavy meal. It’s a light enough sweet treat that doesn’t feel overly indulgent but still satisfies that chocolate-mint craving. And for cozy snacks? This is its natural habitat! I’ll often make a batch when we’re having a movie night or a game night. It’s the ultimate finger food that keeps everyone happy and munching. My family has a tradition of making this when we have a sleepover, and it’s always the first thing to disappear. Another favorite combination is serving it with a tall glass of cold milk, just like you would with regular puppy chow. The creamy milk and the crunchy, minty treat are a match made in snack heaven!
Top Tips for Perfecting Your Thin Mint Puppy Chow
After making this recipe more times than I can count (seriously, it’s my go-to for last-minute get-togethers!), I’ve picked up a few tricks that make all the difference. First, when it comes to the cereal, make sure it’s fresh! Stale cereal won’t give you that satisfying crunch, and you really want that crisp texture for the best puppy chow experience. Also, be gentle when you’re mixing the chocolate into the cereal. You don’t want to pulverize it into dust; keep those squares as intact as possible for the best bite. For the mint extract, trust me on this one: use a good quality one. It makes a noticeable difference in the intensity and purity of the mint flavor. I’ve found that cheap extracts can sometimes taste a bit artificial, and we’re going for that authentic Thin Mint taste here! When you’re melting the chocolate and butter, take your time. Overheating chocolate can make it seize up and become grainy, so low and slow is the way to go, whether you’re using the microwave or the stovetop. Stir frequently! For the powdered sugar coating, make sure your bag is sealed *really* well before shaking. I’ve had a few powdered sugar snowstorms in my kitchen, and while it’s kinda funny in retrospect, it’s a mess to clean up. I like to double-bag it sometimes, just to be safe. If you want to get fancy with the “mint cookie dust” addition, make sure you crush the cookies very finely. A food processor works wonders, or you can put them in a zip-top bag and bash them with a rolling pin. It integrates better into the powdered sugar that way. And a little tip I learned after making it too many times too quickly: let it set up for at least 10-15 minutes before digging in or storing. This helps the chocolate firm up slightly and the powdered sugar adhere better, preventing it from becoming too clumpy.
Storing and Reheating Tips
Storing Thin Mint Puppy Chow is pretty straightforward, but there are a few things that’ll help keep it tasting its best. At room temperature, it’s best to store it in an airtight container. It’ll stay wonderfully fresh and crunchy for about 3-4 days. I usually keep a container on my counter for easy access, but if it’s really warm where you live, the fridge might be a better option to prevent the chocolate from softening too much. For refrigerator storage, simply pop it into an airtight container or a large zip-top bag. It will last a good week, maybe even a bit longer, though the texture might become slightly less crisp over time. Just make sure the container is sealed well to prevent it from absorbing any fridge odors. Now, freezing isn’t my go-to for puppy chow because the texture can change a bit once thawed, but if you *really* need to, you absolutely can! Let the puppy chow cool completely and set. Then, wrap it tightly in a layer of plastic wrap, followed by a layer of aluminum foil, or place it in a freezer-safe airtight container. It should keep well in the freezer for about 1-2 months. When you’re ready to enjoy it, the best way to thaw it is slowly in the refrigerator overnight. This helps minimize any condensation that might make it soggy. For reheating, honestly, there’s no real need to reheat puppy chow. It’s meant to be enjoyed at room temperature. If, for some reason, you wanted to slightly soften the chocolate coating (maybe it got a bit too hard in the fridge), you could spread it out on a baking sheet and pop it in a *very* low oven (around 200°F or 95°C) for just a few minutes, watching it *very* closely. But again, this is usually unnecessary. My preferred method is just to let it come to room temperature naturally.
Frequently Asked Questions
Final Thoughts
So there you have it – my absolute favorite Thin Mint Puppy Chow recipe! It’s the perfect way to capture that beloved cookie flavor in a super easy, no-bake treat that’s guaranteed to be a hit. Whether you’re a lifelong fan of Girl Scout cookies or just someone who loves a good chocolate-mint combination, this recipe is for you. It’s proof that you don’t need to spend hours in the kitchen to create something truly delicious and memorable. The ease, the incredible flavor, and the sheer joy it brings to everyone who tries it make this recipe a winner in my book. If you enjoyed this, you might also want to check out my recipes for classic Chocolate Peanut Butter Puppy Chow or my White Chocolate Cranberry Bliss Bars – they’re also big hits in my household! I can’t wait to hear what you think. Let me know in the comments below how your Thin Mint Puppy Chow turns out, or if you discover any fun variations! Happy snacking!
Thin Mint Puppy Chow
Ingredients
Main Ingredients
- 16 ounces Ghirardelli chocolate wafers
- 0.5 cup chopped Andes mint candy (or Andes baking bits)
- 2 cups powdered sugar
- 10 cups Rice Chex cereal
- 1 bag Mint m&m candies (8 ounces)
Instructions
Preparation Steps
- In microwave, melt chocolate wafers with mint candy together for one minute, stir and continue melting in 30 second intervals until smooth (mine took a total of 2 minutes).
- In a large mixing bowl, combine cereal with melted chocolate. Fold with a large wooden spoon until all cereal is coated.
- In a large, gallon sized ziploc bag, add powdered sugar. Spoon in chocolate cereal mixture. Seal bag and shake until powdered sugar is coating all the cereal completely. Pour onto a large piece of wax paper and allow chocolate to set (about 20 minutes). Combine candies with chex and store in an airtight container. ENJOY!
Notes
Featured Comments
“Impressed! Clear steps and perfect for busy nights results. Perfect for busy nights.”
“New favorite here — family favorite. crowd-pleaser was spot on.”
“Super easy and turned out amazing! My family asked for seconds. Saving this one.”
“This sweet treat was absolutely loved — the fresh really stands out. Thanks!”
“Made it tonight and wow — turned out amazing! Will definitely make Thin Mint Inspired Puppy Chow Delight again.”
“Packed with flavor and so simple. Exactly what I wanted from Thin Mint Inspired Puppy Chow Delight.”


