

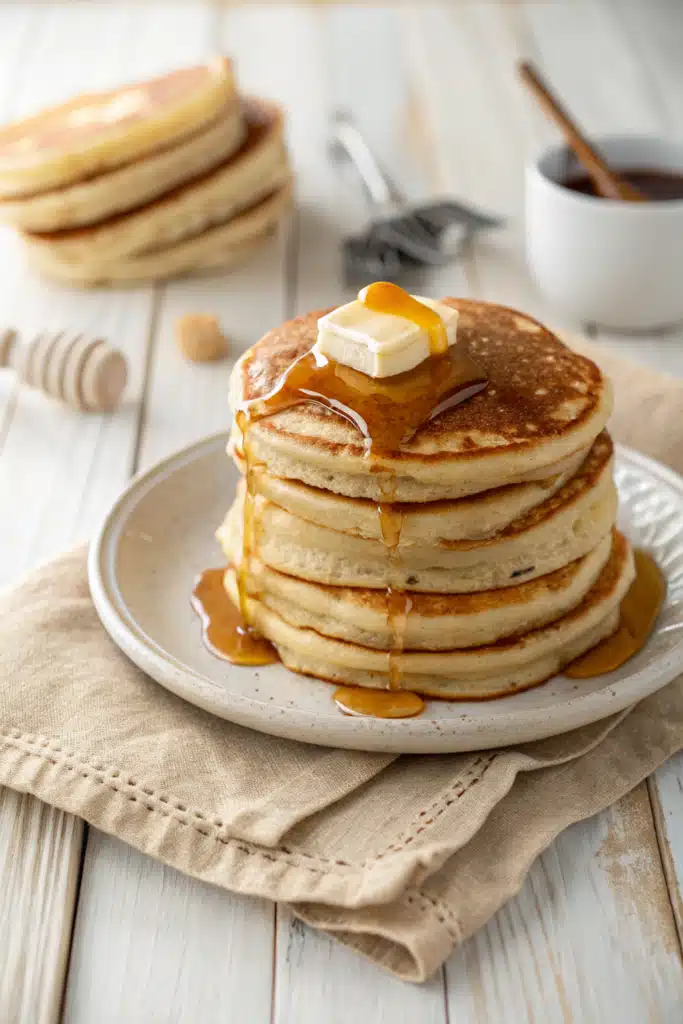
The Best Ever One-Bowl Marble Loaf Cake
Have you ever had one of those days where you desperately want something sweet, but the thought of washing a mountain of dishes makes you want to crawl right back into bed? Yep, me too. That is exactly how this incredible marble loaf cake became a weekly staple in my house. When friends ask me for easy recipe ideas that actually look like you spent hours toiling away in the kitchen, this is the very first thing I send them.
It’s rich, buttery, and has these gorgeous ribbons of chocolate running right through the center. Honestly, there is something so magical about slicing into a freshly baked marble cake and seeing that unique swirl pattern every single time. It feels like a little kitchen victory! Plus, it pairs perfectly with a giant cup of coffee on a lazy Sunday morning. You don’t need any fancy equipment, and you probably already have all the ingredients sitting in your pantry right now. Let’s get baking!

What Is a Marble Loaf Cake?
Basically, a marble loaf cake is the beautiful love child of a classic vanilla pound cake and a rich chocolate cake. Instead of making you choose between the two (because why should we ever have to choose?), you get the absolute best of both worlds in a single, tender slice.
The base is a thick, velvety vanilla batter. We take a portion of that exact same batter, mix in some good-quality cocoa powder, and then gently swirl the two together in a standard loaf pan. The result? A cake that looks incredibly intricate but is actually wonderfully straightforward to pull off. It has a dense, melt-in-your-mouth crumb that reminds me of those expensive bakery slices, but with that unmistakable, comforting taste of homemade goodness. It’s an old-fashioned favorite that never ever goes out of style.
How to Make Marble Loaf Cake
Quick Overview
Before we dive into the nitty-gritty, let’s take a quick bird’s-eye view of what we’re doing today. You’re going to cream your butter and sugar until it’s super light and fluffy—don’t rush this step, it’s the secret to a great cake! Then, you’ll beat in your eggs and vanilla, followed by alternating your dry ingredients with the sour cream. Once your beautiful vanilla batter is ready, scoop a little bit of it out and stir in your cocoa powder. Dollop the two batters into your pan, swirl them up with a knife, and let the oven do the heavy lifting. Super simple, right?
Ingredients
Here is what you’ll need to grab from your pantry and fridge to get started:
- Unsalted butter: Make sure it’s softened to room temperature!
- Granulated sugar: For the perfect amount of sweetness.
- Large eggs: Room temperature eggs mix into the batter much better.
- Vanilla extract: Always measure this with your heart.
- All-purpose flour: The sturdy base of our loaf.
- Baking powder & salt: For lift and flavor balance.
- Sour cream: Full-fat is best here for maximum moisture.
- Unsweetened cocoa powder: To create our rich chocolate swirl.
- Milk: Just a splash to thin out the chocolate batter.

Step-by-Step Instructions
Step 1: Preheat & Prep Pan
Start by preheating your oven to 350°F (175°C). Grab a standard 9×5 inch loaf pan, give it a good spray with non-stick baking spray, and line it with a piece of parchment paper. Leaving a little overhang on the sides makes lifting the baked cake out so much easier later!
Step 2: Cream the Butter and Sugar
In a large bowl, beat your softened butter and granulated sugar together until it looks pale and fluffy. This usually takes about 3 to 4 minutes with a hand mixer. Don’t skimp on the time here; whipping air into the butter is what gives our cake that gorgeous, tender lift.
Step 3: Add the Wet Ingredients
Beat in the eggs one at a time, making sure each one is fully mixed in before adding the next. Splash in that vanilla extract and mix until everything is smooth and smells absolutely amazing.
Step 4: Incorporate the Dry Ingredients and Sour Cream
In a separate small bowl, whisk together your flour, baking powder, and salt. Add half of this dry mixture to your butter bowl, mixing just until combined. Then add all of your sour cream, mix gently, and finally add the rest of the dry ingredients. Be gentle! Overmixing leads to a tough cake.
Step 5: Create the Chocolate Batter
Scoop about one cup of your vanilla batter into a separate bowl. Sift in the cocoa powder and add a splash of milk to loosen it up. Stir until you have a thick, glossy chocolate batter.
Step 6: Swirl and Bake
Drop alternating spoonfuls of vanilla and chocolate batter into your prepared pan. Take a butter knife or a wooden skewer and gently swirl them together in a figure-eight motion. Bake for 55-65 minutes, or until a toothpick inserted into the center comes out clean.
What to Serve It With
Honestly, a thick slice of this marble loaf is practically perfect all on its own. But if you really want to take things up a notch, I highly recommend serving it slightly warm with a generous scoop of vanilla bean ice cream melting right over the top. It is pure heaven.
If you’re having it for breakfast or an afternoon snack, a hot cup of dark roast coffee or a mug of Earl Grey tea is the ultimate companion. The slight bitterness of the coffee cuts through the sweetness of the cake beautifully. You could also drizzle a simple chocolate ganache or a vanilla glaze over the top if you’re serving it for a special occasion and want that extra wow factor!
Top Tips for Perfecting Your Marble Loaf Cake
Want to make sure your cake turns out flawless every single time? Keep these little tricks in mind:
- Room temperature ingredients are non-negotiable: Cold eggs and cold sour cream will cause your butter to seize up, leaving you with a lumpy batter. Set everything out on the counter about an hour before you plan to bake.
- Don’t over-swirl: It is so tempting to just keep swirling that knife through the batter, but if you do it too much, the colors will blend together and look muddy. Three or four figure-eights are plenty!
- Sift your cocoa powder: Cocoa powder loves to clump. Sifting it before adding it to your batter ensures your chocolate swirls are silky smooth.
Storing and Reheating Tips
If you somehow manage to have leftovers (which is a very rare occurrence in my house!), storing this cake is an absolute breeze. Let it cool completely to room temperature, then wrap it tightly in plastic wrap or store it in an airtight container right on the counter. Because of the sour cream, it will stay wonderfully moist for up to 4 days.
Want to freeze it? Wrap the whole loaf or individual slices in plastic wrap, then slip them into a freezer-safe zip-top bag. It freezes beautifully for up to 3 months. When you’re ready for a sweet treat, just let a slice thaw on the counter. To recreate that fresh-out-of-the-oven magic, pop a slice in the microwave for about 10 to 15 seconds.
Frequently Asked Questions
Final Thoughts
There you have it, my friend. A beautiful, buttery, chocolate-swirled masterpiece that proves you don’t need to be a professionally trained pastry chef to bake something extraordinary. I really hope this becomes one of those go-to easy recipe ideas you keep tucked in your back pocket for whenever a sweet craving strikes.
Baking doesn’t have to be stressful or complicated. Sometimes, the most comforting and impressive desserts are the ones that require nothing more than a wooden spoon, a single loaf pan, and a little bit of love. If you give this recipe a try, please let me know how it turns out! Grab a thick slice, pour yourself a hot drink, and enjoy every single bite. Happy baking!

Top Recipes
Ingredients
Main Ingredients
- 1 tbsp olive oil
- 1 medium onion chopped
- 2 cloves garlic minced
- 1 lb chicken breast diced
- 1 tsp salt
- 0.5 tsp black pepper
- 1 cup chicken broth
- 0.5 cup heavy cream
Instructions
Preparation Steps
- Heat the olive oil in a large skillet over medium heat.
- Add the chopped onion and minced garlic, sautéing until translucent.
- Add the diced chicken breast, salt, and black pepper. Cook until the chicken is browned on all sides.
- Pour in the chicken broth and heavy cream. Bring to a simmer and let it cook for 10 minutes until the sauce thickens.
- Remove from heat and serve warm.
Notes
Featured Comments
“This cake sounds absolutely comforting—reminds me of cozy family gatherings too. Definitely adding it to my recipe list!”
“Impressed! Clear steps and family favorite results. Perfect for busy nights.”
“New favorite here — perfect for busy nights. crowd-pleaser was spot on.”
“Super easy and turned out amazing! My family asked for seconds. Saving this one.”
“This sweet treat was absolutely loved — the hearty really stands out. Thanks!”
“Made it tonight and wow — perfect for busy nights! Will definitely make top recipes again.”


This cake sounds absolutely comforting—reminds me of cozy family gatherings too. Definitely adding it to my recipe list!