

Oh, this panna cotta! It’s the kind of dessert that makes you close your eyes and just… savor. You know, those moments when a dessert is so perfectly smooth, so delicately sweet, and just melts in your mouth? That’s this vanilla panna cotta. It’s not just a dessert; it’s pure, unadulterated comfort in a little ramekin. I remember the first time I truly mastered it. I was trying to impress some friends, and honestly, I was a little intimidated. Panna cotta sounded so fancy, right? But this recipe, it turned out to be surprisingly straightforward, and the result was just… magic. It’s the perfect alternative when you want something elegant without spending hours in the kitchen, sort of like how a really good Chocolate Chip Cookie can be just as satisfying as a complex layer cake, but for those times you’re craving a little more sophistication. This vanilla panna cotta hits that sweet spot perfectly. It’s my go-to for dinner parties, and honestly, for those quiet evenings when I just need a little treat after the kids are in bed. It truly is a lifesaver.
What is Vanilla Panna Cotta?
So, what exactly *is* panna cotta? The name itself sounds so Italian and chic, and it is! It literally translates to “cooked cream.” And that’s pretty much what it is at its core: a simple Italian dessert made from sweetened cream, thickened with gelatin. But calling it “just sweetened cream” doesn’t do it justice, not one bit. Think of it as the silkiest, most luxurious custard you can imagine, but without the fuss of eggs or a water bath. It’s incredibly pure in flavor, letting the cream and, in this case, the beautiful aroma and taste of real vanilla, really shine. It sets into a delicate wobble, firm enough to hold its shape but so tender it practically dissolves on your tongue. It’s the ultimate blank canvas, waiting for a little topping to make it sing, but honestly, even on its own, it’s a dream. It’s the dessert equivalent of a warm hug – simple, comforting, and utterly delightful.
How do I make vanilla panna cotta?
Quick Overview
Making this dreamy vanilla panna cotta is ridiculously easy. You’ll gently heat cream and sugar with vanilla, bloom some gelatin, then whisk it all together until smooth. Pour it into pretty ramekins or glasses, let it chill until set, and that’s pretty much it! The key is gentle heating and making sure the gelatin dissolves completely. It’s so simple, I often whip it up while doing other kitchen tasks. The hardest part is waiting for it to chill!
Ingredients
For the Main Batter:
Heavy Cream: About 2 cups. This is the backbone of our panna cotta, so don’t skimp here! Using a good quality, full-fat heavy cream is crucial for that luxurious texture and rich flavor. I’ve tried it with half-and-half before, and while it was okay, it just didn’t have that same velvety mouthfeel. You really want that 35% butterfat content!
Granulated Sugar: About 1/2 cup. This is a good starting point for sweetness, but you can always adjust it slightly to your preference. I find this amount gives a lovely, subtle sweetness that lets the vanilla shine. If you prefer things a little sweeter, you can nudge it up to 2/3 cup, but I’d taste the mixture before committing.
Vanilla Bean or Vanilla Extract: 1 vanilla bean, split and scraped, OR 1 to 1.5 teaspoons pure vanilla extract. This is non-negotiable for *vanilla* panna cotta! If you can get your hands on a vanilla bean, go for it. You’ll see those beautiful little flecks suspended in the cream, and the flavor is just unparalleled. If you’re using extract, make sure it’s PURE vanilla extract; the imitation stuff just doesn’t have the same depth.
Unflavored Gelatin: 1 packet (about 2.25 teaspoons). This is our magic ingredient that makes the cream set. Make sure it’s unflavored so it doesn’t compete with the vanilla. You’ll bloom it in a bit of cold water.
Cold Water: About 1/4 cup. Just enough to sprinkle over the gelatin to let it soften.
Step-by-Step Instructions
Step 1: Preheat & Prep Pan
This step isn’t about preheating an oven; it’s about prepping your vessels! Grab some pretty ramekins, small glasses, or even a small loaf pan if you want to unmold a larger portion. I usually opt for 4-6 individual ramekins, depending on their size. Make sure they’re clean and dry. You don’t need to grease them or anything; the panna cotta will unmold beautifully from smooth surfaces. Just set them aside on a tray that fits in your fridge so you can easily move them later.
Step 2: Mix Dry Ingredients
In a medium saucepan (off the heat for now!), whisk together your granulated sugar. If you’re using a vanilla bean, split it lengthwise with a sharp knife, then scrape out all those tiny, precious seeds from both halves. Add these seeds directly to the sugar. The sugar actually helps to “grind” the seeds and release more of their glorious flavor. If you’re using vanilla extract, you’ll add that later, but for now, just the sugar (and vanilla seeds if using) is fine.
Step 3: Mix Wet Ingredients
Pour the heavy cream into the saucepan with the sugar. If you used a vanilla bean, toss the scraped-out pod into the cream too – it’ll infuse extra flavor. Now, place the saucepan over medium-low heat. We want to gently warm the cream, not boil it. Stir frequently to dissolve the sugar and to prevent the cream from scorching on the bottom. Heat it until it’s steaming and small bubbles just start to form around the edges. This usually takes about 5-8 minutes. Don’t let it come to a rolling boil, as that can affect the texture.
Step 4: Combine
While the cream is warming, let’s get the gelatin ready. In a small bowl, sprinkle the unflavored gelatin evenly over the 1/4 cup of cold water. Let it sit undisturbed for about 5-10 minutes. It will absorb the water and become sort of jiggly and jelly-like. Once the cream is hot (steaming, not boiling!), remove the vanilla pod (if used). Then, slowly whisk the bloomed gelatin into the warm cream mixture. Keep whisking until the gelatin is completely dissolved and you don’t see any clumps. This is important – any undissolved gelatin will result in a less smooth panna cotta.
Step 5: Prepare Filling
If you are using vanilla extract instead of a bean, now is the time to stir it in! Give it a good whisk to combine everything thoroughly. You want a super smooth, homogenous mixture. Taste it at this point. Does it need a touch more sweetness? Now’s your chance to add a tiny bit more sugar if you feel it needs it, but remember it will be a bit less sweet once chilled. The goal is a delicate, creamy vanilla flavor.
Step 6: Layer & Swirl
Carefully pour the warm panna cotta mixture into your prepared ramekins or glasses. You can use a ladle or a steady pour from the saucepan. Fill them evenly. At this stage, you can top them with whatever you like, but for a plain vanilla panna cotta, this is it! If you were making a marbled version, you’d swirl in some fruit puree or chocolate sauce here. For this simple version, just smooth tops are perfect.
Step 7: Bake
This dessert doesn’t actually bake! Once you’ve poured the mixture into your ramekins, you’ll cover them loosely with plastic wrap (you don’t want the plastic touching the surface) and pop them into the refrigerator. This is the chilling stage. You’ll need to let them set for at least 4-6 hours, but I always recommend chilling them overnight for the best results. The longer they chill, the firmer and smoother they’ll become.
Step 8: Cool & Glaze
Since we’re not baking, cooling is done in the fridge! Once the panna cotta has set to a lovely wobble (test by gently nudging a ramekin – it should feel firm but still have a slight jiggle), you can get ready to serve. If you’re planning to unmold them, you might want to dip the bottom of each ramekin in a bowl of hot water for about 10-15 seconds just before inverting. This helps release them cleanly. If you’re serving in the ramekins, you can skip this step. For serving, I love a simple berry compote or a drizzle of caramel, but for this pure vanilla version, sometimes just a few fresh berries are all it needs.
Step 9: Slice & Serve
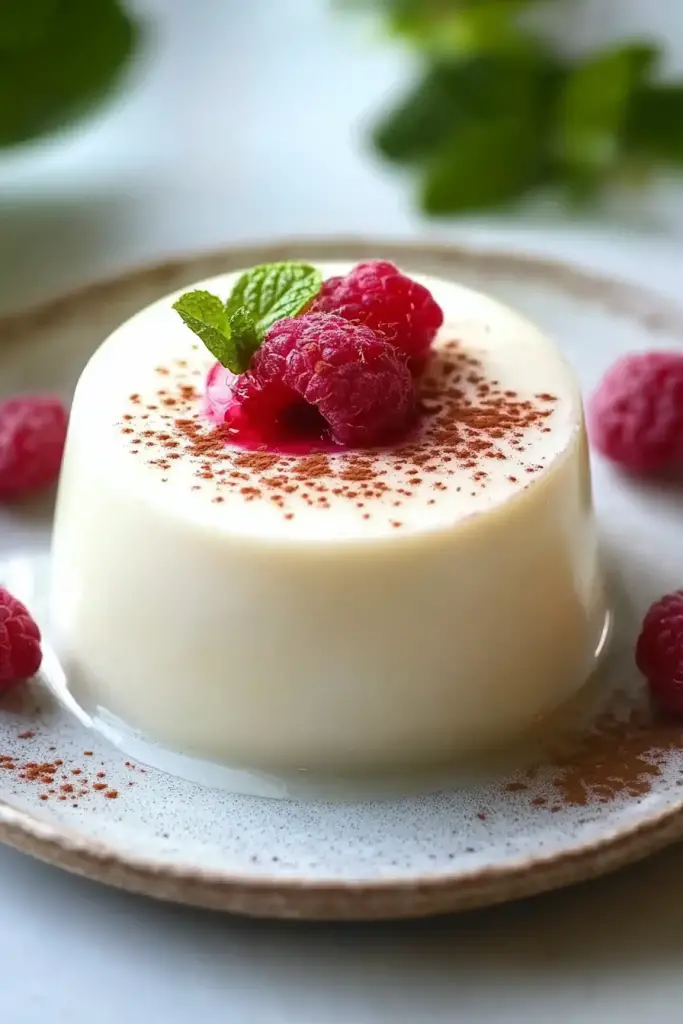
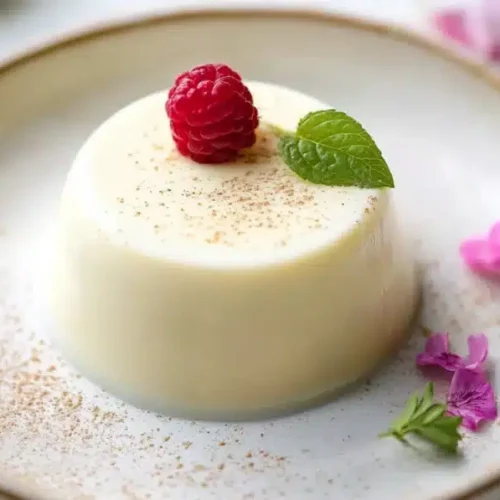
If you’ve unmolded them, carefully invert the ramekin onto your serving plate. Give it a gentle shake. If it doesn’t release immediately, a quick dip in hot water is your friend. If you’re serving them in their dishes, that’s even easier! Just place them on a small plate. I love to add a few fresh raspberries or a tiny mint sprig for a pop of color, but honestly, the creamy white itself is beautiful. Serve chilled and enjoy that incredible silky texture!
What to Serve It With
The beauty of a classic vanilla panna cotta is its versatility. It plays so nicely with other flavors and can be dressed up or down for any occasion. For BREAKFAST, dare I say it? Yes! A small serving, maybe with some fresh berries and a light drizzle of honey, feels so indulgent and special to start the day. It’s far lighter than a big stack of pancakes but still feels like a treat. For BRUNCH, this is where it really shines. Imagine a beautifully set table, and you bring out these elegant ramekins, perhaps with a delicate raspberry coulis drizzled artfully around the plate. It’s sophisticated and light, a perfect counterpoint to richer brunch fare. Pair it with a mimosa or a sparkling rosé. As DESSERT, this is its natural habitat. After a hearty meal, a creamy, cool panna cotta is just what the doctor ordered. Serve it with a dark chocolate ganache for a decadent pairing, or a tart cherry compote to cut through the richness. For COZY SNACKS, don’t underestimate its power! When that 10 pm craving hits, and you don’t want to bake, a pre-made panna cotta from the fridge is your best friend. A sprinkle of toasted nuts or a few chocolate shavings can make it feel extra special, even if you’re just curled up on the couch with a good book.
Top Tips for Perfecting Your Vanilla Panna Cotta
I’ve made this vanilla panna cotta more times than I can count, and along the way, I’ve picked up a few tricks that make all the difference. Let’s talk ZUCCHINI PREP – oh wait, that’s for a different recipe! For this one, let’s focus on the cream and gelatin. For the CREAM, use the good stuff, full-fat heavy cream. It’s the key to that luxurious, melt-in-your-mouth texture. Don’t try to substitute with milk or a lighter cream; you’ll end up with something that’s more watery and less satisfying. When it comes to MIXING ADVICE, the absolute most important thing is to ensure your gelatin is fully dissolved. Sprinkle it evenly over the cold water and let it bloom properly. Then, whisk it into the *warm* cream gently but thoroughly. If you see any little gelatin clumps, your panna cotta might not set evenly. For VANILLA flavor, use a real vanilla bean if you can. The little black specks are so beautiful, and the flavor is unparalleled. If you use extract, always opt for pure vanilla extract. And remember to add it *after* you’ve heated the cream, as prolonged heat can diminish its flavor. For GELATIN, make sure you’re using the right amount. Too little and it won’t set; too much and it can become rubbery. A standard packet of unflavored gelatin (about 2.25 teaspoons) works perfectly for the amount of cream in this recipe. For BAKING TIPS (or rather, chilling tips!), be patient. Panna cotta needs time to set. Give it at least 4-6 hours, but overnight is truly best. This allows the gelatin to work its magic and the flavors to meld. If you’re planning to unmold, a quick dip in hot water is your best friend – don’t skip this if you want a clean release! And finally, for SERVING IDEAS, don’t be afraid to get creative. While I love the classic vanilla, a simple berry sauce, a sprinkle of toasted almonds, or even a light dusting of cocoa powder can elevate it further. My personal favorite is a quick blackberry coulis – the tartness cuts through the sweetness beautifully.
Storing and Reheating Tips
This vanilla panna cotta is a make-ahead marvel, which is one of the main reasons I love it so much for entertaining. For ROOM TEMPERATURE storage, it’s generally not recommended for more than an hour or two, especially in warmer climates, as it can start to soften too much. It’s best served chilled. For REFRIGERATOR STORAGE, this is where it shines! Once set, you can cover individual ramekins tightly with plastic wrap. It will keep beautifully in the fridge for up to 3-4 days. The texture might even improve slightly after the first day as the flavors meld. If you’ve unmolded it and it’s on a serving platter, make sure the platter is covered well with plastic wrap to prevent it from drying out or picking up any odors from the fridge. FREEZER INSTRUCTIONS are a bit trickier. While you *can* freeze panna cotta, it’s not ideal as the gelatin can sometimes change texture upon thawing, becoming a bit grainy or watery. If you absolutely must freeze it, make sure it’s well-wrapped in plastic wrap, then in a layer of foil, and aim to use it within about 1-2 weeks. Thawing should be done slowly in the refrigerator overnight. As for GLAZE TIMING ADVICE, it’s always best to add your toppings *just before* serving. If you put a berry compote or sauce on top and then refrigerate, the liquid can sometimes seep into the panna cotta, making the top layer a bit soggy. So, let it chill plain, then artfully add your garnishes right before you bring it to the table. This ensures everything stays fresh and vibrant!
Frequently Asked Questions
Final Thoughts
So there you have it – my absolute favorite way to make vanilla panna cotta. It’s the kind of recipe that proves you don’t need complicated techniques or fancy ingredients to create something truly memorable. It’s elegant enough for a special occasion but simple enough for a weeknight indulgence. I just love how its delicate vanilla flavor and impossibly smooth texture can bring such a sense of calm and delight. It’s the perfect ending to any meal, or even a delightful treat all on its own. If you enjoy this recipe, you might also love my Lemon Posset or my Chocolate Mousse – they share that same elegant simplicity. I really hope you give this vanilla panna cotta a try. It’s a recipe that’s brought so much joy to my kitchen, and I can’t wait to hear about all the ways you make it your own. Don’t be shy about sharing your own topping ideas or how your family enjoys it in the comments below! Happy making!
Vanilla Panna Cotta
Ingredients
Main Ingredients
- 2 cups heavy cream
- 0.5 cups granulated sugar
- 1 teaspoon vanilla extract
- 0.25 ounces unflavored gelatin
- 0.125 cup cold water
Instructions
Preparation Steps
- In a small bowl, sprinkle the unflavored gelatin over the cold water and let it bloom for 5-10 minutes.
- In a medium saucepan, combine the heavy cream and granulated sugar. Heat over medium heat, stirring occasionally, until the sugar is dissolved and the cream is warm (do not boil).
- Remove the saucepan from the heat. Stir in the bloomed gelatin mixture until it is completely dissolved. Add the vanilla extract and stir to combine.
- Pour the mixture into individual ramekins or a larger mold. Cover and refrigerate for at least 4 hours, or until firm.
- To serve, you can unmold the panna cotta onto plates or serve it directly from the ramekins. Garnish as desired.
Notes
Featured Comments
“This sounds absolutely divine—I can already imagine that perfect, silky texture! Thanks for sharing such a comforting treat.”
“Impressed! Clear steps and quick weeknight win results. Perfect for busy nights.”
“New favorite here — creamy. crowd-pleaser was spot on.”
“Super easy and turned out amazing! My family asked for seconds. Saving this one.”
“This sweet treat was absolutely loved — the bright really stands out. Thanks!”
“Made it tonight and wow — quick weeknight win! Will definitely make Vanilla Panna Cotta again.”


This sounds absolutely divine—I can already imagine that perfect, silky texture! Thanks for sharing such a comforting treat.