

There’s something about the bright, zingy flavor of lemon that just makes me feel like I’m basking in sunshine no matter what time of year it is. I remember those lazy summer afternoons, with the smell of fresh lemon zest wafting through the kitchen while I baked these cookies with my grandma. They’re honestly one of my all-time favorites — a perfect balance of sweet and tart, with a tender crumb that practically melts in your mouth. I’ve made these so many times, tweaking the zest here or swapping the sugar there, and I swear, they never fail to bring a smile. This recipe is my go-to when I need a quick pick-me-up or a treat to share with friends. Trust me, once you try these lemon cookies, they’ll become a staple in your baking lineup, too!
What is lemon cookie?
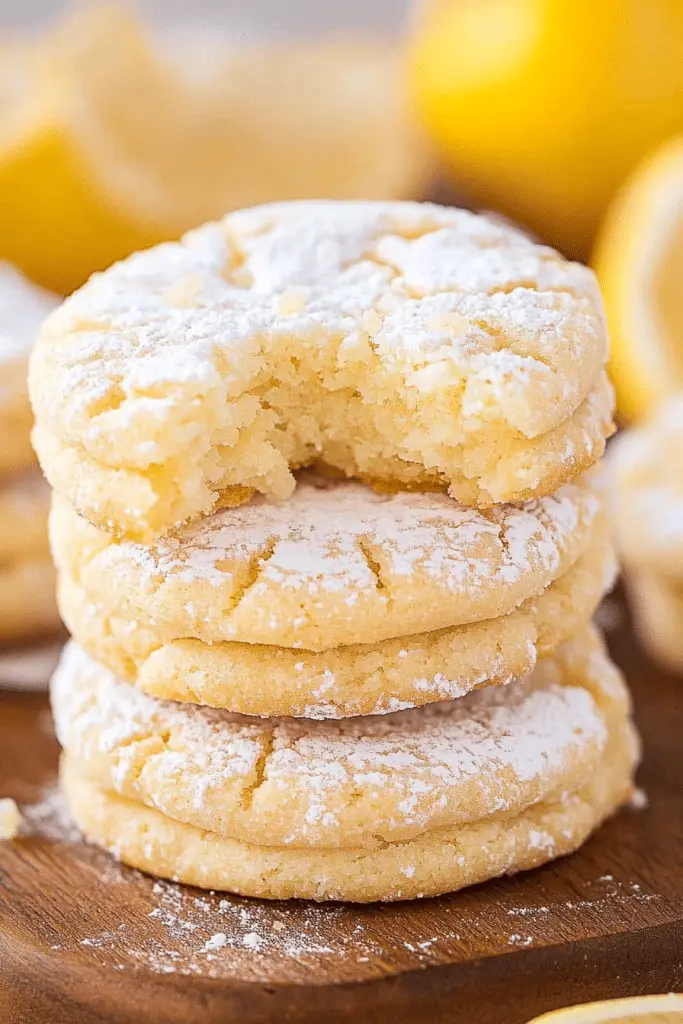
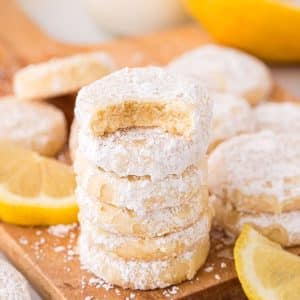
Think of lemon cookies as little bites of sunshine. They’re essentially soft, buttery cookies infused with fresh lemon zest and juice, giving them that irresistible citrus kick. The name’s pretty straightforward — lemon for the flavor and cookies for the sweet little baked treats. These cookies often have a delicate crumb, a slightly chewy edge, and sometimes a little glisten from a sugar glaze or dusting of powdered sugar. They’re the kind of treat that hits the perfect sweet-tart balance — not too sugary, but just enough to satisfy that craving. Something about how the lemon zest bursts with aroma makes these cookies feel like springtime wrapped in a comforting bite. They’re friendly to almost every occasion — from casual afternoons with tea to holiday parties, or even just a quick weekend baking project to brighten your day.
How do I make lemon cookies?
Quick Overview
This recipe comes together quickly — no complicated steps or fancy equipment needed. Start by creaming butter and sugar, then add in lemon zest and juice for that vibrant flavor. Mix in the dry ingredients just until combined, then dollop spoonfuls onto a baking sheet. While they bake, prepare a simple glaze or dust with powdered sugar if you’re feeling fancy. In about 10-12 minutes, you’ll have fragrant, tender cookies ready to enjoy. The secret is in the fresh lemon zest; I always do this when baking lemon cookies because it releases so much extra aroma and flavor. If you want to make them even more special, a drizzle of lemon glaze right after baking takes them to a whole new level — trust me on this one!
Ingredients
For the Main Batter:
- 1 cup (2 sticks) unsalted butter, softened — I always use high-quality butter for the richest flavor.
- 1 cup granulated sugar — I prefer cane sugar; it gives a nice caramel note to the cookies.
- Zest of 2 large lemons — fresh is best, of course!
- Juice of 1 lemon (about 2 tablespoons) — I actually squeeze in a little extra sometimes, just for that extra zing.
- 2 cups all-purpose flour — I’ve used a mix of whole wheat too, and it still turns out great.
- 1 teaspoon baking powder — for just a touch of lift.
- Pinch of salt — enhances all that lemon flavor.
For the Filling:
Optional: Lemon curd or a spoonful of lemon jam if you want a little surprise inside (my kids love these with a sweet, gooey filling!).
For the Glaze:
1 cup powdered sugar, enough lemon juice to make it pourable, and a tiny bit of lemon zest for extra flavor. I like to keep it simple but tangy enough to shine.
Step-by-Step Instructions
Step 1: Preheat & Prep Pan
Heat your oven to 350°F (177°C). Line a baking sheet with parchment paper — trust me, this keeps the cookies from sticking and makes cleanup a breeze. I always do this because I find the cookies bake more evenly and come off the sheet without fussing.
Step 2: Mix Dry Ingredients
In a small bowl, whisk together the flour, baking powder, and salt. This ensures everything is evenly distributed — no weird pockets of baking powder in your batter!
Step 3: Mix Wet Ingredients
In a larger bowl, cream the softened butter and sugar until light and fluffy. I do this with a hand mixer for about 2-3 minutes. Then, stir in the lemon zest and juice — the aroma is almost intoxicating! Make sure your butter isn’t too cold or it won’t blend well. I’ve learned that soft, but not melted, butter works best.
Step 4: Combine
Gradually add the dry ingredients to the wet, mixing just until everything’s incorporated. Be careful not to overmix — overworking the dough can make the cookies tough, and that’s the last thing we want! It should be soft, slightly sticky, but manageable.
Step 5: Prepare Filling
If you’re adding a filling, prepare it now. Lemon curd works beautifully or a dollop of lemon jam. You can also leave these plain and drizzle a glaze later. The filling is optional but adds a fun surprise factor!
Step 6: Layer & Swirl
Drop spoonfuls of dough onto your prepared baking sheet. If you’re adding filling or jam, dollop a small spoonful in the center of each cookie, then gently flatten or swirl the dough around it. For a marble effect, add a tiny bit of extra lemon juice on top and swirl with a toothpick or skewer before baking — it creates those beautiful streaks.
Step 7: Bake
Bake for 10-12 minutes. Keep an eye on them; they should be just starting to turn golden at the edges. My oven runs a bit hot, so I sometimes pull them at 10 minutes for that perfect tender texture. When you gently press the tops, they should give slightly but not feel wet. Let the cookies sit for a couple of minutes — this helps set their shape before you transfer them to a wire rack.
Step 8: Cool & Glaze
Allow cookies to cool slightly on the baking sheet, then transfer to a wire rack. If you’re glazing, do it while they’re still warm so the glaze seeps in a bit and sticks better. I usually mix powdered sugar with a splash of lemon juice, whisk until smooth, then drizzle generously. The lemon glaze adds a beautiful shine and a burst of extra citrus.
Step 9: Slice & Serve
Once cooled, you can also cut or gently break apart any thicker cookies with fillings. Serve these cookies at room temperature — they’re best a little after they’ve cooled so the flavors have settled. A cup of tea or a tall glass of lemonade pairs perfectly and makes the whole experience feel like a little escape.
What to Serve It With
If you’re serving these lemon cookies for breakfast or brunch, I love pairing them with a fresh pot of coffee or a fruity herbal tea. Maybe some sliced strawberries or a dollop of whipped cream on the side? For a more decadent dessert, serve with a scoop of vanilla ice cream or a drizzle of berry coulis. My family especially loves casually dunking these cookies into their tea — it’s like a little citrus-infused toast! During holiday gatherings, I sprinkle a few with powdered sugar or top with a tiny lemon wedge for those picture-perfect moments. For cozy nights, I sometimes warm them up slightly and serve with a glass of cold milk or hot lemon tea — pure comfort on a plate.
Top Tips for Perfecting Your Lemon Cookies
After making these dozens of times, I’ve collected some tricks to make them even better. First, always use fresh lemon zest — that’s what really makes the flavor pop. Try to zest the lemon before juicing it to avoid contamination. I’ve tested squeezing the lemon juice over a fine strainer — no seeds, just pure, bright juice. When mixing the batter, don’t overdo it; mix just until you don’t see dry flour anymore. Overmixing toughens the cookies. If you want a more intense lemon flavor, add a little lemon extract along with the zest — but remember, fresh is always best.
Swirling design is tricky at first, but practice makes perfect. Use a toothpick or skewer to drag through the batter to create marbled effects — just do it gently. For ingredient swaps, you can substitute almond flour for half of the all-purpose flour, which gives a nutty flavor that pairs surprisingly well with lemon. Baked cookies stay soft for 2-3 days at room temperature, stored in an airtight container, or you can freeze them for longer. When freezing, wrap each cookie individually in plastic wrap first so they don’t stick together.
I’ve also learned that baking sheets positioned in the middle of the oven give the most even bake, and if your oven runs hot, decrease the temperature by 10-15°F. Don’t forget to set a timer — these cookies go from perfect to overdone quickly! Glazes are best applied immediately after baking, but if you store the cookies first, reheat them slightly before glazing to help the glaze spread smoothly.
Storing and Reheating Tips
To keep your lemon cookies fresh, store them in an airtight container at room temperature for up to 3 days. They’ll stay soft and flavorful, especially if you add a little piece of bread or a slice of apple in the container — it helps maintain moisture. If you want to keep them longer, refrigerate for up to a week, but note that they might lose a bit of their tender crumb. When refrigerated, let them come to room temperature before serving or give them a quick 10-second microwave burst for soft, warm cookies.
For freezing, wrap the cookies individually or stack them with parchment paper in a freezer-safe container. They’ll last up to 3 months. To thaw, leave them at room temp for about 15 minutes or microwave gently until just warm. The glaze should be added after thawing to keep it nice and glossy. To refresh the flavor, I sometimes sprinkle a little fresh lemon zest in the glaze just before drizzling.
Frequently Asked Questions
Final Thoughts
If you’re looking for a bright, cheerful treat that’s easy to make yet makes any occasion feel special, these lemon cookies are the way to go. They remind me of lazy Sunday afternoons, sunshine-filled kitchens, and family gatherings where everyone licks their fingers happily. Every time I bake them, I feel like I’m sharing a little piece of sunshine — and I hope they do the same for you. Once you’ve got the basic recipe down, feel free to get creative: add a sprinkle of poppy seeds, switch up the fillings, or even try a little twist with a coconut glaze. Baking is all about joy, and these cookies are pure joy in every bite. Happy baking! And please, come back and let me know how yours turned out. I love swapping tips and hearing your variations!
lemon cookies
Ingredients
Main Ingredients
- 0.5 cup granulated white sugar
- 0.5 tablespoon lemon zest
- 0.5 cup salted butter room temperature
- 1 large egg yolk
- 1.25 cups all-purpose flour
- 1 teaspoon cornstarch
- 1 tablespoon lemon juice
- 1 cup powdered sugar
- 0.75 teaspoon lemonade Kool-Aid powder
Instructions
Preparation Steps
- Beat together the white sugar and lemon zest in a large bowl until fragrant, about 1 minute.
- Add butter and beat until well creamed. Mix in egg yolk and beat until combined.
- Beat in the flour and cornstarch on high until a crumbly dough forms. Pour in lemon juice and beat on low until a firm dough forms.
- Using a 1 ½ tablespoon scoop, scoop out dough, split in half, and roll into balls.
- Place each cookie on baking sheet, about 1 inch apart, and flatten slightly.
- Chill in refrigerator for 30-60 minutes until firm.
- Preheat oven to 350°F and prepare baking sheets.
- Bake cookies for 9-12 minutes until edges are golden.
- Whisk powdered sugar and lemonade powder together.
- Cool cookies for 1-2 minutes, then dip in sugar mixture to coat.
- Return to cooling rack and let cool completely.
- Recoat in powdered sugar mixture if desired and serve.
Notes
Featured Comments
“Impressed! Clear steps and spot on results. Perfect for busy nights.”
“New favorite here — turned out amazing. crowd-pleaser was spot on.”
“Super easy and turned out amazing! My family asked for seconds. Saving this one.”
“This sweet treat was absolutely loved — the cozy really stands out. Thanks!”
“Made it tonight and wow — quick weeknight win! Will definitely make Zesty Lemon Cookies How to Make Them again.”
“Packed with flavor and so simple. Exactly what I wanted from Zesty Lemon Cookies How to Make Them.”


