

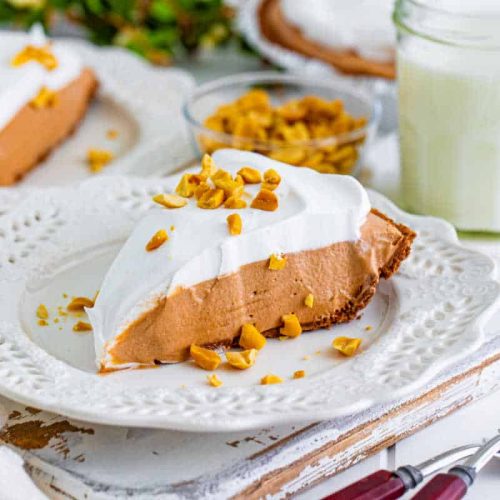
Oh, where do I even begin with this Chocolate Peanut Butter pie? It’s one of those recipes that feels like a warm hug on a chilly evening, or a much-needed sweet escape after a long day. I remember the first time I made it, years ago, and it was for a potluck where I was desperately trying to impress. Spoiler alert: I absolutely did! The sheer delight on people’s faces as they took their first bite… pure magic. It’s so rich, so decadent, and yet, somehow, it’s surprisingly straightforward. If you’re anything like me, a good chocolate peanut butter pie is pure bliss, and this one? It takes that bliss to a whole new level. It’s leagues beyond anything store-bought, and honestly, it’s my go-to when the craving hits and I don’t want to spend hours in the kitchen. It’s the perfect balance of sweet, salty, creamy, and chocolatey, all wrapped up in a dreamy package.
What is chocolate peanut butter pie?
So, what exactly is this glorious concoction we’re talking about? Think of it as the ultimate indulgence. It’s essentially a no-bake pie, meaning no fussy oven time required, which is a huge win in my book. The base is usually a crumb crust – something wonderfully buttery and satisfying. Then comes the star: a luxuriously smooth, intensely flavored chocolate and peanut butter filling. It’s like all your favorite childhood flavors got together and decided to throw the most amazing party in a pie crust. It’s not quite a cheesecake, not quite a mousse, but something in its own magical category. The name itself, “Chocolate Peanut Butter pie,” says it all, promising a delightful collision of two beloved flavors that just work, perfectly. It’s comforting, it’s classic, and it’s a guaranteed crowd-pleaser, every single time.
How to Make Chocolate Peanut Butter Pie
Alright, let’s get down to business! Making this pie is actually much easier than you might think. It comes together in a few simple stages, and the result is always spectacular. The best part? No oven required for the filling!
Quick Overview
We’ll start by whipping up a simple, buttery cookie crust. Then, we’ll create an impossibly smooth and rich chocolate peanut butter filling that just melts in your mouth. The chilling time is crucial for everything to set up perfectly, but trust me, it’s worth the wait! It’s a no-bake wonder that tastes like it came from a high-end bakery.
Ingredients
For the Crust:
Graham Cracker Crumbs: About 1 ½ cups. You can buy them pre-crushed or make your own by pulsing graham crackers in a food processor. I usually go for the whole wheat ones for a bit more depth of flavor, but any will do!
Granulated Sugar: ¼ cup. Just enough to add a hint of sweetness and help bind the crust.
Unsalted Butter: ½ cup, melted. This is the glue that holds it all together and gives it that delightful crispness.
For the Filling:
Cream Cheese: 8 ounces, softened. Make sure it’s truly soft, like room temperature. This is key for a smooth, lump-free filling. I’ve tried it with low-fat, and it just doesn’t have the same luscious texture, so full-fat is definitely the way to go here.
Peanut Butter: 1 cup. I prefer creamy, unsalted peanut butter for this. The unsalted helps me control the saltiness better. If you only have salted, just be mindful when you add any extra salt later. Natural peanut butter can sometimes separate, so give it a good stir before measuring.
Powdered Sugar: 1 cup, sifted. Sifting is important to avoid any grittiness in your filling. It also makes it super smooth.
Heavy Cream: ½ cup, cold. This is what gives the filling its incredible lightness and airy texture. Make sure it’s cold for best whipping results.
Unsweetened Cocoa Powder: ½ cup. Use a good quality one! It makes a difference. Dutch-process cocoa gives a deeper, richer flavor, but natural will work too.
Vanilla Extract: 1 teaspoon. A classic for a reason, it just enhances all the other flavors.
Pinch of Salt: If using unsalted peanut butter and unsalted butter, a tiny pinch of salt here really balances the sweetness.
For the Glaze (Optional but highly recommended!):
Semi-Sweet Chocolate Chips: 1 cup. Or dark chocolate if you prefer a more intense chocolate flavor.
Peanut Butter: 2 tablespoons. This makes the glaze smooth and adds another layer of peanut butter goodness.
Milk or Cream: 2-3 tablespoons. Just enough to get the right pouring consistency.
Step-by-Step Instructions
Step 1: Preheat & Prep Pan
First things first, grab a 9-inch pie plate. You don’t need to grease it or anything fancy, as the crust is going to be buttery enough. Set it aside. I usually preheat my oven to 350°F (175°C) even though we’re not baking the filling, because we’ll bake the crust for just a few minutes to set it up nicely. It gives it a lovely crisp texture that holds up way better.
Step 2: Mix Dry Ingredients
In a medium bowl, combine the graham cracker crumbs and granulated sugar. Give them a good stir with a whisk or a fork to make sure they’re evenly distributed. This is a simple step, but it ensures every bite of your crust has that perfect balance of sweetness and crunch.
Step 3: Mix Wet Ingredients
Pour the melted butter over the graham cracker and sugar mixture. Stir everything together until the crumbs are evenly moistened. It should resemble wet sand, and when you squeeze a bit in your hand, it should hold its shape. This is your sign that it’s ready.
Step 4: Combine
Press the crumb mixture firmly and evenly into the bottom and up the sides of your prepared pie plate. Use the bottom of a measuring cup or a flat-bottomed glass to get it really compact. This is super important for preventing a crumbly crust. Once pressed, pop the crust into your preheated oven for about 8-10 minutes, just until it’s lightly golden and smells amazing. Let it cool completely on a wire rack while you prepare the filling. This step is totally worth it, trust me!
Step 5: Prepare Filling
In a large bowl, beat the softened cream cheese with an electric mixer until it’s completely smooth and creamy. There should be no lumps! Then, add the peanut butter and beat again until well combined and smooth. Gradually beat in the sifted powdered sugar and cocoa powder, alternating with the heavy cream, until everything is smooth and luscious. Add the vanilla extract and pinch of salt (if using). Beat until just combined and everything looks like a dreamy, chocolate-peanut butter cloud. Be careful not to overmix at this stage; we want it rich and smooth, not airy like whipped cream.
Step 6: Layer & Swirl
Now for the fun part! Spoon the glorious filling into the cooled crust. Smooth the top with a spatula. If you want to get fancy, you can reserve a small amount of the filling, add a bit more cocoa powder or a drop of food coloring, swirl it around on top for a marbled effect. Or, you can just enjoy the classic smooth look. For me, it’s all about the taste, but a pretty pie never hurt anyone!
Step 7: Bake
Okay, slight correction here! This is a NO-BAKE PIE for the filling, so no baking needed for the filling itself. What we bake is the crust for a few minutes to set it. So, once your filling is in the crust, you’re going to cover it loosely with plastic wrap or foil. Place it in the refrigerator for at least 4-6 hours, or preferably overnight, to allow it to set up completely. The longer it chills, the firmer and more sliceable it will be. Patience is a virtue, especially with dessert!
Step 8: Cool & Glaze
Once the pie is completely chilled and firm, you can make the glaze. In a microwave-safe bowl, combine the chocolate chips, peanut butter, and milk or cream. Microwave in 30-second intervals, stirring well after each, until the mixture is smooth and pourable. Let the glaze cool slightly for a few minutes so it’s not piping hot, then drizzle or spread it evenly over the top of your chilled pie. If you didn’t chill it long enough, the glaze might melt into the filling, which is still tasty, but the distinct layers are lovely. Let the glaze set for another 15-30 minutes in the fridge.
Step 9: Slice & Serve
This is the moment we’ve all been waiting for! To get clean slices, run a sharp knife under hot water, wipe it dry, and then slice. Repeat for each slice. This helps the knife glide through the pie smoothly. Serve chilled. A little extra whipped cream or a few chopped peanuts on top never go amiss. Enjoy every single decadent bite!
What to Serve It With
This chocolate peanut butter pie is a star all on its own, but serving it with a few thoughtful additions can elevate the experience even further. Here are some of my favorite ways to enjoy it:
For Breakfast: Okay, hear me out! While it’s a dessert pie, a small slice on a weekend morning with a strong cup of coffee is pure indulgence. Think of it as a very special treat. I sometimes cut a very thin sliver and pair it with a rich, dark roast coffee. It’s my little secret pleasure when no one else is awake!
For Brunch: For a more elaborate brunch, this pie is a showstopper. Serve it with fresh berries – raspberries or strawberries add a lovely tartness that cuts through the richness. A side of fluffy scrambled eggs or some crispy bacon can balance out the sweetness. For drinks, mimosas or a nice sparkling cider work wonderfully.
As Dessert: This is its natural habitat, of course! For a truly decadent experience, serve a generous slice with a scoop of vanilla bean ice cream or a dollop of homemade whipped cream. A sprinkle of flaky sea salt on top enhances all the flavors. If you’re feeling adventurous, a drizzle of raspberry coulis or a caramel sauce can add another layer of complexity. It’s perfect after a hearty meal like roast chicken or a rich pasta dish.
For Cozy Snacks: On a rainy afternoon or a quiet evening, there’s nothing better than a slice of this pie. Pair it with a tall glass of cold milk, or for adults, a shot of espresso or a small glass of port wine. Sometimes, I just grab a fork and eat it straight from the pie plate while watching a movie. It’s pure comfort!
My family has a tradition of having this pie for my son’s birthday every year, right alongside his actual birthday cake. It’s that beloved. Another favorite is serving it slightly warmer than fridge-cold with a drizzle of extra peanut butter – sounds crazy, but it’s heavenly!
Top Tips for Perfecting Your Chocolate Peanut Butter Pie
Over the years, I’ve learned a few tricks that make this chocolate peanut butter pie consistently amazing. These little nuggets of wisdom are things I’ve picked up through trial and error, and they’ve made all the difference. I want you to have the best possible experience, so here are my top tips:
Crust Creation: Make sure your graham cracker crumbs are finely ground. If you have chunks, the crust can be uneven. Pressing the crust really firmly into the pie plate is non-negotiable for me. Use the flat bottom of a measuring cup or a glass to get it packed down nice and tight. Pre-baking the crust, even for just 8-10 minutes, makes a world of difference in preventing it from getting soggy, especially when you have a moist filling like this. Let it cool *completely* before adding the filling; a warm crust will lead to a melted filling.
Creamy Filling Secrets: Use full-fat cream cheese and make sure it’s truly softened to room temperature. Cold cream cheese will result in a lumpy filling, and no one wants that! I’ve found that using a good quality, creamy peanut butter (not too oily, not too stiff) yields the best texture. Sift your powdered sugar and cocoa powder. I know it sounds like an extra step, but it’s crucial for a silky-smooth filling. Don’t overmix once you’ve added the dry ingredients and heavy cream. Mix just until everything is combined and smooth. Overmixing can incorporate too much air, making the filling a bit too light and less dense and fudgy.
Swirl Perfection (If You Choose To): If you decide to swirl some extra chocolate or peanut butter on top, do it when the main filling is already in the crust and smoothed. Then, dollop the contrasting mixture on top and use a toothpick or the tip of a knife to create swirls. Don’t over-swirl, or the colors will just blend into one muddy mess. A few elegant swirls are all you need.
Ingredient Swaps & Additions: If you’re not a fan of graham crackers, a chocolate cookie crust (like Oreos, filling and all!) or even a shortbread crust works beautifully. For the peanut butter, you can experiment with crunchy peanut butter if you like a bit of texture, though creamy is my preference for ultimate smoothness. If you want to make this even more decadent, fold in some mini chocolate chips into the filling! And for the glaze, feel free to use milk chocolate, dark chocolate, or even white chocolate chips for a different flavor profile.
Chilling is Key: This pie needs time to set. Seriously, don’t rush it. The minimum is 4-6 hours, but overnight is truly ideal. It needs to be firm enough to slice cleanly. If you cut into it too soon, it will be messy, and while still delicious, it won’t have that satisfying pie-slice structure. If you live in a very warm climate, you might need to chill it a bit longer. The consistency should be firm to the touch and hold its shape when sliced.
Glaze Grace: Let the glaze cool slightly before pouring it over the chilled pie. If it’s too hot, it can melt the filling or cause the glaze to spread too thinly. If it’s too thick, it will be hard to spread. Aim for a pourable, but not runny, consistency. If it’s too thick, add another teaspoon of milk or cream; if too thin, add a few more chocolate chips and let them melt. The glaze should be a beautiful finishing touch, not a running mess.
Storing and Reheating Tips
Properly storing this wonderful chocolate peanut butter pie is key to enjoying it over a few days (if it lasts that long!). Here’s what I’ve found works best:
Room Temperature: Honestly, I rarely store this pie at room temperature for more than a few hours. Because of the cream cheese and heavy cream in the filling, it’s best to keep it chilled to maintain its texture and prevent spoilage. If it’s very cool in your kitchen and the pie has set up firm, you might get away with a couple of hours, but I wouldn’t push it. Always cover it if left out, even for a short time, to protect it from dust or other contaminants.
Refrigerator Storage: This is where this pie truly thrives. Cover the pie tightly with plastic wrap or foil. Make sure the wrap is pressed down slightly onto the surface of the glaze or filling to prevent it from drying out. In the refrigerator, this pie will stay delicious for about 3-4 days. The crust might soften slightly over time, but the flavor remains incredible. I’ve found that storing it in an airtight container is even better if you have one large enough.
Freezer Instructions: Yes, you can freeze this pie! It’s a great way to have dessert on hand for future cravings. For best results, freeze the pie *before* adding the glaze, or make sure the glaze is completely set. Wrap the pie tightly in a layer of plastic wrap, then a layer of aluminum foil. You can also place the wrapped pie in a freezer-safe container or bag. It should keep well in the freezer for up to 2-3 months. When you’re ready to thaw, transfer the pie from the freezer to the refrigerator and let it thaw overnight. This allows it to set up again properly. If you freeze it with the glaze, the glaze might get a bit frosty, but it should still taste great.
Glaze Timing Advice: If you plan to freeze the pie, I highly recommend freezing it *without* the glaze. Once thawed in the refrigerator, you can then make a fresh batch of glaze and apply it. This ensures the glaze looks its best. If you’re storing it in the fridge for a few days, applying the glaze before storing is perfectly fine, as mentioned above. The glaze helps seal in the filling a bit too.
Frequently Asked Questions
Final Thoughts
So there you have it – my absolute favorite chocolate peanut butter pie recipe. It’s the kind of dessert that makes you feel good, both while making it and while eating it. It’s a testament to how simple, quality ingredients can come together to create something truly magical. The blend of rich chocolate and creamy peanut butter, all nestled in a buttery crust, is simply divine. It’s more than just a recipe; it’s a little slice of happiness that I’m so thrilled to share with you all.
If you love this pie, I think you might also enjoy my recipe for [Link to another popular chocolate or peanut butter dessert post]. It’s another one that disappears in my house remarkably fast!
I truly hope you give this chocolate peanut butter pie a try. I can’t wait to hear what you think and how it turns out in your kitchen! Don’t be shy about leaving a comment below with your thoughts, your own tips, or any variations you tried. Happy baking, and more importantly, happy eating!
Chocolate Peanut Butter Pie
Ingredients
Main Ingredients
- 1 box instant chocolate pudding mix (5.9oz box)
- 3 cups whole milk
- 1 package cream cheese (8oz/250g package, softened)
- 1 cup creamy peanut butter
- 0.75 cup powdered sugar
- 16 oz frozen whipped topping (thawed, divided)
- 2 chocolate pie crusts 6oz crusts
Instructions
Preparation Steps
- In a medium mixing bowl, whisk together the pudding mix and milk for 2 minutes. Chill in the fridge for 5 minutes to set.
- In a large mixing bowl, cream together with an electric mixer the cream cheese, peanut butter and powdered sugar until smooth. It will be very thick.
- Add spoonfuls of the pudding to the mixture. Make sure it's fully incorporated before adding more.
- Add in all of the pudding and then fold in half of the whipped topping until there are no streaks left.
- Divide the filling in half and add half to each of the pie crusts.
- Cover and place in the refrigerator for at least 6 hours or overnight.
- Top with the remaining whipped topping. Slice and serve chilled.
Notes
Featured Comments
“This sounds amazing! I can already imagine how rich and creamy it must be—definitely adding this to my dessert list.”
“Impressed! Clear steps and so flavorful results. Perfect for busy nights.”
“New favorite here — creamy. crowd-pleaser was spot on.”
“Super easy and turned out amazing! My family asked for seconds. Saving this one.”
“This sweet treat was absolutely loved — the fresh really stands out. Thanks!”
“Made it tonight and wow — creamy! Will definitely make Easy Chocolate Peanut Butter Pie Perfection again.”


This sounds amazing! I can already imagine how rich and creamy it must be—definitely adding this to my dessert list.