

Homemade Cracker Barrel Fried Apples
Let’s talk about road trips. If your family is anything like mine, a long drive just isn’t complete without a mandatory pit stop at Cracker Barrel. We go for the peg game, the quirky gift shop, and most importantly, the incredible comfort food. My kids, Ellie and Milo, absolutely adore their fried apples. In fact, they beg for them so often that we don’t even need to be on the highway for the cravings to hit.
After making one too many random Tuesday night runs to our local restaurant just to buy a side dish, I decided it was time to crack the code and make my own Cracker Barrel fried apples at home. Let me tell you, this copycat recipe is a total game-changer. My little food critics actually claim these are better than the original! They are warm, perfectly spiced, and melt-in-your-mouth tender. Grab your favorite skillet, and let me show you how to bring a little Southern comfort right into your own kitchen.
What Is Cracker Barrel Fried Apples?
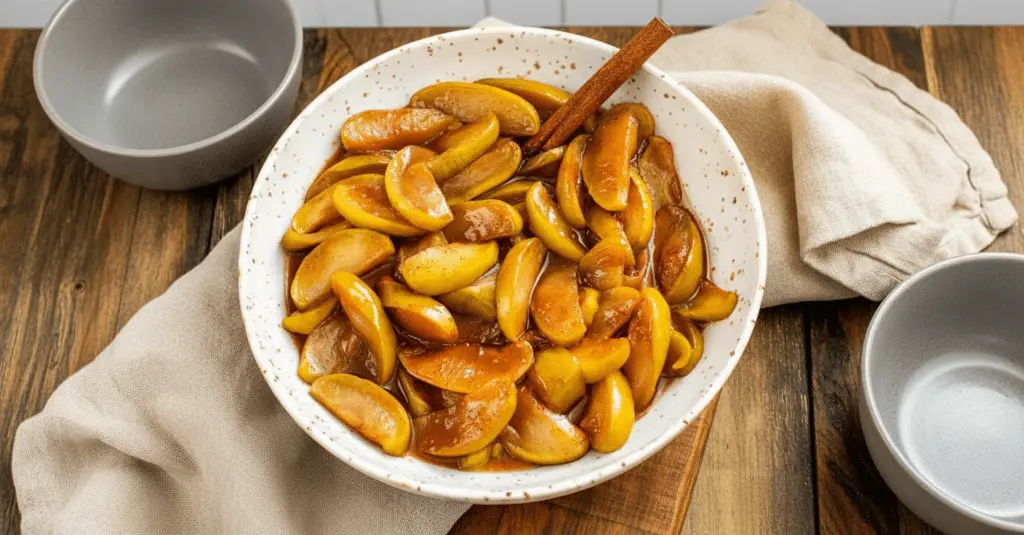
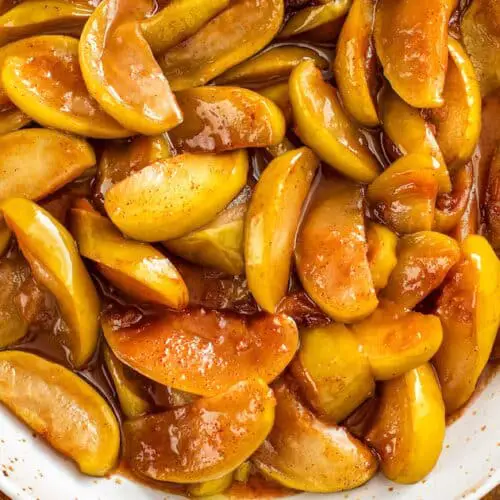
If you have never had the pleasure of sitting down to a steaming bowl of these beauties, you might be wondering what exactly they are. Cracker Barrel fried apples are a beloved, old-school Southern side dish that beautifully blurs the line between dinner and dessert. Despite the name, they aren’t deep-fried in a heavy batter. Instead, thick slices of tart apples are slowly pan-fried and simmered in a rich, buttery syrup made from brown sugar, white sugar, and warm spices.
As the apples cook down in the skillet, they release their natural juices. Those juices mingle with the melted butter and sugar to create a thick, gooey glaze that perfectly coats every single slice. The result is a tender, sweet, and slightly tangy apple dish that tastes exactly like the inside of a freshly baked apple pie, but without all the hassle of rolling out a crust. They are a true staple of Southern comfort food.
How to Make Cracker Barrel Fried Apples
Quick Overview
Making these apples is a total breeze, and you don’t need any fancy culinary skills to get them right. The process really just comes down to creating a rich, spiced buttery syrup in your skillet, tossing in your prepared apples, and letting them simmer away until they reach that perfect, fork-tender consistency. We start by melting our butter and whisking in the sugars and cinnamon. Then, the apples get folded in and covered to cook slowly so they soften up. The real magic happens at the very end when we take the lid off and let that sweet sauce bubble and thicken up into a gorgeous, sticky glaze. It is really that simple!
Ingredients
- Apples: I highly recommend using Granny Smith apples. Because they are crisp and tart, they hold their shape beautifully and balance out the sweetness of the sugar.
- Butter: Unsalted butter is best so we can control the sodium. If you only have salted butter, just cut the extra salt in the recipe down to a quarter teaspoon.
- Sugar: We are using a 50/50 mix of regular granulated white sugar and packed brown sugar for that perfect deep, molasses-like flavor.
- Cinnamon: Ground cinnamon is the classic choice, but you can totally swap it for apple pie spice if you want a little nutmeg and ginger in the mix.
- Salt: Just a half teaspoon to balance the sweetness.
- Lemon Juice (Optional): A quick squeeze at the end brightens up the flavors and adds a nice little zing, especially if your apples are on the sweeter side.
Step-by-Step Instructions
Step 1: Prep Your Apples
Start by washing your apples. You can peel them if you aren’t a fan of the skin, or leave the skin on for a bit more texture and color. Core the apples and cut them into even slices. Try to keep the slices around the same thickness so they all cook at the same rate.
Step 2: Make the Spiced Syrup
Place a large cast-iron skillet (or any heavy-bottomed skillet you have) over medium heat. Drop in your butter and let it melt completely. Once melted, stir in the granulated sugar, brown sugar, cinnamon, and salt. Keep stirring until it forms a dark, bubbling mixture.
Step 3: Simmer the Apples
Gently fold your sliced apples into the skillet, making sure they get nicely coated in the butter and sugar mixture. Turn the heat down to low, pop a lid on the skillet, and let them cook for about 20 minutes. You’ll want to give them a stir every few minutes so they cook evenly and don’t stick to the bottom.
Step 4: Thicken the Glaze
Once the apples are fork-tender, take the lid off the skillet and bump the heat up to medium-high. Let the apples cook for another 5 to 10 minutes, stirring often. This allows the excess liquid to evaporate and the sauce to thicken up into a beautiful syrup. Give them a taste, add a little squeeze of lemon juice if you want the flavors to pop, and serve warm!
What to Serve It With
These fried apples are incredibly versatile. If you want to keep things classic for dinner, spoon them over crispy fried pork chops—the sweet and savory combination is totally out of this world. They also pair beautifully with a hearty Southern chicken fried chicken or a big plate of chicken and dumplings.
Don’t sleep on serving these for breakfast, either! They are absolutely heavenly piled high on top of fluffy pancakes, waffles, or a warm slice of overnight French toast. And of course, if you’re serving them for the holidays, they are the perfect sidekick to a slow cooker glazed ham and a scoop of garlic mashed potatoes.
Top Tips for Perfecting Your Cracker Barrel Fried Apples
Slice evenly: I can’t stress this enough—make sure to cut your apple slices to roughly the same thickness. If you have thick and thin slices in the same pan, the thin ones will turn to complete mush before the thick ones are even cooked through.
Don’t rush the process: From start to finish, this recipe takes about 30 to 35 minutes. Don’t try to crank the heat up to make them cook faster! You want the apples to cook low and slow so they become perfectly tender without burning the sugar.
Double up for a crowd: These always disappear much faster than you think they will. If you are feeding more than four people, or bringing this to a potluck, do yourself a favor and make a double batch.
Keep them warm: If you’re hosting a party, you can easily transfer the finished apples to a slow cooker set to the “warm” setting. Just give them a good stir every now and then so the sauce doesn’t settle at the bottom.
Storing and Reheating Tips
If you happen to have any leftovers, let the cooked apples cool down completely to room temperature. Transfer them to an airtight container and pop them in the fridge. They will stay fresh and delicious for up to 5 days.
When you’re ready to reheat, you have a couple of options. For a quick fix, just microwave your portion for about a minute, stirring halfway through until they are warmed all the way through. If you’re reheating a larger batch, put them back into a skillet or saucepan on the stove over medium-low heat, cover them, and let them warm up gently.
You can even freeze these! Once cooled, spoon the apples and all that yummy syrup into a freezer-safe bag or container. They will freeze beautifully for up to three months. Just let them thaw overnight in the fridge before you reheat them.
Frequently Asked Questions
Final Thoughts
There you have it—the absolute best homemade Cracker Barrel fried apples you will ever make. Whether you decide to serve them alongside a savory pork dinner, spoon them over your Sunday morning pancakes, or just eat them straight out of the bowl with a scoop of vanilla ice cream, I know you are going to fall in love with this recipe. It’s warm, comforting, and guaranteed to bring a little bit of Southern charm right to your dinner table. I can’t wait for you to try it, so grab some apples and get cooking!
Cracker Barrel Fried Apples
Ingredients
Main Ingredients
- 4 large green granny smith apples cored and sliced (peeled or unpeeled)
- 0.5 cup butter
- 0.25 cup granulated sugar
- 0.25 cup packed brown sugar
- 1 tablespoon cinnamon or apple pie spice
- 0.5 teaspoon salt
- lemon juice optional
Instructions
Preparation Steps
- Melt butter in a cast iron skillet (or large heavy bottomed skillet) over medium heat.
- Add granulated sugar, brown sugar, cinnamon and salt. Stir to combine and fold in apple slices.
- Cover and cook over low heat for 20 minutes or until apples are tender, stirring frequently.
- Remove cover and raise heat to medium-high. Cook, stirring often, for 5 to 10 minutes more until the sauce thickens slightly.
- Taste apples, and if they taste a little bland, add a little lemon juice (starting with about 1 to 2 teaspoons) and stir to combine. A little acid can help make the flavors pop! Serve warm, as desired.
Featured Comments
“I totally get it—some smells hit you like a time machine! That cinnamon apple scent sounds so cozy and comforting.”
“Impressed! Clear steps and absolutely loved results. Perfect for busy nights.”
“New favorite here — quick weeknight win. crowd-pleaser was spot on.”
“Super easy and turned out amazing! My family asked for seconds. Saving this one.”
“This sweet treat was absolutely loved — the buttery really stands out. Thanks!”
“Made it tonight and wow — absolutely loved! Will definitely make fried apples again.”


I totally get it—some smells hit you like a time machine! That cinnamon apple scent sounds so cozy and comforting.