

You know those days? The ones where you just need a little something sweet, something comforting, something that feels like a warm hug from the inside out? For me, that something is always, always my marshmallow peanut butter cookies. Seriously, I’ve tried countless cookie recipes over the years – fancy brownies, intricate biscotti, even that popular Chocolate Chip Cookie that everyone raves about. But these? These marshmallow peanut butter cookies are in a league of their own. They’re not just cookies; they’re pure joy. They’re soft, chewy, and that combination of salty peanut butter with gooey marshmallow… oh my goodness. It’s like a little party happening in your mouth! I first started making these years ago when my little ones were obsessed with anything peanut butter, and the marshmallow addition was a stroke of accidental genius. Now, they’re a staple, a request that pops up constantly, especially when there’s a birthday, a bake sale, or just a Tuesday that needs a little extra sparkle. If you’re looking for a cookie that’s both incredibly delicious and surprisingly simple to whip up, you’ve found your new best friend.
What is Marshmallow Peanut Butter Cookies?
So, what exactly *are* these magical little treats I keep going on about? Think of them as the ultimate mashup of two childhood favorites, elevated to cookie perfection. They’re essentially a super soft, slightly chewy peanut butter cookie base, but here’s the secret: we’re folding in mini marshmallows that melt into these delightful little pockets of gooey sweetness as they bake. It’s not a full-on marshmallow fluff filling, but rather those delightful little bursts scattered throughout. The peanut butter flavor is definitely the star, rich and nutty, but the marshmallow softens its edges and adds this incredible, almost cloud-like texture. It’s like taking your favorite classic peanut butter cookie and giving it a whimsical, delightful twist. They’re approachable, familiar, yet excitingly new with every bite. It’s the kind of cookie that makes people close their eyes for a second after the first taste, you know? That’s the magic of marshmallow Peanut Butter Cookies.
How do I make Marshmallow Peanut Butter Cookies?
Quick Overview
This recipe is all about getting delicious, soft, gooey marshmallow Peanut Butter Cookies into your hands with minimal fuss. We’ll cream together the basics, add the wet ingredients, gently fold in the dry, and then stir in those delightful mini marshmallows. The dough comes together quickly, and then it’s just a matter of scooping and baking until golden. The whole process, from mixing to oven, takes less than 30 minutes, making these a perfect solution for unexpected cravings or last-minute sweet treats. You’ll be amazed at how simple it is to achieve such incredible results!
Ingredients
For the Main Batter:
* 1 cup (2 sticks) unsalted butter, softened: Make sure it’s truly softened, not melted! This is key for a good creamy texture without overmixing. If I forget to pull it out in time, I sometimes cut it into smaller cubes and let it sit on the counter for about 20-30 minutes.
* 3/4 cup Creamy Peanut Butter: I prefer creamy for a smoother dough, but crunchy works too if you love extra texture! Natural peanut butter can sometimes make the cookies a bit more oily, so a conventional creamy one usually gives the most consistent results for this recipe.
* 1 cup granulated sugar: This provides sweetness and helps with the cookie’s structure.
* 1 cup packed light brown sugar: The brown sugar is crucial for that lovely soft and chewy texture and adds a subtle caramel note. Don’t skip packing it in!
* 2 large eggs: Room temperature eggs incorporate better into the batter. I usually just pop mine in a bowl of warm water for about 5 minutes if I forget to take them out of the fridge.
* 1 teaspoon vanilla extract: Pure vanilla extract really makes a difference here, enhancing all those lovely flavors.
* 2 1/2 cups all-purpose flour: Spooned and leveled, not scooped directly from the bag, to ensure you don’t end up with dry cookies.
* 1 teaspoon baking soda: This is our leavening agent, giving the cookies a nice lift and chewiness.
* 1/2 teaspoon salt: Balances the sweetness and brings out the peanut butter flavor. If your peanut butter is unsalted, you might want to add a touch more.
For the Marshmallow Magic:
* 1 1/2 cups mini marshmallows: These are perfect because they distribute evenly and melt beautifully without becoming a completely overwhelming goo. You can find them in any grocery store’s baking aisle. Sometimes I’ll even mix in a few regular-sized ones, cut in half, for bigger pockets of marshmallow goodness.
Step-by-Step Instructions
Step 1: Preheat & Prep Pan
First things first, let’s get our oven ready. Preheat it to 375°F (190°C). While the oven is warming up, I like to line my baking sheets with parchment paper. This is a game-changer, trust me. It prevents sticking, makes for super easy cleanup, and helps the cookies bake more evenly without those dreaded burnt bottoms. If you don’t have parchment paper, a light greasing of your baking sheets will do, but parchment is definitely my preferred method.
Step 2: Mix Dry Ingredients
In a medium bowl, whisk together the all-purpose flour, baking soda, and salt. Whisking them thoroughly ensures that the baking soda and salt are evenly distributed throughout the flour, which means your cookies will rise uniformly and have balanced flavor. Give it a good whisk until everything is well combined. Set this aside for now.
Step 3: Mix Wet Ingredients
Now, for the heart of the cookie dough! In a large bowl (or the bowl of your stand mixer if you’re using one), cream together the softened butter and creamy peanut butter. Beat them until they are light and fluffy. This usually takes a couple of minutes. Then, gradually add the granulated sugar and packed light brown sugar. Continue beating until the mixture is light in color and fluffy – this incorporates air, which is vital for a tender cookie. Next, beat in the large eggs, one at a time, making sure each is fully incorporated before adding the next. Finally, stir in the vanilla extract. You want a smooth, well-combined base here.
Step 4: Combine
This is where we bring it all together. Gradually add the dry ingredients (from Step 2) to the wet ingredients (from Step 3). Mix on low speed or stir with a sturdy spoon until *just* combined. It’s really important not to overmix here! Overmixing can develop the gluten in the flour too much, leading to tougher cookies. You’re looking for a dough that’s mostly combined, with maybe a few streaks of flour still visible – they’ll disappear when you add the marshmallows. If it seems too dry, don’t panic; the marshmallows will add a little moisture.
Step 5: Prepare Filling
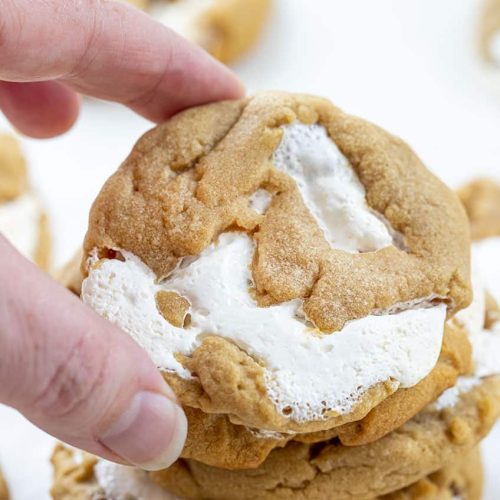
Now for the fun part: the marshmallows! Gently fold in the mini marshmallows into the cookie dough. Use a spatula or a wooden spoon and try to distribute them evenly throughout the dough without crushing them too much. You want those lovely little pockets of gooiness. If you find the dough is a bit sticky, don’t worry, that’s normal with the marshmallows in there. This is the point where I often give myself a little mental pat on the back, knowing how amazing these marshmallow peanut butter cookies are about to be.
Step 6: Layer & Swirl
This step is more about shaping than layering. Drop rounded tablespoons of dough onto your prepared baking sheets, leaving about 2 inches between each cookie. I like to use a cookie scoop for uniform size, but two spoons work just as well. If you want them to be a little flatter and spread more, you can gently press down on the tops with the palm of your hand or the bottom of a glass. This helps ensure the marshmallows melt into those perfect, gooey pockets.
Step 7: Bake
Bake for 9 to 11 minutes, or until the edges are lightly golden brown and the centers still look slightly soft. They’ll continue to cook a bit on the baking sheet after you take them out. For marshmallow peanut butter cookies, I always err on the side of slightly underbaking them. This ensures that wonderful chewy texture and that the marshmallows are perfectly melted and gooey, not dried out. Ovens can vary, so keep an eye on them during the last few minutes of baking.
Step 8: Cool & Glaze
Let the cookies cool on the baking sheets for about 5 minutes. This is crucial for them to set up properly. While they’re still warm, you can optionally drizzle them with a simple glaze (see below for ideas!). If you’re glazing, let them cool a bit more before drizzling so the glaze doesn’t melt away completely. Once they’ve cooled enough on the baking sheets, carefully transfer them to a wire rack to cool completely. This is the hardest part – waiting for them to cool!
Step 9: Slice & Serve
Once cooled, these marshmallow peanut butter cookies are ready to be devoured! They are fantastic served slightly warm, especially if you’ve added a glaze. If serving them plain, they are perfect at room temperature. Arrange them on a platter, pour yourself a glass of milk (it’s practically mandatory with these!), and enjoy the pure bliss. They slice beautifully and make for a truly delightful treat any time of day.
What to Serve It With
These marshmallow peanut butter cookies are pretty self-sufficient, but they also play well with others! For breakfast, they’re a delightful, indulgent treat paired with a strong cup of coffee. I love having one (okay, maybe two!) with my morning brew on a lazy weekend. For brunch, they make a fantastic addition to a dessert table. Imagine them alongside fresh berries or a light fruit salad – the sweetness of the cookies is a lovely contrast. As a dessert, they’re incredible served slightly warm, perhaps with a small scoop of vanilla bean ice cream or a dollop of whipped cream. The warm cookie and cold ice cream is pure heaven. For those cozy snack moments, they are simply divine with a tall, cold glass of milk. It’s a classic pairing for a reason! My kids always beg for them with milk after school. Honestly, any time you need a little pick-me-up, these cookies deliver. They’re so versatile, you can really customize the serving to fit the moment.
Top Tips for Perfecting Your Marshmallow Peanut Butter Cookies
I’ve made these marshmallow peanut butter cookies more times than I can count, and I’ve learned a few things along the way that I want to share to help you achieve cookie perfection. First, Zucchini Prep – wait, zucchini? Oh dear, I think I got mixed up with another recipe! For these cookies, it’s all about the peanut butter and marshmallows. So, let’s focus on the Peanut Butter Choice. While any creamy peanut butter works, I’ve found that the standard commercial brands often yield the most consistent texture and flavor. Natural peanut butters can sometimes separate or make the cookies a bit too greasy, so if you use them, give them a really good stir and be prepared for a slightly different outcome. For Mixing Advice, the golden rule is: do not overmix the dough once the flour is added. Mix just until the dry ingredients are incorporated. Overmixing develops gluten, which leads to tough cookies, and we want these to be soft and chewy. You should see a few streaks of flour left; they’ll disappear when you fold in the marshmallows. When it comes to Marshmallow Distribution, gently fold them in. You want them to melt into little pockets of gooeyness, not disappear into a uniform, sticky mess. If the dough feels a bit sticky from the marshmallows, that’s perfectly fine – it just means they’re ready to melt! For Baking Tips, pay close attention to the doneness cues. The edges should be set and lightly golden, but the center should still look a little soft and underdone when you pull them from the oven. They will continue to bake on the hot baking sheet, so this residual heat is part of the baking process. Trust me on this, slightly underbaked is key to chewiness! Finally, for Glaze Variations, if you decide to add a glaze (and I highly recommend it for an extra touch of deliciousness!), keep it simple. A basic mixture of powdered sugar and a tiny bit of milk or water is perfect. You can add a drop of vanilla or even a tiny pinch of salt to enhance the flavors. Some people like a peanut butter drizzle instead, which is also divine!
Storing and Reheating Tips
Once your marshmallow peanut butter cookies are baked to perfection, you’ll want to store them properly to maintain that delicious texture. At Room Temperature, these cookies stay wonderfully soft for about 3-4 days. The key is to store them in an airtight container. If you’ve glazed them, make sure the glaze is completely set before sealing the container. If they seem a little dry after a day or two, you can sometimes revive them by placing a slice of fresh bread in the container with the cookies for a few hours – the cookies will absorb some of that moisture. For Refrigerator Storage, these cookies are best enjoyed at room temperature, but if you need to keep them longer, an airtight container in the fridge will extend their life for up to a week. Be aware that refrigeration can sometimes firm them up a bit, so you might want to let them sit out for 15-20 minutes before enjoying. If you want to freeze these delights, I highly recommend doing so *before* glazing. Wrap the cooled cookies tightly in plastic wrap, then place them in a freezer-safe bag or container. They’ll keep well in the freezer for up to 2-3 months. To reheat, simply let them thaw at room temperature. If you want that fresh-baked gooeyness back, you can pop them in a low oven (around 300°F/150°C) for just a few minutes until warmed through. For Glaze Timing Advice, if you’re planning to store cookies for more than a day or two, it’s often best to add the glaze just before serving or on the day you plan to eat them. This prevents the glaze from becoming sticky or cracking in storage.
Frequently Asked Questions
Final Thoughts
Honestly, if you’re looking for a cookie that’s more than just a sweet treat – one that’s a little hug in edible form, a guaranteed smile-maker, and surprisingly simple to pull off – then these marshmallow peanut butter cookies are it. They strike that perfect balance between comforting familiarity and delightful surprise. The way the peanut butter and marshmallow come together is just pure magic, and the texture is exactly what you want in a cookie: soft, chewy, and perfectly gooey. I hope you love making them as much as my family and I love eating them. If you give them a try, please let me know how they turn out in the comments below! I’d also love to hear about any fun variations you come up with. For those of you who loved these, you might also enjoy my [link to another peanut butter recipe] or my super soft [link to a chewy cookie recipe]. Happy baking, and enjoy every single bite!
marshmallow peanut butter cookies
Ingredients
Main Ingredients
- 0.5 cup creamy peanut butter
- 0.5 cup unsalted butter room temperature, 1 stick
- 1 cup light brown sugar packed
- 1 large egg room temperature
- 1 teaspoon vanilla extract
- 1.5 cups all-purpose flour 187.5 g
- 1 teaspoon cornstarch
- 0.5 teaspoon kosher salt
- 1 cup marshmallow fluff or marshmallow creme
Instructions
Preparation Steps
- Preheat the oven to 350°F and line two large baking sheets with parchment paper.
- In a large bowl, add peanut butter, butter, and brown sugar. Using a hand mixer, combine the mixture until smooth and creamy, about 2-3 minutes.
- Scrape down the sides of the bowl. Add egg and vanilla and mix until combined (about 30 seconds).
- Add in flour, cornstarch, and salt.
- With the mixer on low, incorporate the ingredients until just combined (30 seconds-1 minute).
- Using a 2-tablespoon cookie scoop, drop dough onto the lined baking sheets. Using your hand, flatten each dough ball into a flat disk shape about 3-inches across.
- Using two spoons, add about 1 tablespoon of marshmallow fluff to the center of each disk of dough. Alternatively, use a piping bag for easier application.
- Bring the dough up around the marshmallow fluff, completely covering the fluff and forming a ball. Place on the lined baking sheets.
- Bake the cookies for 10-12 minutes, or until the edges are brown. Watch carefully to avoid burning the marshmallow.
- Let the cookies rest on the baking sheet for 10-15 minutes before serving to allow them to set.
Notes
Featured Comments
“Impressed! Clear steps and perfect for busy nights results. Perfect for busy nights.”
“New favorite here — perfect for busy nights. crowd-pleaser was spot on.”
“Super easy and turned out amazing! My family asked for seconds. Saving this one.”
“This sweet treat was absolutely loved — the buttery really stands out. Thanks!”
“Made it tonight and wow — family favorite! Will definitely make Marshmallow Peanut Butter Cookie Dreams again.”
“Packed with flavor and so simple. Exactly what I wanted from Marshmallow Peanut Butter Cookie Dreams.”


