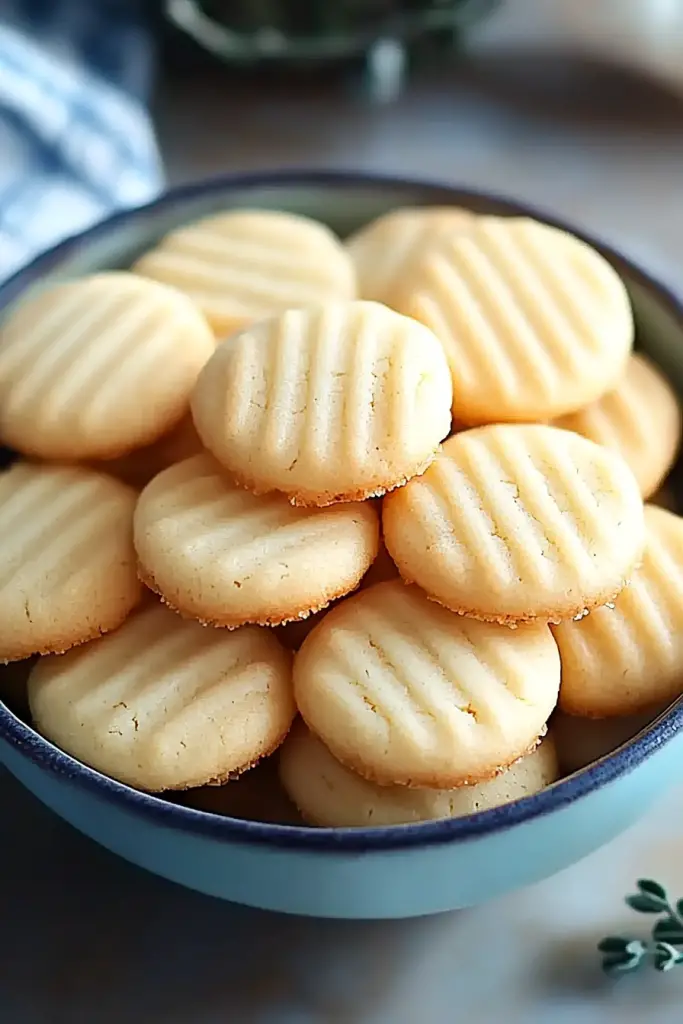
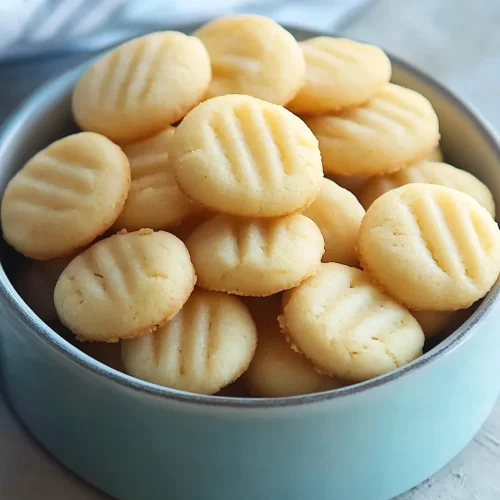
Oh, where do I even begin with these mini butter cookies? For me, they’re more than just a treat; they’re a warm hug from my childhood, a taste of lazy Sunday afternoons spent in Grandma’s kitchen, the air thick with the most incredible sweet, buttery scent. Every time I make them, it’s like I’m right back there, watching her, a little flour dusted on her apron. These aren’t those fussy, complicated cookies that take hours. No, these are the simple, honest-to-goodness kind that just melt in your mouth. If you’ve ever loved those classic shortbread cookies but wanted something a little more… well, *mini* and perhaps a touch more delicate, then you are going to fall head over heels for these. They’re seriously that good, and honestly, they’re surprisingly easy to whip up, even on a weeknight when you’re craving something sweet.
What are mini butter cookies?
So, what exactly are these little wonders? Think of them as the most delightful, bite-sized version of what a perfect butter cookie should be. They’re small, usually no bigger than a couple of bites, which is part of their charm. They’re incredibly tender, almost crumbly in the best possible way, and have that unmistakable, rich butter flavor that just sings. The name itself, “mini butter cookies,” says it all, really. It’s straightforward, honest, and tells you exactly what you’re getting: pure, unadulterated buttery goodness in a perfectly portioned size. They’re not overly sweet, which is something I really appreciate; it lets the quality of the butter and the subtle vanilla shine through. They’re the kind of cookie that makes you pause, close your eyes, and just savor the moment. It’s essentially a little piece of happiness you can hold in your hand.
How do I make mini butter cookies?
Quick Overview
The process for these delightful little cookies is wonderfully straightforward. It’s a classic creaming method where we beat butter and sugar until light and fluffy, then add in our wet ingredients before gently folding in the dry. The dough comes together beautifully, and then it’s just a matter of scooping small portions, rolling them into little balls, and baking them until they’re just golden around the edges. The key is not to overbake them, which keeps them wonderfully tender. You’ll be amazed at how quickly this comes together from start to finish.
Ingredients
For the Main Batter:
Here’s what you’ll need for the star of the show: the cookie dough itself. Quality ingredients really make a difference here, especially with the butter. I always opt for unsalted butter because it gives me more control over the saltiness of the final cookie. Make sure your butter is softened to room temperature – this is super important for getting that lovely, light texture when you cream it. If it’s too cold, it won’t incorporate well, and if it’s too melted, your cookies might spread too much.
- 2 cups all-purpose flour, plus more for dusting
- 1 teaspoon baking powder
- 1/4 teaspoon salt
- 1 cup (2 sticks) unsalted butter, softened
- 3/4 cup granulated sugar
- 1 large egg, room temperature
- 1 teaspoon pure Vanilla Extract
For the Filling:
While these cookies are absolutely divine on their own, sometimes a little something extra makes them even more special. This filling is optional, of course, but it adds a lovely little surprise. I’ve found that a simple jam or a bit of chocolate ganache works beautifully. For jam, I love a good raspberry or apricot preserves – something with a bit of tartness to balance the sweetness of the cookie. If you’re going the chocolate route, a small dollop of dark chocolate ganache or even just some mini chocolate chips folded into the dough before shaping works wonders.
- 1/4 cup your favorite jam (raspberry, apricot, or strawberry work well) OR 1/4 cup chocolate chips
For the Glaze:
This is purely for decoration and an extra touch of sweetness. A simple powdered sugar glaze is perfect. You can thin it out or thicken it to your liking. I often add a tiny bit of milk or lemon juice to mine for a little tang. If you prefer something richer, a thin chocolate ganache drizzle would also be lovely.
- 1 cup powdered sugar
- 2-3 tablespoons milk or water
- 1/2 teaspoon pure vanilla extract (optional)
Step-by-Step Instructions
Step 1: Preheat & Prep Pan
First things first, let’s get our oven ready. Preheat your oven to 350°F (175°C). This is a pretty standard temperature for most cookies, and it’s perfect for these. While the oven heats up, line your baking sheets with parchment paper. Trust me on this one – parchment paper is your best friend for cookies. It prevents sticking, makes for easy cleanup, and helps the cookies bake more evenly without getting too brown on the bottom. Make sure you have enough baking sheets ready, as you’ll likely bake them in batches.
Step 2: Mix Dry Ingredients
In a medium bowl, whisk together the all-purpose flour, baking powder, and salt. You want to make sure these are well combined. This step might seem small, but it’s important for distributing the leavening agent (baking powder) and salt evenly throughout the flour, which ensures your cookies rise properly and have a balanced flavor. I usually give it a good whisk for about 30 seconds to get everything nicely aerated.
Step 3: Mix Wet Ingredients
Now for the creaming part! In a large bowl, using an electric mixer (a stand mixer with the paddle attachment or a hand mixer), cream together the softened unsalted butter and granulated sugar. Beat them on medium speed until the mixture is light, fluffy, and pale yellow. This usually takes about 3-5 minutes. This creaming process is crucial because it incorporates air into the dough, which contributes to the cookie’s tender texture. Next, beat in the egg and vanilla extract until everything is just combined and smooth. Make sure the egg is at room temperature; it helps it emulsify better with the butter and sugar mixture.
Step 4: Combine
Gradually add the dry ingredients to the wet ingredients, mixing on low speed until just combined. Be careful not to overmix here! Overmixing can develop the gluten in the flour too much, leading to tough cookies. You want to mix until you no longer see streaks of dry flour. Sometimes I finish mixing by hand with a spatula to ensure I don’t overwork it, scraping down the sides of the bowl as needed. The dough should be soft but hold its shape.
Step 5: Prepare Filling
If you’re using a filling, now’s the time to get it ready. If you’re using jam, give it a quick stir to loosen it up. If you’re using chocolate chips, have them measured out. If you’re using chocolate ganache, make sure it’s cooled slightly and is of a thick but spoonable consistency. You only need a tiny amount for each cookie, so don’t make too much!
Step 6: Layer & Swirl
This is where the fun starts! Take about a tablespoon of dough and roll it into a small ball, about 1 inch in diameter. Place it on your prepared baking sheet, leaving about 2 inches between cookies. If you’re adding a filling, gently press a small spoonful of jam or a few chocolate chips into the center of the dough ball. Then, take another tablespoon of dough, flatten it, and place it on top of the first ball, enclosing the filling. Gently press the two halves together and re-roll into a smooth ball. Some people like to flatten them slightly with the bottom of a glass, but I usually leave them as little balls for a rustic look. If you’re using chocolate chips and not a jam filling, you can just gently press them into the dough balls before you bake.
Step 7: Bake
Bake the cookies for 10-12 minutes, or until the edges are lightly golden brown and the centers look set. They won’t spread a whole lot, but they should look slightly puffed. Keep an eye on them, as mini cookies can go from perfectly baked to overdone very quickly! The exact baking time will depend on your oven and the size of your cookies, so watch for those visual cues.
Step 8: Cool & Glaze
Let the cookies cool on the baking sheet for about 5 minutes before carefully transferring them to a wire rack to cool completely. This is important because they are quite delicate when they’re hot out of the oven. Once they are completely cool, you can add the glaze. Whisk together the powdered sugar, milk (or water), and vanilla extract until smooth. If it’s too thick, add a little more liquid, a teaspoon at a time. If it’s too thin, add a little more powdered sugar. Drizzle the glaze over the cooled cookies using a spoon or a piping bag with a fine tip. Let the glaze set completely before storing.
Step 9: Slice & Serve
Once the glaze has set, these little beauties are ready to be devoured! They are perfect served as is, or alongside a cup of tea or coffee. Because they’re small, they’re easy to grab and enjoy without feeling like you’re indulging too much. They also look so pretty arranged on a platter, making them a lovely addition to any gathering.
What to Serve It With
These mini butter cookies are so versatile, they fit into almost any occasion. They’re like the little black dress of the cookie world – always appropriate and always appreciated!
For Breakfast: Honestly, I sometimes sneak one (or two!) with my morning coffee. They aren’t overly sweet, so they don’t feel like a dessert-for-breakfast situation. They’re great alongside a mug of strong black coffee or a creamy latte. You can even arrange them on a small plate next to a Fruit Salad for a little touch of sweetness to start your day.
For Brunch: These are absolutely perfect for a brunch spread. Imagine a beautiful tiered stand filled with mini butter cookies, alongside scones, mini quiches, and fresh fruit. They add a delicate, sweet counterpoint to savory dishes. I like to serve them with a variety of teas, or even a light mimosa. Their small size makes them easy for guests to nibble on while they mingle.
As Dessert: While they can certainly stand alone, these mini butter cookies are also fantastic as part of a larger dessert platter. Think of them alongside slices of cake, mini cheesecakes, or even just a bowl of fresh berries. They provide a lovely textural contrast and a simple, classic flavor that complements richer desserts beautifully. A drizzle of chocolate sauce or a dusting of powdered sugar can elevate them even further for a more formal dessert setting.
For Cozy Snacks: This is where they truly shine in my book. After dinner, when you’re curled up on the couch with a good book or watching a movie, a few of these with a glass of milk or a warm cup of herbal tea are pure bliss. They’re the perfect comforting treat without being too heavy. My kids often ask for these when they’re doing homework or just need a little pick-me-up, and I’m always happy to oblige because they’re so easy to make!
Top Tips for Perfecting Your Mini Butter Cookies
I’ve made these mini butter cookies more times than I can count, and over the years, I’ve picked up a few tricks that I think make a real difference. These aren’t hard-and-fast rules, but rather little things that have helped me achieve that perfect tender, buttery bite every single time.
Zucchini Prep: Oops, I meant Cookie Dough prep! My brain goes straight to baking. For these cookies, the key is really in the butter and sugar creaming. Make sure your butter is truly softened – it should yield to gentle pressure but not be greasy or melted. Creaming it with the sugar for a good 3-5 minutes is non-negotiable if you want that light, airy texture. Don’t rush this step; it’s the foundation!
Mixing Advice: The biggest mistake people make with cookies is overmixing once the flour is added. As soon as you don’t see any dry flour streaks, stop mixing. Seriously, stop! Overmixing develops the gluten, which will make your cookies tough and chewy instead of tender and crumbly. I often finish incorporating the flour by hand with a spatula, just to be sure I’m not going too far. It’s better to have a tiny bit of flour still showing and let it incorporate as you shape the cookies.
Swirl Customization: While I often just make simple rounds, you can get creative! If you’re using jam, try a nice thick dollop in the center. For chocolate chips, I like to press them in slightly so they don’t just fall out. You can also try gently pressing the top ball of dough into the bottom one, then giving it a gentle twist for a slightly more swirled look before re-rolling. The key is to ensure the filling is well-enclosed so it doesn’t ooze out during baking. A little sprinkle of coarse sugar on top before baking also adds a lovely sparkle and crunch.
Ingredient Swaps: While this recipe is pretty classic, I have tinkered a bit! I’ve tried using a good quality dairy-free butter alternative in a 1:1 ratio, and it worked quite well, though the flavor is slightly different. For the flour, if you need to make it gluten-free, a good quality 1:1 gluten-free baking blend usually does the trick. You might need to add a tiny bit more liquid if the dough seems too dry. I haven’t experimented much with sugar substitutes, but if you do, be aware that it might affect texture and browning.
Baking Tips: Always bake in the center of your oven. If you’re baking multiple batches, consider rotating your baking sheets halfway through baking for even browning. The visual cue of lightly golden edges is your best indicator for doneness. They will continue to bake a little on the hot baking sheet even after you take them out, so it’s better to underbake slightly than overbake. I’ve learned this the hard way, many times!
Glaze Variations: The simple powdered sugar glaze is lovely, but don’t be afraid to play! A splash of lemon juice instead of milk adds a nice tang. You can also add a tiny bit of food coloring for fun, especially for holidays. For a richer finish, a thin drizzle of melted dark chocolate or white chocolate looks stunning. Just ensure the cookies are completely cool before glazing, or the glaze will melt and become a sticky mess. If you want a really smooth glaze, sieve your powdered sugar first.
Storing and Reheating Tips
One of the best things about these mini butter cookies is how well they keep. This means you can make a batch ahead of time, which is always a win in my book!
Room Temperature: Once completely cooled and the glaze has set, you can store these cookies in an airtight container at room temperature for up to 4-5 days. I find that they are best within the first 2-3 days, as they stay wonderfully tender. Make sure the container is truly airtight to prevent them from going stale. If they are very humid where you live, you might want to add a small food-safe silica gel packet to the container to absorb any excess moisture.
Refrigerator Storage: While not strictly necessary, if you live in a very warm climate or want them to last a little longer, you can store them in the refrigerator for up to a week. However, be aware that refrigeration can sometimes make cookies a bit firmer. To combat this, make sure they are in a well-sealed container, and consider bringing them back to room temperature for about 15-20 minutes before serving if you find them too hard.
Freezer Instructions: These cookies freeze exceptionally well! Once they are completely cooled and the glaze is set, you can freeze them in a single layer on a baking sheet until firm, then transfer them to a freezer-safe airtight container or a heavy-duty freezer bag. They’ll keep for up to 2-3 months. Thaw them overnight in the refrigerator, or for a few hours at room temperature. They usually retain their texture and flavor beautifully, which is why I often make a double batch and freeze half for later.
Glaze Timing Advice: If you plan to freeze your cookies, I highly recommend glazing them *after* they have been thawed. Freezing and thawing can sometimes affect the texture of a hardened glaze, making it prone to cracking. So, bake, cool, freeze, thaw, and then glaze! If you’re just storing them at room temperature, glazing them before storing is perfectly fine, as long as they are completely cooled first.
Frequently Asked Questions
Final Thoughts
So there you have it – my beloved mini butter cookies! They’re simple, they’re delicious, and they’re packed with nostalgia. I truly hope you give this recipe a try. They’re just one of those recipes that makes you feel good, both while you’re making them and especially when you’re enjoying that first melt-in-your-mouth bite. They remind me that the best things in life, and in the kitchen, are often the simplest. If you love these, you might also enjoy my Classic Shortbread recipe or my Easy Sugar Cookies, which share that same wonderful buttery foundation. I can’t wait to hear how your mini butter cookies turn out! Please feel free to leave a comment below with your thoughts, any variations you tried, or just to say hello!
Mini Butter Cookies
Ingredients
Main Ingredients
- 1 cup unsalted butter softened
- 0.5 cup granulated sugar
- 1.5 cup all-purpose flour
Instructions
Preparation Steps
- Preheat oven to 350°F (175°C). Line baking sheets with parchment paper.
- In a large bowl, cream together the softened butter and granulated sugar until light and fluffy.1 cup unsalted butter
- Gradually add the flour to the wet ingredients and mix until just combined. Do not overmix.1 cup unsalted butter
- Roll small portions of dough into balls (about 1 inch in diameter) and place them on the prepared baking sheets, leaving some space between them.
- Gently flatten the tops of the cookies with the bottom of a glass or a fork.
- Bake for 10-12 minutes, or until the edges are lightly golden brown.
- Let the cookies cool on the baking sheets for a few minutes before transferring them to a wire rack to cool completely.
Notes
Featured Comments
“Impressed! Clear steps and creamy results. Perfect for busy nights.”
“New favorite here — creamy. crowd-pleaser was spot on.”
“Super easy and turned out amazing! My family asked for seconds. Saving this one.”
“This sweet treat was absolutely loved — the hearty really stands out. Thanks!”
“Made it tonight and wow — quick weeknight win! Will definitely make mini butter cookies again.”
“Packed with flavor and so simple. Exactly what I wanted from mini butter cookies.”