

Oh, where do I even begin with these Neapolitan Krispie Treats? They’re more than just a dessert; they’re a little box of sunshine, a bite-sized hug, and a serious trip down memory lane for me. You know how some foods just instantly transport you back to your childhood kitchen, the smell of something delicious wafting through the air? That’s exactly what happens with these. Forget elaborate cakes or fussy cookies; sometimes, the simplest things are the most magical. I’ve always been a sucker for anything that combines textures and flavors, and when you swirl together the classic trio of chocolate, vanilla, and strawberry into that chewy, gooey, crispy base of Rice Krispie treats? Well, that’s pure genius, if you ask me. They’re like the grown-up, sophisticated cousin of the regular Krispie treat, but without any of the fuss. Honestly, if you’re looking for a guaranteed crowd-pleaser that’s ridiculously easy to whip up, you’ve hit the jackpot. These Neapolitan Krispie Treats are my absolute go-to when I need a sweet fix that doesn’t involve turning on the oven, especially during those warm summer evenings or when the kids have friends over and I need to whip up something impressive in a flash. They’re a childhood favorite reinvented, and they never, ever disappoint.
What are Neapolitan Krispie treats?
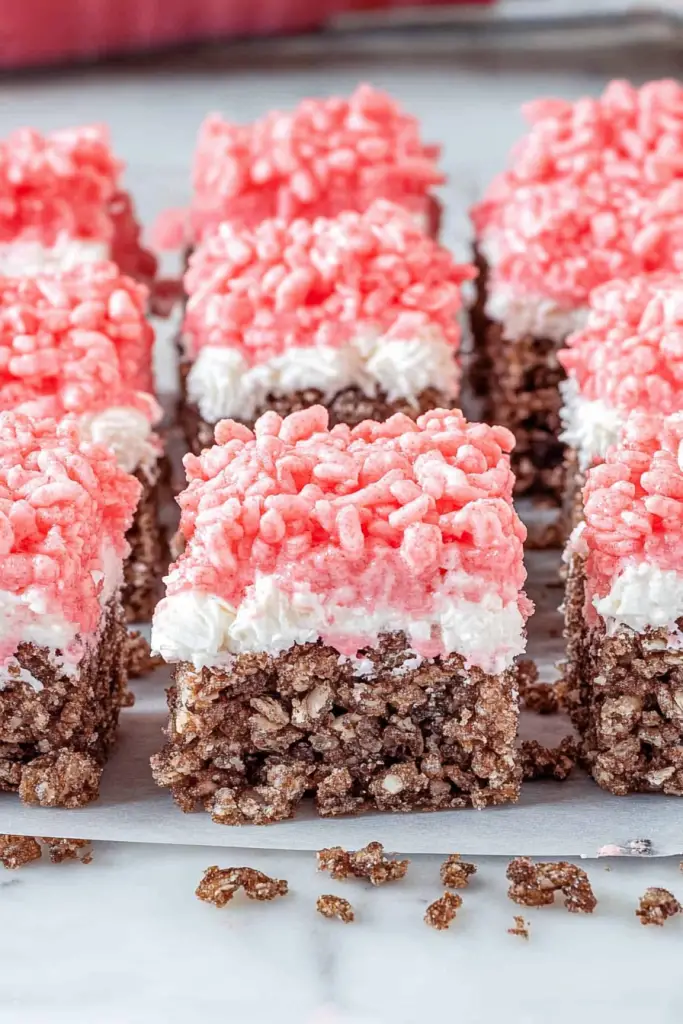
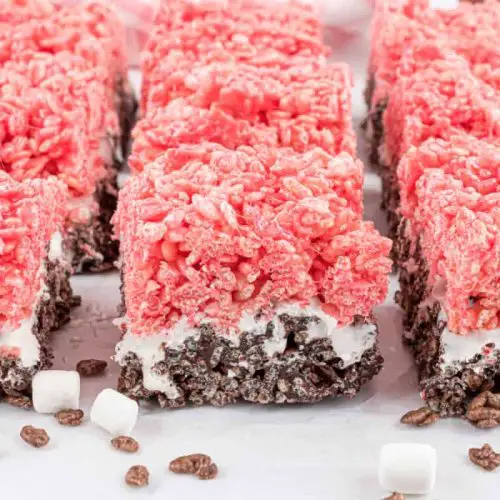
So, what exactly are Neapolitan Krispie Treats? Think of them as the most delightful mash-up you can imagine. You take the beloved, classic Rice Krispie Treat – that perfect chewy, crispy, marshmallowy goodness – and you give it a fantastic Neapolitan makeover. Instead of just one flavor, we’re layering in the iconic trifecta: rich chocolate, sweet vanilla, and delicate strawberry. It’s essentially three incredible flavors combined into one single, amazing bite. The name itself, “Neapolitan,” comes from the traditional ice cream flavor that features these three distinct yet harmonious tastes. We’re taking that concept and applying it to our no-bake treat. It’s not complicated at all; it’s just a clever way of elevating a simple classic. We achieve the distinct layers by dividing the marshmallow mixture and coloring/flavoring each portion separately before swirling them all together. It’s a visually stunning treat, but don’t let its good looks fool you – it’s incredibly approachable and achievable for any home cook, even if you’re just starting out in the kitchen. It’s essentially a no-bake confection that tastes like a celebration.
How to Make Neapolitan Krispie Treats
Quick Overview
Making these Neapolitan Krispie Treats is as easy as 1-2-3, or rather, 1-2-3-4-5-6-7-8-9! The whole process boils down to melting marshmallows, stirring in cereal, dividing and coloring the mixture, swirling it all together, letting it set, and then slicing. What makes this method so special is the layering and swirling technique that creates those beautiful Neapolitan stripes without any complicated steps. You’re essentially creating three distinct flavor zones within the classic chewy base. It’s a no-fuss, no-bake wonder that guarantees smiles all around. You’ll be amazed at how simple it is to achieve such a visually striking and delicious result. Seriously, it’s one of my favorite “wow” recipes because it looks like you put in so much more effort than you actually did!
Ingredients
For the Main Batter:
6 cups (about 10 oz or 280g) crispy rice cereal: Use your favorite brand of crispy rice cereal. Make sure it’s fresh for the best crunch. I always opt for the standard kind; it has the perfect texture and holds up well to the marshmallow mixture without getting too soggy.
10.5 oz (about 3 cups or 300g) mini marshmallows: Mini marshmallows melt more evenly and quickly than the large ones. You can also use about 40 large marshmallows, just make sure they’re completely melted. I’ve found that name-brand marshmallows often give the best, most consistent results for that classic gooeyness.
4 tablespoons (1/2 stick or 57g) unsalted butter: This adds richness and helps everything bind together. Using unsalted butter gives you more control over the saltiness of the final treat.
For the Filling:
1 teaspoon Vanilla Extract: A good quality vanilla extract makes a big difference here, enhancing the sweetness and adding a lovely aroma.
Red food coloring: Just a few drops are needed to achieve that classic strawberry pink. You can use gel food coloring for more vibrant results, but liquid works too.
2 tablespoons unsweetened cocoa powder: This will give us that rich chocolate flavor. Whisk it with a tiny bit of hot water (just a teaspoon) to make a smooth paste before adding it to the marshmallow mixture. This prevents clumps.
For the Glaze (Optional, but highly recommended!):
1/2 cup (about 3 oz or 85g) powdered sugar: Sifted, if you have the time, for a smoother glaze.
1-2 tablespoons milk or water: Start with 1 tablespoon and add more, a teaspoon at a time, until you reach your desired drizzling consistency. You can also use heavy cream for an extra rich glaze.
1/4 teaspoon vanilla extract (optional): For a little extra flavor boost in the glaze.
Step-by-Step Instructions
Step 1: Preheat & Prep Pan
First things first, get your pan ready! You’ll need a 9×13 inch baking pan. Generously grease it with butter, cooking spray, or line it with parchment paper, leaving some overhang on the sides. This overhang acts as handles, making it super easy to lift the whole slab out later. I usually go with parchment paper because it ensures zero sticking, every single time. It’s my little trick for a clean release.
Step 2: Mix Dry Ingredients
In a large bowl, measure out your crispy rice cereal. Set it aside. This is straightforward – just make sure you have enough space to dump the gooey marshmallow mixture into it later.
Step 3: Mix Wet Ingredients
In a large saucepan, melt the butter over low heat. Once the butter is fully melted, add the mini marshmallows. Stir constantly until the marshmallows are completely melted and smooth. This is where patience pays off; don’t rush this step on high heat or you risk scorching the marshmallows. Once smooth, stir in the vanilla extract. You’ll have a beautiful, glossy, white marshmallow mixture.
Step 4: Combine
Now, pour the melted marshmallow mixture over the prepared crispy rice cereal in your large bowl. Gently but thoroughly stir until all the cereal is coated. It’s important to work relatively quickly here because the mixture starts to set up as it cools. Make sure every single piece of cereal is coated in that delicious, gooey marshmallow. This ensures the best texture.
Step 5: Prepare Filling
This is where the magic happens! Divide the marshmallow-coated cereal mixture into three roughly equal portions.
For the vanilla portion: Leave one portion as is.
For the strawberry portion: To one portion, add a few drops of red food coloring and stir until you get a nice pink hue.
For the chocolate portion: To the last portion, stir in the cocoa powder paste you made earlier (cocoa powder mixed with a teaspoon of hot water). Stir until it’s evenly distributed and turns a rich brown color.
Step 6: Layer & Swirl
Now, grab your prepared 9×13 inch pan. Lightly grease your hands or a spatula. Start by dropping spoonfuls of each colored mixture into the pan, alternating the colors. Don’t worry about making it perfect; this is where the “swirl” comes in. Once all the mixture is in the pan, use a lightly greased spatula or your hands to gently press it into an even layer. Then, take a knife or a skewer and gently swirl the colors together. Don’t over-swirl, or the colors will just blend into one! You want distinct streaks of pink, brown, and white. It’s like painting with your dessert!
Step 7: Bake
Actually, there’s no baking for this recipe! You just need to let them set. You can pop the pan into the refrigerator for about 30 minutes to speed things up, or just let it sit at room temperature for about 1-2 hours until firm.
Step 8: Cool & Glaze
Once the treats are set, prepare your glaze if you’re using one. Whisk together the powdered sugar and 1 tablespoon of milk or water until smooth. Add more liquid, a teaspoon at a time, until it’s a drizzly consistency. Drizzle the glaze over the top of the set Krispie treats. If you want a stronger Neapolitan look, you can even divide the glaze and tint small portions with the leftover food coloring to mimic the stripes.
Step 9: Slice & Serve
Once the glaze is set (or if you skipped the glaze), use the parchment paper overhang to lift the entire slab out of the pan. Place it on a cutting board and slice into squares using a sharp knife. I find that running the knife under hot water and wiping it clean between cuts helps get really neat edges. Serve them fresh and enjoy that burst of flavor!
What to Serve It With
These Neapolitan Krispie Treats are so versatile, they can be paired with pretty much anything! They’re fantastic on their own, of course, but here are a few ideas that my family and I love:
For Breakfast: Honestly, why not? They’re a fun treat for a special weekend morning. Serve them alongside a big mug of coffee or a tall glass of cold milk. You could even cut them into smaller, bite-sized pieces and serve them as a fun “sweet bite” with scrambled eggs or breakfast sausage. It’s a little bit of sweet to start the day!
For Brunch: They’re perfect for a laid-back brunch spread. Arrange them on a tiered stand with fresh fruit like berries or melon. They add a pop of color and a fun, nostalgic element that everyone loves. Pair them with mimosas or freshly squeezed orange juice for a festive touch.
As Dessert: This is their natural habitat! Serve them after dinner, perhaps alongside a scoop of vanilla bean Ice Cream for an extra-treat. They also look gorgeous arranged on a dessert platter with other small bites like brownies or cookies. A dusting of powdered sugar or a simple chocolate drizzle can elevate them even further. They’re always a hit at parties!
For Cozy Snacks: These are my secret weapon on a rainy afternoon or when I just need a little something sweet to get me through the evening. They pair wonderfully with a warm cup of tea or hot chocolate. My kids love having one (or two!) after school with a glass of milk. It’s that perfect, comforting treat that never fails to bring a smile.
My family tradition is to make these whenever we have a significant life event – a good report card, a team win, or just because it’s Tuesday! They’re a symbol of small celebrations and sweet moments. I’ve also found that serving them slightly chilled gives them a wonderful texture, especially on warmer days.
Top Tips for Perfecting Your Neapolitan Krispie Treats
I’ve made enough batches of these Neapolitan Krispie Treats to know a thing or two about getting them just right, so let me share some of my hard-earned wisdom with you!
Zucchini Prep: Oh wait, that’s for my zucchini bread! For these Krispie Treats, we’re focused on the cereal and marshmallows. My biggest tip here is about the cereal itself. Make sure it’s fresh! Stale cereal will result in a less crispy, slightly chewier treat, and nobody wants that. Measure it accurately; too much cereal and they’ll be dry, too little and they’ll be too gooey and fall apart. For the marshmallows, low and slow is key when melting. Don’t scorch them! Stirring constantly ensures they melt into a smooth, homogenous mixture. If you use large marshmallows, make sure every single one is completely melted before moving on; any lumps will create an odd texture.
Mixing Advice: Once the marshmallow mixture is ready, work quickly! The longer you wait, the harder it will be to coat the cereal evenly, and the less chewy your treats will be. When combining the cereal and marshmallow, fold it in gently but thoroughly. You want every piece of cereal coated. Overmixing can actually break down the cereal and make the treats tough, so aim for just enough mixing to coat everything. My trick is to use a large, sturdy spatula and really get into the corners of the bowl.
Swirl Customization: This is where you can really have fun! Don’t be afraid to use a generous amount of coloring and cocoa to get vibrant results. For the swirl, remember: less is more. You’re aiming for beautiful streaks, not a muddy mess. Use a knife or a skewer and make just a few passes through the mixture. I’ve also experimented with adding a few drops of strawberry extract to the pink portion for an extra flavor kick, and a touch of peppermint extract to the white or chocolate for a minty twist. Think about color contrast too – deeper pinks and richer browns really pop against the creamy white.
Ingredient Swaps: While I love the classic crispy rice cereal, I’ve tried using a mix of cereals with success. A combination of crispy rice and a tiny bit of corn flakes can add an interesting texture. For a richer chocolate flavor, you could dust the chocolate portion with a bit of extra cocoa powder. If you find you’re running low on mini marshmallows, you can use marshmallow fluff (about 7 oz) as a substitute, but you might need to adjust the butter slightly. For a dairy-free version, use vegan butter and marshmallows – they work surprisingly well! I tested this with almond milk in the glaze and it actually made it even creamier!
Baking Tips: Again, no baking here! The key is letting them set properly. If you want them softer and gooier, let them set at room temperature for about 1-2 hours. If you prefer them firmer and easier to cut cleanly, pop them in the fridge for about 30 minutes. Don’t leave them in the fridge too long, though, as they can become too hard and brittle. Make sure the pan is evenly greased or lined; sticky treats are the bane of my existence! And for slicing, a sharp, non-serrated knife is your best friend. Running it under hot water and wiping it clean between cuts is a game-changer for perfectly neat squares.
Glaze Variations: The glaze is optional but adds a lovely sweetness and a professional finish. For a thicker glaze, use less liquid. For a thinner, more decorative drizzle, add more milk or water, a teaspoon at a time. You can also divide the glaze and tint small portions with food coloring to create extra swirls that mimic the Neapolitan colors. Another fun alternative is a simple dusting of powdered sugar or a drizzle of melted chocolate chips.
Storing and Reheating Tips
Storing these Neapolitan Krispie Treats is pretty straightforward, but how you store them will affect their texture over time. They are definitely best enjoyed fresh, but they’ll still be delicious for a few days!
Room Temperature: This is my preferred method for short-term storage. Once they are fully set and any glaze has hardened, I like to cut them into squares and store them in an airtight container. Make sure to layer them with parchment paper or wax paper in between so they don’t stick together. At room temperature, they’ll stay fresh and retain their chewy texture for about 2-3 days. After that, they might start to dry out a bit, but they’re still perfectly edible. I always make sure they are completely cooled before covering them to prevent condensation.
Refrigerator Storage: If you want them to last a little longer, or if your kitchen is particularly warm, you can store them in the refrigerator. Again, an airtight container with parchment paper between layers is best. They should keep well for up to a week in the fridge. The texture will be firmer straight from the fridge, so I recommend letting them sit at room temperature for about 10-15 minutes before serving to soften them up a bit. This also helps to revive that lovely chewiness.
Freezer Instructions: These Neapolitan Krispie Treats freeze surprisingly well, which is fantastic if you want to make a big batch ahead of time. Once they are completely set and sliced, wrap each square tightly in plastic wrap, then place them in a freezer-safe bag or container. They can be stored in the freezer for up to 2-3 months. To thaw, simply unwrap them and let them come to room temperature on a plate or cooling rack for about 30-60 minutes. They’ll taste almost as good as fresh!
Glaze Timing Advice: If you’re adding a glaze, it’s best to apply it just before you plan to serve them or just before refrigerating/freezing. If you glaze them and then store them for a long time, the glaze can sometimes become sticky or absorb moisture, especially if it’s humid. For freezing, I often prefer to leave them unfrosted and then drizzle them with glaze or melted chocolate once they’ve thawed. This keeps the glaze looking its best.
Frequently Asked Questions
Final Thoughts
So there you have it – my beloved Neapolitan Krispie Treats! I really hope you give these a try. They’re a testament to the fact that you don’t need fancy ingredients or hours in the kitchen to create something truly special and delicious. They’re fun, they’re nostalgic, and they taste absolutely incredible. That perfect chew, that delightful crisp, and those three iconic flavors swirling together… it’s just pure bliss. If you love classic comfort desserts with a fun twist, I think you’ll adore these just as much as my family and I do. They’re the perfect treat for parties, a sweet afternoon pick-me-up, or simply when you want to bring a little extra joy into your day. If you enjoyed this recipe, you might also want to check out my No-Bake Chocolate Peanut Butter Bars or my Fudgy Brownies for more easy and delicious treats!
I can’t wait to hear how yours turn out! Please leave a comment below and let me know your favorite part about these Neapolitan Krispie Treats. Did you add any special swirls or flavors? I love hearing your stories and seeing your creations! Happy baking… well, happy no-baking!
Neapolitan Krispie Treats
Ingredients
Main Ingredients
- 3 tablespoons butter
- 10 ounces mini marshmallows
- 6 cups crispy rice cereal
- 0.5 teaspoons vanilla extract
- 3 tablespoons strawberry frosting
- 3 tablespoons chocolate frosting
Instructions
Preparation Steps
- Grease a 9x13 inch pan with cooking spray or butter.
- In a large microwave-safe bowl, melt the butter in the microwave. Stir in the mini marshmallows and microwave for 1-2 minutes, stirring every 30 seconds, until completely melted and smooth.
- Stir in the vanilla extract.
- Add the crispy rice cereal and stir until well combined.
- Divide the mixture into three equal portions. Leave one portion plain. To the second portion, gently stir in the strawberry frosting until just combined. To the third portion, gently stir in the chocolate frosting until just combined.
- Press the plain mixture into the prepared pan. Layer the strawberry mixture on top, and then the chocolate mixture. You can swirl them slightly if desired.
- Let cool for at least 30 minutes before cutting into squares.
Notes
Featured Comments
“These sound absolutely delicious—who knew Krispie treats could feel like a cozy memory in every bite?”
“Impressed! Clear steps and spot on results. Perfect for busy nights.”
“New favorite here — restaurant-level. crowd-pleaser was spot on.”
“Super easy and turned out amazing! My family asked for seconds. Saving this one.”
“This sweet treat was absolutely loved — the rich really stands out. Thanks!”
“Made it tonight and wow — family favorite! Will definitely make Neapolitan Krispie Treats again.”


These sound absolutely delicious—who knew Krispie treats could feel like a cozy memory in every bite?