

There are some recipes that just feel like coming home, aren’t there? This No Bake Chocolate Eclair Cake is one of those for me. It’s the kind of dessert that instantly transports me back to my childhood kitchen, the smell of chocolate and vanilla filling the air, and my mom humming along to the radio. If you’ve ever found yourself craving that classic eclair flavor but dreaded the fuss of choux pastry and pastry cream, then you are going to absolutely fall head over heels for this. It’s like the elegant, sophisticated cousin of a graham cracker icebox cake, but with all the rich, decadent flavors of a proper eclair, minus all the work. Seriously, this one is a lifesaver on busy nights when a sweet craving hits hard and the thought of turning on the oven feels like too much. It’s become such a staple in my house, especially during holidays or just when we need a little something special without the stress.
What is no bake chocolate eclair cake?
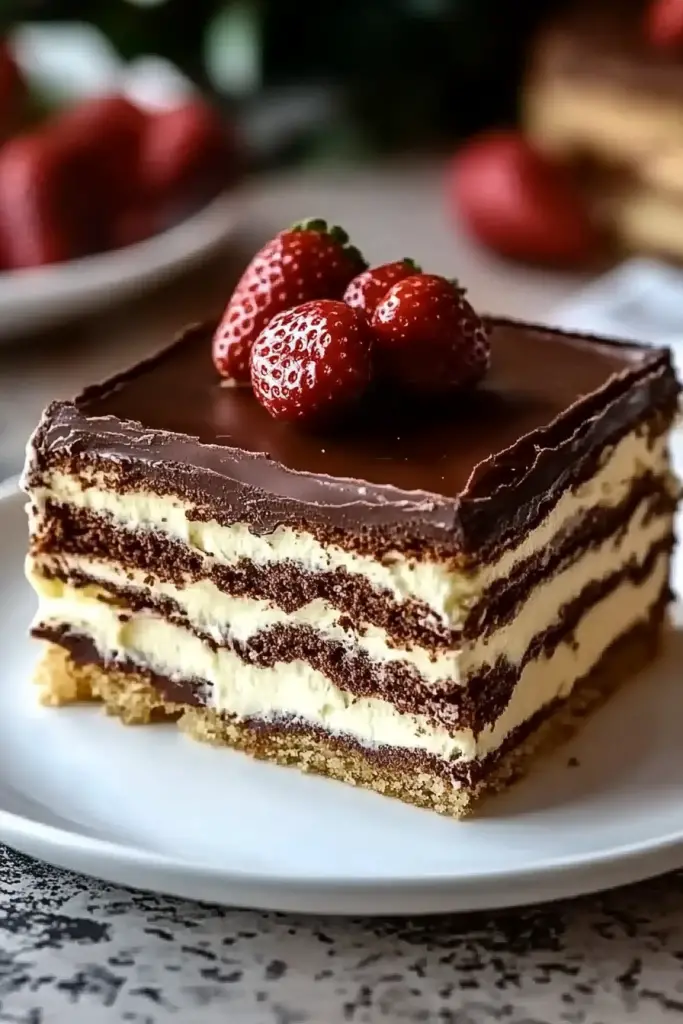
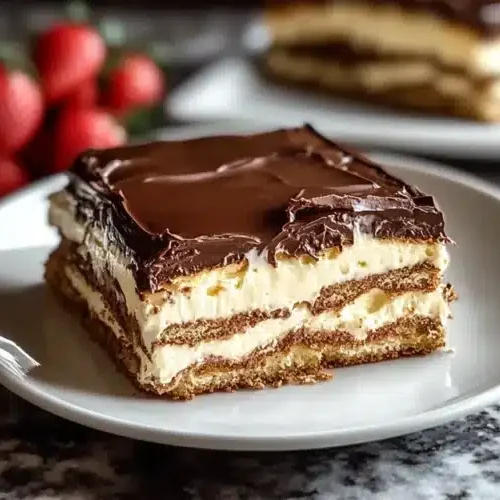
So, what exactly *is* a No Bake Chocolate Eclair Cake? Well, think of it as a delightful deconstructed eclair, if you will, but built layer by glorious layer. Instead of delicate choux pastry, we use simple graham crackers as the base. Then, we sandwich them between layers of a creamy, luscious vanilla pudding or custard-like filling. And to top it all off? A rich, smooth chocolate ganache or frosting that hardens just slightly at room temperature, giving you that signature eclair topping. It’s essentially all the best parts of an eclair – the creamy filling, the crisp cracker “crust” (instead of pastry), and that irresistible chocolate shell – brought together in a way that requires zero baking. It’s a dessert designed for pure enjoyment with minimal effort, making it an absolute dream for any home cook.
Why you’ll love this
Honestly, there are so many reasons why this No Bake Chocolate Eclair Cake has earned a permanent spot in my recipe binder, and I just know you’re going to feel the same way. First off, the flavor is just out of this world. You get that deep, comforting vanilla pudding mingling with the subtle sweetness of the graham crackers, all brought together by that irresistible, glossy chocolate topping. It’s a symphony of textures and tastes that’s incredibly satisfying. Then there’s the sheer simplicity of it all. No oven needed means no worrying about cracking pastry, no complicated techniques – just straightforward assembly. This makes it perfect for those last-minute dessert needs, or when you’re hosting and want to spend more time with your guests than in the kitchen. It’s also surprisingly budget-friendly! The ingredients are all pantry staples or easily found at any grocery store, making it an affordable way to create a show-stopping dessert. And versatility? Oh yes! While it’s fantastic as is, I’ve had friends experiment with adding a layer of fresh berries or a hint of coffee liqueur to the filling, and it’s always a hit. But what I truly love most about this no bake chocolate eclair cake is that it’s pure, unadulterated comfort. It’s the kind of dessert that brings smiles to everyone’s faces, from the pickiest eaters to the most discerning grown-ups. It’s proof that you don’t need a fancy degree or a professional kitchen to create something truly delicious and memorable.
How do I make no bake chocolate e
Quick Overview
This recipe is all about building layers of flavor and texture. We’ll start by getting our pan ready, then whip up a dreamy vanilla filling, layer it with graham crackers, and finish with a glossy chocolate glaze. It’s truly as simple as mixing, layering, and chilling. The beauty of this no bake chocolate eclair cake is that the chilling time is what does all the magic, allowing the flavors to meld and the crackers to soften just perfectly. You’ll be amazed at how something so simple can taste so incredibly decadent.
Ingredients
For the Graham Crack
We’re using standard graham crackers here, and you’ll need about 2 to 3 sleeves, depending on the size of your pan. You want enough to create two or three distinct layers. Make sure they’re fresh; stale crackers can sometimes have a slightly off flavor.
For the Creamy Vanilla Filling:
* 2 cups whole milk – Using whole milk really gives the creamiest texture, but I’ve tested it with 2% and even a good quality almond milk, and it still turns out wonderfully, just slightly less rich.
* 1 (3.4 ounce) package instant vanilla pudding mix – This is the secret to its effortless creaminess! Make sure you get the *instant* kind, not the cook-and-serve.
* 8 ounces cream cheese, softened – Let this sit on the counter for about an hour until it’s nice and pliable. It makes it so much easier to incorporate without lumps.
* 1 cup heavy whipping cream, cold – This adds incredible lightness and volume to the filling. Keep it chilled until you’re ready to whip it.
* 1 teaspoon Vanilla Extract – Just a touch more vanilla to really boost that classic flavor.
For the Easy Chocolate Glaze:
* 1 cup semi-sweet chocolate chips – Good quality chips make a difference here.
* 1/4 cup unsalted butter – This gives the glaze that lovely sheen and smooth texture.
* 2 tablespoons milk or heavy cream – Helps to thin the glaze to the perfect drizzling consistency.
Step-by-Step Instructions
Step 1: Preheat & Prep Pan
Grab an 8×8 or 9×9 inch baking dish. I find that greasing it very lightly with a bit of butter or non-stick spray is helpful, though not strictly necessary. It just ensures the cake releases cleanly when you go to slice it. Set it aside while you whip up the magic.
Step 2: Mix Dry Ingredients
In a large bowl, whisk together the instant vanilla pudding mix. That’s it for the dry ingredients! The magic happens when we introduce the wet.
Step 3: Mix Wet Ingredients
In a separate, larger bowl, beat the softened Cream Cheese until it’s smooth and fluffy. Then, gradually add the whole milk and the vanilla extract, beating until well combined. Pour in the cold heavy whipping cream and continue beating until the mixture is thick and holds stiff peaks. This is your luscious filling!
Step 4: Combine
Now, gently fold the pudding mix into the cream cheese mixture. Use a spatula and be careful not to overmix – you want to keep that airy texture from the Whipped Cream. The goal is a smooth, creamy, and utterly irresistible filling.
Step 5: Prepare Filling
This filling is what makes the No Bake Chocolate Eclair Cake so special. It’s rich, creamy, and tastes wonderfully of vanilla. Ensure your cream cheese is completely softened and your heavy cream is very cold for the best results. If you like a less sweet filling, you can experiment with using a sugar-free pudding mix, though I haven’t personally tested this.
Step 6: Layer & Swirl
Lay a single layer of graham crackers on the bottom of your prepared baking dish. Break them to fit if needed. Spread about half of the vanilla filling evenly over the crackers. Add another layer of graham crackers, then spread the remaining filling on top. Finish with a final layer of graham crackers. This creates those beautiful, distinct layers that are key to the eclair cake experience.
Step 7: Bake
This is the “no bake” part! We don’t bake this cake at all. The magic happens in the refrigerator. Cover the dish tightly with plastic wrap or a lid. Refrigerate for at least 4-6 hours, or preferably overnight. This is crucial for the crackers to soften and absorb moisture from the filling, creating that cake-like texture.
Step 8: Cool & Glaze
Once the cake has chilled and the crackers have softened, it’s time for the glaze! In a microwave-safe bowl, combine the chocolate chips, butter, and milk (or cream). Microwave in 30-second intervals, stirring in between, until the chocolate is melted and smooth. Stir until you have a glossy, pourable glaze. Let it cool slightly for a few minutes, then pour it evenly over the chilled cake. Spread it gently to cover the top layer of crackers completely. Let the glaze set up at room temperature for about 30 minutes, or pop it back in the fridge for about 15 minutes if you’re in a hurry. The key is to let it set just enough so it doesn’t all slide off when you cut into it.
Step 9: Slice & Serve
Once the glaze has set, it’s ready to slice and serve! Use a sharp knife dipped in hot water and wiped dry between cuts for clean slices. This No Bake Chocolate Eclair Cake is best served chilled. Enjoy every creamy, chocolatey bite!
What to Serve It With
This No Bake Chocolate Eclair Cake is a star all on its own, but it also plays incredibly well with others! Here are some ideas for occasions:
For Breakfast: While I usually save this for dessert, if you’re feeling adventurous or have some leftovers, a small slice with a hot cup of coffee is surprisingly delightful. The richness of the chocolate and vanilla cuts through the bitterness of the coffee beautifully. I’ve even seen some people serve mini versions for a decadent brunch treat.
For Brunch: Elevate it with some fresh berries! A small bowl of raspberries or sliced strawberries on the side adds a pop of color and a lovely tartness that balances the sweetness of the cake. A mimosa or a sparkling cider pairs wonderfully here.
As Dessert: This is its natural habitat! Serve it after a savory meal like roasted chicken or a hearty pasta dish. A scoop of vanilla bean ice cream alongside is pure indulgence, or a dollop of lightly sweetened whipped cream. For a fancier affair, consider a drizzle of raspberry coulis.
For Cozy Snacks: This is the ultimate comfort food. Pair it with a warm mug of hot chocolate on a chilly evening, or a glass of cold milk for a classic treat. It’s perfect for movie nights or just a sweet pick-me-up after a long day. My family often requests this for our impromptu “dessert movie nights.”
Top Tips for Perfecting Your No Bake Chocolate Eclair Cake
Over the years of making this delicious No Bake Chocolate Eclair Cake, I’ve picked up a few tricks that I think are worth sharing. They’re the little things that can take this already fantastic dessert from great to absolutely unforgettable.
Graham Cracker Prep: While you can use whole graham crackers, I sometimes find that breaking them slightly in half or thirds can help them fit into the pan more snugly and absorb the filling better. Don’t over-break them into crumbs, though – you want those distinct cracker layers. And trust me, using fresh graham crackers makes a world of difference. Stale ones can lead to a slightly chewy texture instead of that perfect, softened cake-like quality.
Mixing Advice: When you’re making the filling, the key is to whip that heavy cream to stiff peaks *before* folding in the pudding mix. This gives the filling its airy, luscious texture. Don’t be tempted to overmix once the pudding mix is in; you’ll deflate all that lovely air. Just gentle folding until everything is combined is perfect. Also, ensure your cream cheese is truly softened; cold cream cheese will result in lumps, and nobody wants a lumpy eclair cake!
Layering Technique: When you’re assembling the layers, try to get the filling as evenly distributed as possible. This helps ensure that all the graham crackers soften uniformly. If you have gaps, the crackers in those spots might remain a bit too firm. For the top layer of crackers, I sometimes overlap them slightly to ensure full coverage before adding the final layer of filling.
Ingredient Swaps: While the instant vanilla pudding is classic, I’ve experimented with other instant pudding flavors like chocolate or cheesecake, and they are fantastic! Just be aware that changing the pudding flavor might affect the sweetness level. For the chocolate glaze, if you don’t have semi-sweet chips, dark chocolate chips will work, but you might want to add a touch more butter or milk to ensure it thins out nicely. You can also use a good quality melting chocolate if you have it.
Baking Tips: Remember, there’s no baking involved! The “baking” is actually the chilling time. Don’t skimp on this! The longer it chills, the better the texture. I highly recommend at least 6 hours, but overnight is truly the sweet spot. If you’re in a rush, you can put the pan in the freezer for an hour or two, but the texture won’t be quite as good as a long, slow chill in the fridge.
Glaze Variations: If you’re not a fan of a thick chocolate glaze, you can thin it down with a bit more milk or cream for a runnier consistency that dries to a thinner shell. Alternatively, you could dust the top with powdered sugar for a simpler finish, or even drizzle melted white chocolate over the dark chocolate glaze for a decorative touch. I once made a batch where I stirred in a teaspoon of instant espresso powder into the chocolate glaze, and it was divine!
Storing and Reheating Tips
One of the best things about this No Bake Chocolate Eclair Cake is how well it stores, making it perfect for making ahead. It actually often tastes even better the next day as the flavors have more time to meld.
Room Temperature: I honestly wouldn’t recommend storing this cake at room temperature for more than a couple of hours, especially if your kitchen is warm. The dairy in the filling and glaze can spoil, and the glaze can become too soft and messy.
Refrigerator Storage: This is where this cake shines! Once it’s completely assembled and the glaze has set, cover it tightly with plastic wrap or an airtight lid. It will keep well in the refrigerator for up to 3-4 days. The crackers will soften beautifully, and the flavors will continue to develop. Just make sure it’s covered well to prevent it from absorbing any other odors in your fridge.
Freezer Instructions: Yes, you can freeze this No Bake Chocolate Eclair Cake! It’s a great make-ahead strategy. Assemble the cake and let the glaze set. Then, wrap it very tightly, first in plastic wrap and then in aluminum foil, or place it in an airtight freezer-safe container. It should be good in the freezer for up to 1-2 months. When you’re ready to serve, thaw it overnight in the refrigerator. The texture might be slightly different than fresh, but it’s still delicious! You might find the glaze is a little softer after thawing, so letting it chill for a bit after thawing can help.
Glaze Timing Advice: For the best results, I always recommend glazing the cake *after* it has chilled and the crackers have softened. If you glaze it too early, the glaze can become brittle and crack when the cake is sliced. If you’re freezing the cake, I would suggest glazing it *after* thawing, right before serving, to ensure the glaze is fresh and perfectly set. However, if you are freezing it *after* glazing, just be aware that the texture of the glaze might change slightly upon thawing.
Frequently Asked Questions
Final Thoughts
I truly hope you give this No Bake Chocolate Eclair Cake a try. It’s one of those recipes that just brings so much joy with so little effort, and that’s something I always treasure in my kitchen. It’s the perfect blend of creamy, sweet, and chocolatey goodness, all coming together in a dessert that looks impressive but is delightfully easy to whip up. Whether you’re a seasoned baker or just starting out, this recipe is designed to make you feel like a star. It’s the kind of dessert that brings people together, sparking smiles and happy memories with every bite. If you love this, you might also enjoy my No Bake Cheesecake Bars or my classic Chocolate Mousse – they share that same spirit of decadent flavor without the fuss! I can’t wait to hear what you think, and if you make any fun tweaks of your own. Happy creating in the kitchen!
No Bake Chocolate Eclair Cake
Ingredients
Graham Cracker Crust
- 1.5 cups graham cracker crumbs
- 0.375 cups butter, melted
Creamy Pudding Filling
- 3.4 ounce instant vanilla pudding mix
- 3 cups milk
Chocolate Topping
- 1 cup semi-sweet chocolate chips
- 0.5 cup heavy cream
Whipped Topping
- 8 ounces cream cheese, softened
- 1 cup powdered sugar
- 2 cups whipped topping (like Cool Whip)
Instructions
Preparation Steps
- In a bowl, combine graham cracker crumbs and melted butter. Press mixture evenly into the bottom of a 9x13 inch baking dish.
- In a separate bowl, whisk together instant vanilla pudding mix and milk until smooth and thickened. Spread evenly over the graham cracker crust.
- In a small saucepan over low heat, melt semi-sweet chocolate chips with heavy cream, stirring until smooth. Pour over the pudding layer.
- In a medium bowl, beat softened cream cheese and powdered sugar until smooth. Gently fold in the whipped topping until well combined. Spread evenly over the chocolate layer.
- Chill in the refrigerator for at least 4 hours, or until firm.
- Cut into squares and serve cold.
Notes
Featured Comments
“Absolutely! This recipe hits all the right spots — simple, nostalgic, and delicious. Perfect for when you want something comforting without the fuss.”
“Absolutely! This recipe sounds like pure comfort in a bowl—no bake, no stress, just chocolatey perfection. I’m definitely saving this one for the weekend.”
“Absolutely love this recipe—it’s such a comforting treat and always a hit at gatherings!”
“Impressed! Clear steps and family favorite results. Perfect for busy nights.”
“New favorite here — absolutely loved. crowd-pleaser was spot on.”
“Super easy and turned out amazing! My family asked for seconds. Saving this one.”


Absolutely love this recipe—it’s such a comforting treat and always a hit at gatherings!
Absolutely! This recipe sounds like pure comfort in a bowl—no bake, no stress, just chocolatey perfection. I’m definitely saving this one for the weekend.
Absolutely! This recipe hits all the right spots — simple, nostalgic, and delicious. Perfect for when you want something comforting without the fuss.