

Oh, these no bake peanut butter balls! Where do I even begin? Honestly, this recipe is like a warm hug on a chilly evening, or a sweet little secret weapon for those moments when you *desperately* need a treat but the thought of turning on the oven feels like climbing Mount Everest. I remember the first time I whipped these up. It was a chaotic Tuesday evening, the kids were buzzing with end-of-day energy, and I’d completely forgotten to plan for dessert. Panic set in. Then, like a beacon of hope, I remembered this super simple no bake peanut butter balls recipe my grandma used to make. It was a lifesaver then, and it still is today. They’re so quick, so satisfying, and genuinely taste like you slaved over them for hours. If you’ve ever loved classic Peanut Butter Cookies, but wished you could have that flavor without the baking time, then you’re in for a real treat. These are basically those cookies, but in ball form, and without any heat involved!
What are no bake peanut butter balls?
So, what exactly *are* these magical little spheres of deliciousness? Think of them as the ultimate no-fuss, no-bake cookie dough bites, packed with that Irresistible Peanut Butter flavor we all adore. The name says it all, really – no bake peanut butter balls. It’s a simple combination of pantry staples that magically transform into delightful little treats. They’re not quite fudge, not quite cookie dough, but something wonderfully in-between. The beauty of them is their simplicity; you’re basically mixing a few key ingredients together, rolling them into balls, and chilling them until firm. It’s that easy! This recipe is a testament to how a few humble ingredients can create something truly special without needing a whole production in the kitchen. They’re the perfect answer to a sweet craving when you want something delicious, fast, and without all the fuss of traditional baking. I often tell people, it’s like eating delicious peanut butter cookie dough, but it’s totally safe and ready to eat!
How do I make no bake peanut butter balls?
Quick Overview
This recipe is all about speed and simplicity. You’ll combine your wet ingredients and dry ingredients separately, then bring them together to form a pliable dough. From there, it’s just a matter of rolling them into bite-sized balls and letting them chill until they’re perfectly firm. The whole process, from start to finish, takes less than 15 minutes of active time, and the hardest part is waiting for them to set in the fridge! It’s the kind of recipe that makes you feel like a kitchen magician, conjuring up deliciousness out of thin air.
Ingredients
For the Main Batter:
Let’s talk ingredients. These are pretty standard, so you likely won’t need a special trip to the store. The star, of course, is peanut butter. I always opt for creamy, natural peanut butter. Look for one where the ingredients are just peanuts and maybe a little salt; the oils can separate, but just give it a good stir! If you use a sweetened, processed peanut butter, you might need to adjust the sugar. I’ve also tested this with crunchy peanut butter, and while it’s delicious, you lose a bit of that smooth, melt-in-your-mouth texture. So, for this classic version, creamy is the way to go!
- 2 cups Creamy Peanut Butter (natural, unsweetened is best)
- 1 cup powdered sugar (sifted, to avoid lumps)
- 1/2 cup unsalted butter, softened (not melted!)
- 1 teaspoon vanilla extract
- Pinch of salt (optional, especially if your peanut butter is salted)
For the Filling:
This recipe doesn’t really have a separate “filling” in the traditional sense, but rather the Peanut Butter mixture *is* the delicious filling for the chocolate coating! The magic happens when you coat these little beauties.
For the Glaze:
This is where we take our no bake peanut butter balls from delicious to decadent! I love a simple chocolate coating, but there are so many ways to jazz this up. You want a good quality chocolate that melts smoothly. Semi-sweet or dark chocolate chips work beautifully. I sometimes add a tiny bit of coconut oil or vegetable oil to make the chocolate a little more fluid and easier to dip. If it gets too thick, a touch more oil should do the trick.
- 2 cups semi-sweet chocolate chips (or your favorite chocolate)
- 1 tablespoon coconut oil or vegetable oil (optional, for smoother melting)
Step-by-Step Instructions
Step 1: Preheat & Prep Pan
Wait, no oven? That’s right! For these no bake peanut butter balls, there’s no preheating involved. What you *do* need to do is prepare a baking sheet. Line a large baking sheet or a plate with parchment paper or wax paper. This is crucial because otherwise, your delicious little balls will stick! Make sure you have enough space for all the balls you’re about to make. I usually need two standard baking sheets.
Step 2: Mix Dry Ingredients
In a medium bowl, whisk together the sifted powdered sugar and the pinch of salt, if you’re using it. Sifting the powdered sugar is a little step that makes a big difference. It ensures that your peanut butter balls are super smooth and free of any gritty lumps. Nobody wants a lumpy peanut butter ball, right? Just a quick whisk to make sure it’s all combined.
Step 3: Mix Wet Ingredients
In a separate, larger bowl, cream together the softened butter and the creamy peanut butter. You want this to be really smooth and well combined. Using softened butter (not melted!) is key here. If it’s melted, your mixture might end up too greasy or not hold together as well. Add the vanilla extract to this mixture and give it a good stir. The smell at this stage is already divine!
Step 4: Combine
Now for the magic! Gradually add the dry ingredients (the powdered sugar mixture) to the wet ingredients (peanut butter mixture). Mix on low speed with an electric mixer or stir with a sturdy spoon until everything is just combined and forms a thick, dough-like consistency. Be careful not to overmix. You want it to come together, but you don’t want to work it too much. It should feel like a thick, moldable dough. If it seems a little too dry, you can add a teaspoon of milk or even a tiny bit more peanut butter. If it’s too sticky, a little more powdered sugar can help, but go slow!
Step 5: Prepare Filling
The “filling” is essentially your peanut butter dough! Once it’s mixed, you’re ready to roll. You want to work relatively quickly, especially if your kitchen is warm, as the butter can start to soften. I usually scoop out portions using a small cookie scoop or just by hand. Aim for about 1-inch diameter balls. If your hands get sticky, a little bit of water or a dusting of powdered sugar can help.
Step 6: Layer & Swirl
This step is about forming the actual balls. Take about a tablespoon of the dough and roll it between your palms until it forms a smooth ball. Place each ball onto your prepared baking sheet. Repeat with the rest of the dough. Try to make them all roughly the same size so they bake (or in this case, chill) evenly. This is where my kids love to help! They have so much fun rolling these little guys.
Step 7: Bake
Here’s the best part: there is no baking! You’ll pop the entire baking sheet with the rolled balls into the refrigerator for at least 30 minutes, or until they are firm to the touch. This chilling step is essential for them to hold their shape when you dip them in chocolate. If you’re in a real rush, you can pop them in the freezer for about 15 minutes, but I find the fridge gives them a better texture.
Step 8: Cool & Glaze
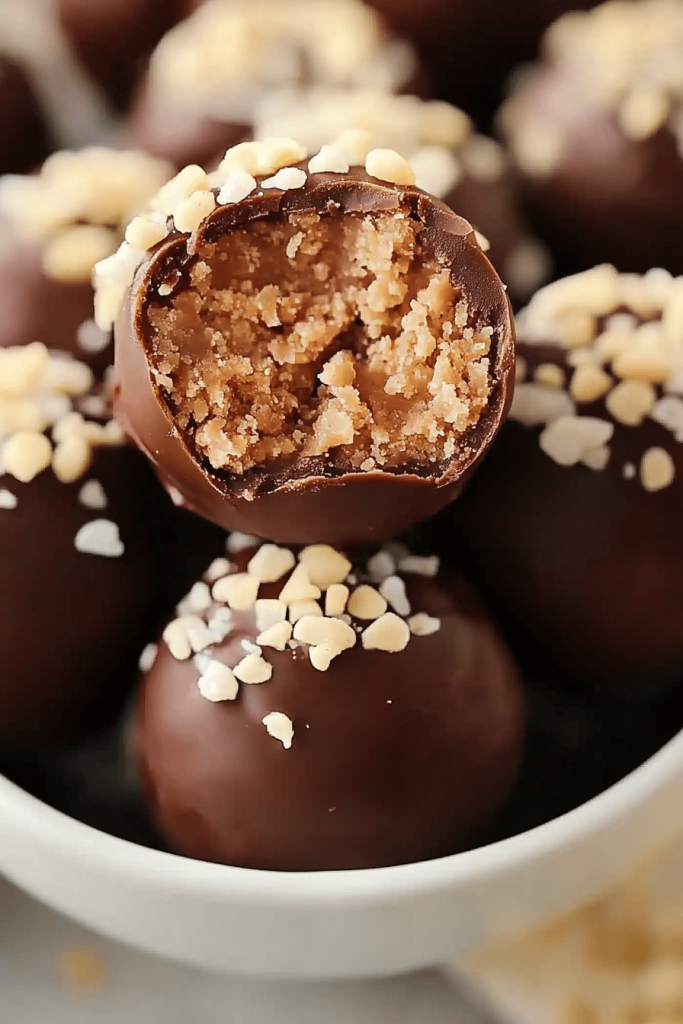
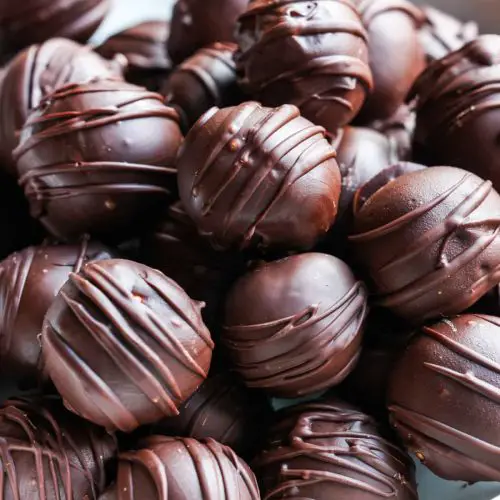
Once the balls are firm, it’s time for the chocolate bath! Melt your chocolate chips (and oil, if using) in a microwave-safe bowl in 30-second intervals, stirring in between, until smooth. Alternatively, you can use a double boiler. You want the chocolate to be fluid enough to coat the balls easily. Dip each chilled peanut butter ball into the melted chocolate, using a fork or a toothpick to help coat them completely. Let any excess chocolate drip back into the bowl. Place the coated balls back onto the parchment-lined baking sheet. If you want to get fancy, you can drizzle a little extra melted chocolate over the tops once they’ve set a bit, or sprinkle them with a few extra chocolate chips or even sea salt.
Step 9: Slice & Serve
Once all the balls are dipped and coated, return the baking sheet to the refrigerator for another 15-20 minutes, or until the chocolate has hardened completely. This makes them super neat to handle and gives that satisfying snap when you bite into them. They are now ready to be devoured! I love serving them chilled, straight from the fridge. They make a perfect dessert, a sweet snack, or even a little treat to share with colleagues.
What to Serve It With
These no bake peanut butter balls are so wonderfully versatile, they fit into almost any occasion! For breakfast? Forget a heavy pastry, try one or two of these with a strong cup of coffee. They’re not overly sweet, so they feel decadent without being overwhelming first thing in the morning. For a more elaborate brunch, I love to arrange them on a pretty platter alongside some fresh berries and a light yogurt dip. They add a touch of indulgence that guests always rave about. As a dessert, they’re fantastic after a hearty meal, especially when paired with a glass of milk or a scoop of vanilla ice cream. They’re rich enough to feel like a proper dessert but small enough not to leave you feeling too full. And for those cozy, spontaneous snack attacks? They’re perfect. Grab a few, curl up on the couch with a good book or a movie, and just enjoy the simple pleasure. My absolute favorite way to serve them is with a tall glass of cold milk – it’s a classic combo for a reason! My kids also love them as an after-school treat, especially when we’ve made a double batch!
Top Tips for Perfecting Your No Bake Peanut Butter Balls
I’ve made these no bake peanut butter balls more times than I can count, and over the years, I’ve picked up a few tricks that I think make them even better. First, the peanut butter is really important. I know I mentioned natural earlier, and I stand by it for the best flavor, but if you’re using a standard processed peanut butter, just be aware it might be sweeter and you might need to adjust the powdered sugar. Always taste your dough before you roll! For the butter, make sure it’s softened, not melted. It should be pliable enough to mash with a fork, but not liquid. If it’s too cold, it’ll be hard to mix; too warm, and your dough might be too soft. When you’re combining the wet and dry ingredients, resist the urge to overmix. Once the flour and butter are just combined, stop. Overworking it can make the balls tough. I learned that the hard way a few times! For rolling, if the dough is too sticky, wetting your hands *very slightly* with water or a tiny bit of oil can help. Don’t go overboard, though, or they’ll get greasy. When you’re melting the chocolate, take your time. Microwaving in short bursts and stirring is usually best. If it starts to seize up or look strange, it’s often too hot. You can try adding a tiny bit more oil to smooth it out, or even start over with a fresh batch of chocolate. For a really clean coating, I like to use a fork to dip and then gently tap the fork on the side of the bowl to let excess chocolate drip off. A toothpick can also work, but sometimes it leaves a slightly larger hole. For ingredient swaps, I’ve experimented with different nut butters, and almond butter works surprisingly well, though the flavor is different. For a richer coating, you could even use milk chocolate or dark chocolate with sea salt. The options are truly endless!
Storing and Reheating Tips
These no bake peanut butter balls are fantastic for making ahead, which is why I love them so much! For storing them at room temperature, they’ll typically stay fresh for about 2-3 days, as long as your kitchen isn’t too warm and the chocolate coating is fully set. It’s best to keep them in an airtight container. If your room is on the warmer side, or if you want them to last longer, the refrigerator is your best friend. In the fridge, they’ll stay delicious for up to a week, sometimes even longer! I find that keeping them in an airtight container or a resealable bag works perfectly. The cold air keeps the butter from softening too much and the chocolate nice and firm. Now, freezing is also an option, especially if you want to make a big batch for future cravings. Wrap each ball individually in plastic wrap or parchment paper, then place them in a freezer-safe bag or container. They can be kept frozen for up to 2-3 months. To thaw, just transfer them from the freezer to the refrigerator overnight. They’ll be perfectly firm and ready to eat in the morning! For the glaze, it’s always best to apply it when the peanut butter balls are fully chilled and firm. If you’re storing them unfrosted in the fridge, you can dip them in chocolate just before serving or right after thawing from the freezer for the best results.
Frequently Asked Questions
Final Thoughts
There you have it – my go-to recipe for the simplest, most satisfying no bake peanut butter balls! I hope you love them as much as my family and I do. They’re the perfect example of how a few basic ingredients can create something truly magical without any fuss. Whether you need a quick dessert, a crowd-pleasing snack, or just a little something sweet to brighten your day, these little wonders never disappoint. They’re easy enough for kids to help make, and delicious enough to impress any adult! If you enjoy this recipe, you might also like my Easy No Bake Chocolate Oat Bars or my Fudgy Brownie Bites for more quick and tasty treats. I can’t wait to hear how your no bake peanut butter balls turn out! Please leave a comment below and let me know what you think, or share any fun variations you’ve tried. Happy no-baking!
no bake peanut butter balls
Ingredients
Main Ingredients
- 1 cup creamy peanut butter
- 1 cup butter, softened
- 4 cups powdered sugar
- 1.25 cups graham cracker crumbs
- 15 ounces semi-sweet chocolate chips for melting
Instructions
Preparation Steps
- In a large bowl, combine the peanut butter and softened butter. Mix until smooth and well combined.
- Gradually add the powdered sugar and graham cracker crumbs to the peanut butter mixture. Mix until a thick dough forms.
- Using a small cookie scoop (about 1 tablespoon), portion the dough and roll it into balls. Place the balls on a parchment-lined baking sheet.
- Place the baking sheet in the refrigerator for at least 30 minutes to chill the peanut butter balls.
- Melt the semi-sweet chocolate chips in a microwave-safe bowl in 25-second increments, stirring after each, until smooth.
- Dip each chilled peanut butter ball into the melted chocolate, using a fork to help coat. Tap off any excess chocolate and place the coated balls back on the parchment-lined baking sheet.
- If desired, drizzle any remaining melted chocolate over the tops of the peanut butter balls.
- Allow the chocolate to set completely before storing the peanut butter balls.
Notes
Featured Comments
“I love these no-bake treats—so easy and always a hit! The perfect blend of peanut butter and sweetness.”
“Impressed! Clear steps and perfect for busy nights results. Perfect for busy nights.”
“New favorite here — perfect for busy nights. crowd-pleaser was spot on.”
“Super easy and turned out amazing! My family asked for seconds. Saving this one.”
“This sweet treat was absolutely loved — the cozy really stands out. Thanks!”
“Made it tonight and wow — comforting! Will definitely make Peanut Butter Balls The Best No Bake Treat again.”


I love these no-bake treats—so easy and always a hit! The perfect blend of peanut butter and sweetness.