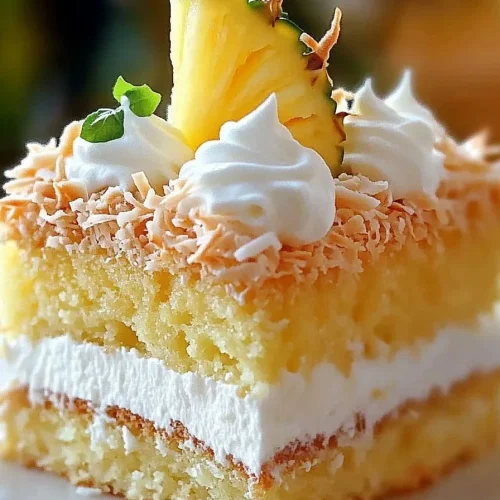
Oh, friends, if there’s one cake that instantly transports me back to sun-drenched afternoons and the sweet scent of summer, it’s this Pineapple Coconut Cake. It’s not just a cake; it’s a little slice of pure happiness, really. I remember my grandma making this for our family gatherings, and the aroma would fill her entire house, making everyone giddy with anticipation. It’s got this incredible tropical vibe that feels like a vacation, but it’s so easy to whip up, even on a weeknight when you’re craving something truly special. It’s a bit like a moist, tender pound cake met a Pina Colada and they decided to get married – with a little bit of coconutty goodness thrown in for good measure! If you’ve ever enjoyed a classic pineapple upside-down cake, imagine that wonderful caramelization but with a delightful coconut twist and a fluffier, more tender crumb. This Pineapple Coconut Cake is truly a crowd-pleaser, and I can’t wait to share it with you.
What is Pineapple Coconut Cake?
So, what exactly makes this Pineapple Coconut Cake so darn special? Think of it as a celebration of two of the most beloved tropical flavors: bright, juicy pineapple and creamy, sweet coconut. It’s essentially a wonderfully moist and tender cake, usually a simple butter or oil-based recipe, that’s infused with shredded coconut and incorporates crushed pineapple right into the batter. This isn’t just for flavor; the pineapple brings an incredible amount of moisture and a subtle tang that balances the sweetness. The coconut adds a lovely chew and a comforting aroma that just screams “tropical paradise.” It’s not overly complicated, meaning you don’t need to be a master baker to achieve fantastic results. It’s the kind of cake that feels both indulgent and wonderfully approachable, perfect for any occasion, from a casual afternoon tea to a more festive celebration. It’s essentially sunshine in cake form, and who wouldn’t want a piece of that?
How do I make Pineapple Coconut Cake?
Quick Overview
Making this Pineapple Coconut Cake is surprisingly straightforward, which is part of its charm! You’ll basically mix your dry ingredients, then your wet ingredients, combine them, and fold in the pineapple and coconut. The magic happens in the oven as these simple components transform into a beautifully moist and flavorful cake. We’ll then finish it off with a simple, luscious glaze. It’s a process that’s forgiving for beginners and satisfying for experienced bakers alike. You’ll have a stunning, tropical-inspired cake ready to impress with minimal fuss.
Ingredients
For the Main Batter:
- 2 ½ cups all-purpose flour: I always use a good quality all-purpose flour. Make sure it’s spooned and leveled, not scooped directly from the bag, to avoid a dense cake.
- 1 ½ teaspoons baking powder: This gives our cake its lovely lift.
- ½ teaspoon baking soda: Works with the acidic pineapple to create tenderness.
- ½ teaspoon salt: Essential for balancing the sweetness and enhancing all the other flavors.
- 1 cup (2 sticks) unsalted butter, softened: Make sure it’s truly softened, not melted. This is key for a light and fluffy cake.
- 1 ¾ cups granulated sugar: You can adjust this slightly, but I find this amount perfect for sweetness and texture.
- 3 large eggs: At room temperature, they incorporate much better into the batter.
- 1 teaspoon vanilla extract: A must for depth of flavor.
- 1 cup full-fat coconut milk (from a can): This is where a lot of that amazing tropical flavor and moisture comes from! Don’t use the carton kind; the canned version is richer and better for baking.
- ½ cup crushed pineapple, well-drained: You can crush canned pineapple yourself or buy it pre-crushed. Draining it is super important to avoid a soggy cake!
- ½ cup shredded sweetened coconut: Use the sweetened kind for best results, but feel free to use unsweetened and add a touch more sugar to the batter if you prefer.
For the Glaze:
- 1 cup powdered sugar: Sifted for a smooth glaze.
- 2-3 tablespoons coconut milk (or pineapple juice for an extra tang!): Start with 2 tablespoons and add more until you reach your desired drizzling consistency.
- ½ teaspoon vanilla extract (optional): For an extra hint of flavor.
Step-by-Step Instructions
Step 1: Preheat & Prep Pan
Alright, let’s get started! First things first, preheat your oven to 350°F (175°C). While the oven is warming up, grab a 9×13 inch baking pan. I like to grease it really well with butter or non-stick spray, and then lightly dust it with flour, tapping out any excess. This ensures your beautiful Pineapple Coconut Cake releases without any fuss. Some people even like to line the bottom with parchment paper for extra insurance – never a bad idea!
Step 2: Mix Dry Ingredients
In a medium-sized bowl, whisk together the flour, baking powder, baking soda, and salt. Give it a good whisk to make sure everything is evenly distributed. This step is important because it ensures the leavening agents and salt are spread throughout, giving you a consistent rise and flavor in every bite. No one wants a pocket of blandness!
Step 3: Mix Wet Ingredients
In a large bowl, cream together the softened butter and granulated sugar until light and fluffy. This usually takes a few minutes with an electric mixer, or a bit longer if you’re doing it by hand. You’re looking for a pale yellow, airy mixture. Then, beat in the eggs one at a time, making sure each is fully incorporated before adding the next. Stir in the Vanilla Extract.
Step 4: Combine
Now, it’s time to bring the wet and dry ingredients together. Add about half of the dry ingredients to the butter mixture and mix on low speed (or gently by hand) until just combined. Then, pour in the coconut milk and mix until just incorporated. Finally, add the remaining dry ingredients and mix until no streaks of flour remain. Be careful not to overmix here! Overmixing can develop the gluten in the flour too much, resulting in a tough cake. We want tender, not tough!
Step 5: Prepare Filling
Gently fold in the well-drained crushed pineapple and the shredded coconut into the batter. Make sure they’re evenly distributed throughout. This is where all that delicious tropical goodness gets integrated. I always give the crushed pineapple an extra squeeze to make sure it’s as dry as possible; it’s a small step that makes a big difference in the final texture of your Pineapple Coconut Cake.
Step 6: Layer & Swirl
Pour the batter evenly into your prepared baking pan. Smooth the top with a spatula. At this point, you can add a little extra coconut on top if you like for an extra toasted coconut finish – just sprinkle it over the top before baking. If you’re feeling fancy, you could even swirl in a tablespoon or two of pineapple preserves for an extra layer of flavor, but it’s totally optional!
Step 7: Bake
Bake for 30-40 minutes, or until a wooden skewer or toothpick inserted into the center comes out clean. Oven temperatures can vary, so start checking around the 30-minute mark. You want the cake to be golden brown and slightly springy to the touch. Overbaking is the enemy of a moist cake, so keep an eye on it!
Step 8: Cool & Glaze
Once baked, let the cake cool in the pan on a wire rack for about 15-20 minutes. This allows it to firm up a bit before you remove it. While it’s cooling, whisk together the powdered sugar, 2 tablespoons of coconut milk, and vanilla extract (if using) in a small bowl. You’re looking for a glaze that’s thick but pourable. If it’s too thick, add a tiny bit more coconut milk, a teaspoon at a time. Once the cake has cooled slightly in the pan, you can either drizzle the glaze over the top while it’s still warm (it will set to a lovely, slightly crispy shell) or let the cake cool completely before glazing. I often do the latter so the glaze stays nice and soft.
Step 9: Slice & Serve
Once the glaze has set (or if you chose the warm glaze method), slice your Pineapple Coconut Cake into squares. This cake is delicious served at room temperature, but I personally love it slightly warm, maybe with a scoop of vanilla bean Ice Cream melting into it. The aroma of warm pineapple and coconut is just heavenly!
What to Serve It With
This Pineapple Coconut Cake is wonderfully versatile and truly shines no matter how you serve it. Here are some of my favorite ways to enjoy it, depending on the occasion:
For Breakfast: This cake is surprisingly fantastic for breakfast! Think of it as a sweet treat to start your day. I love a thick slice with a hot cup of coffee or a refreshing glass of orange juice. It’s not overly rich, so it feels like a delightful indulgence rather than a heavy meal. I sometimes toast a slice lightly in the toaster oven for an extra crispy edge – divine!
For Brunch: For a more elegant brunch spread, this cake is a showstopper. Serve it cut into smaller squares and arrange them on a pretty platter. It pairs beautifully with a mimosa or a sparkling rosé. You could also add a dollop of lightly sweetened Whipped Cream or a small serving of fresh tropical fruit salad alongside it. It adds a wonderful sweet, tropical note to a spread of savory items.
As Dessert: This is probably its most classic role, and it excels here! Serve a generous slice warm, perhaps with a scoop of premium vanilla bean ice cream or some coconut gelato. A drizzle of caramel sauce or a scattering of toasted coconut flakes on top adds a restaurant-worthy finish. It’s a perfect end to a meal, especially if you’ve served something savory like grilled chicken or fish.
For Cozy Snacks: Honestly, this is my personal favorite time to enjoy a slice. With a cup of tea in the afternoon, or even a late-night craving that needs satisfying, this Pineapple Coconut Cake hits the spot. It’s comforting, satisfying, and doesn’t feel overly heavy. It’s the kind of cake that makes you feel cozy and content. My kids love a small piece with a glass of milk after school. It’s a little taste of sunshine on any given day!
Top Tips for Perfecting Your Pineapple Coconut Cake
I’ve made this Pineapple Coconut Cake more times than I can count, and over the years, I’ve picked up a few tricks that I think really make a difference. These aren’t complicated steps, but they’re little things that ensure you get the absolute best results every single time.
Zucchini Prep: Wait, zucchini? Oh dear, I think I might be thinking of a different recipe! For this Pineapple Coconut Cake, the key is truly preparing your pineapple. Make sure it’s *really* well-drained. I often spread the crushed pineapple out on a clean kitchen towel or paper towels and gently press out as much liquid as possible. Excess moisture is the enemy of a good cake texture, leading to sogginess. Freshly crushed pineapple works wonderfully too, just make sure to drain it thoroughly!
Mixing Advice: The biggest mistake many bakers make, and one I learned the hard way, is overmixing the batter once the flour is added. Gluten develops when flour is mixed with liquid, and too much gluten makes a cake tough and chewy instead of tender and soft. Mix the dry and wet ingredients until *just* combined. A few tiny streaks of flour are okay; they’ll disappear during baking. Err on the side of under-mixing rather than over-mixing. You want that melt-in-your-mouth texture!
Swirl Customization: While this recipe doesn’t have a swirl in the traditional sense, if you choose to add pineapple preserves or even a bit of cream cheese mixture for a marbled effect, remember to do it gently. Don’t over-mix the swirls into the batter. You want distinct ribbons of flavor and color, not a uniformly mixed batter. A few gentle passes with a knife or skewer are all you need.
Ingredient Swaps: I’ve experimented with this recipe quite a bit! For the coconut milk, if you can’t find full-fat canned coconut milk, a good quality evaporated milk can work in a pinch, but the texture and flavor won’t be quite as rich. I’ve also tried using almond milk or soy milk, but honestly, the full-fat coconut milk is what gives this cake its signature moistness and depth. For the shredded coconut, you can use unsweetened if that’s all you have, but you might want to add an extra tablespoon or two of sugar to the batter to compensate for the lack of sweetness in the coconut itself. And for the pineapple, while crushed is standard, I’ve also used finely chopped fresh pineapple, but again, draining is crucial!
Baking Tips: Always trust your oven, but know its quirks! If your oven tends to bake hot, you might want to reduce the temperature by 10-15 degrees Fahrenheit or reduce the baking time slightly. I always recommend using the middle rack in your oven for even heat distribution. Don’t be afraid to do the toothpick test multiple times. A clean toothpick means it’s done. If it comes out with wet batter, give it a few more minutes. If it comes out with moist crumbs, that’s usually perfect! I’ve learned that the “done” point can vary slightly based on your oven and even the humidity outside!
Glaze Variations: The basic glaze is simple and delicious. For a tangier kick, use pineapple juice instead of coconut milk. For a richer, slightly creamier glaze, use a bit of cream cheese whisked with the powdered sugar before adding the liquid. You can also add a drop of yellow food coloring for a brighter color that really screams tropical! And if you don’t want a glaze at all, a simple dusting of powdered sugar or a sprinkle of toasted coconut flakes is absolutely lovely.
Storing and Reheating Tips
Properly storing your delicious Pineapple Coconut Cake will ensure it stays moist and flavorful for days. I’ve found that this cake is pretty forgiving when it comes to storage, which is always a bonus!
Room Temperature: If your cake is plain (no cream cheese frosting or perishable fillings) and has been fully cooled, you can store it at room temperature for up to 2-3 days. The best way to do this is to cover the pan tightly with plastic wrap or transfer the cake to an airtight container. It’s important to keep it covered to prevent it from drying out. I usually find it’s best eaten within the first day or two for optimal freshness.
Refrigerator Storage: For longer storage, or if you’ve frosted it with something creamy, the refrigerator is your best bet. Wrap the cake tightly in plastic wrap, and then place it in an airtight container. It should keep well in the fridge for about 5-7 days. The texture might become slightly firmer when cold, but it’s still delicious. Just let it sit at room temperature for about 20-30 minutes before serving to take the chill off and bring out its lovely moisture again.
Freezer Instructions: This Pineapple Coconut Cake freezes beautifully! This is a great way to have some on hand for when those baking cravings strike. Let the cake cool completely, then either wrap the entire cake or individual slices very tightly in a double layer of plastic wrap, followed by a layer of aluminum foil or a freezer-safe bag. It will keep well in the freezer for up to 3 months. To thaw, remove the wrapping and let it come to room temperature on a wire rack. For a frozen slice, you can also gently warm it in a low oven (around 300°F or 150°C) for about 10-15 minutes until heated through.
Glaze Timing Advice: If you plan to store your cake at room temperature or in the freezer, it’s often best to glaze it just before serving. The glaze can get a bit sticky or melt if stored for too long, especially in warmer conditions. If you do glaze it ahead, ensure it’s fully set and then wrap it very carefully to prevent the glaze from sticking to the wrapping material. For refrigerator storage, glazing it beforehand is usually fine, but as mentioned, let it warm up slightly before eating.
Frequently Asked Questions
Final Thoughts
There you have it, my friends! This Pineapple Coconut Cake is more than just a recipe to me; it’s a little piece of sunshine, a reminder of simpler times, and a guaranteed way to bring smiles to faces. It’s the perfect balance of tropical flavors, incredible moistness, and that satisfying, comforting cake texture that we all love. It’s proof that you don’t need complicated techniques or exotic ingredients to create something truly special.
I really hope you give this Pineapple Coconut Cake a try. I know it might seem like just another cake recipe, but trust me, there’s something magical about the combination of pineapple and coconut baked into this tender crumb. It’s that hint of island escape in every single bite. If you love this recipe, you might also enjoy my Coconut Lime Loaf or my Easy Tropical Fruit Salad for more vibrant flavors.
I can’t wait to hear how yours turns out! Please leave a comment below and tell me what you think, or share any special variations you tried. Your feedback and photos always make my day! Happy baking, and enjoy every delicious slice!
Pineapple Coconut Cake
Ingredients
Cake Batter
- 2.5 cups all-purpose flour
- 1.5 cups granulated sugar
- 1 tablespoon baking powder
- 0.5 teaspoon salt
- 0.5 cup unsalted butter softened
- 2 large eggs
- 0.5 cup milk
- 1 teaspoon vanilla extract
- 1 cup crushed pineapple drained
- 0.5 cup shredded coconut sweetened
Cream Cheese Frosting
- 8 ounces cream cheese softened
- 0.5 cup unsalted butter softened
- 3 cups powdered sugar
- 0.25 cup milk
- 1 teaspoon vanilla extract
Instructions
Cake Preparation
- Preheat oven to 350°F (175°C). Grease and flour a 9x13 inch baking pan.
- In a large bowl, whisk together the flour, sugar, baking powder, and salt.
- Add the softened butter and mix until the mixture resembles coarse crumbs.
- In a separate bowl, whisk together the eggs, milk, and vanilla extract.
- Gradually add the wet ingredients to the dry ingredients, mixing until just combined. Do not overmix.
- Gently fold in the crushed pineapple and shredded coconut.
- Pour the batter into the prepared baking pan and spread evenly.
- Bake for 30-35 minutes, or until a toothpick inserted into the center comes out clean.
- Let the cake cool in the pan for 10 minutes before inverting it onto a wire rack to cool completely.
Frosting Preparation
- In a medium bowl, beat together the softened cream cheese and butter until smooth and creamy.
- Gradually add the powdered sugar, alternating with the milk, until the frosting reaches your desired consistency.
- Stir in the vanilla extract.
Assembly
- Once the cake is completely cool, frost the top with the cream cheese frosting.
- Garnish with additional shredded coconut if desired.
Notes
Featured Comments
“Impressed! Clear steps and absolutely loved results. Perfect for busy nights.”
“New favorite here — super easy. crowd-pleaser was spot on.”
“Super easy and turned out amazing! My family asked for seconds. Saving this one.”
“This sweet treat was absolutely loved — the fresh really stands out. Thanks!”
“Made it tonight and wow — crowd-pleaser! Will definitely make Pineapple Coconut Cake again.”
“Packed with flavor and so simple. Exactly what I wanted from Pineapple Coconut Cake.”