

The kitchen smells like sunshine on a Sunday morning, doesn’t it? I remember my grandmother’s sunlit porch and jars that lined the pantry shelves, glinting like tiny sunsets. This Raspberry Jam Recipe is what I reach for when I want something familiar but bursting with brightness. It’s not fussy—just pure berry goodness with a bright citrus kiss. I grew up watching raspberries pop from the garden, and this jam captures that memory in every spoonful. It’s the kind of recipe that’s incredibly forgiving, so if you’re a first-timer or a seasoned canner, you’ll feel confident and cozy dipping your spoon into the pot. This Raspberry Jam Recipe is a guest at the table of memories, and it still tastes like celebration even on a busy Tuesday. I always make a double batch because the pantry loves it as much as we do. It’s addictive, and yes, it disappears in minutes around here.
What is a raspberry jam recipe?
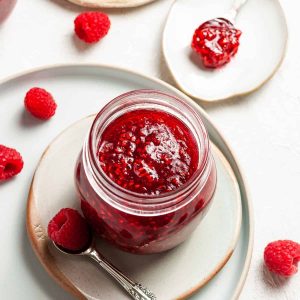
Raspberry jam recipe is a simple, bright fruit preserve built on raspberries, sugar, and a touch of citrus to lift the flavor. Think of it as the sun itself captured in a jar: tart and sweet, with a glossy, jewel-like finish. The name hints at the humble origin—a kitchen staple that families pass down with stories as much as with spoons. It’s essentially berries + sugar, simmered slowly until the mixture thickens and clings to the back of a spoon. There’s no need for fancy equipment; this Raspberry Jam Recipe wants you to keep it easy, keep it fragrant, and keep that jar in reach for toast, yogurt, or a swirl in your morning oatmeal. It’s the kind of recipe that makes you feel like you’ve got a little sunshine stored away for harvest-time mornings.
How do I make raspberry jam?
Quick Overview
This Raspberry Jam Recipe comes together on the stovetop in a handful of steps: you macerate the berries, bring them to a lively boil, then simmer until it thickens to the point that a spoon leaves a rapid trail. The trick is to maintain a steady bubble and not rush the gel point. If you’ve ever made jam before, you know patience pays off here. If you’re new to this, think of it as a little science experiment with a warm, fruity payoff: berries, sugar, lemon juice, and a gentle simmer until everything is jammy and bright. The aroma alone makes the house feel inviting, and the flavor is dependable enough to spread on everything from toast to roast pork leftovers. Yes, Raspberry Jam Recipe is forgiving, and it’s a gateway to canning confidence without overcomplicating your routine.
Ingredients
For the Main Batter:
- 4 cups fresh raspberries, washed and gently hulled (about 1½ to 2 pounds)
- 2 cups granulated sugar (adjust to taste; I like a 1:1 ratio with the fruit after simmering)
- 2 tablespoons fresh lemon juice (from about 1 lemon)
- ¼ teaspoon fine sea salt (a pinch balances sweetness)
- 1 tablespoon lemon zest (optional, for brightness)
- 1–2 tablespoons quick-set pectin (optional, for a firmer set)
For the Filling:
- Vanilla bean scrap or 1 teaspoon pure vanilla extract (optional, for a creamy depth)
- Water as needed to loosen if you’re adjusting texture during cooking
- Fine sieve for a seed-strainer option if you prefer a smoother jam
For the Glaze:
- ¼ cup Raspberry Jam (thinned with 1–2 tablespoons water) or a light dusting of granulated sugar for a glossy finish
- Extra lemon juice or a splash of liqueur (optional, to brighten or tweak flavor)
Step-by-Step Instructions
Step 1: Preheat & Prep Pan
Set a wide, heavy-bottomed pot over medium-high heat. You want a pan that will give the jam a good, even simmer and help it reduce without scorching. While the pot warms, rinse your raspberries briefly under cool water and pat them dry. If you’re canning, have your jars sterilized and ready on a rack in a hot-water bath. If not canning, have a few clean jars ready for immediate cooling—the jam will still taste amazing on toast even if you refrigerate it right away.
Step 2: Mix Dry Ingredients
In this Raspberry Jam Recipe, the “dry ingredients” are basically the sugar and salt. Stir the sugar and salt together so they’re evenly distributed. The salt helps balance the sweetness and keeps the jam bright, which is the whole point of this recipe.
Step 3: Mix Wet Ingredients
Gently mash half of the raspberries with a wooden spoon or potato masher, leaving the rest fairly whole for texture. The mash helps release pectin, and the whole berries keep that vibrant, jewel-like appearance. Stir in the lemon juice and zest if you’re using it. The citrus is what makes this Raspberry Jam Recipe sing—the brightness brightens the fruit’s natural tartness in a way that feels almost springtime.
Step 4: Combine
Pour the sugar over the berries and let them sit for about 10 minutes. You’ll notice the fruit releasing more juice as it rests, a process called maceration. Heat the mixture to a gentle boil, then reduce to a lively simmer. Don’t rush this part; a steady, gentle boil gives you a glossy jam with a nice heft from the natural pectin. If you’re using pectin, sprinkle it in evenly and whisk—it helps prevent clumps and ensures a smoother set.
Step 5: Prepare Filling
If you’re aiming for seed-free jam, you can push the hot mixture through a fine sieve after the initial boil, pressing gently to extract the seeds. I sometimes leave a few seeds for texture, but when I’m serving jam on delicate pastries, I’ll strain it for a smooth finish. This step is optional in this Raspberry Jam Recipe, but it’s a handy trick to tailor texture to your needs. If you want to whisk in a touch of vanilla, do it here while the mixture is still hot and fluid.
Step 6: Layer & Swirl
Here’s where you can play a little. If you want a marbled swirl in your pastries or toast, swirl in a teaspoon of vanilla or a pinch of citrus zest just before the jam reaches its final consistency. You can also fold in a ribbon of lavender or mint for a fragrant twist. The goal is a gentle, swirling pattern rather than a full infusion, so you preserve the berry’s purée and keep the jam visually appealing as you spoon it out onto bread.
Step 7: Bake
My Raspberry Jam Recipe doesn’t require an oven, but I sometimes say I “bake it down” in a pan to evoke that slow-cooked, jammy texture. Maintain a steady boil and let the mixture simmer, stirring often to prevent sticking. You’re aiming for a gel point where the jam coats the back of a spoon and bellies slightly when you swipe your finger through it. If you’re using pectin, follow the package directions for setting point; otherwise, you’ll judge by texture and a glossy sheen rather than by a specific time. If you’re canning, process the hot jars according to safe canning guidelines after the jam reaches the desired thickness.
Step 8: Cool & Glaze
Once your Raspberry Jam Recipe has reached the perfect thickness, remove from heat and skim off any foam from the surface. Ladle into sterilized jars (or clean, cooled containers) while it’s still hot and glossy. Wipe rims clean, seal, and let them cool undisturbed. If you’re glazing pastries or giving a pastry glaze a quick shine, whisk a few tablespoons of the jam with a splash of water until smooth and then brush on while warm. The glaze adds a bright, fruity gloss that looks as good as it tastes.
Step 9: Slice & Serve
When the jam has cooled to room temperature, you can chill it for a moment before serving. It’s perfect on toasted sourdough, tucked into a warm biscuit, or swirled into yogurt or ricotta on waffles. The texture will depend on how long you simmered it and whether you strained out seeds. My family loves a generous spoonful on breakfast toast, while I adore it folded into a minimal cheesecake swirl. If you’re sharing, a little jar tied with string and a handwritten note feels like a warm hug in a pantry. This Raspberry Jam Recipe makes you feel like you’ve captured sunshine in a jar, and that warmth travels with every slice.
What to Serve It With
Raspberry jam is a versatile little jar of personality. Here are a few ideas to keep your Raspberry Jam Recipe shining at different moments of the day and week.
For Breakfast: Smear it on thick slices of toast, swirl into a bowl of creamy yogurt, or spoon over warm oats with a shower of chopped almonds. The aroma of lemon and berries makes coffee taste even better, trust me on this one.
For Brunch: Dollop on top of vanilla bean pancakes or waffles, pair with lemon curd for a bright tart-sweet contrast, and serve with a sparkling rosé or iced tea. It’s an easy way to elevate a casual gathering into something special.
As Dessert: Layer between slices of pound cake, swirl into vanilla custard, or use as a filling for a simple cake. A few berries on top and a light dusting of powdered sugar create a pretty, inviting finish.
For Cozy Snacks: Serve with cheddar on crackers, or mix into Whipped Cream for a quick fruit topping on shortcake. It’s a comforting option that still feels a touch festive.
Over the years, I’ve found that this Raspberry Jam Recipe pairs with so many foods because it’s both bright and forgiving. It’s not just a spread; it’s a little culinary memory in a jar, a way to bring sunshine to a busy night or a late-night craving. My family’s rituals often involve tasting from spoons like little traditions—one more jar, one more slice, one more story to tell while the bread warms. This jam has traveled from our kitchen to friend’s kitchens, and every time, it’s the same warm reaction: “That’s so good.” It’s the simplest, most generous thing you can offer another person, and it starts with this Raspberry Jam Recipe.
Top Tips for Perfecting Your Raspberry Jam Recipe
Here’s how I dial this Raspberry Jam Recipe into a near-perfect jam, with tips organized by technique so you can grab what you need fast.
Zucchini Prep: You won’t be using zucchini here, obviously, but the idea is the same: prep with intention. Rinse berries carefully to avoid muddy water that can blur color, pat dry, and remove any stems. Small tricks like using a heavy-bottom pan prevent scorching and help you reach that glossy finish without constant babysitting. If you find your mixture is too watery, you can simmer a few extra minutes or add a touch more pectin if you like a firmer set.
Mixing Advice: Don’t rush the boil. A steady, rolling boil helps release pectin from the fruit while maintaining color. Stir frequently at the start to knit the fruit and sugar together, then back off as the jam thickens to avoid scorching around the edges. If you see foam, skim it away; it won’t affect flavor, but it looks tidier in the jar.
Swirl Customization: The swirl is optional but fun. Add a splash of vanilla, a hint of citrus, or a whisper of mint right at the end for a delicate aroma. Swirls are a great way to customize this Raspberry Jam Recipe for guests who prefer a subtler fruit note or a more layered dessert profile.
Ingredient Swaps: If you want to experiment, try half raspberries and half other berries (like blackberries) for a different balance. Sugar can be reduced a bit if you’re using extra-ripe fruit, but go slow and taste as you go. If you’re keeping it vegan, you can leave out any animal-derived flavorings—this jam shines on its own. For a vegan glaze, thicken with pectin or a short simmer rather than relying on gelatin or other thickeners.
Baking Tips: While this Raspberry Jam Recipe is mostly a stovetop project, think about how you’ll use it with baked goods. If you’re glazing a pastry, gently re-warm the jam with a splash of water to a pourable consistency. For canning, ensure jars and lids are sterilized, and follow standard canning guidelines for processing times and headspace.
Glaze Variations: A thin jam glaze can be brightened with lemon juice or flavored with a splash of liqueur. If you want a more pronounced glaze, reduce the jam to a slightly thicker consistency, then brush onto pastries as they come out of the oven. A little glaze goes a long way, but it makes everything look irresistible and tastes like a little dessert in disguise.
I’ve learned to trust this Raspberry Jam Recipe over the years: it’s flexible, forgiving, and deeply satisfying. If you’re new to jam-making, start with this recipe, follow the steps, and you’ll discover what I did—there’s nothing quite like the moment you pull a glossy jar from the pantry and know you’ve captured a little sunshine for later. If you oil the gears—i.e., keep notes on what you did, what textures you preferred, and how your family liked the final product—you’ll have a personal blueprint for all kinds of preserves in the future. This Raspberry Jam Recipe isn’t just a recipe; it’s a memory you can open again and again.
Storing and Reheating Tips
Storing Raspberry Jam Recipe is simple, and it rewards patience. Properly stored jam retains flavor and color for weeks, if not months, and it remains a bright addition to breakfast, snacks, and desserts.
Room Temperature: If you’ve used the canning process, stored jars can sit in a cool, dark pantry for up to a year. If you didn’t can, refrigerate after opening and use within three to four weeks for best flavor and texture.
Refrigerator Storage: A clean, airtight jar in the fridge will keep your Raspberry Jam Recipe tasting vibrant for about two to four weeks. If you’re worried about texture, give it a quick stir before serving—the jam sometimes separates a touch as it sits.
Freezer Instructions: You can freeze jam in a freezer-safe container for up to six months. Thaw in the fridge overnight and give it a quick stir. This is a lifesaver when you’ve picked more berries than you can use in a week.
Glaze Timing Advice: If you plan to glaze pastries with the jam later, avoid reheating the glaze too many times. Keep extra jam in the fridge for ready-to-use spoonfuls and only warm what you’ll actually glaze in one session. A few minutes on the stove with a splash of water will do the trick.
In short, this Raspberry Jam Recipe is flexible. It tastes fantastic fresh, ferments beautifully in a jar, and can be adapted to your pantry routine without losing its bright personality. The most important part is tasting as you go, so you adjust the sweetness and texture to your liking. It’s a simple, comforting ritual that makes even ordinary mornings feel special.
Frequently Asked Questions
Final Thoughts
This Raspberry Jam Recipe isn’t just about a jar of bright fruit; it’s about the little rituals that bring people to the table. It’s about the way the kitchen fills with citrus and berry perfume as you stir, the quiet satisfaction of watching the jam glisten, and the joy of sharing something you’ve lovingly prepared. If you’re new to jam-making, start with this recipe and you’ll quickly learn that simple ingredients, patience, and a splash of sunshine are all you need. I hope this Raspberry Jam Recipe becomes a staple in your home, the kind of jar that makes mornings a little brighter and afternoons a touch sweeter. I’d love to hear how yours turns out—what tweaks did you try, what did you serve it with, and how did your family react? Happy baking, and may your pantry always smell like summer.
Raspberry Jam Recipe
Ingredients
Main Ingredients
- 4 cups raspberries fresh or frozen
- 2 cups granulated sugar
- 2 tablespoons lemon juice
Instructions
Preparation Steps
- Combine raspberries, sugar, and lemon juice in a large saucepan. Stir to combine.
- Cook over medium-high heat, stirring occasionally, until the mixture comes to a rolling boil. This should take about 15-20 minutes.
- Test for set by placing a small spoonful of jam onto a chilled plate. If it wrinkles when pushed, it's ready.
- Skim off any foam that forms on top.
- Ladle hot jam into sterilized jars, leaving 0.25 inches headspace. Seal tightly.
- Process in a boiling water bath for 10 minutes. Let cool completely before storing.
Notes
Featured Comments
“Impressed! Clear steps and super easy results. Perfect for busy nights.”
“New favorite here — so flavorful. crowd-pleaser was spot on.”
“Super easy and turned out amazing! My family asked for seconds. Saving this one.”
“This sweet treat was absolutely loved — the rich really stands out. Thanks!”
“Made it tonight and wow — spot on! Will definitely make Raspberry Jam Recipe again.”
“Packed with flavor and so simple. Exactly what I wanted from Raspberry Jam Recipe.”


