

Oh, you guys. I have *got* to tell you about these Reese’s Peanut Butter Chocolate Mini Cheesecakes. Seriously, if you’re looking for something that’s going to knock your socks off and make everyone think you’re a gourmet baker, this is it. They look fancy, they taste like heaven, but the secret? They are surprisingly simple to whip up. I remember the first time I made these for a neighborhood potluck. I was a little nervous because, well, I wanted to impress, but also I was juggling a million things that week. My friend Sarah, who is always looking for killer dessert recipes, practically tackled me for the recipe card. She said, and I quote, “This is what my dreams are made of!” And you know what? I think she’s right. These little bites of pure joy are what dreams are made of. They’re like a tiny, perfectly portioned indulgence that hits every single sweet and salty note you could ever want. Forget a whole cake, these Reeses Peanut Butter Chocolate Mini Cheesecakes are the answer to those late-night cravings when you want something special without all the fuss.
What is Reeses Peanut Butter Chocolate Mini Cheesecake?
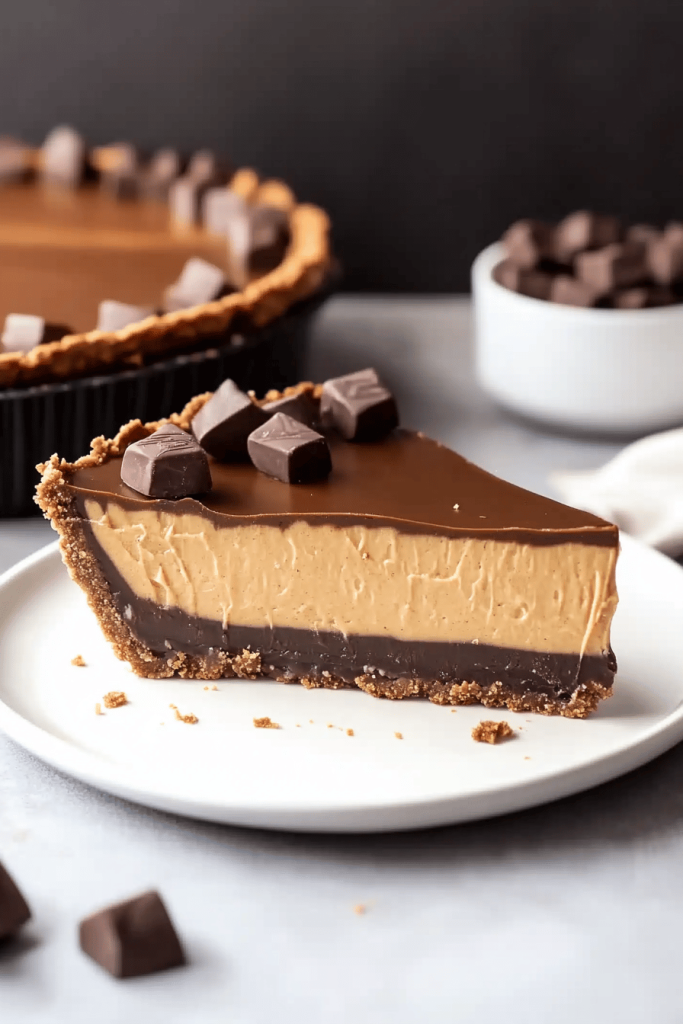
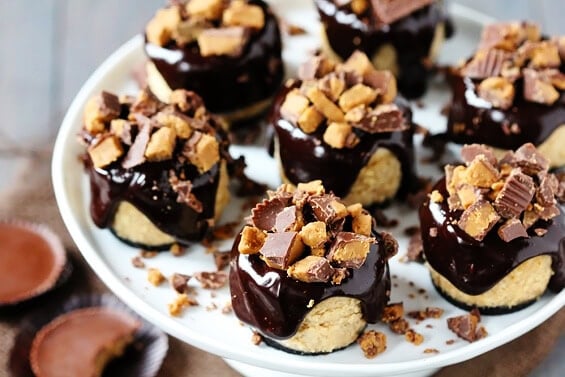
So, what exactly are these little wonders? Think of them as miniature, individual cheesecakes, but with that irresistible Reese’s Peanut Butter Cup magic baked right in. We’re talking a rich, creamy cheesecake filling that’s infused with the unmistakable flavor of peanut butter, all nestled on a chocolatey base, and then topped with a luscious chocolate drizzle that just screams indulgence. It’s not just a cheesecake; it’s an experience. It’s that perfect bite that balances the smooth tang of cream cheese with the salty sweetness of peanut butter and the deep, satisfying richness of chocolate. It’s like your favorite candy bar met your favorite dessert and they decided to have the most delicious baby ever. They’re baked in mini muffin tins, which makes them super easy to handle and serve. No slicing, no fuss, just pure, unadulterated deliciousness in every single wrapper.
How do I make Reeses Peanut Butter Chocolate Mini Cheesecakes?
Quick Overview
The magic of these mini cheesecakes lies in their straightforward approach. We start with a simple chocolate cookie crust, press it into mini muffin tins, then whip up a ridiculously easy, no-fuss cheesecake batter that’s packed with Peanut Butter goodness. A quick swirl of chocolate on top and a gentle bake are all that stand between you and dessert perfection. It’s designed to be melt-in-your-mouth delicious with minimal effort, making it ideal for those times you want a showstopper without spending hours in the kitchen.
Ingredients
For the Chocolate Crust:
1 ½ cups chocolate cookie crumbs (like Oreos, finely crushed, filling included!) – I love using Oreos for that extra chocolate punch. You can buy them pre-crushed or just pop them in a food processor. Make sure they’re fine crumbs, almost like sand, for the best texture.
2 tablespoons unsalted butter, melted – This helps bind the crumbs together. Don’t skimp here; it makes all the difference in holding its shape.
For the Peanut Butter Cheesecake Filling:
8 ounces cream cheese, softened to room temperature – This is crucial for a smooth batter. If it’s cold, you’ll get lumps, and nobody wants lumpy cheesecake! I usually take mine out about an hour before I start.
⅓ cup Creamy Peanut Butter (your favorite kind!) – I find the classic Jif or Skippy works best for that nostalgic Reese’s flavor. Natural peanut butter can sometimes separate or be too oily.
⅓ cup granulated sugar – For that perfect sweetness.
1 large egg, at room temperature – Again, room temperature is key for emulsifying properly.
1 teaspoon vanilla extract – A classic for a reason, it enhances all the other flavors.
For the Chocolate Glaze:
½ cup semi-sweet chocolate chips – I usually use Guittard or Ghirardelli. Whatever you have on hand works, but a good quality chip makes for a smoother glaze.
1 tablespoon unsalted butter or coconut oil – This gives the glaze a lovely shine and helps it melt smoothly.
Step-by-Step Instructions
Step 1: Preheat & Prep Pan
First things first, get your oven preheating to 325°F (160°C). Line a standard 24-cup mini muffin tin with paper or silicone liners. If you don’t have liners, you can grease and flour the cups very well, but liners make life so much easier for these little guys!
Step 2: Mix Dry Ingredients
In a small bowl, combine your chocolate cookie crumbs and melted butter. Stir it all together until the crumbs are evenly moistened. It should look like wet sand. This is your crust!
Step 3: Mix Wet Ingredients
In a medium bowl, beat the softened cream cheese with an electric mixer until it’s completely smooth and creamy. This might take a minute or two, and you want to scrape down the sides of the bowl a few times. Then, beat in the creamy peanut butter until it’s well combined and smooth. Gradually add the granulated sugar and beat until it’s incorporated and fluffy. Beat in the egg and vanilla extract until just combined. Don’t overmix at this stage; we just want everything to come together nicely.
Step 4: Combine
This step is pretty much done in Step 3! The cream cheese, peanut butter, sugar, egg, and vanilla are all combined into one glorious, peanut buttery cheesecake batter. The key is to ensure the cream cheese is super soft so you don’t end up with any lumps. If you see any small lumps, just keep beating for another 30 seconds or so. You want it to be luscious and smooth.
Step 5: Prepare Filling
The filling is what we just made in Step 3! That’s the beauty of these mini cheesecakes – the filling is inherently peanut butter flavored, no separate step needed to prepare a peanut butter mixture, unless you want to swirl in extra peanut butter later (more on that in tips!). This is your luscious, creamy, peanut buttery base.
Step 6: Layer & Swirl
Spoon about a tablespoon of the chocolate crumb mixture into each lined mini muffin cup and press it down gently with the back of a spoon or your fingers to form a crust. Then, spoon the peanut butter cheesecake batter over the crusts, filling each cup about two-thirds to three-quarters full. Now for the fun part: the chocolate drizzle! In a small microwave-safe bowl, combine the chocolate chips and butter (or coconut oil). Microwave in 30-second intervals, stirring in between, until melted and smooth. Drizzle the melted chocolate over the top of each cheesecake. You can use a spoon or a piping bag for this. For a fancy look, use a toothpick to gently swirl the chocolate into the cheesecake batter. Don’t go too deep, just a light swirl on top.
Step 7: Bake
Bake for 15-20 minutes, or until the edges are set and the centers are just slightly jiggly. They shouldn’t look completely liquid, but they’ll firm up as they cool. Overbaking is the enemy of tender cheesecake, so err on the side of caution!
Step 8: Cool & Glaze
Let the mini cheesecakes cool in the muffin tin for about 10-15 minutes. This helps them set. Then, carefully lift them out of the tin (using the liners is easiest) and transfer them to a wire rack to cool completely. Once they are completely cool, you can add a final drizzle of chocolate if you want that extra visual pop! For the glaze, melt the ½ cup chocolate chips with 1 tablespoon butter or coconut oil until smooth. Drizzle over the cooled cheesecakes. This is optional but highly recommended for that extra touch of decadence.
Step 9: Slice & Serve
These are best served chilled or at room temperature. Just peel off the wrapper and enjoy! They’re perfect little individual desserts. If you made them ahead, they’re ready to go straight from the fridge. They’re also wonderful with a dollop of whipped cream or a raspberry coulis, but honestly, they’re perfect just as they are.
What to Serve It With
These Reeses Peanut Butter Chocolate Mini Cheesecakes are so versatile, they fit into almost any occasion! For a cozy BREAKFAST treat (yes, I’m one of those people who believes dessert can be breakfast!), I love serving them with a hot cup of coffee. The richness of the cheesecake and the warmth of the coffee are just divine. They look elegant enough for BRUNCH too! Imagine them arranged on a tiered platter with some fresh berries and maybe a mimosa. They truly shine as a DESSERT, of course. They’re the perfect end to a dinner party, especially after a hearty meal. I like to serve them on a pretty plate with a few fresh raspberries or a light dusting of cocoa powder. And for COZY SNACKS? These are my absolute go-to. When I’m curled up with a good book or watching a movie, I’ll grab one (or two!) with a glass of cold milk. My family insists that they are the best little afternoon pick-me-ups. I’ve also found they pair wonderfully with a scoop of vanilla bean ice cream, or even a drizzle of caramel sauce if you’re feeling extra indulgent!
Top Tips for Perfecting Your Reeses Peanut Butter Chocolate Mini Cheesecakes
I’ve made these Reeses Peanut Butter Chocolate Mini Cheesecakes so many times, and I’ve picked up a few tricks along the way that I just have to share. For the cookie crust, make sure those crumbs are really fine. If you’ve got bigger chunks, they won’t pack down as nicely and might crumble when you try to eat them. I usually pulse my Oreos in the food processor a few times until it’s a uniform texture. When it comes to the cream cheese filling, my biggest tip is ALWAYS make sure your cream cheese and egg are at room temperature. I’ve rushed it before, and the batter wasn’t as smooth. It really does make a difference. If you don’t have time to let them sit out, you can gently warm the cream cheese in the microwave for about 15-20 seconds at a time, stirring in between. For the peanut butter, I’ve found that the standard commercial brands work best because they’re formulated to stay smooth and creamy. Natural peanut butters can sometimes release oil or have a grainier texture, which isn’t ideal for this smooth cheesecake filling. When you’re mixing the batter, resist the urge to overbeat once the egg is in. Overmixing can incorporate too much air, which can cause your cheesecakes to puff up too much in the oven and then crack as they cool. We want smooth, dense, rich cheesecakes here! For the swirl, don’t overdo it. A gentle swirl with a toothpick is all you need to create that beautiful marbling effect. If you swirl too much, you’ll just end up muddying the colors. For ingredient swaps, if you can’t find chocolate cookie crumbs, you could try finely crushed chocolate graham crackers or even chocolate wafer cookies. The texture might be slightly different, but the flavor will still be great. And for baking, every oven is a little different. Keep an eye on them after the 15-minute mark. You want them set but not browned on top. A little jiggly center is perfectly fine; they’ll continue to set as they cool. If you’re worried about overbaking, you can always take them out a little earlier. They will firm up beautifully on the wire rack. For the glaze, if it’s too thick, you can always stir in a tiny bit of milk or vegetable oil to thin it out. If it’s too thin, let it sit for a few minutes or gently warm it up for a few extra seconds. Patience is key with that final drizzle!
Storing and Reheating Tips
One of the best things about these Reeses Peanut Butter Chocolate Mini Cheesecakes is how well they keep! For ROOM TEMPERATURE storage, if they’re not fully glazed and are just the baked cheesecake, they can be kept in an airtight container for up to 2 days, but honestly, they disappear so fast in my house, I rarely need to test this! If they *are* glazed, I prefer to store them in the refrigerator. For REFRIGERATOR STORAGE, keep them in an airtight container. They will stay fresh and delicious for up to 4-5 days. They actually taste even better on the second day as the flavors meld together. When you’re ready to serve them from the fridge, you can either let them sit out for about 15-20 minutes to come to a slightly softer, more pleasant temperature, or enjoy them chilled – both are fantastic. For FREEZER INSTRUCTIONS, this is a great option if you want to make a big batch ahead of time. Once the cheesecakes are completely cooled and glazed, you can freeze them. The best way is to place them on a baking sheet in a single layer until frozen solid (this prevents them from sticking together). Then, transfer them to a freezer-safe container or a heavy-duty zip-top bag. They’ll keep well in the freezer for about 2-3 months. To THAW, transfer them from the freezer to the refrigerator and let them thaw overnight. They’ll be perfectly ready to enjoy the next day. As for the GLAZE TIMING ADVICE: I always recommend glazing them *after* they’ve cooled completely. If you glaze them while they’re still warm, the chocolate will melt and get all messy. For cheesecakes you plan to freeze, I sometimes hold off on the final drizzle until after they’ve thawed. This way, the glaze stays nice and shiny. However, a good quality chocolate drizzle holds up pretty well to freezing too, so it’s not a hard and fast rule!
Frequently Asked Questions
Final Thoughts
Seriously, if you’ve been searching for that perfect dessert that’s impressive but not complicated, your search ends here. These Reeses Peanut Butter Chocolate Mini Cheesecakes are the answer to your sweet dreams. They’re little bites of pure happiness that deliver that classic peanut butter and chocolate combo in a way that feels elegant and utterly delicious. I know I’ve said it a hundred times, but they are just so darn easy to make, which means more time for you to enjoy them and less time stressing in the kitchen. They’re a guaranteed crowd-pleaser, perfect for parties, holidays, or just a Tuesday night treat. If you love this recipe, you might also enjoy my No-Bake Chocolate Peanut Butter Bars or my Ultimate Fudgy Brownies – they’re in a similar vein of rich, comforting chocolate goodness! I truly hope you give these mini cheesecakes a try. I can’t wait to hear how they turn out for you! Please leave a comment below and share your experience, or even your own special twists on the recipe. Happy baking, everyone!
Reeses Peanut Butter Chocolate Mini Cheesecakes
Ingredients
Crust
- 1.5 cups crushed chocolate wafer cookies
- 5 tablespoons unsalted butter, melted
Cheesecake Filling
- 24 ounces cream cheese, softened
- 1 cup granulated sugar
- 2 large eggs
- 0.5 cup sour cream
- 1 teaspoon vanilla extract
- 0.5 cup peanut butter
Toppings
- 12 miniature Reese's Peanut Butter Cups, halved
- 0.5 cup semi-sweet chocolate chips
- 0.25 cup heavy cream
Instructions
Preparation Steps
- Preheat oven to 350°F (175°C). Line a 12-cup muffin tin with paper liners.
- In a small bowl, combine crushed cookies and melted butter. Press about 1 tablespoon of the mixture into the bottom of each muffin liner.
- In a large bowl, beat cream cheese and sugar until smooth. Beat in eggs one at a time, then stir in sour cream, vanilla extract, and peanut butter until well combined.
- Spoon the filling evenly into the prepared muffin liners over the crust.
- Bake for 20-25 minutes, or until the edges are set and the centers are slightly jiggly.
- Let cool in the muffin tin for 10 minutes, then transfer to a wire rack to cool completely.
- While cheesecakes are cooling, prepare the chocolate ganache. In a small microwave-safe bowl, combine chocolate chips and heavy cream. Microwave on high in 30-second intervals, stirring in between, until smooth.
- Once cheesecakes are completely cooled, top each with a halved Reese's Peanut Butter Cup and drizzle with chocolate ganache.
- Chill for at least 1 hour before serving.
Notes
Featured Comments
“OMG, these look absolutely irresistible! I need to make them ASAP — peanut butter + chocolate + cheesecake? Yes please!”
“Impressed! Clear steps and absolutely loved results. Perfect for busy nights.”
“New favorite here — crowd-pleaser. crowd-pleaser was spot on.”
“Super easy and turned out amazing! My family asked for seconds. Saving this one.”
“This sweet treat was absolutely loved — the light really stands out. Thanks!”
“Made it tonight and wow — family favorite! Will definitely make Reeses Peanut Butter Chocolate Mini Cheesecakes again.”


OMG, these look absolutely irresistible! I need to make them ASAP — peanut butter + chocolate + cheesecake? Yes please!