

Okay, confession time. There are nights when a serious craving hits, you know the kind – that deep, gnawing need for something warm, sweet, and utterly comforting. And on those nights, my friends, the last thing I want to do is fuss with multiple bowls, cookie sheets, and then face a mountain of dishes. That’s where this skillet cookie recipe comes in, and let me tell you, it’s an absolute lifesaver. It’s like the magical cousin of a classic Chocolate Chip Cookie, but way more chill and just as delicious. Forget individual cookies; we’re talking about one giant, glorious circle of cookie dough baked right in a cast-iron skillet. It’s pure joy in every gooey, slightly crispy-edged bite. If you love a good chocolate chip cookie, just imagine that flavor amplified, with a rustic charm and an undeniable warmth that only a skillet can provide. This, my friends, is about to become your new best friend in the kitchen.
What is a Skillet Cookie?
So, what exactly is this wonder of the dessert world? A skillet cookie is, quite simply, a large cookie baked directly in a cast-iron skillet. Think of it as a giant, shareable Chocolate Chip Cookie that’s designed to be pulled apart and devoured right from the pan. It’s not complicated; it’s just a brilliant way to simplify the cookie-baking process. Instead of portioning out dozens of individual cookies, you mix up a single batch of dough, press it into a greased skillet, and bake it all at once. The result is a cookie with a beautifully golden-brown bottom and edges, a soft and chewy center, and the irresistible allure of being baked in a rustic, oven-safe vessel. It’s the kind of dessert that feels both impressive and incredibly homey, perfect for a casual get-together or just a treat for yourself.
How do you make a Skillet cookie?
Quick Overview
Making this skillet cookie is delightfully straightforward. You’ll cream together your butter and sugars, add in your eggs and vanilla, then gently fold in your dry ingredients until just combined. Next, you’ll press this glorious dough into a preheated, greased skillet and bake until it’s golden brown and the center is still slightly underdone. The best part? It’s ready to be devoured warm, right out of the oven. It’s a no-fuss approach to a seriously satisfying dessert that looks and tastes like you’ve spent ages on it.
Ingredients
For the Main Batter:
1 cup (2 sticks) unsalted butter, softened – Make sure it’s softened, not melted! This is key for that perfect creamy texture. I always pull mine out of the fridge about an hour before I start.
1 cup packed light brown sugar – This gives us that lovely chewy texture and rich caramel notes. Don’t skimp on packing it in!
½ cup granulated sugar – For a touch of crispness and sweetness.
2 large eggs – Room temperature is best. They incorporate much more smoothly this way.
2 teaspoons pure Vanilla Extract – Don’t use imitation if you can help it; pure vanilla extract makes a huge difference in flavor.
2 ½ cups all-purpose flour – Spooned and leveled, not scooped. Scooping can lead to too much flour, making your cookie dry.
1 teaspoon baking soda – Our leavening agent to get that perfect rise and chew.
½ teaspoon salt – Balances out the sweetness and enhances all the other flavors.
1 ½ cups semi-sweet chocolate chips – Or a mix of milk and dark! Use good quality ones; they really shine here.
For the Filling:
This part is optional, but oh-so-worth-it!
½ cup Creamy Peanut Butter (or your favorite nut butter) – Smooth is best for easy spreading.
¼ cup powdered sugar – Helps thicken it up just slightly.
2 tablespoons milk (dairy or non-dairy) – To get the right consistency.
For the Glaze:
1 cup powdered sugar – Sifted, if you want it super smooth.
2-3 tablespoons milk (dairy or non-dairy) – Start with 2 and add more until you reach your desired drizzling consistency.
½ teaspoon vanilla extract – For a hint of extra flavor.
Step-by-Step Instructions
Step 1: Preheat & Prep Pan
First things first, preheat your oven to 350°F (175°C). Grab a 9 or 10-inch cast-iron skillet. I swear by cast iron for this because it heats so evenly, giving you that perfect crust. Grease it really well with butter or non-stick cooking spray. You can even line the bottom with a round of parchment paper if you’re nervous about sticking, though a well-greased pan should do the trick. Getting this ready beforehand means your dough goes straight into a warm pan, which is exactly what we want.
Step 2: Mix Dry Ingredients
In a medium bowl, whisk together your flour, baking soda, and salt. Just a good whisking will do – we’re not trying to overwork anything here. This ensures the leavening agents and salt are evenly distributed throughout the flour, so every bite is perfectly balanced. Set this aside for a moment.
Step 3: Mix Wet Ingredients
In a large bowl, cream together the softened butter, light brown sugar, and granulated sugar. You can use a stand mixer with a paddle attachment or a hand mixer for this. Beat them together until the mixture is light and fluffy, about 2-3 minutes. This step is crucial for incorporating air, which gives your cookie its wonderful texture. Then, beat in the eggs one at a time, making sure each is fully incorporated before adding the next. Finally, stir in the vanilla extract. The mixture should look smooth and slightly glossy.
Step 4: Combine
Now, it’s time to bring it all together. Gradually add the dry ingredients to the wet ingredients, mixing on low speed or by hand with a spatula until *just* combined. Seriously, stop mixing as soon as you don’t see any streaks of dry flour. Overmixing is the enemy of tender cookies! We want a soft, pliable dough. Gently fold in your chocolate chips.
Step 5: Prepare Filling (Optional)
If you’re going the extra mile, mix the peanut butter, powdered sugar, and milk in a small bowl until smooth and spreadable. This makes a delicious, slightly sweet peanut butter layer that is absolutely divine with the chocolate. Don’t make it too thin; you want it to hold its shape.
Step 6: Layer & Swirl
Press about two-thirds of the cookie dough evenly into the bottom of your prepared skillet. If you’re using the peanut butter filling, dollop it over the dough and gently swirl it with a knife or offset spatula. Then, carefully spread the remaining one-third of the cookie dough over the filling (or directly on top if you skipped the filling). You can also just press dollops of the remaining dough over the base layer. Don’t worry too much about perfection; rustic is beautiful here!
Step 7: Bake
Pop that skillet into your preheated oven. Bake for 25-35 minutes, or until the edges are golden brown and the center is set but still looks a little underbaked. It will continue to cook as it cools. A toothpick inserted near the center should come out with moist crumbs, not wet batter. Ovens can vary, so keep an eye on it. I usually start checking around the 25-minute mark.
Step 8: Cool & Glaze
This is the hardest part: letting it cool! Let the skillet cookie cool in the skillet on a wire rack for at least 15-20 minutes. This allows it to set up properly. While it’s cooling, whisk together the powdered sugar, milk, and vanilla extract for the glaze. Start with 2 tablespoons of milk and add more slowly until you get a drizzly consistency that’s not too thin. Drizzle generously over the warm, but not piping hot, cookie. The warmth will help the glaze melt just a touch.
Step 9: Slice & Serve
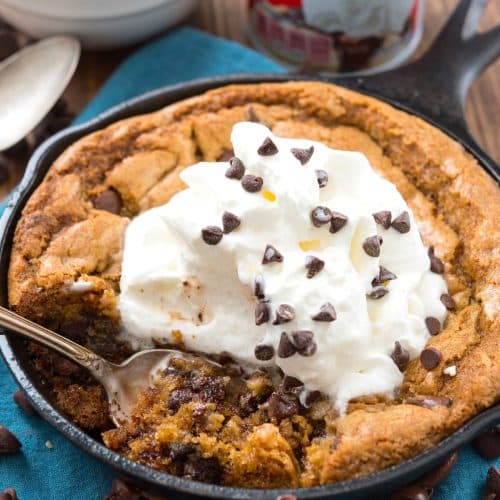
Once the glaze has set slightly, grab a spoon or a sturdy spatula and dive in! You can also cut it into wedges like a pie. This skillet cookie is absolutely divine served warm, with a scoop of vanilla ice cream or a dollop of whipped cream. Enjoy the sheer indulgence!
What to Serve It With
This skillet cookie is a star all on its own, but it can also be part of a delightful spread for any meal or occasion. For a cozy breakfast, imagine slicing off a warm piece and pairing it with a strong cup of black coffee. The rich flavors are surprisingly wonderful in the morning! For a more elegant brunch, I love to serve it cut into smaller wedges, perhaps with some fresh berries on the side for a pop of color and freshness. It pairs beautifully with mimosas or a light sparkling rosé. As a dessert, it’s the ultimate showstopper. A scoop of good quality vanilla bean ice cream melting into the warm cookie is pure bliss. You could also serve it with a drizzle of raspberry sauce or a sprinkle of flaky sea salt for an extra gourmet touch. And for those purely cozy snack moments, sometimes all you need is a fork and a good book, with a warm slice of this cookie as your companion. I’ve even served it with a shot of espresso on the side for a grown-up treat. My family has a tradition of making it after family game nights, and it’s become a beloved ritual.
Top Tips for Perfecting Your Skillet Cookie
I’ve made this skillet cookie more times than I can count, and over the years, I’ve picked up a few tricks that make all the difference. First, about the butter and sugar creaming – don’t rush it! That fluffiness you achieve is what gives the cookie its tender crumb. I’ve learned that if you don’t cream it long enough, you can end up with a denser, tougher cookie. For the flour, always spoon it into your measuring cup and level it off with a straight edge. Packing it in can lead to a dry, cakey result, and nobody wants that! When it comes to mixing the wet and dry ingredients, remember my mantra: *just combined*. Overmixing develops the gluten in the flour, making your cookie tough. Stop as soon as you don’t see any dry flour streaks. I once made the mistake of mixing too vigorously, and the texture was noticeably different – less chewy, more crumbly. For the chocolate chips, I love using a mix of semi-sweet and dark chocolate, or even adding some milk chocolate chunks for extra creaminess. If you like nuts, feel free to toss in about ½ cup of chopped walnuts or pecans with the chocolate chips. For the optional peanut butter swirl, make sure it’s a smooth, creamy peanut butter; chunky can be a bit tricky to spread evenly. If your dough seems a little too stiff to press into the pan, don’t be afraid to use your hands – just lightly greasing them can help prevent sticking. When it comes to baking, keep an eye on it! Ovens are notoriously different. My oven runs a little hot, so I often pull mine out a couple of minutes earlier than the recipe states. You’re looking for golden brown edges and a center that still looks a bit soft and underdone. It will firm up as it cools. If you’re worried about the bottom getting too dark, you can always place a baking sheet on the rack below the skillet. For the glaze, consistency is key. I usually start with the lower amount of milk and add more just a teaspoon at a time until it’s perfect for drizzling. Too much milk, and it’ll just run off. Not enough, and it’ll be too thick to spread. A little extra vanilla in the glaze really boosts the flavor, too!
Storing and Reheating Tips
This skillet cookie is best enjoyed fresh and warm, but it does store surprisingly well for a few days. If you have any leftovers (which is rare in my house!), let the cookie cool completely before storing. For room temperature storage, keep it in the skillet covered loosely with foil or plastic wrap, or transfer it to an airtight container. It should stay fresh and delicious for about 2-3 days. If you plan on keeping it longer, I highly recommend refrigerating it. Place it in an airtight container (you can keep it in the skillet if it fits, or transfer to a container) and it will last for up to 5 days. The texture might change slightly, becoming a bit firmer, but it’s still wonderfully tasty. For longer storage, freezing is a great option. Let the cookie cool completely, then wrap it tightly in plastic wrap, followed by a layer of aluminum foil. It can be frozen for up to 2-3 months. When you’re ready to enjoy it, thaw it overnight in the refrigerator. For reheating, if it’s been refrigerated or frozen and thawed, you can gently warm it up in a low oven (around 300°F or 150°C) for about 5-10 minutes, or until warmed through. You can also microwave it in short bursts, but be careful not to overheat it, as it can become tough. For the glaze, I usually apply it just before serving or once the cookie has cooled slightly after baking. If you’re storing a glazed cookie, the glaze might become a bit softer or even slightly sticky, which is perfectly normal. If you’re freezing, it’s often best to glaze it after reheating.
Frequently Asked Questions
Final Thoughts
There you have it – the recipe for my go-to skillet cookie! It’s honestly one of those recipes that just makes everyone happy. It’s ridiculously easy to make, requires minimal cleanup, and the payoff in terms of flavor and comfort is HUGE. Whether you’re looking for a quick dessert for family movie night, a show-stopping treat for a casual get-together, or just a way to satisfy a serious sweet tooth, this skillet cookie is your answer. It’s got that perfect balance of chewy, gooey, and slightly crispy that we all love in a cookie, elevated by the rustic charm of being baked and served straight from the skillet. If you enjoyed this, you might also love my Classic Chocolate Chip Cookies or my Brown Butter Blondies for more comforting baked goods. I truly can’t wait to hear how yours turns out! Please leave a comment below and share your experience, or any fun variations you tried. Happy baking, and enjoy every single bite!
Skillet Chocolate Chip Cookie
Ingredients
Main Ingredients
- 0.125 cup butter melted
- 0.125 cup granulated sugar
- 0.125 cup packed brown sugar
- 1 teaspoon vanilla extract
- 0.25 teaspoon baking soda
- 0.125 teaspoon salt
- 0.5 cup all purpose flour
- 0.33 cup mini chocolate chips or other chocolate chips or candy
Instructions
Preparation Steps
- Preheat oven to 350°F. You will need a 6.25” mini cast iron skillet to make this cookie. If you don’t have a skillet, you can use a 6” cake pan, or an 8x4” loaf pan. If you are using a skillet, cake, or loaf pan, spray it with nonstick cooking spray. If you’re using a muffin pan, use liners for easy removal and serving (it will probably make about 4 muffin sized cookies).
- Melt butter in a large bowl. Stir in both sugars, then egg yolk, extract, baking soda and salt. Carefully stir in the flour, then mix in the chocolate chips.
- Bake the mini cast iron skillet for about 18-24 minutes, or until the edges are puffed and the center no longer looks translucent. Using another pan will affect baking time.
- Serve warm, with lots of whipped cream or ice cream and sprinkles.
Notes
Featured Comments
“I totally get that craving—this skillet cookie recipe sounds perfect for those moments. Love how it comes together so quickly!”
“Impressed! Clear steps and creamy results. Perfect for busy nights.”
“New favorite here — crowd-pleaser. crowd-pleaser was spot on.”
“Super easy and turned out amazing! My family asked for seconds. Saving this one.”
“This sweet treat was absolutely loved — the light really stands out. Thanks!”
“Made it tonight and wow — crowd-pleaser! Will definitely make Small Batch Skillet Cookie Magic again.”


I totally get that craving—this skillet cookie recipe sounds perfect for those moments. Love how it comes together so quickly!