

You know those recipes that just feel like a warm hug? The ones you pull out when you need a little something special, but also something that won’t stress you out? Well, this Lemon Cream Cheese cake is *that* recipe for me. It’s not just a cake; it’s a memory. I can practically smell it baking in my grandma’s kitchen on a sunny afternoon, the scent of lemon zest dancing in the air. It’s the kind of dessert that makes people’s eyes light up and ask, “What is this magic?” And the best part? It’s surprisingly simple. Forget those complicated layer cakes that take hours. This beauty is rich, tangy, and utterly divine, with a creamy, dreamy texture that just melts in your mouth. If you’ve ever loved a classic cheesecake or a bright, zesty pound cake, you’re going to fall head over heels for this lemon cream cheese cake. It’s truly the best of both worlds.

What is a lemon cream cheese cake?
So, what exactly *is* this magnificent creation? Think of it as a delightful hybrid, a perfect marriage between a rich, dense cheesecake and a wonderfully moist, tender cake. It’s essentially a cake batter infused with the luxurious creaminess of Cream Cheese, then brightened up with a generous swirl of tangy lemon. It’s not as intensely dense or as wet as a traditional baked cheesecake, nor is it as light and airy as a standard sponge cake. It hits this beautiful middle ground, offering a satisfyingly rich texture without being heavy. The lemon isn’t just a hint; it’s a vibrant, zesty star that cuts through the richness, making every bite refreshing and exciting. It’s the kind of dessert that feels sophisticated enough for a dinner party but comforting enough for a quiet afternoon with a cup of tea. It’s honestly my go-to when I want something truly impressive without the fuss.
How do I make lemon cream cheese cake?
Quick Overview
Making this lemon Cream Cheese cake is wonderfully straightforward. We’ll start by creaming together some key ingredients to get a lovely light base, then we’ll gently fold in the wet ingredients. The real magic happens when we swirl in a simple, tangy cream cheese and lemon filling right into the batter before baking. It creates those gorgeous marbled effects and ensures a burst of creamy lemon goodness in every slice. The whole process takes less than 20 minutes of active prep time, and the oven does most of the work. It’s designed to be foolproof, giving you that impressive, bakery-worthy result without any stress.
Ingredients
For the Main Batter:
This is where the cake gets its structure and subtle sweetness. I always opt for good quality all-purpose flour, as it gives the best texture. Make sure it’s at room temperature; it really makes a difference in how smoothly everything incorporates. The granulated sugar provides sweetness, of course, but also helps with the cake’s tenderness. Unsalted butter is my go-to because it lets me control the saltiness perfectly. Make sure it’s softened to room temperature – this is non-negotiable for getting that fluffy, creamy base. Eggs, also at room temperature, are essential for binding and richness. And for that unmistakable moistness and tender crumb, we’ll use a bit of milk. Whole milk works best for richness, but I’ve experimented with 2% and even almond milk in a pinch, and it was still delicious, just a touch less rich. Don’t forget your leavening agents: baking powder for a good lift and a pinch of salt to balance all the flavors.
For the Filling:
This is the heart of the “cream cheese” part of our lemon cream cheese cake! You’ll need cream cheese, of course, and it absolutely must be full-fat and softened. Low-fat or cream cheese spread just won’t give you that same luxuriously smooth texture. I like to add a bit more granulated sugar here to balance the tang of the lemon and the cream cheese. And the star player: fresh lemon juice and zest. Don’t skimp on this! Using fresh lemons makes all the difference; the bottled stuff just doesn’t have that vibrant, natural perfume. I usually use the zest and juice of about one large lemon, but you can totally adjust this to your lemon preference. A touch of Vanilla Extract rounds out the flavors beautifully.
For the Glaze:
This is optional, but highly recommended for that extra punch of flavor and gorgeous finish. It’s just powdered sugar (also known as confectioners’ sugar or icing sugar), whisked with fresh lemon juice until it reaches a pourable, but not too runny, consistency. You want it thick enough to coat the cake but thin enough to drizzle. If it’s too thick, add lemon juice a teaspoon at a time. If it’s too thin, a bit more powdered sugar will do the trick. You can also add a tiny bit of lemon zest here for even more lemon-y goodness!
Step-by-Step Instructions
Step 1: Preheat & Prep Pan
First things first, let’s get our oven preheated to 350°F (175°C). This ensures an even baking temperature from the moment the cake goes in. Next, grab your cake pan – I usually use a 9-inch round pan or an 8×8 inch square pan for this. Grease it really well with butter or non-stick spray, and then lightly flour it, tapping out any excess. This is a crucial step to prevent sticking. Trust me, there’s nothing more heartbreaking than a cake that won’t release cleanly!
Step 2: Mix Dry Ingredients
In a medium bowl, whisk together your flour, baking powder, and salt. Give it a good whisk for about 30 seconds. This aerates the flour and distributes the leavening agents evenly, which helps create a lighter, fluffier cake. It’s a simple step, but it really does make a difference in the final texture.
Step 3: Mix Wet Ingredients
In a large bowl, beat the softened butter and granulated sugar together until light and fluffy. This is called creaming, and it’s key to incorporating air into the batter, which helps the cake rise. Then, beat in your eggs, one at a time, making sure each one is fully incorporated before adding the next. Scrape down the sides of the bowl as needed. Stir in the milk and vanilla extract until just combined.
Step 4: Combine
Now, we’ll gradually add the dry ingredients to the wet ingredients. Add about a third of the dry ingredients to the wet mixture and mix on low speed (or by hand) until just combined. Then, add half of the remaining dry ingredients, mix again, and repeat with the last third of the dry ingredients. Be careful not to overmix! Overmixing develops the gluten in the flour, which can lead to a tough cake. Stop mixing as soon as you no longer see streaks of flour.
Step 5: Prepare Filling
While the batter is resting, let’s whip up that glorious cream cheese filling. In a separate small bowl, beat together the softened cream cheese, granulated sugar, lemon juice, lemon zest, and vanilla extract until smooth and creamy. Make sure there are no lumps of cream cheese. The mixture should be thick and luscious.
Step 6: Layer & Swirl
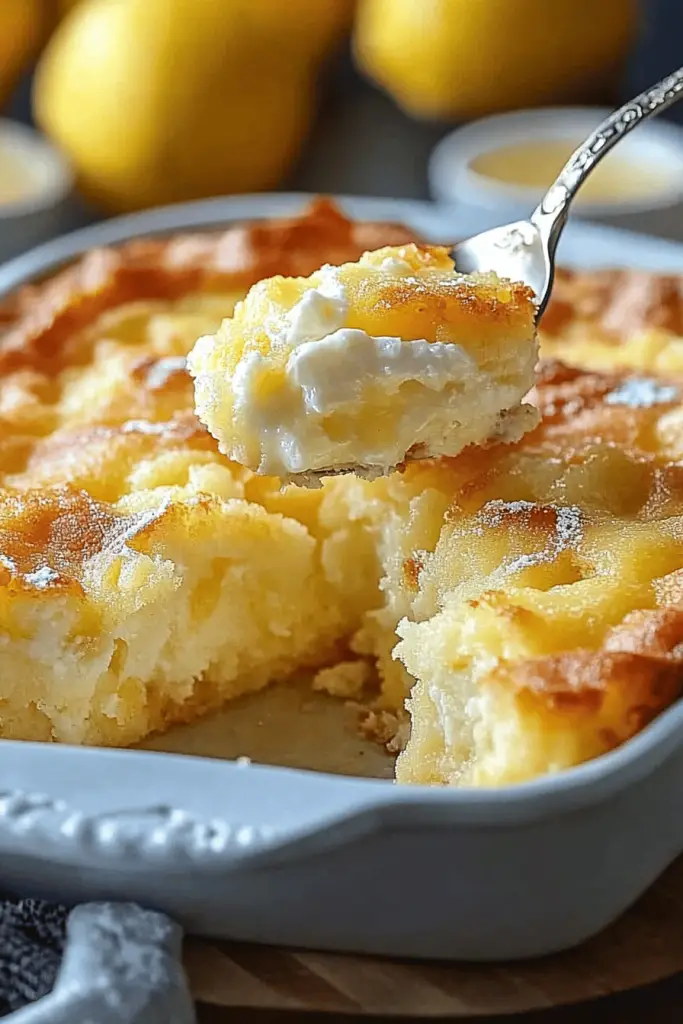
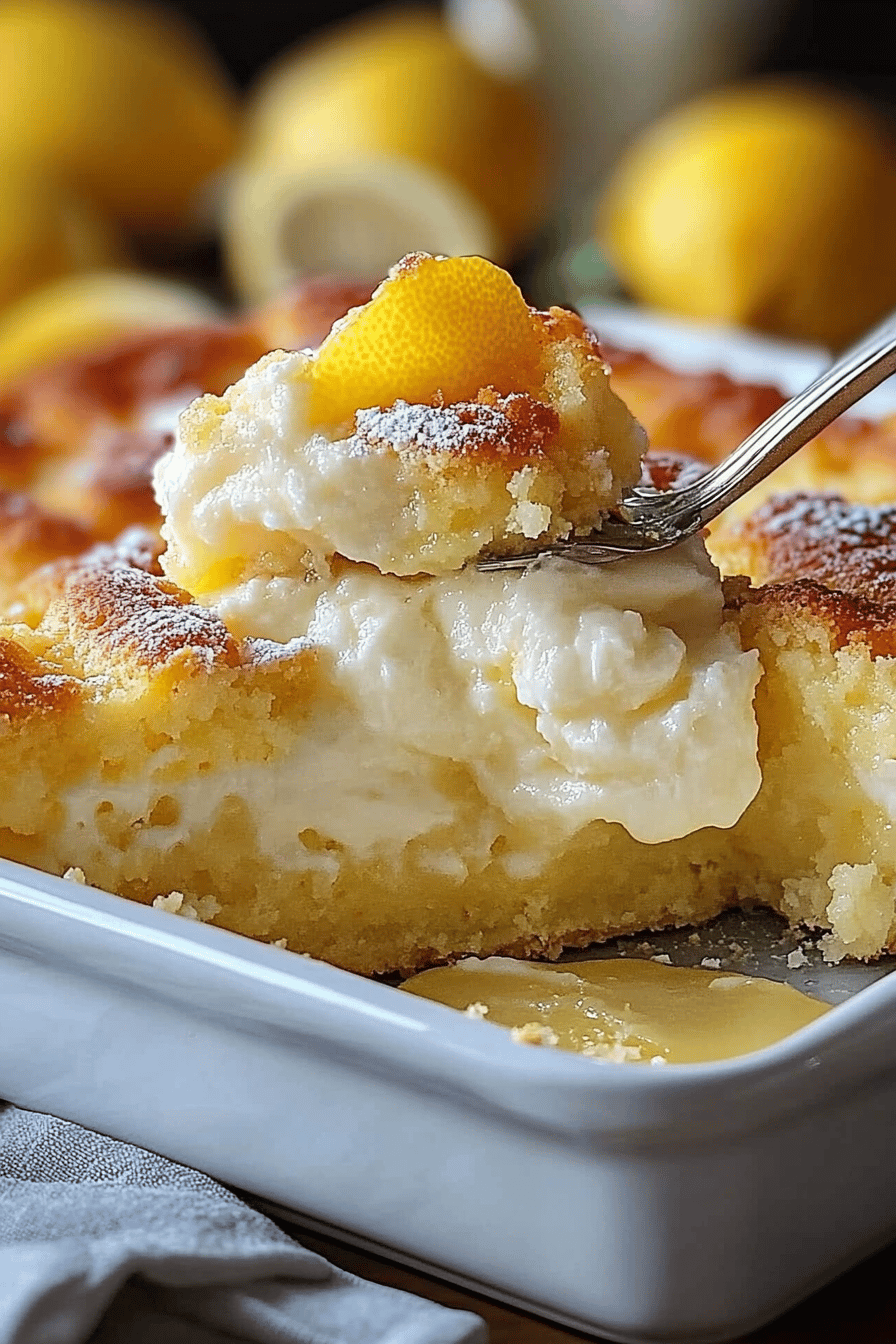
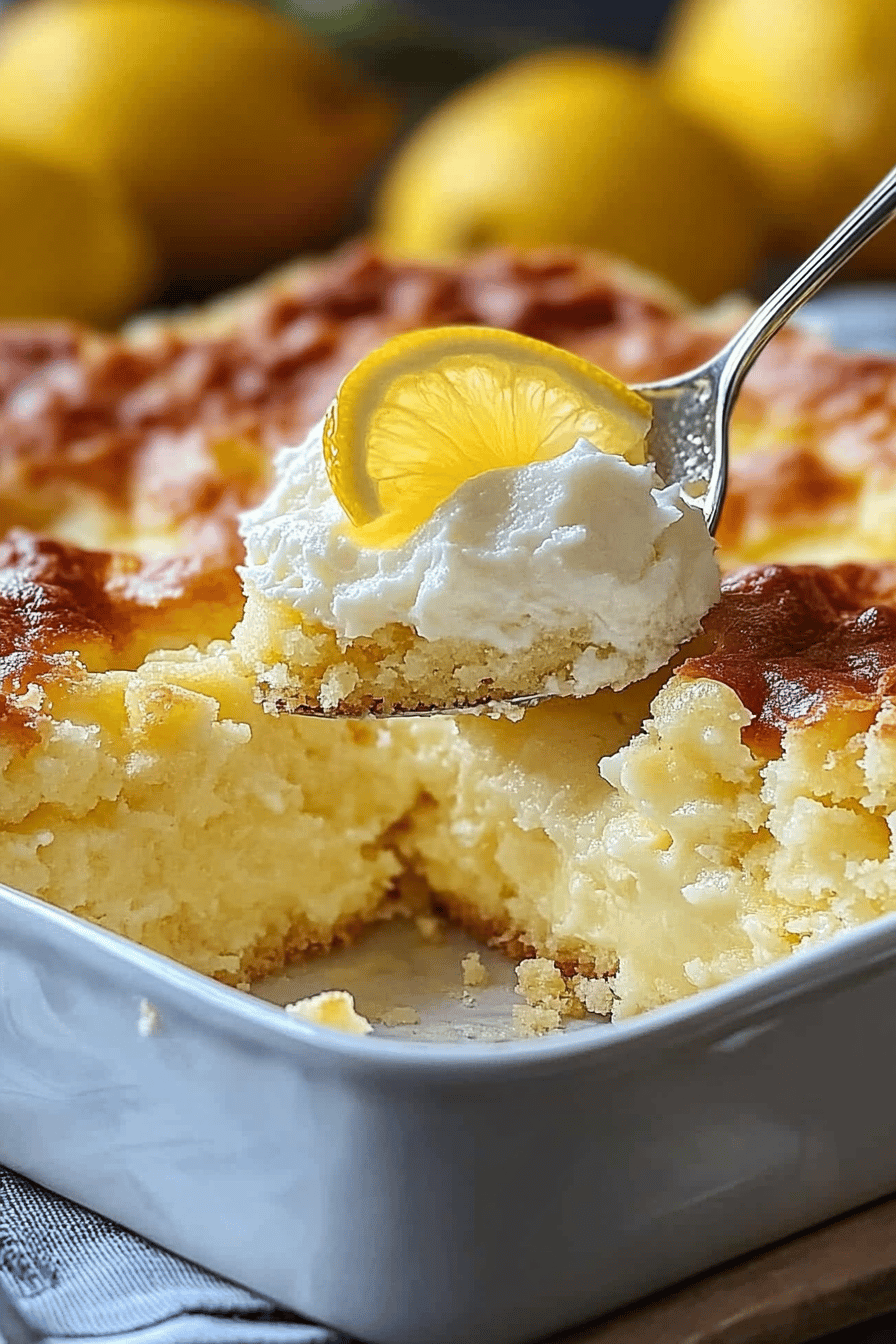
Pour about half of the cake batter into your prepared pan and spread it evenly. Dollop spoonfuls of the cream cheese filling over the batter. Then, pour the remaining cake batter over the filling. Dollop the rest of the cream cheese filling on top. Now for the fun part! Take a butter knife or a skewer and gently swirl the filling into the batter. Don’t over-swirl; you want distinct ribbons of cream cheese, not a uniform mix. Think beautiful marbling!
Step 7: Bake
Pop the pan into your preheated oven and bake for 30-40 minutes. The exact time will depend on your oven, but you’ll know it’s done when a wooden skewer or toothpick inserted into the center comes out clean, or with just a few moist crumbs attached. The top should be golden brown and slightly puffed.
Step 8: Cool & Glaze
Once baked, let the cake cool in the pan on a wire rack for about 10-15 minutes. This helps it set up properly. Then, carefully invert the cake onto the wire rack to cool completely. Once it’s fully cooled, whisk together the powdered sugar and lemon juice for the glaze. Drizzle it over the top of the cake, letting it drip down the sides. If you like, you can add a bit more lemon zest to the glaze for extra flair.
Step 9: Slice & Serve
Once the glaze has set a bit, it’s time to slice and enjoy your incredible lemon cream cheese cake! I find it slices best with a sharp knife, wiped clean between cuts for nice, clean pieces. Serve it at room temperature for the best flavor and texture.
What to Serve It With
This lemon cream cheese cake is so versatile, it can truly grace any table, any time of day! For a delightful breakfast treat, I love serving a slice with a perfectly brewed cup of coffee. The brightness of the cake pairs wonderfully with a robust brew. For a more elegant brunch spread, it’s fantastic alongside fresh fruit salad and maybe some crispy bacon. I often arrange a few thin slices on a pretty platter with a scattering of fresh raspberries or blueberries – it just looks so inviting. As a dessert, it’s simply divine on its own, but if you’re feeling extra fancy, a tiny dollop of unsweetened whipped cream or a scoop of vanilla bean ice cream can be lovely. My absolute favorite way to enjoy it as a dessert, though, is with a glass of chilled Moscato or a light dessert wine. And for those moments when you just need a comforting, sweet pick-me-up, this cake is pure bliss. It’s perfect with a mug of herbal tea on a chilly afternoon. My kids, who are usually picky, devour this cake with milk. It’s become a family tradition for special occasions and “just because” days alike!
Top Tips for Perfecting Your Lemon Cream Cheese Cake
I’ve made this lemon cream cheese cake more times than I can count, and over the years, I’ve picked up a few little tricks that I think make it even better. For the lemon zest, I always use a microplane; it really gets all that fragrant zest without any of the bitter white pith. And don’t just zest one lemon – I often use the zest of two large lemons to really amp up that bright, fresh flavor. When it comes to mixing the batter, remember the golden rule: don’t overmix! I’ve learned the hard way that overworking the batter leads to a tough, dense cake, and nobody wants that. Mix until *just* combined, and you’ll get a wonderfully tender crumb. For the cream cheese swirl, I like to use a spoon to drop dollops of the filling evenly over the batter, and then I use a butter knife to make about 5-6 gentle zig-zag motions. You want to see those beautiful creamy ribbons, not completely blend everything together. I’ve experimented with different pans, and while a 9-inch round is my favorite for even baking, an 8×8 inch square pan also works beautifully, though it might bake a little faster. If your oven tends to run hot, keep an eye on it towards the end of the baking time. A toothpick coming out with moist crumbs is your cue that it’s perfectly done – not too dry, not too wet. And for the glaze, consistency is key. I always start with just a tablespoon or two of lemon juice and add more gradually until it drizzles nicely. It should be thick enough to coat but thin enough to flow. If you want to make it even more vibrant, you can add a tiny drop of yellow food coloring, but I usually find the lemon zest gives it a beautiful natural hue. Another thing I’ve discovered is that this cake tastes even better the next day, once the flavors have had a chance to meld. So if you can resist, let it sit for a few hours or overnight before slicing!
Storing and Reheating Tips
This lemon cream cheese cake is pretty forgiving when it comes to storing, which is another reason I love it so much. If you’re planning to enjoy it within a day or two, you can absolutely leave it at room temperature. Just make sure to cover it loosely with plastic wrap or foil to keep it fresh and prevent it from drying out. It’s perfect for when you want a treat readily available. For longer storage, the refrigerator is your best friend. Once the cake has completely cooled, wrap it tightly in plastic wrap, and then place it in an airtight container. It should stay deliciously moist and flavorful in the fridge for up to 4-5 days. I usually slice off what I need and then re-cover the rest tightly. If you want to freeze portions of this cake, it freezes beautifully! I recommend cutting it into individual slices first, wrapping each slice thoroughly in plastic wrap, then in a layer of aluminum foil, and finally placing them in a freezer-safe bag or container. It can be stored in the freezer for up to 2-3 months. To thaw, simply unwrap the slices and let them come to room temperature, or gently warm them in a low oven (around 300°F or 150°C for about 5-10 minutes) if you prefer it warm. It’s best to add the glaze *after* the cake has cooled completely and just before serving, especially if you plan on refrigerating or freezing it. The glaze can sometimes get a bit sticky or messy if it sits for too long in different storage conditions.
Frequently Asked Questions
Final Thoughts
There you have it – my absolute favorite lemon cream cheese cake! I truly hope you give this recipe a try. It’s one of those gems that’s simple enough for any home cook but tastes so incredibly special. The combination of bright lemon and creamy tang is just divine, and the texture is simply melt-in-your-mouth perfection. It’s the kind of cake that makes people happy, brings back sweet memories, and creates new ones. If you’re looking for a dessert that’s a guaranteed crowd-pleaser without the stress, this is it. It’s been a lifesaver for me on countless occasions, and I know it will become a favorite in your kitchen too. Don’t forget to share your own creations and any tweaks you make in the comments below – I always love hearing how your baking adventures turn out! Happy baking, my friends!

Lemon cream cheese cake
Ingredients
Main Ingredients
- 1 box yellow cake mix
- 1 can evaporated milk 12 ounce can
- 1 package cream cheese 8 ounce package, softened
- 4 large eggs
- 0.5 cup butter melted
- 1 tablespoon lemon zest fresh
- 0.5 cup lemon juice fresh
Instructions
Preparation Steps
- Preheat oven to 350 degrees F (175 degrees C). Grease and flour a 9x13 inch baking pan.
- In a large bowl, combine the cake mix, evaporated milk, softened cream cheese, eggs, melted butter, lemon zest, and lemon juice. Beat until smooth.
- Pour the batter into the prepared baking pan.
- Bake for 40-50 minutes, or until a wooden skewer inserted into the center comes out clean.
- Let cool completely before slicing and serving.
Notes
Featured Comments
“Impressed! Clear steps and spot on results. Perfect for busy nights.”
“New favorite here — crowd-pleaser. crowd-pleaser was spot on.”
“Super easy and turned out amazing! My family asked for seconds. Saving this one.”
“This sweet treat was absolutely loved — the balanced really stands out. Thanks!”
“Made it tonight and wow — creamy! Will definitely make Lemon cream cheese cake again.”
“Packed with flavor and so simple. Exactly what I wanted from Lemon cream cheese cake.”


