Oh, hello there! Come on in, grab a mug. I was just thinking about this ridiculously good treat that my mom used to make, and I couldn’t wait to share it with you. It’s got this name – White Trash Candy – that might sound a little… well, you know. But let me tell you, there’s absolutely nothing trashy about the flavor. It’s pure, unadulterated, chocolatey, peanut buttery goodness. Seriously, this stuff disappears in my house faster than you can say “second helping.” It’s one of those recipes that feels like a warm hug, the kind that instantly transports you back to lazy summer afternoons or cozy winter evenings. If you’ve ever tried those ridiculously popular chocolate pretzel clusters or those no-bake Peanut Butter Cookies, you’re in for a treat. This White Trash Candy is like their cooler, more laid-back cousin, and honestly, I think it might be even better because it’s just so darn simple and satisfying.
What is white trash candy?
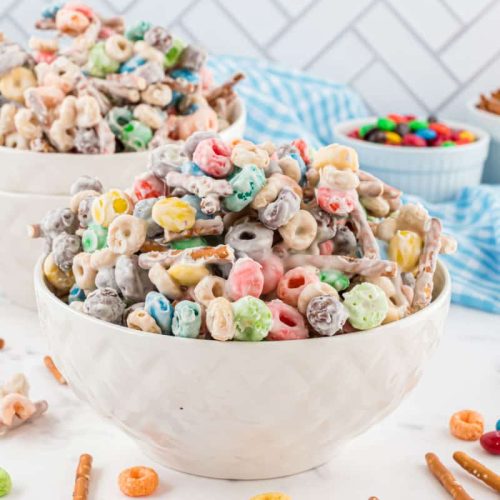
So, what exactly *is* this magical concoction we call White Trash Candy? Don’t let the name fool you one bit. Think of it as the ultimate no-bake candy bar in a spreadable, dippable, spoonable form. It’s essentially a rich, dense, chocolate-Peanut Butter mixture studded with all sorts of crunchy, chewy bits that give it texture and insane flavor. It’s a celebration of simple, delicious ingredients coming together in perfect harmony. The “trash” part, I think, comes from the fact that you can throw in pretty much any leftover bits and bobs you have in your pantry – pretzels, cereal, nuts, you name it – and it all works. It’s the definition of resourceful and delicious. It’s not fancy, it doesn’t require a degree in pastry, but it’s utterly irresistible. It’s the kind of treat that makes you feel like you’ve pulled off something amazing with minimal effort, and who doesn’t love that?
How do you make white trash candy?
Quick Overview
This is the kind of recipe you can practically make with your eyes closed. We’re essentially melting chocolate and Peanut Butter together, stirring in your favorite crunchy bits, and then letting it set. It’s all about simple steps that lead to an incredibly rewarding result. The magic truly lies in the combination of textures and flavors that come together with minimal fuss. You’ll be amazed at how quickly you can go from pantry staples to a decadent treat that tastes like you slaved away for hours. It’s the ultimate shortcut to sweet success!
Ingredients
For the Main Base:
2 cups semi-sweet chocolate chips: I always go for good quality ones, it really does make a difference in the melt and the finished taste. You can use milk chocolate if you prefer it sweeter, or even dark chocolate for a more intense flavor.
1 cup Creamy Peanut Butter: Any brand works, but I find that natural peanut butters can sometimes be a little too oily, which can affect the texture. A classic creamy peanut butter is usually best here.
1/4 cup unsalted butter: This helps everything melt smoothly and gives it that luscious, creamy mouthfeel.
For the Crunch & Chew:
2 cups crushed pretzels: I like to give them a rough crush in a zip-top bag with a rolling pin. You want some chunkiness for texture, not just dust!
1 cup Rice Krispies cereal: Or any crispy rice cereal. This adds a delightful lightness and crunch.
1/2 cup chopped peanuts: Roasted and salted are my preference, as they add another layer of flavor and a salty kick. You can swap these for other nuts like almonds or walnuts if you prefer.
Optional additions: If you’re feeling adventurous, a handful of mini marshmallows, some chopped candy bars, or even a sprinkle of toffee bits can be amazing additions!
Step-by-Step Instructions
Step 1: Preheat & Prep Pan
You’ll want to grab a baking sheet, about 9×13 inches is usually a good size. Line it with parchment paper or wax paper. This is crucial because this candy is sticky stuff, and you want to be able to lift it out easily once it’s set. Make sure the parchment paper covers the bottom and comes up the sides a bit; it makes for easier removal. No need to preheat an oven for this one, which is a huge win!
Step 2: Melt the Base Ingredients
In a medium saucepan, combine the semi-sweet chocolate chips, creamy peanut butter, and unsalted butter. Place this over low heat. You want to melt these ingredients gently, stirring frequently until everything is smooth and well combined. Alternatively, you can do this in a microwave-safe bowl in 30-second intervals, stirring in between, until smooth. Be careful not to scorch the chocolate!
Step 3: Stir in the Crunch
Once your chocolate-peanut butter mixture is perfectly smooth and glossy, it’s time to add the fun stuff! Add your crushed pretzels, Rice Krispies cereal, and chopped peanuts directly into the saucepan. Fold everything in gently until all the crunchy bits are nicely coated in the chocolatey goodness. Don’t overmix, you want to keep that texture!
Step 4: Spread and Swirl
Pour the mixture onto your prepared baking sheet. Use a spatula or the back of a spoon to spread it out into an even layer. You don’t need it perfectly smooth; a little rustic texture is part of its charm. If you’re feeling fancy, you can use a knife to make some swooshes or swirls on top for an extra visual appeal.
Step 5: Chill and Set
This is the hardest part: waiting! Place the baking sheet in the refrigerator for at least 1 to 2 hours, or until the candy is completely firm and set. You can also pop it in the freezer for about 30 minutes if you’re in a real hurry, but be careful not to freeze it solid.
Step 6: Break and Serve
Once it’s firm, lift the entire sheet of candy out of the pan using the parchment paper. Break it into irregular pieces with your hands. The edges will be a little sharper, and the centers a bit softer, giving you a delightful variety of textures in every bite. Serve immediately and watch it disappear!
What to Serve It With
This White Trash Candy is so versatile, it really shines no matter the occasion. For breakfast, I love breaking off a small piece to have with my morning coffee. It’s like a little sweet reward to start the day. It’s not overly sweet like a pastry, so it feels just right. For a casual brunch, I’ll break it into smaller, bite-sized pieces and arrange them on a cute platter alongside some fresh fruit or mini muffins. It adds a fun, unexpected element that everyone always raves about. As a dessert, this is pure indulgence. I’ll often serve it after a lighter meal, maybe with some vanilla ice cream or a dollop of whipped cream. The contrast of the cool ice cream and the rich candy is divine. And for those cozy snack times, when you just need something comforting and delicious? This is it. I’ll break off a big chunk and just enjoy it while curled up on the couch with a good book or watching a movie. My personal family tradition is to make a big batch around the holidays, and we always have a “candy breaking ceremony” where everyone gets to smash it up and then we share the pieces. It’s messy, fun, and totally delicious!
Top Tips for Perfecting Your White Trash Candy
I’ve made this White Trash Candy more times than I can count, and over the years, I’ve picked up a few little tricks that I think make a big difference. First, about melting the chocolate and peanut butter: always use low heat. Seriously, patience is key here. If you rush it or use heat that’s too high, you risk scorching the chocolate, and that will give you a grainy, unpleasant texture. Nobody wants that! I learned this the hard way early on. My second big tip is about the mix-ins. Don’t be afraid to get creative! While pretzels and Rice Krispies are classic, I’ve had amazing results adding things like crushed graham crackers for a s’mores vibe, or even some broken up peppermint candies during the holidays. Just make sure your additions aren’t too wet, as that can affect the setting of the candy. When it comes to spreading the mixture on the baking sheet, a little trick I learned is to lightly grease your spatula or spoon with a tiny bit of oil or butter. It helps prevent sticking and makes for a smoother, more even layer. And for breaking it apart, I find that if it’s really firm, running a warm knife under the pieces can help create cleaner breaks, though I honestly love the rustic, jagged edges you get from just breaking it with your hands. If your peanut butter is really thick and hard to stir into the chocolate, a tiny splash of milk or even a tablespoon of melted butter can help loosen it up. Finally, for storage, I always recommend keeping it in an airtight container in the fridge. It stays perfectly crisp and delicious that way, and it’s easy to grab a piece whenever the craving strikes!
Storing and Reheating Tips
When it comes to storing this glorious White Trash Candy, it’s pretty straightforward, but a few tips will keep it tasting its best. At room temperature, it’s best to eat it within a day or two, especially if it’s warm where you live. The chocolate can start to get a bit soft and melty, and while that’s not necessarily bad, it loses some of that satisfying crunch. If your house is cool, you might get away with 3-4 days at room temperature, stored in an airtight container. However, for optimal freshness and that perfect crisp texture, I always recommend refrigerator storage. Pop it into an airtight container, and it will keep beautifully for up to two weeks. The cold helps maintain its firmness and prevents it from getting greasy. Some people even freeze this candy, and I’ve had success with that too! Wrap individual pieces tightly in plastic wrap, then place them in a freezer-safe bag or container. It can last for up to 3 months in the freezer. To thaw, just transfer the frozen pieces to the refrigerator for a few hours, or let them come to room temperature on the counter. I usually wait to add the glaze (if I’m using one, which is rare for this recipe, but you could!) until just before serving if I’m worried about it getting sticky during storage. But honestly, this candy is so good, it rarely lasts long enough to worry too much about long-term storage!
Frequently Asked Questions
Final Thoughts
So there you have it, my friends! My absolute favorite White Trash Candy recipe. It’s proof that the simplest ingredients can create the most incredible flavors and textures. It’s the perfect treat when you’re craving something sweet but don’t want to turn on the oven, or when you need to whip up a last-minute dessert for unexpected guests. I truly believe this recipe is a treasure, and I hope you love it as much as my family and I do. Give it a try, play around with the mix-ins, and let me know how yours turns out! If you enjoy this kind of easy, no-bake treat, you might also love my recipe for ______ [Link to another related recipe if available]. Happy baking, or rather, happy *no-baking*!
White Trash Candy
Ingredients
Main Ingredients
- 11 ounces pretzel twists
- 1.5 cups semi-sweet chocolate chips
- 0.5 cup peanut butter creamy
- 0.5 cup peanuts roasted and salted
Instructions
Preparation Steps
- Line a baking sheet with parchment paper.
- In a microwave-safe bowl, combine the semi-sweet chocolate chips and peanut butter. Microwave in 30-second intervals, stirring in between, until smooth and fully melted.11 ounces pretzel twists
- Gently fold in the pretzel twists and peanuts until they are well coated with the chocolate mixture.11 ounces pretzel twists
- Drop spoonfuls of the mixture onto the prepared baking sheet.
- Refrigerate for at least 30 minutes, or until firm.
- Break apart any larger pieces and serve.
Notes
Featured Comments
“Impressed! Clear steps and quick weeknight win results. Perfect for busy nights.”
“New favorite here — absolutely loved. crowd-pleaser was spot on.”
“Super easy and turned out amazing! My family asked for seconds. Saving this one.”
“This sweet treat was absolutely loved — the light really stands out. Thanks!”
“Made it tonight and wow — turned out amazing! Will definitely make White Trash Candy again.”
“Packed with flavor and so simple. Exactly what I wanted from White Trash Candy.”