

Oh, you guys. If there’s one treat that instantly transports me back to being a kid, it’s the humble peanut butter cup. You know, the ones you’d find tucked away in a lunchbox or sneak into the pantry after school? There’s just something magical about that Creamy Peanut Butter hugging a sweet chocolate shell. For years, I was perfectly happy buying them, but then one day, a craving hit me HARD. I wanted *that* flavor, but even better, homemade. I started experimenting, and let me tell you, the results were nothing short of spectacular. This recipe is my absolute pride and joy, a labor of love that’s surprisingly simple to whip up. Forget those store-bought versions; we’re making peanut butter cups that will blow your mind. Seriously, the texture, the flavor… it’s like a hug for your taste buds. And the best part? They’re ridiculously easy to customize. If you love a good no-bake treat that tastes like pure bliss, you are in the right place. These homemade peanut butter cups are going to become your new obsession, just like they are in my house!
What are some good recipes for homemade peanut butter cups?
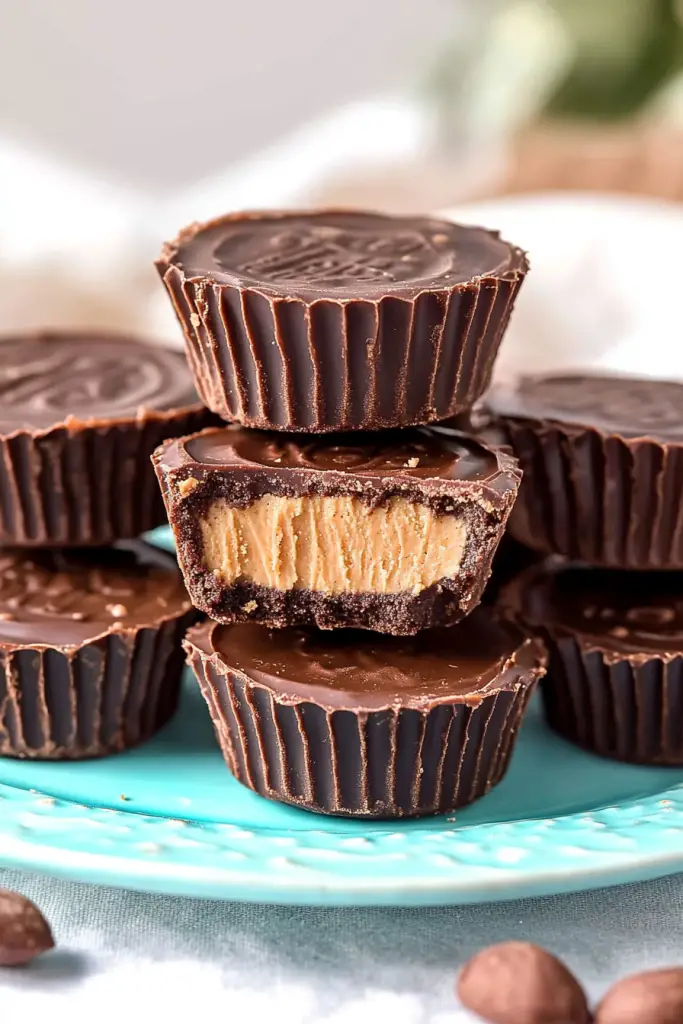
So, what exactly *are* these heavenly creations we’re talking about? Think of them as the artisanal, super-charged version of the classic Peanut Butter Cup. Instead of relying on a factory, we’re doing this in our own kitchens, with ingredients we can actually pronounce and trust. The concept is beautifully simple: a rich, luscious chocolate shell encasing a sweet, salty, perfectly creamy peanut butter filling. It’s that irresistible combination of contrasting textures and flavors that just works. We’re talking smooth, melty chocolate meeting a slightly fudgy, melt-in-your-mouth peanut butter center. It’s essentially pure joy, solidified. The name itself, “Peanut Butter Cups,” is pretty straightforward, but the experience of making and eating them is anything but ordinary. It’s a taste of childhood nostalgia, elevated with the satisfaction of creating something truly delicious with your own two hands. They’re the perfect little indulgence that feels a bit fancy, even though they’re incredibly approachable for any home cook.
How do I make peanut butter cups?
Quick Overview
This recipe is all about bringing together smooth, luscious chocolate and a dreamy Peanut Butter filling. We’ll melt our chocolate, create a base layer in a muffin tin, fill it with a quick peanut butter mixture, top with more chocolate, and let them set. The magic really happens in the layering and the cooling. It’s straightforward, requires minimal fuss, and the payoff is immense. You’ll be amazed at how easily you can create these delightful peanut butter cups right in your own kitchen. Trust me, once you try making them this way, you won’t go back!
Ingredients
For the Chocolate Shell:
This is where you can really elevate the flavor. I’m a big fan of a good quality semi-sweet chocolate – it’s got that perfect balance of sweetness and rich cocoa flavor. You can absolutely use milk chocolate if you prefer a sweeter cup, or even dark chocolate for a more intense, grown-up taste. I usually opt for chocolate chips because they melt so easily, but good quality chocolate bars chopped up work beautifully too. A tablespoon of coconut oil or a neutral-flavored oil like vegetable oil is key here. It helps the chocolate melt smoothly and gives it that beautiful, glossy sheen that sets up perfectly without being brittle. Don’t skimp on the quality; it makes a noticeable difference!
For the Peanut Butter Filling:
This is the heart and soul of the Peanut Butter Cup! I always use creamy peanut butter. Natural peanut butter, the kind where the oil separates, can work, but you’ll need to stir it *really* well to get it super smooth and consistent. If you use it, make sure it’s at room temperature. I also add a touch of softened unsalted butter – this makes the filling incredibly creamy and rich. Powdered sugar is essential for that smooth, almost fudgy texture and sweetness, and a pinch of salt is crucial to balance everything out and really make that peanut butter flavor sing. Sometimes, if I’m feeling wild, I’ll add a tiny splash of vanilla extract, but it’s totally optional.
For the Optional Drizzle/Garnish:
This is purely for fun and aesthetics, but it really makes them look extra special. A little extra melted chocolate for drizzling, or some flaky sea salt sprinkled on top right after they set. It adds a lovely texture and visual appeal. You can also get creative with sprinkles, chopped nuts, or even a tiny bit of caramel drizzle if you’re feeling decadent!
Step-by-Step Instructions
Step 1: Preheat & Prep Pan
First things first, let’s get our workspace ready. Grab a standard 12-cup muffin tin. If you have silicone liners, use those – they make life SO much easier when it comes to removing the finished peanut butter cups. If you’re using paper liners, make sure they’re sturdy. You want to line each muffin cup with a liner. This is where we’ll build our beautiful peanut butter cups. Make sure you have everything measured out and ready to go before you start melting the chocolate, as melted chocolate can seize up quickly if you’re not careful!
Step 2: Mix Dry Ingredients
In a medium bowl, we’ll combine the ingredients for our glorious peanut butter filling. First, add your creamy peanut butter. If you’re using natural peanut butter, give it a really good stir until it’s smooth and cohesive. Then, add your softened unsalted butter. This is what makes it so unbelievably creamy. Next, it’s time for the powdered sugar. Sift it in if you can – it helps prevent any lumps. Add that pinch of salt, which is super important for flavor balance. If you’re using vanilla, now’s the time to add it. Give everything a good mix with a spatula or a wooden spoon. It might seem a bit stiff at first, but keep mixing. You’re aiming for a thick, smooth, and easily spreadable consistency. It should feel almost like a playdough, but much tastier!
Step 3: Mix Wet Ingredients
Now for the chocolate! In a microwave-safe bowl, combine your semi-sweet (or whichever chocolate you’ve chosen) chocolate chips or chopped chocolate. Add the tablespoon of coconut oil or vegetable oil. This oil is crucial for getting that smooth, meltable texture that sets up beautifully. Microwave the chocolate in 30-second intervals, stirring well after each interval. Be patient! You don’t want to scorch the chocolate. Keep stirring until it’s mostly melted, and then just stir until the residual heat melts the remaining bits. It should be completely smooth and glossy. Alternatively, you can use a double boiler method on the stovetop for super gentle melting. Once it’s beautifully smooth, set it aside for just a minute to cool slightly.
Step 4: Combine
This step isn’t really a “combine wet and dry” like in baking, but rather, we’re bringing the components together. The chocolate is your “wet” here, and the peanut butter mixture is your “filling.” We’ll be layering these in the muffin liners. Make sure your peanut butter filling is ready to go and that your chocolate is smooth and slightly cooled, but still very pourable. Having everything prepped makes the assembly process quick and efficient, which is exactly what you want when working with chocolate!
Step 5: Prepare Filling
Okay, so the peanut butter filling should be ready from Step 2. It should be thick enough to hold its shape but soft enough to press into the chocolate. If it feels too stiff, you can knead it a tiny bit with your hands (clean hands, of course!) or even pop it in the microwave for just 5-10 seconds to soften it up slightly. We want it pliable but not gooey. The goal is to be able to scoop or roll it into small portions that will fit nicely inside our chocolate cups. If your peanut butter mixture seems a little too wet, you can always add another tablespoon of powdered sugar and mix it in until it reaches that perfect, dough-like consistency.
Step 6: Layer & Swirl
This is the fun part! Start by spooning about a tablespoon of the melted chocolate into the bottom of each prepared muffin liner. Use the back of your spoon or a small offset spatula to spread the chocolate up the sides of the liner, creating a nice shell. You want a good, even layer. Don’t worry if it’s not perfect; the magic of homemade is its charm! Once your shells are coated, it’s time for the peanut butter filling. Take a spoonful of your peanut butter mixture (about a tablespoon, or slightly less, depending on your liner size) and gently press it into the chocolate-lined cup, right in the center. Don’t press too hard, you don’t want it to break through the chocolate base. Now, spoon the remaining melted chocolate over the peanut butter filling, making sure to cover it completely. Gently tap the muffin tin on the counter a few times to settle the chocolate and remove any air bubbles. If you want that classic swirl look, you can use a toothpick to swirl the top layer of chocolate just a tiny bit, but it’s not essential.
Step 7: Bake
Here’s the part where these peanut butter cups get to chill out and do their thing. You don’t actually bake them in the oven! This is a no-bake recipe. Once they’re assembled, pop the muffin tin into the refrigerator. This is the best way to get them to set quickly and evenly. Let them chill for at least 30-60 minutes, or until the chocolate is firm to the touch. The cold helps everything set up perfectly, giving you those clean edges and that satisfying snap when you bite into them. I always find myself peeking in the fridge every 15 minutes – the anticipation is part of the fun!
Step 8: Cool & Glaze
After they’ve chilled and set in the refrigerator, it’s time to carefully remove them from the muffin tin. If you used silicone liners, they should pop right out. If you used paper liners, you might need to gently peel them away. This is the moment of truth! They should be beautifully formed. Now, if you’re adding an optional drizzle, this is the time. Melt a little extra chocolate (or white chocolate for contrast!) and drizzle it artfully over the top of your peanut butter cups using a fork or a piping bag with a small tip. If you’re adding flaky sea salt, sprinkle it on immediately after drizzling or right as the chocolate sets. Let them sit at room temperature for a few minutes to firm up the drizzle, or pop them back in the fridge for another 10-15 minutes if you want them super firm.
Step 9: Slice & Serve
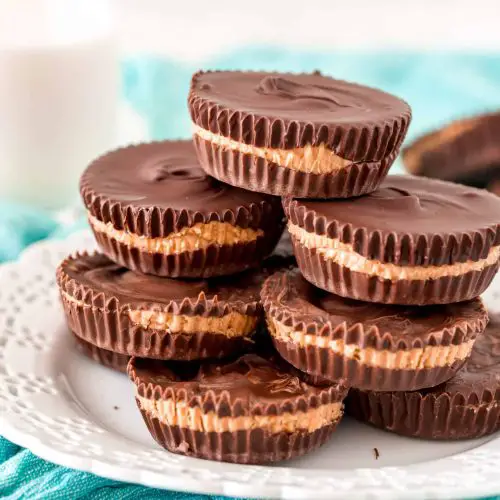
And there you have it! Your absolutely gorgeous, homemade peanut butter cups are ready to be devoured. The best way to serve them is slightly chilled, but they’re also fantastic at room temperature. They’re perfect little individual treats. You can arrange them on a pretty platter for guests, or just pop one (or two!) straight into your mouth. They’re best enjoyed fresh, but they hold up beautifully. The crisp chocolate shell gives way to that unbelievably creamy peanut butter center, and it’s just pure bliss. Enjoy every single bite!
What to Serve It With
Honestly, these peanut butter cups are pretty much a standalone superstar. But if you want to get fancy or pair them with something, I’ve got some ideas that my family absolutely adores. For Breakfast, this might sound a little indulgent, but hear me out! One of these peanut butter cups alongside a strong cup of black coffee is a decadent start to the day. It’s like a little sweet reward before the busy morning rush. They’re also surprisingly good with a slightly less sweet pastry, like a plain croissant, to balance the richness. For Brunch, I love to serve them as part of a dessert spread. Imagine a beautiful charcuterie board, but make it sweet – these peanut butter cups nestled amongst some fresh berries, maybe some chocolate-covered pretzels, and a small dish of whipped cream. For a beverage, a sparkling rosé or a mimosa feels just right. As a Dessert, they’re perfect after a hearty meal. I’ll often serve them with a scoop of vanilla bean ice cream, or even a warm brownie. The contrast of the cold ice cream with the cool, rich peanut butter cup is divine. For Cozy Snacks, this is where they truly shine. After the kids are in bed, or on a lazy Saturday afternoon, I’ll pair one with a glass of cold milk. It’s pure comfort. They also go wonderfully with a warm mug of hot chocolate. My family tradition is to have one (or two!) with a movie night. They’re the ultimate comfort food indulgence, simple yet so satisfying.
Top Tips for Perfecting Your Peanut Butter Cups
I’ve made these peanut butter cups more times than I can count, and over the years, I’ve picked up a few tricks that I think make all the difference. Here are my top tips to ensure yours turn out perfectly every single time. For the Chocolate Shell, the key is good quality chocolate and not overheating it. If you microwave it, use short bursts and stir frequently. If it looks slightly streaky, that’s usually okay, as long as it’s mostly melted. The oil helps to keep it smooth, but don’t add too much, or it might make the chocolate too soft when it sets. When it comes to Mixing the Peanut Butter Filling, don’t be afraid to really work it. That softened butter and powdered sugar create a dense, fudgy texture, but you want it to be as smooth as possible. If your peanut butter is very stiff, kneading it with clean hands for a minute or two can help make it more pliable. For Layering and Swirling, be generous with the first layer of chocolate in the liner. You want a solid base. Then, when you add the peanut butter filling, press it gently into the center. You don’t want it touching the sides of the liner if you can help it, otherwise, it might make unmolding tricky. When you add the top layer of chocolate, gently tap the tin to settle it. If you want that classic swirl, use a toothpick and make gentle, sweeping motions, but don’t overdo it, or you’ll mix the peanut butter in too much. For Ingredient Swaps, if you’re out of butter for the filling, you can sometimes get away with using a bit more peanut butter or even a tablespoon of shortening, but butter really adds the best richness. For the chocolate, using a combination of semi-sweet and milk chocolate can give you a nice balanced flavor. If you’re looking for a Vegan Option, use vegan chocolate chips and vegan butter or coconut oil in the filling, and ensure your peanut butter is just peanuts and salt. My biggest Baking Tip (even though it’s no-bake!) is patience. Let them chill properly! Rushing the process is the main reason people have issues with them not setting or being difficult to remove. If your kitchen is warm, they might take a little longer to set in the fridge. And finally, for Glaze Variations, if you want a thinner drizzle, add a tiny bit more oil to your melted chocolate. If you want a thicker, more robust topping, use less oil or even no oil and just use good quality melted chocolate. Experiment with white chocolate, dark chocolate, or even colored candy melts for a festive look!
Storing and Reheating Tips
These homemade peanut butter cups are wonderfully forgiving when it comes to storage, but there are a few things that will help them stay perfectly delicious. If you’re going to eat them within a day or two, Room Temperature Storage is totally fine, especially if they’re fully set. Keep them in an airtight container in a cool, dry place. I wouldn’t leave them out for more than 2-3 days, especially if your house tends to be warm, as the chocolate can start to soften. For longer storage, Refrigerator Storage is your best bet. Place them in an airtight container, and they’ll keep beautifully for up to 2 weeks. They’ll be firm and refreshing straight from the fridge. When you want to eat them, I recommend letting them sit out for about 10-15 minutes to take the chill off, so the chocolate shell isn’t quite so hard. For super long-term storage, Freezer Instructions are fantastic. Wrap each peanut butter cup individually in parchment paper or plastic wrap, then place them in a freezer-safe bag or container. They can last for up to 3 months in the freezer! To thaw, transfer them to the refrigerator overnight, and then let them come to room temperature for a bit before enjoying. The Glaze Timing Advice is simple: if you’re planning to refrigerate or freeze them, add your drizzle *after* they’ve set, and then chill them again to firm up the drizzle. If you’re eating them right away, you can add the glaze just before serving. Just remember, the smoother and firmer they are when you store them, the better they’ll hold up!
Frequently Asked Questions
Final Thoughts
There you have it – my absolute favorite way to make peanut butter cups right at home! I truly believe this recipe is a keeper. It’s proof that you don’t need a ton of complicated steps or fancy ingredients to create something truly special and incredibly delicious. The combination of rich chocolate and creamy peanut butter is simply classic for a reason, and making them yourself just elevates the whole experience. Whether you’re whipping these up for a holiday treat, a party, or just because you need a little moment of sweetness in your day, I promise they will be a huge hit. They’re so satisfying to make and even more satisfying to eat. If you love these peanut butter cups, you might also enjoy my recipe for No-Bake Chocolate Chip Cookie Bars or my fudgy One-Bowl Brownies. Both are super easy and always get rave reviews. I really hope you give these peanut butter cups a try. I can’t wait to hear what you think, and I’d love to see your creations if you share them! Happy baking (or in this case, no-baking)! Let me know in the comments how yours turned out!
Peanut Butter Cups
Ingredients
Main Ingredients
- 2 cups Semi-sweet chocolate chips
- 1.5 cups Peanut butter Creamy or crunchy
- 0.5 cup Powdered sugar
- 0.25 cup Butter Softened
- 0.5 teaspoon Vanilla extract
Instructions
Preparation Steps
- Line a mini muffin tin with paper liners.
- In a microwave-safe bowl, melt the chocolate chips with 1 tablespoon of peanut butter. Stir until smooth. Spoon about 1 teaspoon of the chocolate mixture into the bottom of each liner.
- In a separate bowl, mix the remaining peanut butter, powdered sugar, softened butter, and vanilla extract until well combined.
- Spoon about 1 teaspoon of the peanut butter mixture on top of the chocolate in each liner.
- Top with the remaining chocolate mixture, spreading it to cover the peanut butter layer.
- Refrigerate for at least 15 minutes, or until firm.
Notes
Featured Comments
“I totally agree! Peanut butter cups bring back such sweet childhood memories—they’re like a little hug in chocolate and peanut butter.”
“Impressed! Clear steps and comforting results. Perfect for busy nights.”
“New favorite here — perfect for busy nights. crowd-pleaser was spot on.”
“Super easy and turned out amazing! My family asked for seconds. Saving this one.”
“This sweet treat was absolutely loved — the fresh really stands out. Thanks!”
“Made it tonight and wow — turned out amazing! Will definitely make Peanut Butter Cups again.”


